


一、下载Oracle12C
下载地址:http://download.oracle.com/otn/linux/oracle12c/122010/linuxx64_12201_database.zip
(自己百度云也保存了^-^)
二、配置hosts
添加hosts
127.0.0.1       test01
10.177.11.222   test01
三、配置oracle 安装的先决条件
1、修改内核参数
编辑sysctl.conf文件
# vi /etc/sysctl.conf

写入如下内容:
fs.file-max = 6815744
kernel.sem = 250 32000 100 128
kernel.shmmni = 4096
kernel.shmall = 1073741824
kernel.shmmax = 4398046511104
kernel.panic_on_oops = 1
net.core.rmem_default = 262144
net.core.rmem_max = 4194304
net.core.wmem_default = 262144
net.core.wmem_max = 1048576
net.ipv4.conf.all.rp_filter = 2
net.ipv4.conf.default.rp_filter = 2
fs.aio-max-nr = 1048576
net.ipv4.ip_local_port_range = 9000 65500

使配置生效
# sysctl -p
2、 限制oracle 用户资源使用
编辑/etc/security/limits.conf
末尾写入如下呢容:
oracle   soft   nofile    1024
oracle   hard   nofile    65536
oracle   soft   nproc    16384
oracle   hard   nproc    16384
oracle   soft   stack    10240
oracle   hard   stack    32768
oracle   hard   memlock    30000000
oracle   soft   memlock    30000000
3、安装依赖包
yum install -y binutils compat-libcap1 compat-libstdc++-33 compat-libstdc++-33.i686 glibc glibc.i686 glibc-devel glibc-devel.i686 ksh libaio libaio.i686 libaio-devel libaio-devel.i686 libX11 libX11.i686 libXau libXau.i686 libXi libXi.i686 libXtst libXtst.i686 libgcc libgcc.i686 libstdc++ libstdc++.i686 libstdc++-devel libstdc++-devel.i686 libxcb libxcb.i686 make nfs-utils net-tools smartmontools sysstat unixODBC unixODBC-devel4、创建组与用户
创建安装oracle组:# groupadd -g 54321 oinstall
创建管理数据库组:# groupadd -g 54322 dba
创建oper组: # groupadd -g 54323 oper
将oracle用户加入组: # useradd -u 54321 -g oinstall -G dba,oper oracle
5、为oracle用户设置密码
[root@test01 ~]# passwd oracle
Changing password for user oracle.
New password:
BAD PASSWORD: The password is shorter than 8 characters
Retype new password:
passwd: all authentication tokens updated successfully.
6、 关闭selinux与防火墙
关闭selinux
# setenforce 0# sed -i 's/SELINUX=enforcing/SELINUX=disabled/g' /etc/selinux/config
关闭防火墙
# systemctl stop firewalld# systemctl disable firewalld
7、创建oracle安装目录
# mkdir -p /u01/app
# chown -R oracle:oinstall /u01
# chmod -R 775 /u01
8、配置Oracle环境变量并验证
切换至oracle用户
su - oracle编辑 .bash_profile 配置环境变量
vim .bash_profile

ORACLE_BASE=/u01/app
ORACLE_HOME=$ORACLE_BASE/oracle12c
ORACLE_SID=TEST01
export ORACLE_BASE ORACLE_HOME ORACLE_SID
PATH=$ORACLE_HOME/bin:$PATH
使配置立即生效
$ source .bash_profile验证是否生效
[oracle@test01 ~]$ echo $ORACLE_HOME/u01/app/oracle12c四、Oracle的安装
1、上传数据库安装包并解压
如下都使用oracle用户执行即可
[root@test01 u01]# pwd
/u01/app
[root@test01 app]# ll
total 3372752
drwxrwxr-x  2 oracle oinstall          6 Feb 28 22:58 app
-rw-r--r--. 1 oracle oinstall 3453696911 Feb 22 23:07 linuxx64_12201_database.zip
linuxx64_12201_database.zip将解压至/u01/app
$ unzip linuxx64_12201_database.zip2、修改安装响应文件配置
可参见https://oracle-base.com/articles/misc/oui-silent-installations进行设置
vim /u01/app/database/response/db_install.rsp修改如下需要改的内容:
oracle.install.option=INSTALL_DB_SWONLY
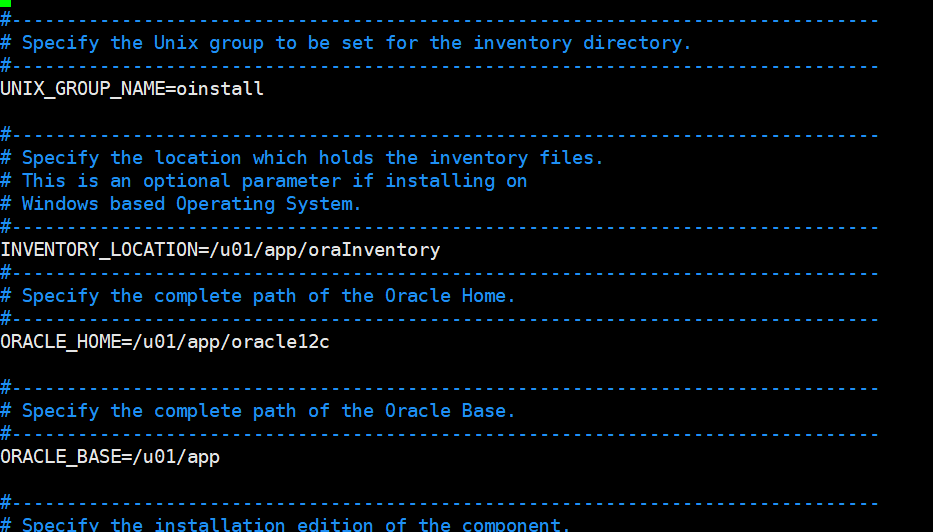
UNIX_GROUP_NAME=oinstall
INVENTORY_LOCATION=/u01/app/oraInventory
ORACLE_HOME=/u01/app/oracle12c
ORACLE_BASE=/u01/app
oracle.install.db.InstallEdition=EE
oracle.install.db.OSDBA_GROUP=dba
oracle.install.db.OSOPER_GROUP=dba
oracle.install.db.OSBACKUPDBA_GROUP=dba
oracle.install.db.OSDGDBA_GROUP=dba
oracle.install.db.OSKMDBA_GROUP=dba
oracle.install.db.OSRACDBA_GROUP=dba例示:
3、相应文件式安装
(也有静默安装,大同小异)
切换目录到/u01/app/database
cd /u01/app/database开始安装
./runInstaller -ignoreSysPrereqs -ignorePrereq -waitforcompletion -showProgress -silent -responseFile /u01/app/database/response/db_install.rsp执行结果如下:
[oracle@test01 database]$ ./runInstaller -ignoreSysPrereqs -ignorePrereq -waitforcompletion -showProgress -silent -responseFile /u01/app/database/response/db_install.rsp
Starting Oracle Universal Installer...

Checking Temp space: must be greater than 500 MB.   Actual 190805 MB    Passed
Checking swap space: must be greater than 150 MB.   Actual 4095 MB    Passed
Preparing to launch Oracle Universal Installer from /tmp/OraInstall2022-03-02_10-25-42PM. Please wait ...[WARNING] [INS-32055] The Central Inventory is located in the Oracle base.
   ACTION: Oracle recommends placing this Central Inventory in a location outside the Oracle base directory.
You can find the log of this install session at:
 /u01/app/oraInventory/logs/installActions2022-03-02_10-25-42PM.log

Prepare in progress.
..................................................   8% Done.

Prepare successful.

Copy files in progress.
..................................................   17% Done.
..................................................   22% Done.
..................................................   27% Done.
..................................................   32% Done.
..................................................   40% Done.
..................................................   45% Done.
..................................................   50% Done.
..................................................   55% Done.
..................................................   60% Done.
..................................................   65% Done.
..................................................   70% Done.
..................................................   75% Done.
..................................................   80% Done.
....................
Copy files successful.

Link binaries in progress.
..........
Link binaries successful.

Setup files in progress.
..............................
Setup files successful.

Setup Inventory in progress.

Setup Inventory successful.

Finish Setup successful.
The installation of Oracle Database 12c was successful.
Please check '/u01/app/oraInventory/logs/silentInstall2022-03-02_10-25-42PM.log' for more details.

Setup Oracle Base in progress.

Setup Oracle Base successful.
..................................................   95% Done.

As a root user, execute the following script(s):
    1. /u01/app/oraInventory/orainstRoot.sh
    2. /u01/app/oracle12c/root.sh


..................................................   100% Done.
Successfully Setup Software.
安装完毕后切换到root用户执行以下脚本
As a root user, execute the following script(s):
1. /u01/app/oraInventory/orainstRoot.sh
2. /u01/app/oracle12c/root.sh
su - root


[root@test01 ~]# /u01/app/oraInventory/orainstRoot.sh
Changing permissions of /u01/app/oraInventory.
Adding read,write permissions for group.
Removing read,write,execute permissions for world.

Changing groupname of /u01/app/oraInventory to oinstall.
The execution of the script is complete.


[root@test01 ~]# /u01/app/oracle12c/root.sh
Check /u01/app/oracle12c/install/root_fce-slt-warranty_2022-03-02_22-36-48-507025673.log for the output of root script
检查是否安装成功,切换至oracle用户运行 sqlplus / as sysdba
[oracle@test01 ~]$ sqlplus / as sysdba

SQL*Plus: Release 12.2.0.1.0 Production on Wed Mar 2 22:38:38 2022

Copyright (c) 1982, 2016, Oracle.  All rights reserved.

Connected to an idle instance.

SQL>
此时数据库软件安装成功。
五、数据库创建
参见https://oracle-base.com/articles/misc/database-configuration-assistant-dbca-silent-mode,使用数据库配置助手DBCA静默模式下创建数据库,具体设置参见https://docs.oracle.com/database/121/ADMIN/create.htm#ADMIN14032
执行命令创建数据库:
(dbname SID 字符集 密码 都要自定义设置好)
(路径要写对)
dbca -silent -createDatabase  \
-templateName /u01/app/oracle12c/assistants/dbca/templates/General_Purpose.dbc \
-gdbname TEST -sid TEST01  \
-responseFile /u01/app/database/response/dbca.rsp \
-characterSet AL32UTF8 \
-sysPassword Test@123 \
-systemPassword Test@123 \
-createAsContainerDatabase false
注意:密码设置需要密码长度至少8位,包含至少1个大写字符,1个小写字符和1个数字[0-9]。否则会有如下警告。
[WARNING] [DBT-06208] The 'SYS' password entered does not conform to the Oracle recommended standards.
   CAUSE:
a. Oracle recommends that the password entered should be at least 8 characters in length, contain at least 1 uppercase character, 1 lower case character and 1 digit [0-9].
b.The password entered is a keyword that Oracle does not recommend to be used as password
   ACTION: Specify a strong password. If required refer Oracle documentation for guidelines.
[WARNING] [DBT-06208] The 'SYSTEM' password entered does not conform to the Oracle recommended standards.
   CAUSE:
a. Oracle recommends that the password entered should be at least 8 characters in length, contain at least 1 uppercase character, 1 lower case character and 1 digit [0-9].
b.The password entered is a keyword that Oracle does not recommend to be used as password
   ACTION: Specify a strong password. If required refer Oracle documentation for guidelines.
Copying database files
创建库执行结果:
Copying database files
1% complete
2% complete
18% complete
33% complete
Creating and starting Oracle instance
35% complete
40% complete
44% complete
49% complete
50% complete
53% complete
55% complete
Completing Database Creation
56% complete
57% complete
58% complete
62% complete
65% complete
66% complete
Executing Post Configuration Actions
100% complete
Look at the log file "/u01/app/cfgtoollogs/dbca/WARRANTY/WARRANTY.log" for further details.
确认数据库是否创建完成:
进入数据库:
$ sqlplus / as sysdba检查数据库状态是否为 OPEN
SQL> select status from v$instance;

STATUS
------------
OPEN
如上状态数据库创建完成。
六、 数据库配置监听
未配置监听前执行 lsnrctl status 结果如下:
[oracle@fce-slt-warranty ~]$ lsnrctl status

LSNRCTL for Linux: Version 12.2.0.1.0 - Production on 02-MAR-2022 23:10:07

Copyright (c) 1991, 2016, Oracle.  All rights reserved.

Connecting to (ADDRESS=(PROTOCOL=tcp)(HOST=)(PORT=1521))
TNS-12541: TNS:no listener
 TNS-12560: TNS:protocol adapter error
  TNS-00511: No listener
   Linux Error: 111: Connection refused
使用默认的netca.rsp文件 执行命令 netca -silent -responseFile /u01/app/database/response/netca.rsp
[oracle@test01 ~]$ netca -silent -responseFile /u01/app/database/response/netca.rsp

Parsing command line arguments:
    Parameter "silent" = true
    Parameter "responsefile" = /u01/app/database/response/netca.rsp
Done parsing command line arguments.
Oracle Net Services Configuration:
Profile configuration complete.
Oracle Net Listener Startup:
    Running Listener Control:
      /u01/app/oracle12c/bin/lsnrctl start LISTENER
    Listener Control complete.
    Listener started successfully.
Listener configuration complete.
Oracle Net Services configuration successful. The exit code is 0
再次 lsnrctl status 查看监听可以看到已经成功启动监听
[oracle@test01 ~]$ lsnrctl status

LSNRCTL for Linux: Version 12.2.0.1.0 - Production on 02-MAR-2022 23:10:54

Copyright (c) 1991, 2016, Oracle.  All rights reserved.

Connecting to (DESCRIPTION=(ADDRESS=(PROTOCOL=TCP)(HOST=localhost)(PORT=1521)))
STATUS of the LISTENER
------------------------
Alias                     LISTENER
Version                   TNSLSNR for Linux: Version 12.2.0.1.0 - Production
Start Date                02-MAR-2022 23:10:53
Uptime                    0 days 0 hr. 0 min. 1 sec
Trace Level               off
Security                  ON: Local OS Authentication
SNMP                      OFF
Listener Parameter File   /u01/app/oracle12c/network/admin/listener.ora
Listener Log File         /u01/app/diag/tnslsnr/fce-slt-warranty/listener/alert/log.xml
Listening Endpoints Summary...
  (DESCRIPTION=(ADDRESS=(PROTOCOL=tcp)(HOST=fce-slt-warranty)(PORT=1521)))
  (DESCRIPTION=(ADDRESS=(PROTOCOL=ipc)(KEY=EXTPROC1521)))
The listener supports no services
The command completed successfully
查看端口也有了1521端口的监听
[oracle@test01 ~]$ ss -ntlp
State      Recv-Q Send-Q                                         Local Address:Port                                                        Peer Address:Port
LISTEN     0      128                                                        *:111                                                                    *:*
LISTEN     0      128                                                        *:22                                                                     *:*
LISTEN     0      100                                                127.0.0.1:25                                                                     *:*
LISTEN     0      100                                                       :::8009                                                                  :::*
LISTEN     0      128                                                       :::111                                                                   :::*
LISTEN     0      100                                                       :::8080                                                                  :::*
LISTEN     0      128                                                       :::1521                                                                  :::*                   users:(("tnslsnr",pid=31448,fd=8))
LISTEN     0      128                                                       :::22                                                                    :::*
LISTEN     0      100                                                      ::1:25                                                                    :::*
LISTEN     0      128                                                       :::12571                                                                 :::*                   users:(("ora_d000_warrnt",pid=8719,fd=8))
LISTEN     0      1                                           ::ffff:127.0.0.1:8005                                                                  :::*
七、 配置oracle数据库 开机自启
1.切换到root用户下执行如下操作:
vim /etc/oratab
N 改为Y
WARRANTY:/u01/app/oracle12c:N  改为  WARRANTY:/u01/app/oracle12c:Y
2.切换到oracle用户下
切换目录
$ cd $ORACLE_HOME/binx修改文件 vim dbstart
大约在80行
ORACLE_HOME_LISTNER=$1 改为 ORACLE_HOME_LISTNER=$ORACLE_HOME

修改 vim dbshut
在50行左右
ORACLE_HOME_LISTNER=$1 改为 ORACLE_HOME_LISTNER=$ORACLE_HOME

3.测试运行 dbshut, dbstart 看能否启动oracle 服务及listener服务
测试停止:
[oracle@test01 bin]$ ./dbshut
Processing Database instance "TEST01": log file /u01/app/oracle12c/shutdown.log
[oracle@fce-slt-warranty bin]$ ss -ntlp
State      Recv-Q Send-Q                    Local Address:Port                                   Peer Address:Port
LISTEN     0      128                                   *:111                                               *:*
LISTEN     0      128                                   *:22                                                *:*
LISTEN     0      100                           127.0.0.1:25                                                *:*
LISTEN     0      100                                  :::8009                                             :::*
LISTEN     0      128                                  :::111                                              :::*
LISTEN     0      100                                  :::8080                                             :::*
LISTEN     0      128                                  :::22                                               :::*
LISTEN     0      100                                 ::1:25                                               :::*
LISTEN     0      1                      ::ffff:127.0.0.1:8005                                             :::*
测试启动:
[oracle@test01 bin]$ ./dbstart
Processing Database instance "TEST01": log file /u01/app/oracle12c/startup.log
[oracle@fce-slt-warranty bin]$ ss -ntlp
State      Recv-Q Send-Q                    Local Address:Port                                   Peer Address:Port
LISTEN     0      128                                   *:111                                               *:*
LISTEN     0      128                                   *:22                                                *:*
LISTEN     0      100                           127.0.0.1:25                                                *:*
LISTEN     0      100                                  :::8009                                             :::*
LISTEN     0      128                                  :::111                                              :::*
LISTEN     0      100                                  :::8080                                             :::*
LISTEN     0      128                                  :::1521                                             :::*                   users:(("tnslsnr",pid=15933,fd=8))
LISTEN     0      128                                  :::22                                               :::*
LISTEN     0      100                                 ::1:25                                               :::*
LISTEN     0      128                                  :::14621                                            :::*                   users:(("ora_d000_warran",pid=16140,fd=8))
LISTEN     0      1                      ::ffff:127.0.0.1:8005                                             ::
可以启动数据库与监听,测试可以连接。
4.配置系统启动项
切换为root用户
添加自启文件可执行权限
# chmod +x /etc/rc.d/rc.local编辑该文件末尾写入如下内容:
su - oracle -lc dbstart测试能否开机自启

*备注:
命令执行:启动:su - oracle -lc dbstart
停止:su - oracle -lc dbshut
八、创建表空间与业务用户授权
创建无限制大小表空间文件:
create bigfile tablespace "表空间名如:ALESDEV" datafile '/data/app/oradata/ALESDEV/datafile/ALESDEV.dbf' size 128m AUTOEXTEND ON NEXT 256M MAXSIZE UNLIMITED;'/data/app/oradata/ALESDEV/datafile/ALESDEV.dbf' 这是表空间存放的路径。
bigfile 代表大文件类型表空间。
创建数据库业务用户:
CREATE USER "用户名"
  IDENTIFIED BY "密码"
  DEFAULT TABLESPACE "上面创建的表空间名"
  TEMPORARY TABLESPACE TEMP
  PROFILE DEFAULT
  ACCOUNT UNLOCK;
例如:
CREATE USER ALESDEV
  IDENTIFIED BY TEST@01
  DEFAULT TABLESPACE ALESDEV
  TEMPORARY TABLESPACE TEMP
  PROFILE DEFAULT
  ACCOUNT UNLOCK;
将创建好的用户授权给数据库:
  GRANT CONNECT TO ALESDEV;
  GRANT DBA TO ALESDEV;
  GRANT RESOURCE TO ALESDEV;
上面授权语句是将ALESDEV用户授权为DBA权限用户。
将该用户与密码发给业务开发,即可用连接数据库。


 1351
1351


 被折叠的 条评论
为什么被折叠?
被折叠的 条评论
为什么被折叠?
 到【灌水乐园】发言


