


 本文讲述了如何在React项目中利用ReactKonva框架实现Konva图形节点的动态布局,包括IconText组件的创建、拖拽事件处理和图例的自动排列。作者分享了具体实现步骤和示例代码,供读者参考和优化项目中的此类需求。
前言
在最近的前端项目实战中,我遇到了一个任务,即利用React与React Konva框架,实现对Konva图形节点的灵活、动态布局。接下来,我将深入剖析我是如何系统地攻克这一需求的具体步骤和策略,同时,热烈欢迎各位同行针对本文中的任何疏漏或不足之处提出宝贵意见,并分享可能存在的更为优化的解决方案。需要指出的是,这里所述的方法是基于项目实际场景进行的个性化实践,旨在提供一种解决思路参考。
最终效果
一、version
"react": "^18.2.0"
"react-konva": "^18.2.10"
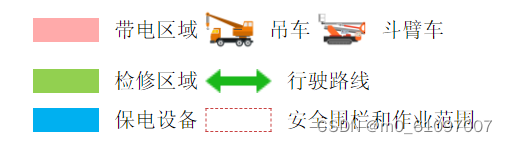
"konva": "^9.2.0"二、图例
图例是由图标和文字两部分构成,其中图标部分可以是图片元素,也可以是利用Konva.Rect创建的自定义形状。
IconText组件
export enum DataType {
  'stage' = 'stage',
  'workPointSetting' = 'workPointSetting', // 作业点
  'riskSetting' = 'riskSetting', // 风险分析
  'liveAreaSetting' = 'liveAreaSetting', // 带电区域
  'bucketArmCarSetting' = 'bucketArmCarSetting', // 斗臂车
  'craneSetting' = 'craneSetting', // 吊车
  'serviceAreaSetting' = 'serviceAreaSetting', // 检修区域
  'drivingRoutesSetting' = 'drivingRoutesSetting', // 行驶路线
  'powerRetentionSetting' = 'powerRetentionSetting', // 保电设备
  'safetySetting' = 'safetySetting', // 安全围栏和作业范围
  'controlDiagramSetting' = 'controlDiagramSetting' // 管控图
}
import Konva from 'konva';
import React, { useCallback, useEffect, useMemo, useRef } from 'react';
import { Group, Rect, Transformer } from 'react-konva';
import { DataType } from '../../common';
import { Html } from 'react-konva-utils';
interface IProps {
x: number;
y: number;
name?: DataType;
iconUrl?: string;
iconFill?: string;
iconSzie?: [number, number];
text?: string;
textSize?: [number, number];
textFill?: string;
textFontSize?: number;
spacing?: number;
isDash?: boolean;
isSelected?: boolean;
onChange?: (data: any, name: DataType) => void;
}
export const IconText: React.FC<IProps> = props => {
const { x, y, iconSzie = [10, 10], iconUrl, spacing = 10, iconFill = 'rgba(0, 0, 255, 0.5)', isDash = false, text = '图例', textSize = [10, 10], textFontSize = 14, textFill = 'rgba(0, 0, 0, 0.65)', onChange, isSelected, name = DataType.stage } = props;
const [iconWidth, iconHeight] = iconSzie;
const [textWidth, textHeight] = textSize;
const trRef = useRef<Konva.Transformer>(null);
const rectRef = useRef<Konva.Rect>(null);
useEffect(() => {
if (isSelected && trRef.current !== null && rectRef.current !== null) {
trRef.current.nodes([rectRef.current]);
}
}, [isSelected]);
useEffect(() => {
const bgWorkPointElement = document.getElementById('bg-icon-text-' + name);
if (bgWorkPointElement === null) {
return;
}
const parentElement = bgWorkPointElement.parentElement;
if (parentElement === null) {
return;
}
const firstChild = parentElement.firstChild;
if (firstChild === null) {
parentElement.appendChild(bgWorkPointElement);
} else {
parentElement.insertBefore(bgWorkPointElement, firstChild);
}
}, [name]);
const handleOnDragMove = useCallback(
(e: Konva.KonvaEventObject<DragEvent>) => {
const target = e.target;
let newX = target.x();
let newY = target.y();
const stage = target.getStage();
if (stage === null) {
onChange &&
onChange(
{
x: Math.round(newX),
y: Math.round(newY)
},
name
);
return;
}
// 获取舞台的宽度和高度
const stageWidth = stage.width();
const stageHeight = stage.height();
// 获取矩形的宽度和高度
const rectWidth = target.width();
const rectHeight = iconHeight > textHeight ? iconHeight : textHeight;
// 计算边界限制
const minX = 0;
const minY = 0;
const maxX = stageWidth - rectWidth;
const maxY = stageHeight - rectHeight - 10;
if (newX < minX) {
newX = minX;
} else if (newX > maxX) {
newX = maxX;
}
if (newY < minY) {
newY = minY;
} else if (newY > maxY) {
newY = maxY;
}
target.x(newX);
target.y(newY);
onChange &&
onChange(
{
x: Math.round(newX),
y: Math.round(newY)
},
name
);
},
[iconHeight, name, onChange, textHeight]
);
const divMemo = useMemo(() => {
const groupHeight = iconHeight > textHeight ? iconHeight : textHeight;
const styles: React.CSSProperties = {
width: iconWidth + 'px',
height: iconHeight + 'px'
};
return (
<div style={{ position: 'relative', top: 0, left: 0, width: '100%', height: '100%', overflow: 'hidden', display: 'flex', justifyContent: 'center', alignItems: 'center', fontFamily: 'Inter', backgroundColor: isSelected ? '#F1F4FF' : '' }}>
{!iconUrl && !isDash && <div style={{ ...styles, backgroundColor: iconFill }}></div>}
{!iconUrl && isDash && <div style={{ ...styles, border: '1px dashed ' + iconFill }}></div>}
{iconUrl && <img src={iconUrl} style={{ ...styles }} />}
<span style={{ fontSize: textFontSize + 'px', marginLeft: '10px', lineHeight: groupHeight + 'px' }}>{text}</span>
</div>
);
}, [iconFill, iconHeight, iconUrl, iconWidth, isDash, isSelected, text, textFontSize, textHeight]);
return useMemo(() => {
const groupWidth = iconWidth + textWidth + spacing;
const groupHeight = iconHeight > textHeight ? iconHeight : textHeight;
return (
<Group>
<Html groupProps={{ x, y }} divProps={{ style: { zIndex: 0, width: groupWidth + 10 + 'px', height: groupHeight + 10 + 'px' }, id: 'bg-icon-text-' + name }}>
{divMemo}
</Html>
<Rect name={name} ref={rectRef} x={x} y={y} width={groupWidth + 10} height={groupHeight + 10} draggable onDragMove={handleOnDragMove} />
{isSelected && (
<Transformer
ref={trRef}
rotateEnabled={false}
boundBoxFunc={(oldBox, newBox) => {
// 限制变换框的范围
if (newBox.width < 100 || newBox.height < 100) {
return oldBox;
}
return newBox;
}}
enabledAnchors={[]}
/>
)}
</Group>
);
}, [divMemo, handleOnDragMove, iconHeight, iconWidth, isSelected, name, spacing, textHeight, textWidth, x, y]);
};
export default IconText;
class Legend
interface LegendConfig {
  name: DataType;
  iconSzie: [number, number]; //宽高
  textSize: [number, number]; //宽高
  iconFill?: string;
  iconUrl?: string;
  text: string;
  spacing: number;
}

type WithUndefined<T = any> = T | undefined;
export class Legend {
  private _x: number = 0;

  private _y: number = 0;

  private _name: WithUndefined<DataType>;

  private _iconSzie: WithUndefined<[number, number]>;

  private _textSize: WithUndefined<[number, number]>;

  private _iconFill: WithUndefined<string>;

  private _iconUrl: WithUndefined<string>;

  private _text: WithUndefined<string>;

  private _spacing: WithUndefined<number>;

  constructor(options: LegendConfig) {
    const { name, iconSzie, textSize, iconFill, iconUrl, text, spacing } = options;
    this._name = name;
    this._iconSzie = iconSzie;
    this._textSize = textSize;
    this._iconFill = iconFill;
    this._iconUrl = iconUrl;
    this._text = text;
    this._spacing = spacing;
  }

  get x() {
    return this._x;
  }

  set x(value: number) {
    this._x = value;
  }

  get y() {
    return this._y;
  }

  set y(value: number) {
    this._y = value;
  }

  get name() {
    return this._name;
  }

  get iconSzie() {
    return this._iconSzie;
  }

  get textSize() {
    return this._textSize;
  }

  get iconFill() {
    return this._iconFill;
  }

  get iconUrl() {
    return this._iconUrl;
  }

  get text() {
    return this._text;
  }

  get spacing() {
    return this._spacing;
  }

  get width() {
    if (this._iconSzie && this._textSize && this._spacing) {
      const iconSizeWidth = Array.isArray(this._iconSzie) ? this._iconSzie[0] : undefined;
      const textSizeWidth = Array.isArray(this._textSize) ? this._textSize[0] : undefined;
      if (iconSizeWidth !== undefined && textSizeWidth !== undefined) {
        return iconSizeWidth + textSizeWidth + this._spacing;
      } else {
        return undefined;
      }
    } else {
      return undefined;
    }
  }

  get height() {
    if (this._iconSzie && this._textSize) {
      const iconSizeHeight = Array.isArray(this._iconSzie) ? this._iconSzie[1] : undefined;
      const textSizeHeight = Array.isArray(this._textSize) ? this._textSize[1] : undefined;
      if (iconSizeHeight !== undefined && textSizeHeight !== undefined) {
        return iconSizeHeight > textSizeHeight ? iconSizeHeight : textSizeHeight;
      } else {
        return undefined;
      }
    } else {
      return undefined;
    }
  }
}
初始化数据
export const liveAreaIconConfig: Legend = new Legend({
  name: DataType.liveAreaSetting,
  iconSzie: [44, 16],
  textSize: [56, 16],
  iconFill: '#FFAAAA',
  text: '带电区域',
  spacing: 10
});

export const serviceAreaIconConfig: Legend = new Legend({
  name: DataType.serviceAreaSetting,
  iconSzie: [44, 16],
  textSize: [56, 16],
  iconFill: '#92D050',
  text: '检修区域',
  spacing: 10
});

export const powerRetentionIconConfig = new Legend({
  name: DataType.powerRetentionSetting,
  iconSzie: [44, 16],
  textSize: [56, 16],
  iconFill: '#00B0F0',
  text: '保电设备',
  spacing: 10
});

export const safetyIconConfig: Legend = new Legend({
  name: DataType.safetySetting,
  iconSzie: [44, 16],
  textSize: [126, 16],
  iconFill: '#C94242',
  text: '安全围栏和作业范围',
  spacing: 10
});

export const bucketArmCarIconConfig: Legend = new Legend({
  name: DataType.bucketArmCarSetting,
  iconSzie: [32, 32],
  textSize: [42, 16],
  text: '斗臂车',
  spacing: 10
});

export const craneIconConfig: Legend = new Legend({
  name: DataType.craneSetting,
  iconSzie: [32, 32],
  textSize: [28, 16],
  text: '吊车',
  spacing: 10
});

export const drivingRoutesIconConfig: Legend = new Legend({
  name: DataType.drivingRoutesSetting,
  iconSzie: [44, 16],
  textSize: [56, 16],
  text: '行驶路线',
  spacing: 10
});
排列图例方法
export const sortLegend = (legends: Array<Legend>, lineSpacing: number = 10, spacing: number = 10, containerWidth: number = 350, offsetX: number = 0, offsetY: number = 0) => {
  const sort: Array<{
    legends: Array<Legend>;
    rowHeight: number;
  }> = [];

  // 换行 x坐标
  let row = 0;
  let currentWidth = 0;
  for (let index = 0; index < legends.length; index++) {
    const legend = legends[index];
    const width = (legend.width || 0) + spacing;
    currentWidth += width;
    if (currentWidth <= containerWidth) {
      sort[row] === undefined &&
        (sort[row] = {
          legends: [],
          rowHeight: 0
        });
      legend.x = currentWidth - width + offsetX;
      sort[row].legends.push(legend);
    } else {
      ++row;
      currentWidth = width;
      sort[row] === undefined &&
        (sort[row] = {
          legends: [],
          rowHeight: 0
        });
      legend.x = currentWidth - width + offsetX;
      sort[row].legends.push(legend);
    }
  }

  // 行高 y坐标
  let height: number = 0;
  for (let index = 0; index < sort.length; index++) {
    const element = sort[index];
    const rowHeight = Math.max(...element.legends.map(item => item.height || 0)) + lineSpacing; // 每一行的最大宽度
    element.rowHeight = rowHeight;
    height += rowHeight;
    for (let j = 0; j < element.legends.length; j++) {
      const legend = element.legends[j];
      const currentHeight = (legend.height || 0) + lineSpacing;
      if (currentHeight < rowHeight) {
        legend.y = height - rowHeight + (rowHeight / 2 - currentHeight / 2) + offsetY;
      } else {
        legend.y = height - rowHeight + offsetY;
      }
    }
  }

  return sort.flatMap(item => item.legends);
};
使用
 const legends: Legend[] = [];
      legends.push(liveAreaIconConfig);
      isCrane && legends.push(craneIconConfig);
      isCat && legends.push(bucketArmCarIconConfig);
      legends.push(serviceAreaIconConfig);
      isArrow && legends.push(drivingRoutesIconConfig);
      _protectText && legends.push(powerRetentionIconConfig);
      legends.push(safetyIconConfig);
      const sortLegends = sortLegend(legends, 10, 5, 300);
      for (let index = 0; index < sortLegends.length; index++) {
        const element = sortLegends[index];
        const xy = {
          x: element.x,
          y: element.y
        };
        element.name && updateSettingXy(element.name, xy);
      }


 2425
2425


 被折叠的 条评论
为什么被折叠?
被折叠的 条评论
为什么被折叠?
 到【灌水乐园】发言


