


百度网盘:链接:https://pan.baidu.com/s/1xZflA-8kKf9nLd9QWYxegw
提取码:kb4y
1.下载maven,直接解压
![]()
2.配置maven环境
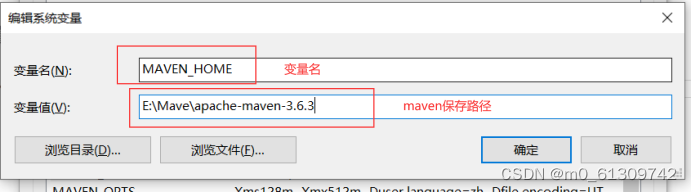
1).打开设置----高级系统设置----环境变量----创建 :
MAVEN_HOME:指向Maven的安装目录
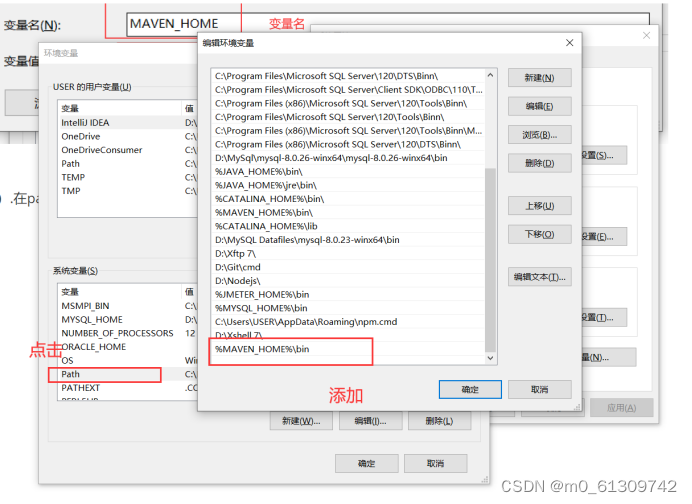
2).在path中添加 :%MAVEN_HOME%\bin
3).验证是否配置成功:在CMD或终端窗口查看Maven的版本信息
mvn -version

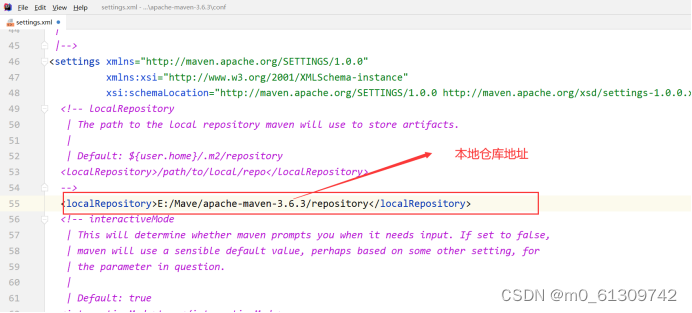
4).配置 settings.xml
1.文件路径:apache-maven-3.6.3\conf

2.找到本地仓库的地址:repository

3.配置本地仓库地址settings.xml中,找到:localRepository标签
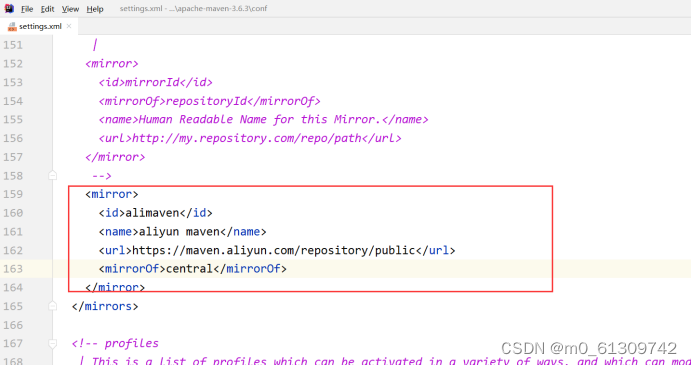
4.配置公共仓库:mirrors----mirror
配置阿里云仓库下载:
2.配置Maven捆绑
1)在IDEA中找到位置:
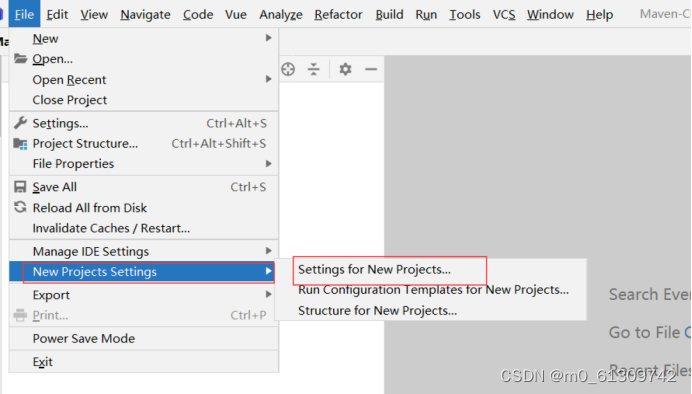
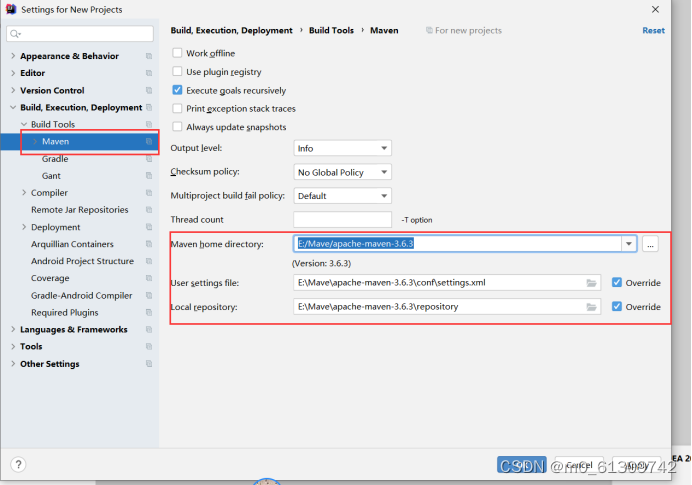
2)设置maven
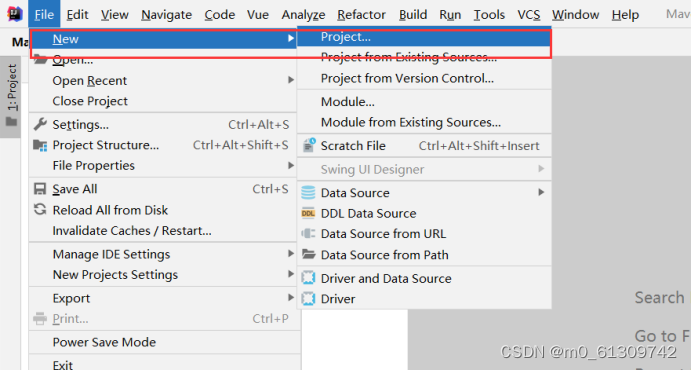
3.创建maven项目
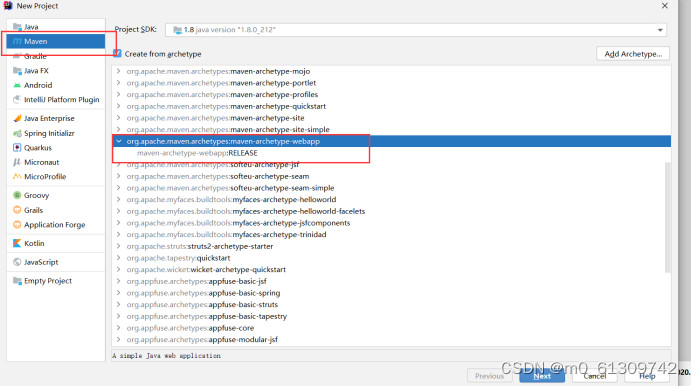
1.选择创建模板
2.设置创建maven项目的路径
3.设置maven的路径和仓库地址

4.下载模板地址查看
5.创建完成:


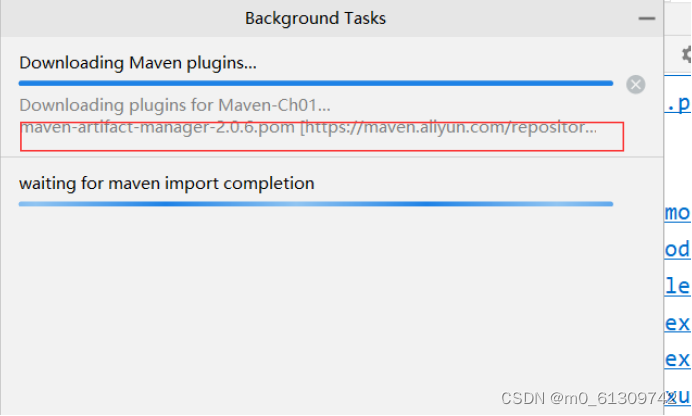
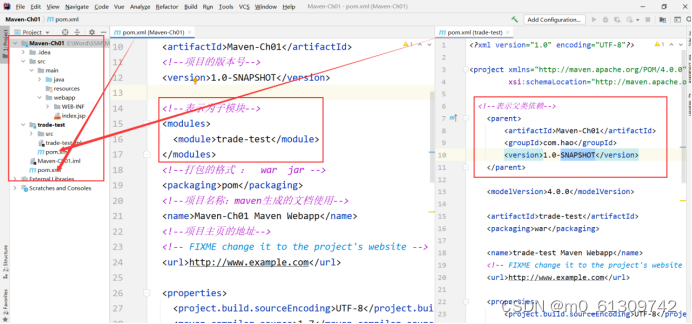
6.创建子模块

7.相互自动会添加依赖
8.查询maven的指令操作

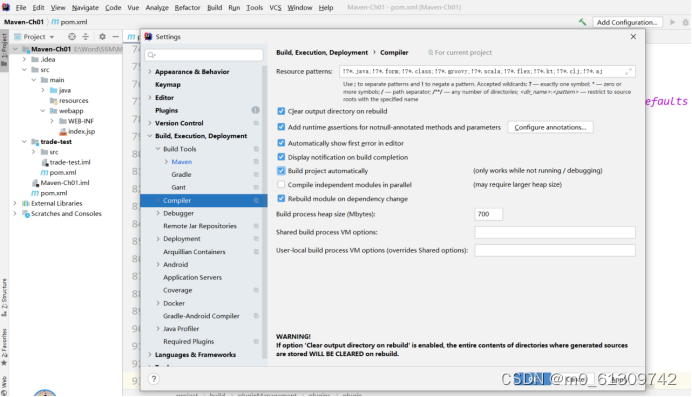
9.进行热部署

2.选择勾选 compiler.automake.allow.when.app.running

3.设置窗口配置项目的自动构建
1.父类的pom.xml
<?xml version="1.0" encoding="UTF-8"?><project xmlns="http://maven.apache.org/POM/4.0.0" xmlns:xsi="http://www.w3.org/2001/XMLSchema-instance"  xsi:schemaLocation="http://maven.apache.org/POM/4.0.0 http://maven.apache.org/xsd/maven-4.0.0.xsd">  <!--版本-->  <modelVersion>4.0.0</modelVersion>
   <!--项目唯一的标识符-->
   <groupId>com.hao</groupId>
   <!--項目名称-->
   <artifactId>Maven-Ch01</artifactId>
   <!--项目的版本号-->
   <version>1.0-SNAPSHOT</version>
   <!--表示为子模块-->
   <modules>
       <module>trade-test</module>
   </modules>
   <!--打包的格式 : war jar -->
   <packaging>pom</packaging>
   <!--项目名称:maven生成的文档使用-->
   <name>Maven-Ch01 Maven Webapp</name>
   <!--项目主页的地址-->  <!-- FIXME change it to the project's website -->  <url>http://www.example.com</url>
   <!--定义的常量-->
   <properties>
       <project.build.sourceEncoding>UTF-8</project.build.sourceEncoding>
       <maven.compiler.source>1.7</maven.compiler.source>
       <maven.compiler.target>1.7</maven.compiler.target>
   </properties>
   <!--定义此项目的依赖关系集合-->
   <dependencies>
       <!--配置子模块依赖-->
       <dependency>
           <groupId>com.hao</groupId>
           <artifactId>trade-test</artifactId>
           <version>1.0-SNAPSHOT</version>
           <!-- maven认为,程序对外部的依赖会随着程序的所处阶段和应用场景而变化,     所以maven中的依赖关系有作用域(scope)的限制。 -->      <!--scope包含如下的取值:compile(编译范围)、     provided(已提供范围)、runtime(运行时范围)     、test(测试范围)、system(系统范围) -->
           <scope>test</scope>
           <!-- 设置指依赖是否可选,默认为false,即子项目默认都继承:为true,     则子项目必需显示的引入,与dependencyManagement里定义的依赖类似 -->
           <optional>false</optional>
           <!-- 屏蔽依赖关系。 比如项目中使用的libA依赖某个库的1.0版,     libB依赖某个库的2.0版,现在想统一使用2.0版,就应该屏蔽掉对1.0版的依赖 -->
           <exclusions>
               <exclusion>
                   <groupId>org.slf4j</groupId>
                   <artifactId>slf4j-api</artifactId>
               </exclusion>
           </exclusions>
       </dependency>
       <!--依赖-->
       <dependency>
           <groupId>junit</groupId>
           <artifactId>junit</artifactId>
           <version>4.11</version>
           <scope>test</scope>
       </dependency>
       <!--   <dependency>
<groupId>org.springframework.boot</groupId>
<artifactId>spring-boot-devtools</artifactId>
<optional>true</optional>
</dependency>-->
   </dependencies>
   <!--描述如何编译和打包项目-->
   <build>
       <finalName>Maven-Ch01</finalName>
       <pluginManagement>
           <!-- lock down plugins versions to avoid using Maven defaults (may be moved to parent pom) -->
           <plugins>
               <!--添加springboot-->
               <plugin>
                   <groupId>org.springframework.boot</groupId>
                   <artifactId>spring-boot-maven-plugin</artifactId>
                   <configuration>
                       <fork>true</fork>
                   </configuration>
                   <dependencies>
                       <dependency>
                           <groupId>org.springframework.boot</groupId>
                           <artifactId>spring-boot-maven-plugin</artifactId>
                           <version>2.1.5.RELEASE</version>
                       </dependency>
                   </dependencies>
               </plugin>
               <plugin>
                   <artifactId>maven-war-plugin</artifactId>
                   <version>3.2.2</version>
               </plugin>
           </plugins>
       </pluginManagement>
   </build>
</project>
3.配置私服nexus
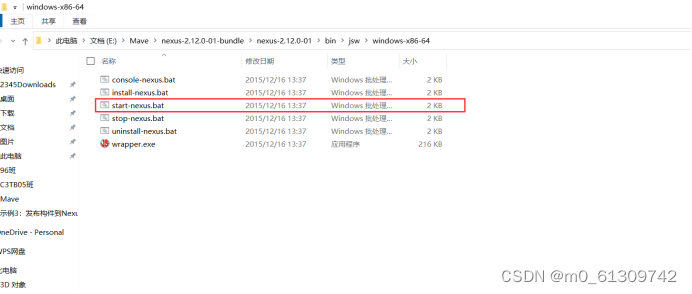
1.下载包:nexus-2.12.0-01-bundle.zip,解压
 2.生成服务:
路径:nexus-2.12.0-01-bundle\nexus-2.12.0-01\bin\jsw\windows-x86-64
右键使用管理员运行:
 3.打开服务,启动服务nexus
4.访问Nexus管理页面
地址:http://服务器IP:8081/nexus/ 如:本地地址:http://localhost:8081/nexus 默认用户名/密码:admin/admin123
 5.Nexus管理页面左侧菜单:Views/Repositories → Repositories
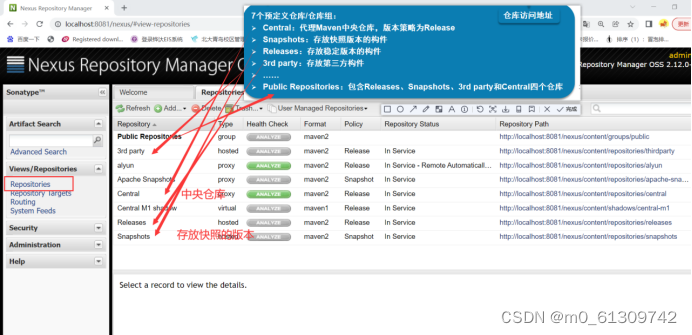
6.选择仓库:就是下载pom.xml依赖

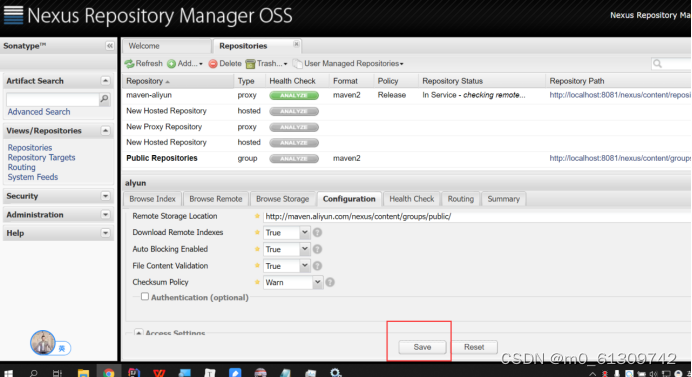
7.自定义添加仓库
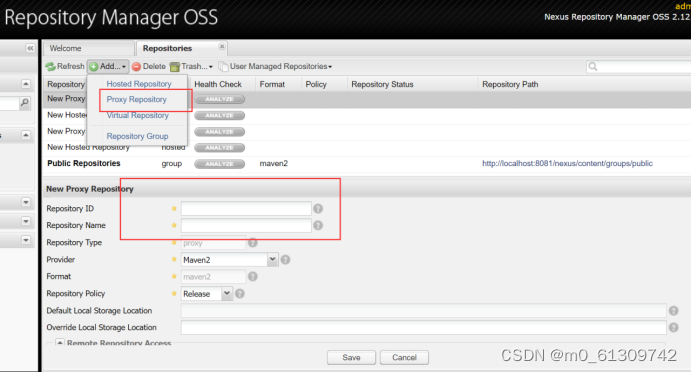
8.设置仓库名称和ID
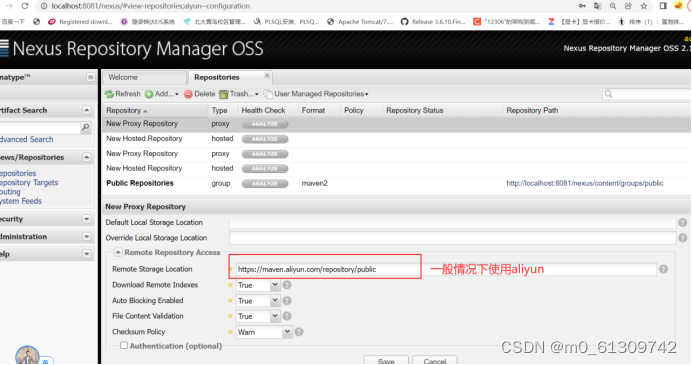
 9.设置仓库下载依赖地址
10.保存设置
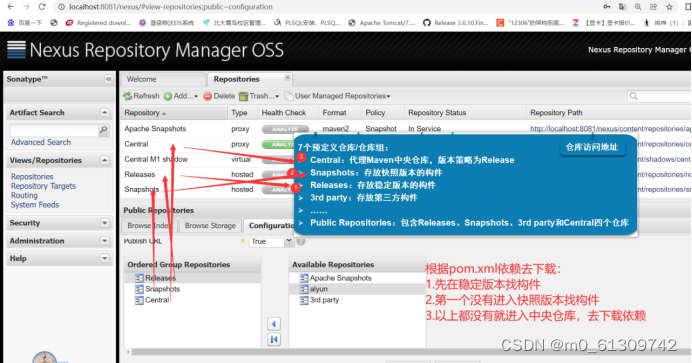
11.查看自定义仓库是否创建成功,在移入到依赖中
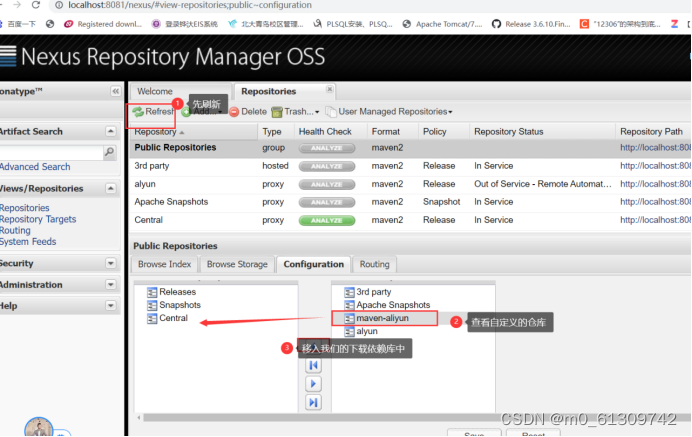
12.移入后进行位置调整,中央仓库放在最后面,进行保存

13.配置settings.xml依赖
1).servers中配置server标签中配置私服账号和密码 admin/admin123
<!-- 配置私服的账号和密码-->
<server>
<id>nexus-public</id> <!-- nexus的认证id-->
<username>admin</username><!-- nexus中的用户名和密码-->
<password>admin123</password>
</server>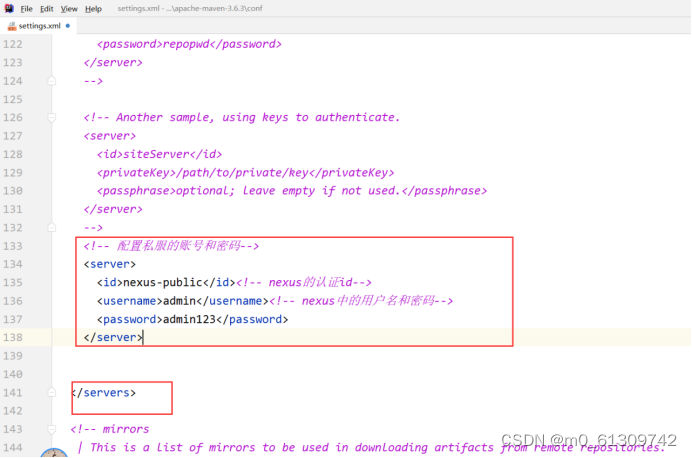 2).profiles中设置私服仓库地址: repositories>repository>id的值要和server>id的值相同
<profile>
   <id>nexus</id>
   <repositories>
       <repository>
           <id>nexus-public</id>
           <name>Nexus Release Snapshot Repository</name>
           <url>http://localhost:8081/nexus/content/groups/public/</url>
           <releases><enabled>true</enabled></releases>
           <snapshots><enabled>true</enabled></snapshots>
       </repository>
   </repositories>
   <pluginRepositories>
       <pluginRepository>
           <id>nexus-public</id>
           <url>http://localhost:8081/nexus/content/groups/public/</url>
           <releases><enabled>true</enabled></releases>
           <snapshots><enabled>true</enabled></snapshots>
       </pluginRepository>
   </pluginRepositories>
</profile>

3).使私服配置生效:私服名称要和 profle > id值相同,才能生效
使私服配置生效
<activeProfiles>
   <!--使私服配置生效-->
   <activeProfile>nexus</activeProfile>
</activeProfiles>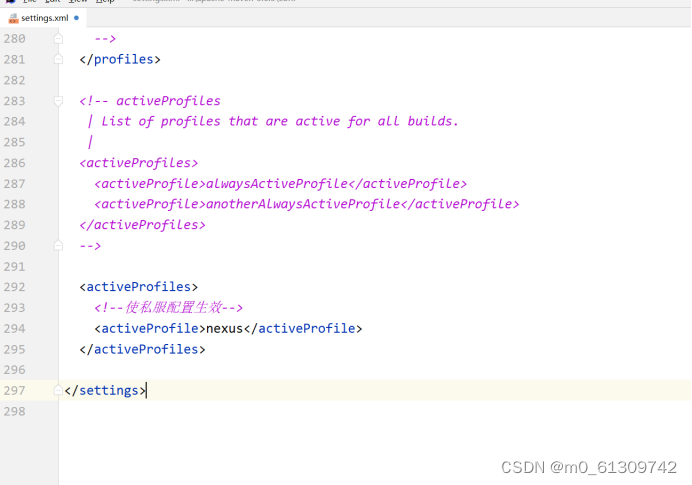

4).使用私服
 <!--使用私服-->
<mirror>
   <id>nexus</id>
   <mirrorOf>*</mirrorOf>
   <name>Nexus aliyun</name>
   <url>http://localhost:8081/nexus/content/groups/public/</url>
</mirror>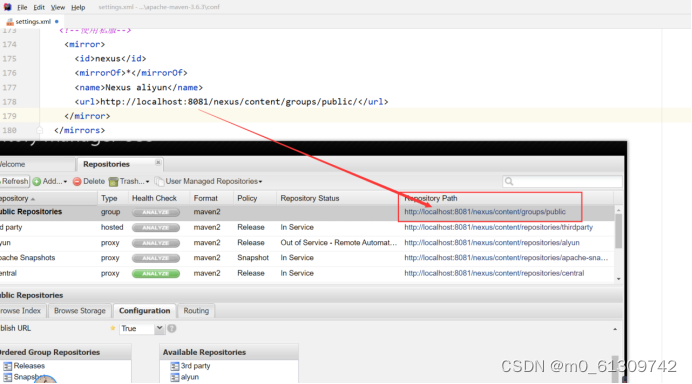
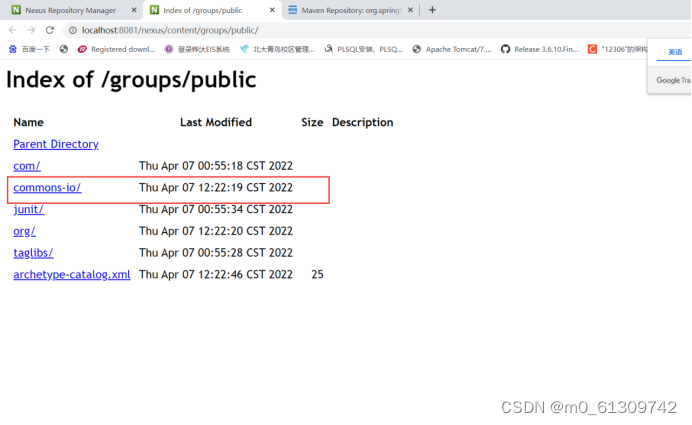
5).在pom.xml中添加依赖,测试私服下载


 571
571


 被折叠的 条评论
为什么被折叠?
被折叠的 条评论
为什么被折叠?
 到【灌水乐园】发言


