


@作者 : SYFStrive
@博客首页 : HomePage
📌:个人社区(欢迎大佬们加入) 👉:社区链接🔗
📌:觉得文章不错可以点点关注 👉:专栏连接🔗
💃:程序员每天坚持锻炼💪
👉 飞机大战专栏(🔥)


目录
游戏单例脚本
单例模式是1种设计模式:👉(Design pattern)代表了最佳的实践,通常被有经验的面向对象的软件开发人员所采用。设计模式是软件开发人员在软件开发过程中面临的一般问题的解决方案。这些解决方案是众多软件开发人员经过相当长的一段时间的试验和错误总结出来的。
单例使用说明:“单例模式是指在内存中只会创建一次对象的设计模式,并且确保一个类只有实例,而且会自行实例化,并向整个系统提供这个实例。
非持久化泛型单例
using UnityEngine;

//摘要:Base class for everything attached to GameObjects.
//Component中文说明:所有能挂载到游戏对象上的类型基类
public class Singleton<T> : MonoBehaviour where T :Component
{
    public static T Instance { get; private set; }

    protected virtual void Awake()
    {
        Instance = this as T;
    }
}
游戏基类
子弹基类实现子弹移动
using System.Collections;
using System.Collections.Generic;
using UnityEngine;

public class Projectile : MonoBehaviour
{
    //子弹的移动速度
    [SerializeField] float moveSpeed;
    //子弹的移动方向
    [SerializeField] protected Vector3 moveDirection;
    //子弹移动的Obj
    protected GameObject targer;

    protected virtual void OnEnable()
    {
        StartCoroutine(ProjectileMoveIE());
    }

    IEnumerator ProjectileMoveIE()
    {
        while (true)
        {
            //子弹移动
            transform.position += moveSpeed * moveDirection * Time.deltaTime;
            yield return null;
        }
    }
}
视口限制
窗口如 👇
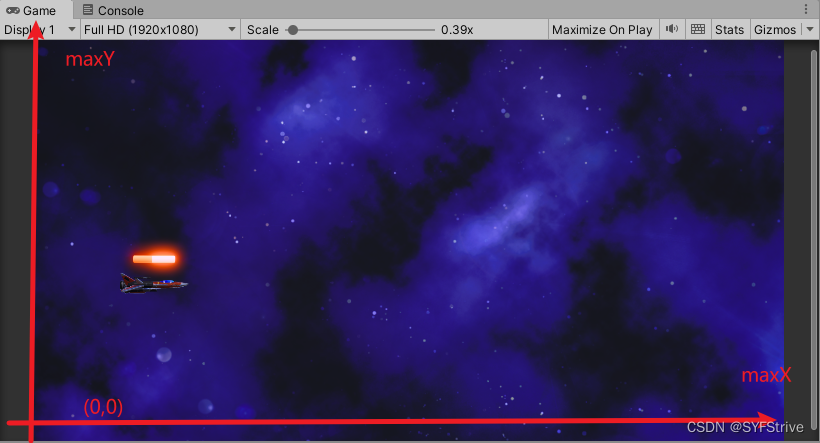
限制视口脚本
说明:因为是工具脚本所以续成范型单例
视口脚本Viewport 如 👇
using UnityEngine;

public class Viewport : Singleton<Viewport>
{
    //限制player的镜头
    private float maxX;
    private float minX;
    private float maxY;
    private float minY;

    private void Start()
    {
        //获取摄像机
        Camera camera = Camera.main;

        //屏幕坐标转换为世界坐标
        Vector2 bottomLeft = camera.ViewportToWorldPoint(Vector3.zero);
        Vector2 topRight = camera.ViewportToWorldPoint(Vector3.one);

        //获取对应的X、Y值
        maxX = topRight.x;
        minX = bottomLeft.x;
        maxY = topRight.y;
        minY = bottomLeft.y;
    }

	/// <summary>
	/// 限制Player的坐标
	/// </summary>
	/// <param name="playerPosition">玩家位置</param>
	/// <param name="paddingX">X的偏移量</param>
	/// <param name="paddingY">Y的偏移量</param>
	/// <returns></returns>
	public Vector3 AstrictPlayerPosition(Vector3 playerPosition,float paddingX,float paddingY)
   {
      //初始位置
      Vector3 intaialPosition = Vector3.zero;

      //Mathf.Clamp参数说明(值,最小值,最大值)
      //paddingX、paddingY 限制飞机一半身体超出视口外偏移量
      intaialPosition.x = Mathf.Clamp(playerPosition.x, minX+ paddingX, maxX- paddingX);
      intaialPosition.y = Mathf.Clamp(playerPosition.y, minY+ paddingY, maxY- paddingY);

      //返回位置
      return intaialPosition;
   }
}
Player脚本
实现共能: 添加系统事件 👉 使系统事件与新输入系统绑定
添加代码如 👇
using UnityEngine;
//运行时自动添加Rigidbody组件
[RequireComponent(typeof(Rigidbody2D))]
public class Player : MonoBehaviour
{

  	[Header("---Input---")]
    [SerializeField]PlayerInput playerInput;

    //获取刚体
    private new Rigidbody2D rigidbody;

	[Header("---Move---")]
    //移动的速度
    [SerializeField] float moveSpeed=10;

    //限制飞机的一半身体超出视口
    float paddingX;
    float paddingY;

    private void Awake()
    {
        //获取刚体组件
        rigidbody=GetComponent<Rigidbody2D>();
    }
    private void Start()
    {
        //初始化重力为0
        rigidbody.gravityScale = 0f;
        //初始化激活动作表
        playerInput.AstrictImport();

    //玩家的尺度
    //GetComponent<MeshFilter>().sharedMesh.bounds.size获得的是未经缩放的大小。
    //GetComponent<Renderer>().bounds.size获得是是经过缩放后的大小。
    var size = transform.GetChild(0).GetComponent<Renderer>().bounds.size;
    paddingX = size.x / 2;
    paddingY = size.y / 2;
    }

    private void OnEnable()
    {
        //订阅事件
        playerInput.onMove += Move;
        playerInput.onStopMove += StopMove;
    }

    private void OnDisable()
    {
        //移除事件
        playerInput.onMove -= Move;
        playerInput.onStopMove -= StopMove;
    }

    /// <summary>
    /// 移动
    /// </summary>
    private void Move(Vector2 moveInput)
    {
        //好理解先接受移动的值
        var moveSpeedS = moveInput * moveSpeed;
        //刚体移动
        rigidbody.velocity= moveSpeedS;
    }

    /// <summary>
    /// 停止移动
    /// </summary>
    private void StopMove()
    {
        //刚体移动
        rigidbody.velocity = Vector3.zero;
	    //停止携程(限制范围)
	    StopCoroutine("AstrictPlayerPositionIE");
    }

	/// <summary>
	/// 移动
	/// </summary>
	private void Move(Vector2 moveInput)
	{
	    //好理解先接受移动的值
	    var moveSpeedS = moveInput * moveSpeed;
	    //刚体移动
	    rigidbody.velocity= moveSpeedS;
	    //开启携程(限制范围)
	    StartCoroutine("AstrictPlayerPositionIE");
	}

	//限制飞机的位置 方法:1、可以在Update调用(消耗性能的神) 2、可以在携程调用(这里使用携程)
	IEnumerator AstrictPlayerPositionIE()
	{
	    while (true)
	    {
	        transform.position = Viewport.Instance.AstrictPlayerPosition(transform.position, paddingX, paddingY);

	        yield return null;
	    }
	}
}
效果
效果如 👇

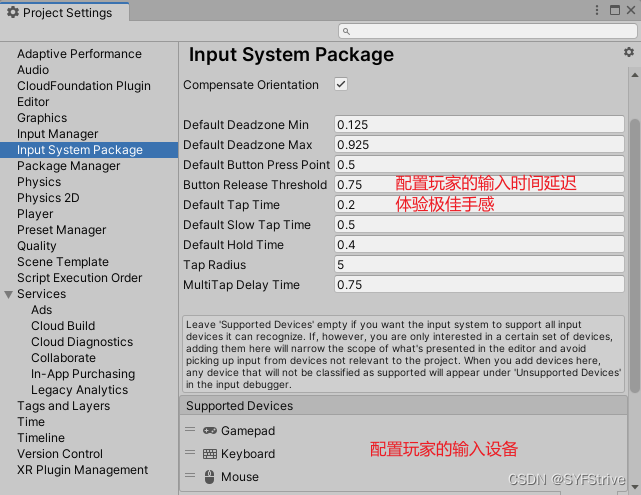
实现玩家的加速与减速携程
配置输入设备的手感
Player脚本
实现共能: 实现加速与减速携程
添加代码如 👇
using UnityEngine;
//运行时自动添加Rigidbody组件
[RequireComponent(typeof(Rigidbody2D))]
public class Player : MonoBehaviour
{
  	[Header("---Input---")]
    [SerializeField]PlayerInput playerInput;

    //获取刚体
    private new Rigidbody2D rigidbody;

	  [Header("---Move---")]
	  //移动的速度
	  [SerializeField] float moveSpeed = 10;
	  //限制飞机的一半身体超出视口
	  float paddingX;
	  float paddingY;
	  //飞机的加速与减速时间
	  [SerializeField] float speedUpTime = 3;
	  [SerializeField] float speedCutTime = 3;
	  //飞机移动旋转的角度
	  [SerializeField] float playerMoveRosition = 10;
	  //防止被刚体碰到短暂停止BUG
	  private Vector2 moveDirection;
	  //玩家移动旋转的初始化值 防止频繁触发GC
	  private float t;
	  private Vector2 moveVelocity;
	  private Quaternion moveQuaternion;
	  private WaitForFixedUpdate moveWaitForFixedUpdate = new WaitForFixedUpdate();

	  [Header("---停止待参数的携程---")]

	  //停止携程的第三种方法
	  private Coroutine moveCoroutine;
	  private Coroutine relfRecoverCoroutine;


    private void Awake()
    {
        //获取刚体组件
        rigidbody=GetComponent<Rigidbody2D>();
    }
    private void Start()
    {
        //初始化重力为0
        rigidbody.gravityScale = 0f;
        //初始化激活动作表
        playerInput.AstrictImport();
	    //视口的尺度
	    //GetComponent<MeshFilter>().sharedMesh.bounds.size获得的是未经缩放的大小。
	    //GetComponent<Renderer>().bounds.size获得是是经过缩放后的大小。
	    var size = transform.GetChild(0).GetComponent<Renderer>().bounds.size;
	    paddingX = size.x / 2;
	    paddingY = size.y / 2;
    }

    private void OnEnable()
    {
        //订阅事件
        playerInput.onMove += Move;
        playerInput.onStopMove += StopMove;
    }

    private void OnDisable()
    {
        //移除事件
        playerInput.onMove -= Move;
        playerInput.onStopMove -= StopMove;
    }

	  #region Move
	  /// <summary>
	  /// 玩家移动
	  /// </summary>
	  private void Move(Vector2 moveInput)
	  {
	    //再次移动前应该停止之前的携程(使用第三种参数停止携程)
	    if (moveCoroutine != null)
	      StopCoroutine(moveCoroutine);

	    好理解先接受移动的值
	    //var moveSpeedS = moveInput * moveSpeed;
	    刚体移动
	    //rigidbody.velocity= moveSpeedS;

	    //移动的初始值
	    moveDirection = moveInput.normalized;
	    //获取旋转的值
	    Quaternion moveRosition = Quaternion.AngleAxis(playerMoveRosition * moveInput.y, Vector3.right);
	    //开启携程(限制加速减速)
	    moveCoroutine = StartCoroutine(PlayerMoveCoroutine(speedUpTime, moveDirection * moveSpeed, moveRosition));
	    //开启携程(限制范围)
	    stopMoveCoroutine = StartCoroutine(nameof(AstrictPlayerPositionIE));
	  }

	  /// <summary>
	  /// 停止移动
	  /// </summary>
	  private void StopMove()
	  {
	    //再次移动前应该停止之前的携程(使用第三种参数停止携程)
	    if (moveCoroutine != null)
	      StopCoroutine(moveCoroutine);

	    刚体移动
	    //rigidbody.velocity = Vector3.zero;

	    //停止携程(限制加速减速)
	    moveDirection = Vector3.zero;
	    moveCoroutine = StartCoroutine(PlayerMoveCoroutine(speedCutTime, moveDirection, Quaternion.identity));

	    //停止携程(限制范围)
	    StopCoroutine(stopMoveCoroutine);
	  }


	//限制飞机的位置 方法:1、可以在Update调用(消耗性能的神) 2、可以在携程调用(这里使用携程)
	IEnumerator AstrictPlayerPositionIE()
	{
	    while (true)
	    {
	        transform.position = Viewport.Instance.AstrictPlayerPosition(transform.position, paddingX, paddingY);

	        yield return null;
	    }
	}


	/// <summary>
	/// 加速与减速携程
	/// </summary>
	/// <param name="time">加速的时间</param>
	/// <param name="moveTarget">移动的目标位置</param>
	/// <param name="rositionTarget">旋转的目标位置</param>
	/// <returns></returns>
	IEnumerator PlayerMoveCoroutine(float time, Vector2 moveTarget, Quaternion rositionTarget)
	{
	  t = 0f;
	  //初始化移动速度
	  moveVelocity = rigidbody.velocity;
	  //初始化旋转角度
	  moveQuaternion = transform.rotation;

	  while (t < 1f)
	  {
	    t += Time.fixedDeltaTime / time;

	    //lerp移动体验极佳手感
	    rigidbody.velocity = Vector2.Lerp(moveVelocity, moveTarget, t);

	    //玩家移动旋转
	    transform.rotation = Quaternion.Lerp(moveQuaternion, rositionTarget, t);

	    //空返回
	    yield return moveWaitForFixedUpdate;
	  }
	}
	#endregion

	  /// <summary>
	  /// 停止移动
	  /// </summary>
	  private void StopMove()
	  {
	    //再次移动前应该停止之前的携程(使用第三种参数停止携程)
	    if (moveCoroutine != null)
	      StopCoroutine(moveCoroutine);

	    刚体移动
	    //rigidbody.velocity = Vector3.zero;

	    刚体移动
	    //rigidbody.velocity = Vector3.zero;

	    //停止携程(限制加速减速)
	    moveDirection = Vector3.zero;
	    moveCoroutine = StartCoroutine(PlayerMoveCoroutine(speedCutTime, moveDirection, Quaternion.identity));

	    //停止携程(限制范围)
	    StopCoroutine(stopMoveCoroutine);
	  }
}
效果

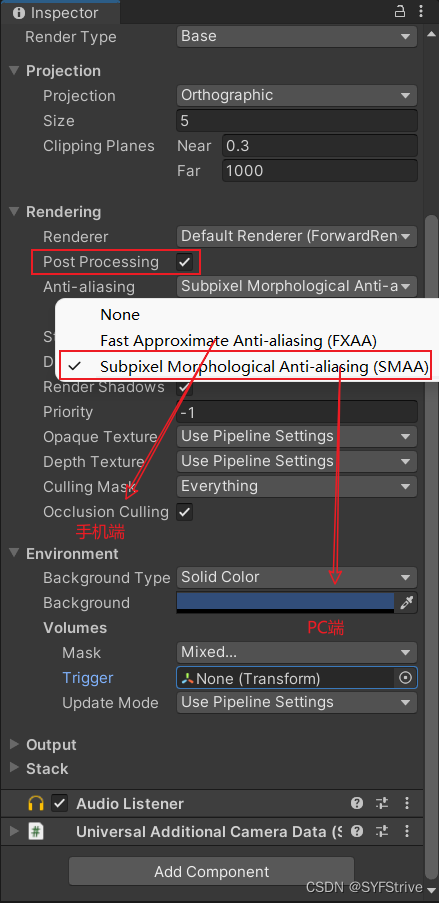
UPR添加配置后处理
- 使用了Unity的后处理插件Post-Processing。
- 该插件十分强大,能增强画面真实感,产生发光效果,进行调色等。使用也很简单,调节一下参数即可。
- 后处理 (Post-Processing) 是全屏图像处理效果的通用术语,它发生在摄像机绘制场景之后,但场景在屏幕上呈现之前。后期处理可以大大改善您的产品的视觉效果,只需很少的设置时间。您可以使用后期处理效果来模拟物理相机和胶片的属性。
相机处理如 👇
添加后处理效果
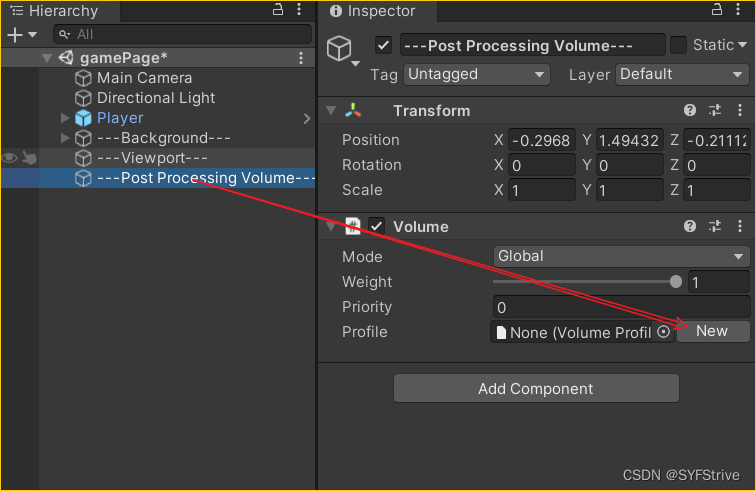
局部处理及全局处理效果(项目用的是全局处理)
说明:当主摄像机碰到局部Volume对象的碰撞体后就会应用这个局部的镜头变形效果。
使用场景:水波纹等效果。
后处理参数如 👇
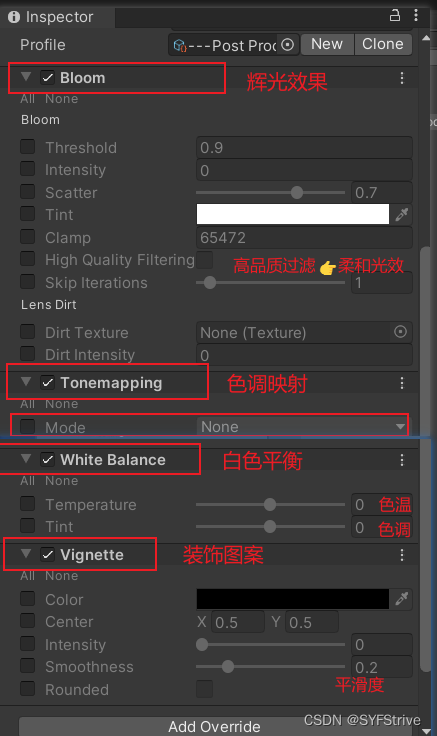
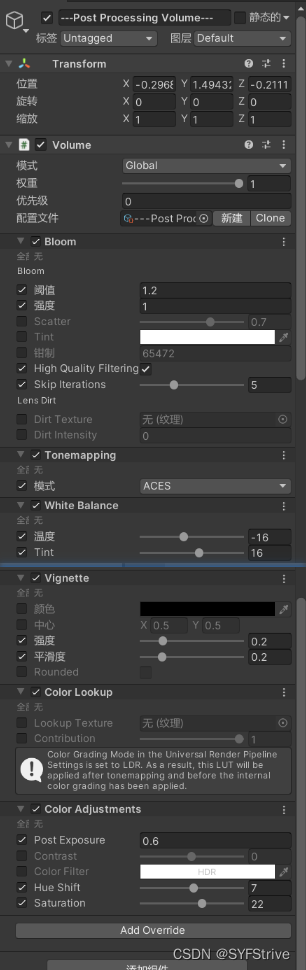
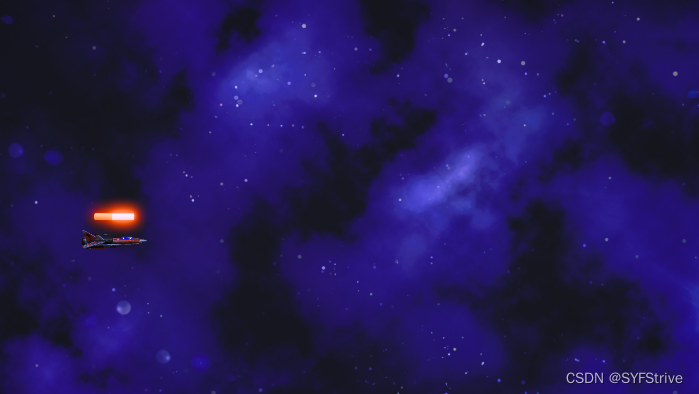
效果
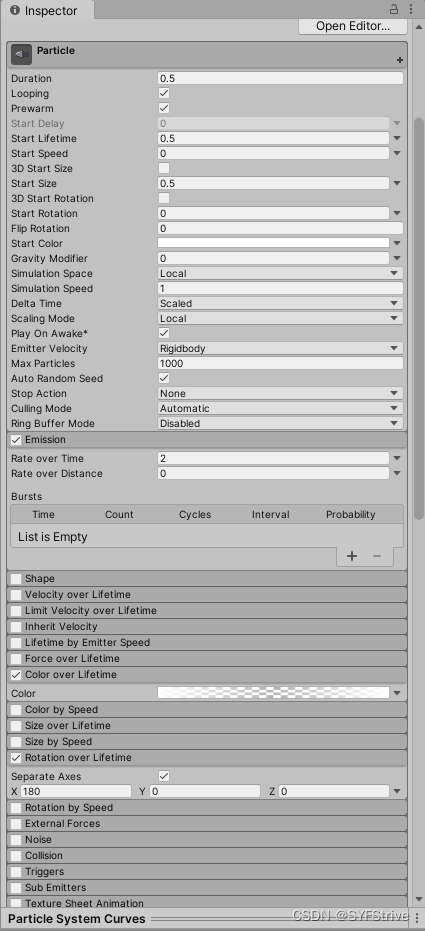
子弹配置
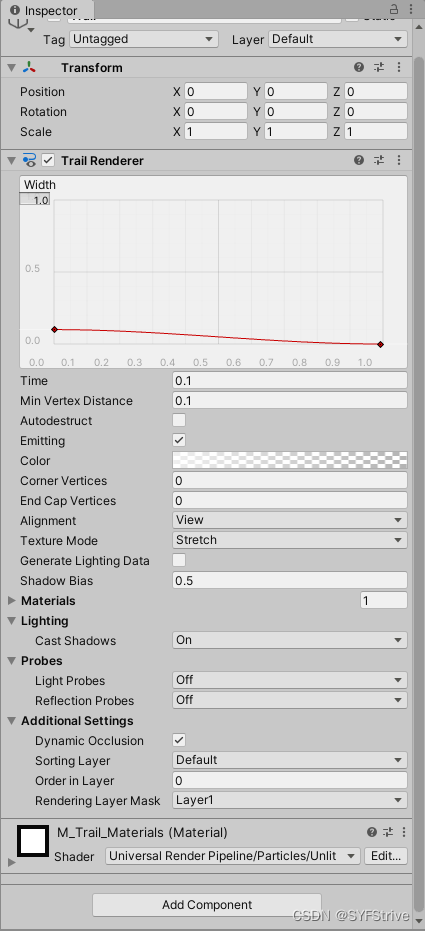
子弹拖尾效果配置
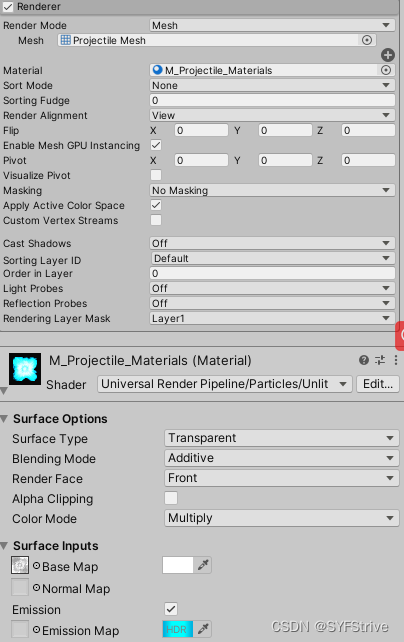
效果
实现玩家发射子弹
玩家子类子弹
实现:每按下时发射子弹
using UnityEngine;
public class PlayerProjectile : Projectile
{

}
Player脚本
public class Player : MonoBehaviour
{
	  [Header("---Fire---")]
	  //子弹的预制体
	  [SerializeField] GameObject ProjectileTOP90;
	  [SerializeField] GameObject ProjectileTOP;
	  [SerializeField] GameObject ProjectileCenter;
	  [SerializeField] GameObject ProjectileDown;
	  [SerializeField] GameObject ProjectileDown90;

	  //子弹模式
	  [SerializeField, Range(0, 4)] int attackPattern = 0;

	  //发射的位置
	  [SerializeField] Transform fireTranPosTop90;
	  [SerializeField] Transform fireTranPosCenter;
	  [SerializeField] Transform fireTranPosTop;
	  [SerializeField] Transform fireTranPosDown;
	  [SerializeField] Transform fireTranPosDown90;

	  //发射子弹的间隔
	  [SerializeField] float fireTime = 0.3f;
	  //发射子弹间隔携程
	  WaitForSeconds fireProjectileTimeIE;
	  //生命自动恢复的间隔携程
	  WaitForSeconds selfRecoverTimeIE;
	  //使用技能下的开火时间携程
	  WaitForSeconds areSkillFireProjectileTimeIE;

  //发射子弹携程
  IEnumerator FireProjectileIE()
  {
    //创建预制体
    while (true)
    {
	  Instantiate(projectile1, fireTranPosCenter.position, Quaternion.identity);

      //协程间隔 👉 判断是否是仅能子弹
      yield return isEnetgySkill ? areSkillFireProjectileTimeIE : fireProjectileTimeIE;
	}
  }
}
子弹的销毁或隐藏共能ProjectileDestroy
ProjectileDestroy 实现如 👇
using System.Collections;
using UnityEngine;

public class ProjectileDestroy : MonoBehaviour
{
  //删除或隐藏的间隔时间
  [SerializeField] float destroyTimer=1.3f;
  //是否删除
  [SerializeField] bool isDestroy;
  //删除的子弹的间隔携程
  [SerializeField] WaitForSeconds destroyTime;

  private void Awake()
  {
    //初始化
    destroyTime = new WaitForSeconds(destroyTimer);
  }
  private void OnEnable()
  {
    //显示时执行携程
    StartCoroutine(DestroyProjectile());
  }


  IEnumerator DestroyProjectile()
  {
    yield return destroyTime;

    if (isDestroy)
    {
      Destroy(gameObject);
    }
    else
    {
      gameObject.SetActive(false);
    }
  }
}
效果
最后
本文到这里就结束了,大佬们的支持是我持续更新的最大动力,希望这篇文章能帮到大家💪

下篇文章再见ヾ( ̄▽ ̄)ByeBye


 1570
1570


 被折叠的 条评论
为什么被折叠?
被折叠的 条评论
为什么被折叠?
 到【灌水乐园】发言


