


Nacos是目前比较流行的一款集服务发现和配置管理的中间件,同时支持CP和AP两种模式。Nacos是久经考验的稳定、高性能的服务发现、配置管理的服务。我们在使用一个开源工具时,除了它的外在特性外,往往都想了解它的内在。否则万一出了什么问题,岂是不一脸懵,如果我们对它的代码都非常熟悉,就算出了问题,也是一点不慌。所以,解读开源代码是一项非常重要的技能!需要框架源码的朋友可以看我个人简介联系我。

那么如何解读开源代码呢?
先说下本人的做法:望其名,识其义,也就是盲猜一波。需要注意的是,走读代码时,要关注最主要的分支逻辑,不要被一些不重要的分支吸引浪费大量精力。
比如说,怎么快速定位到Nacos服务端的服务注册的逻辑代码呢,先看下Nacas的几个模块的名称,然后根据名字猜测下。
- 首先,address应该是地址相关的,应该是被其他模块引用的工具类的实现;
- api模块更是好猜了,属于api的声明模块了;
- auth、client、cmdb、common更不用说,肯定不是服务注册的核心代码所在;
- consistency:一致性,这个含义猜测应该是和Raft共识算法有关系,所以也不是这个模块;
- config:配置,这个很明显,应该是配置管理的核心模块,但不是服务发现的所在模块;
- console:终端、控制台,这个含义应该是Nacos的前端界面的后台,引用其他模块,与之对应的console-ui模块应该就是前端的代码;
- core:核心,猜测应该是公共的核心代码实现,以便各个模块复用代码;
- distribution:发布,所以这个模块应该是发布、打包相关的;
- example、istio、sys、test肯定也不是;
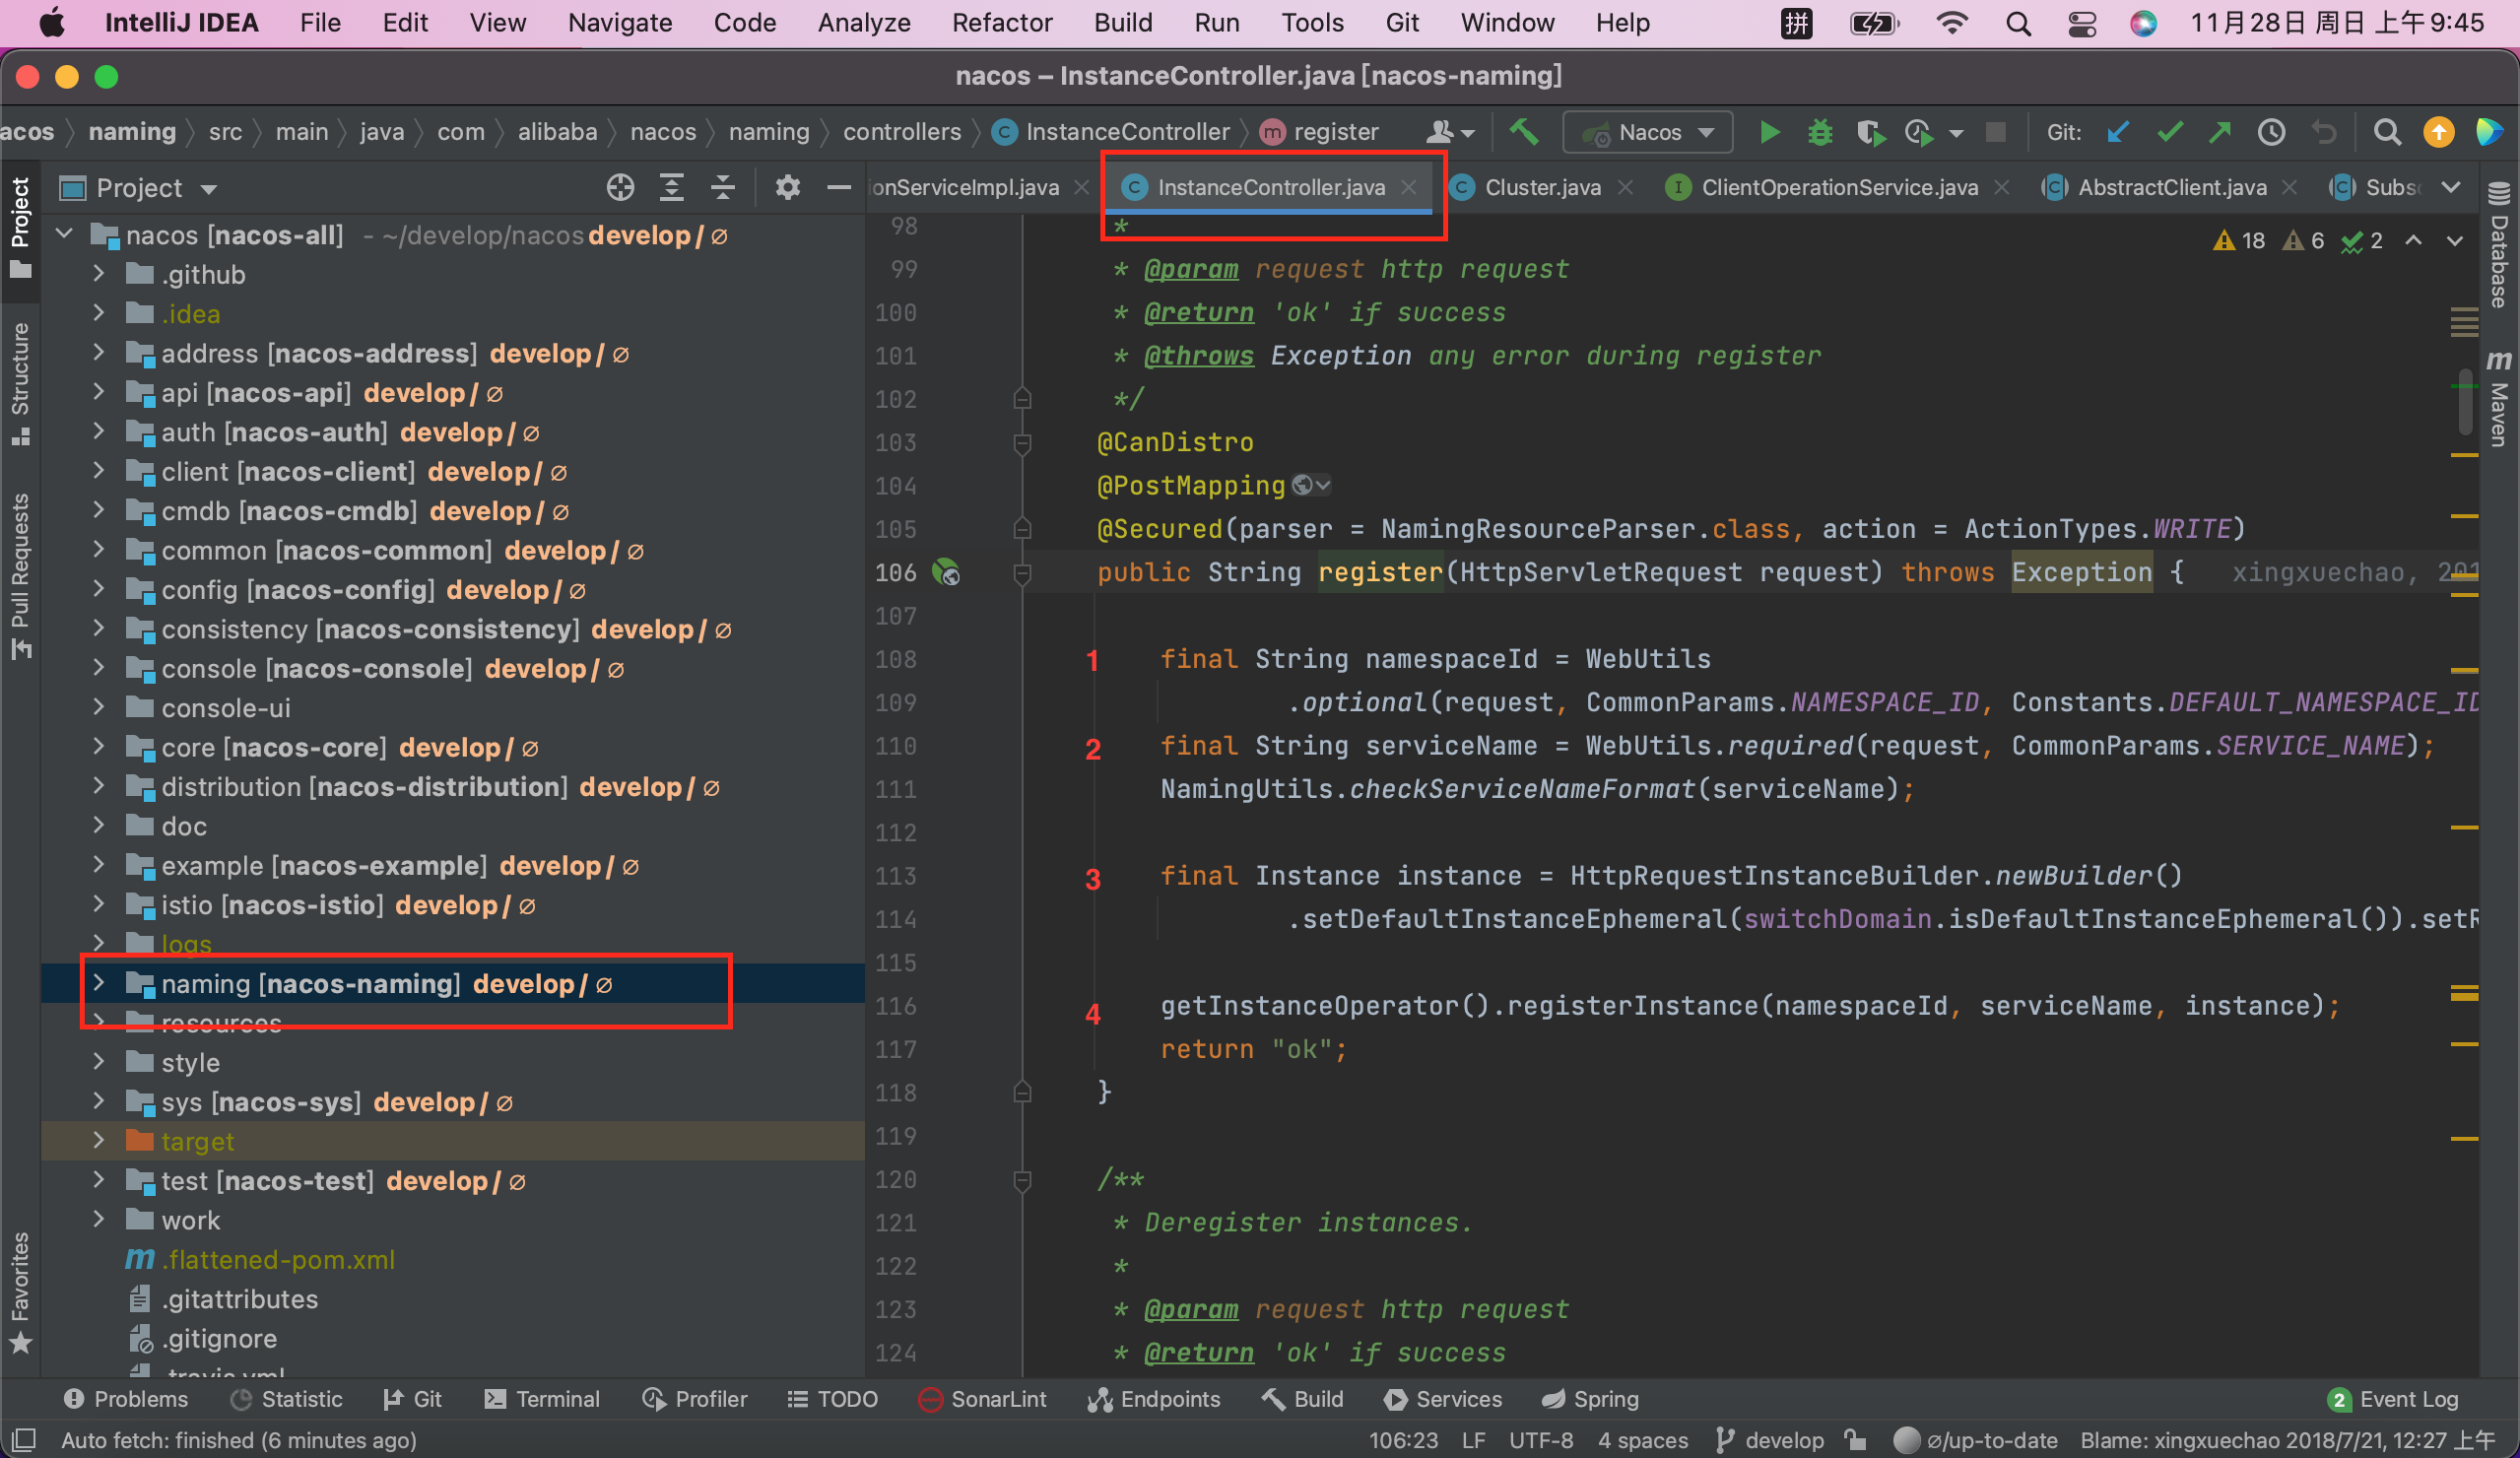
- naming:命名、给...起名字,所以应该是和服务发现有关系的,到这个模块里看看,发现存在一个InstanceController.java的文件,如下图
看来盲猜的并没有错,服务注册的服务端入口就是这里了,下面就解读下这几行代码。
Nacos服务注册核心代码解读
如上图中标注的1、2、3、4,可以看出1、2、3都是为了4,也就是解析request请求得到客户的传入的instance,所以下面进入4的实现中详细走读,不要在1、2、3做过多的停留。在registerInstance处右键进入实现代码,选择服务端实现即:InstanceOperatorServiceImpl
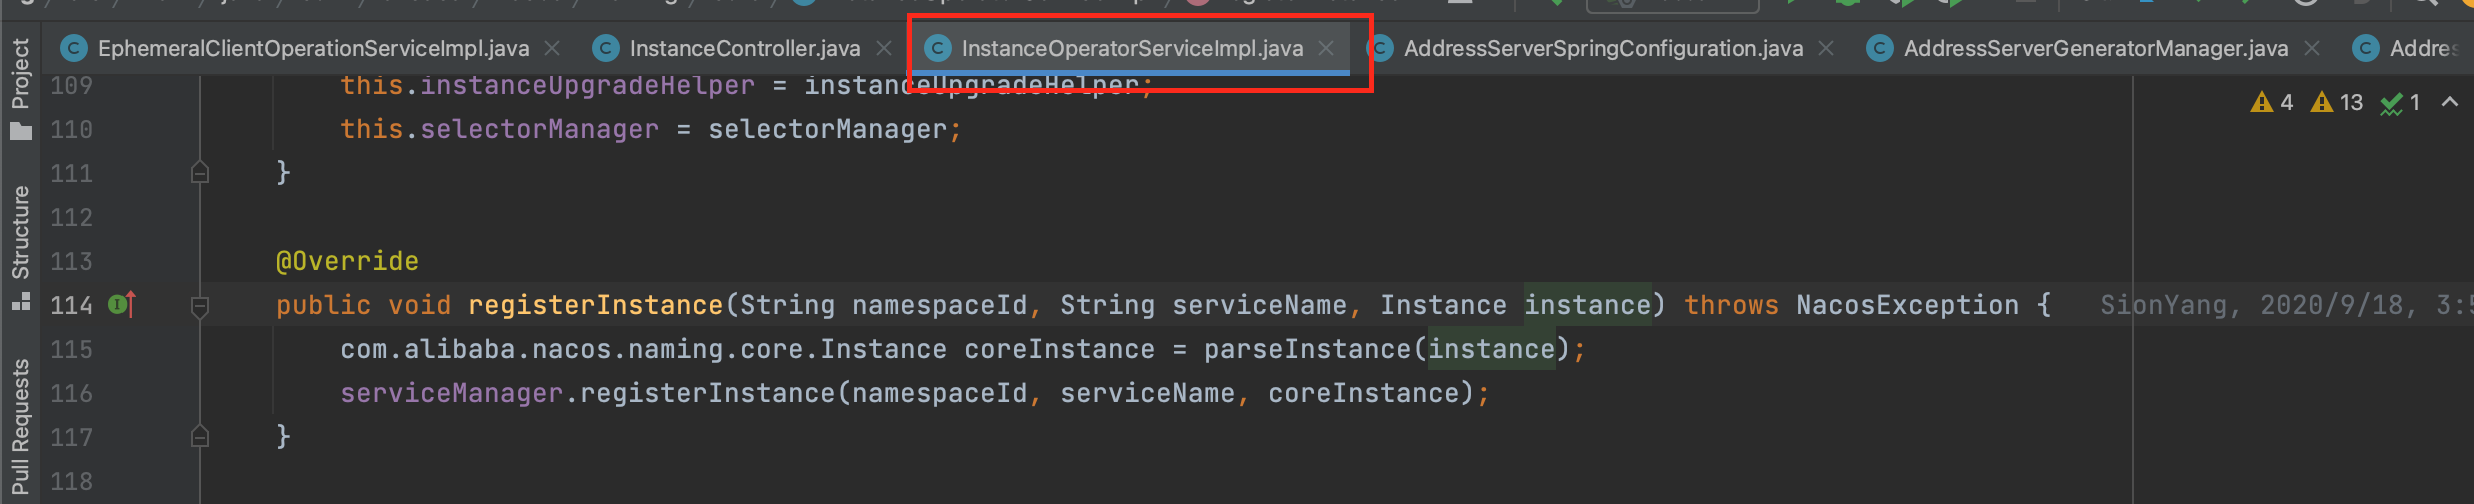
仅有两行代码,不要对第一行代码关注太多,等把核心逻辑理完后再关心细枝末节的实现。接下来,继续进入下一层,来到了ServiceManager类中。
前三行主要是参数检测,关键在最后一行的addInstance方法中。这里先埋一个伏笔,注意ServiceManager这个类,它很重要,它有一个成员变量叫serviceMap,看看这个成员变量的注释,是不是有点眼熟。
/**
 * Map(namespace, Map(group::serviceName, Service)).
 */
private final Map<String, Map<String, Service>> serviceMap = new ConcurrentHashMap<>();
/**
* Register an instance to a service in AP mode.
*
* <p>This method creates service or cluster silently if they don't exist.
*
* @param namespaceId id of namespace
* @param serviceName service name
* @param instance instance to register
* @throws Exception any error occurred in the process
*/
public void registerInstance(String namespaceId, String serviceName, Instance instance) throws NacosException {
createEmptyService(namespaceId, serviceName, instance.isEphemeral());
Service service = getService(namespaceId, serviceName);
checkServiceIsNull(service, namespaceId, serviceName);
addInstance(namespaceId, serviceName, instance.isEphemeral(), instance);
}看下addInstance的实现,如下,前面的几行代码目的是生成instances,然后传入consistencyService中,使用IDEA时可以看出consistencyService.put有很多的实现,到底是用的哪一个实现类呢?
/**
 * Add instance to service.
 *
 * @param namespaceId namespace
 * @param serviceName service name
 * @param ephemeral   whether instance is ephemeral
 * @param ips         instances
 * @throws NacosException nacos exception
 */
public void addInstance(String namespaceId, String serviceName, boolean ephemeral, Instance... ips)
        throws NacosException {

    String key = KeyBuilder.buildInstanceListKey(namespaceId, serviceName, ephemeral);

    Service service = getService(namespaceId, serviceName);

    synchronized (service) {
        List<Instance> instanceList = addIpAddresses(service, ephemeral, ips);

        Instances instances = new Instances();
        instances.setInstanceList(instanceList);

        consistencyService.put(key, instances);
    }
}
@Resource(name = "consistencyDelegate")
private ConsistencyService consistencyService;
@DependsOn("ProtocolManager")
@Service("consistencyDelegate")
public class DelegateConsistencyServiceImpl implements ConsistencyService {找到声明成员变量的位置,name为consistencyDelegate,可以看出很有可能是第一个了,进入DelegateConsistencyServiceImpl类中,果然,就是它了。
进入put方法,发现仅有一行代码:
@Override
public void put(String key, Record value) throws NacosException {
    mapConsistencyService(key).put(key, value);
}
private ConsistencyService mapConsistencyService(String key) {
return KeyBuilder.matchEphemeralKey(key) ? ephemeralConsistencyService : persistentConsistencyService;
}ephemeralConsistencyService 和 persistentConsistencyService代表着什么呢,ephemeral是临时的意思,persistent是持久化的意思,所以二者分别对应着Nacos的AP和CP两种模式。
我们先看下AP模式,也就是ephemeralConsistencyService的实现。
@Override
public void put(String key, Record value) throws NacosException {
    onPut(key, value);
    // If upgrade to 2.0.X, do not sync for v1.
    if (ApplicationUtils.getBean(UpgradeJudgement.class).isUseGrpcFeatures()) {
        return;
    }
    distroProtocol.sync(new DistroKey(key, KeyBuilder.INSTANCE_LIST_KEY_PREFIX), DataOperation.CHANGE,
            DistroConfig.getInstance().getSyncDelayMillis());
}到这里之后,onPut会触发一个change事件,然后在另一个线程中处理这个change事件,如下run是线程的执行方法。而【distroProtocol.sync】根据它的名字不难猜出,应该推送给客户端更新事件的。
@Override
public void run() {
    Loggers.DISTRO.info("distro notifier started");

    for (; ; ) {
        try {
            Pair<String, DataOperation> pair = tasks.take();
            handle(pair);
        } catch (Throwable e) {
            Loggers.DISTRO.error("[NACOS-DISTRO] Error while handling notifying task", e);
        }
    }
}

private void handle(Pair<String, DataOperation> pair) {
    try {
        String datumKey = pair.getValue0();
        DataOperation action = pair.getValue1();

        services.remove(datumKey);

        int count = 0;

        if (!listeners.containsKey(datumKey)) {
            return;
        }

        for (RecordListener listener : listeners.get(datumKey)) {

            count++;

            try {
                if (action == DataOperation.CHANGE) {
                    listener.onChange(datumKey, dataStore.get(datumKey).value);
                    continue;
                }

                if (action == DataOperation.DELETE) {
                    listener.onDelete(datumKey);
                    continue;
                }
            } catch (Throwable e) {
                Loggers.DISTRO.error("[NACOS-DISTRO] error while notifying listener of key: {}", datumKey, e);
            }
        }

        if (Loggers.DISTRO.isDebugEnabled()) {
            Loggers.DISTRO
                    .debug("[NACOS-DISTRO] datum change notified, key: {}, listener count: {}, action: {}",
                            datumKey, count, action.name());
        }
    } catch (Throwable e) {
        Loggers.DISTRO.error("[NACOS-DISTRO] Error while handling notifying task", e);
    }
}
到这里之后,很多人就有点迷惑了,这里是终点吗?下一步又要去哪里呢?显然,不是终点,关键在:listener.onChange(datumKey, dataStore.get(datumKey).value);
这一句到底做了什么,listener是啥,DistroConsistencyServiceImpl类中有个
public void listen(String key, RecordListener listener)的方法,谁调用了listen,谁实现了RecordListener接口,当我们一层层的往上查的时候,会发现正是ServiceManager类,还记得我上面所说的伏笔吗,往下层转了一圈又回到了这里。
public class ServiceManager implements RecordListener<Service>也就是说,调用了listener.onChange,也就是调用了ServiceManager类中的onChange方法,这样做,实现了异步处理,客户端请求的时候可以不被阻塞,快速返回。
@Override
public void onChange(String key, Service service) throws Exception {
    try {
        if (service == null) {
            Loggers.SRV_LOG.warn("received empty push from raft, key: {}", key);
            return;
        }

        if (StringUtils.isBlank(service.getNamespaceId())) {
            service.setNamespaceId(Constants.DEFAULT_NAMESPACE_ID);
        }

        Loggers.RAFT.info("[RAFT-NOTIFIER] datum is changed, key: {}, value: {}", key, service);

        Service oldDom = getService(service.getNamespaceId(), service.getName());

        if (oldDom != null) {
            oldDom.update(service);
            // re-listen to handle the situation when the underlying listener is removed:
            consistencyService
                    .listen(KeyBuilder.buildInstanceListKey(service.getNamespaceId(), service.getName(), true),
                            oldDom);
            consistencyService
                    .listen(KeyBuilder.buildInstanceListKey(service.getNamespaceId(), service.getName(), false),
                            oldDom);
        } else {
            putServiceAndInit(service);
        }
    } catch (Throwable e) {
        Loggers.SRV_LOG.error("[NACOS-SERVICE] error while processing service update", e);
    }
}
oldDom若为null则执行putServiceAndInit,该方法是放入service并初始化,关键的是oldDom.update(service)
CopyOnWrite机制解读
顺着oldDom.update继续往下追,过程类似比较复杂,我直接到终点看了,在Cluster类中的如下方法,就是最底层的服务注册更新的逻辑了,心跳探测的逻辑也差不多。
/**
 * Update instance list.
 *
 * @param ips       instance list
 * @param ephemeral whether these instances are ephemeral
 */
public void updateIps(List<Instance> ips, boolean ephemeral) {

    Set<Instance> toUpdateInstances = ephemeral ? ephemeralInstances : persistentInstances;

    HashMap<String, Instance> oldIpMap = new HashMap<>(toUpdateInstances.size());

    for (Instance ip : toUpdateInstances) {
        oldIpMap.put(ip.getDatumKey(), ip);
    }

    List<Instance> updatedIps = updatedIps(ips, oldIpMap.values());
    if (updatedIps.size() > 0) {
        for (Instance ip : updatedIps) {
            Instance oldIP = oldIpMap.get(ip.getDatumKey());

            // do not update the ip validation status of updated ips
            // because the checker has the most precise result
            // Only when ip is not marked, don't we update the health status of IP:
            if (!ip.isMarked()) {
                ip.setHealthy(oldIP.isHealthy());
            }

            if (ip.isHealthy() != oldIP.isHealthy()) {
                // ip validation status updated
                Loggers.EVT_LOG.info("{} {SYNC} IP-{} {}:{}@{}", getService().getName(),
                        (ip.isHealthy() ? "ENABLED" : "DISABLED"), ip.getIp(), ip.getPort(), getName());
            }

            if (ip.getWeight() != oldIP.getWeight()) {
                // ip validation status updated
                Loggers.EVT_LOG.info("{} {SYNC} {IP-UPDATED} {}->{}", getService().getName(), oldIP, ip);
            }
        }
    }

    List<Instance> newIPs = subtract(ips, oldIpMap.values());
    if (newIPs.size() > 0) {
        Loggers.EVT_LOG
                .info("{} {SYNC} {IP-NEW} cluster: {}, new ips size: {}, content: {}", getService().getName(),
                        getName(), newIPs.size(), newIPs);

        for (Instance ip : newIPs) {
            HealthCheckStatus.reset(ip);
        }
    }

    List<Instance> deadIPs = subtract(oldIpMap.values(), ips);

    if (deadIPs.size() > 0) {
        Loggers.EVT_LOG
                .info("{} {SYNC} {IP-DEAD} cluster: {}, dead ips size: {}, content: {}", getService().getName(),
                        getName(), deadIPs.size(), deadIPs);

        for (Instance ip : deadIPs) {
            HealthCheckStatus.remv(ip);
        }
    }

    toUpdateInstances = new HashSet<>(ips);

    if (ephemeral) {
        ephemeralInstances = toUpdateInstances;
    } else {
        persistentInstances = toUpdateInstances;
    }
}
上面的这段代码很长很复杂,大家可以仔细阅读,分析可知,先是拷贝的一份,然后在拷贝的列表上做处理,最后把处理的数据再复写过去。
那么为什么这么做呢?先考虑一个问题,多线程是否一定是高效的呢,显然,如果涉及资源的并非访问,多个线程会不断的在挂起和激活状态下切换,浪费大量的性能,所以多线程并不一定高效,在某些场景下,单线程反而能发挥更高性能。
思考一下服务发现的实际应用场景,服务注册的写入操作是否是非常高的并发量?读取的操作是否是很高的并发量?显然这是一个读多写少的场景。上述代码正式应用了CopyOnWrite的机制,在写的时候是操作一个新的实例,而此时如果有客户端读的话,则是读取的旧的实例,保证了资源的并发安全性。等写入逻辑完全执行完毕再更新引用,那么下次读的时候就是读取最新的实例了。
上面讲了AP模式,CP模式也差不多,只是多了Raft分布式共识算法部分。
这一次的Nacos服务端源码解读到这里就结束了。


 1988
1988


 被折叠的 条评论
为什么被折叠?
被折叠的 条评论
为什么被折叠?
 到【灌水乐园】发言


