


1、CSS3的calc()方法
简单场景:width: calc(100% - 20px);
支持加减乘除,但是 运算符号 两边都要留一个空格。
2、文本换行样式 white-space: nowrap;
| 值 | 描述 |
|---|---|
| normal | 默认。空白会被浏览器忽略。 |
| pre | 空白会被浏览器保留。其行为方式类似 HTML 中的 <pre> 标签。 |
| nowrap | 文本不会换行,文本会在在同一行上继续,直到遇到 <br> 标签为止。 |
| pre-wrap | 保留空白符序列,但是正常地进行换行。 |
| pre-line | 合并空白符序列,但是保留换行符。 |
| inherit | 规定应该从父元素继承 white-space 属性的值。 |
3、①超出几行显示省略号
word-break: break-all;
text-overflow: ellipsis;
display: -webkit-box;
-webkit-box-orient: vertical;
/* 这里是超出几行省略 */
-webkit-line-clamp: 2;
overflow: hidden;
②css超出1行显示省略号
white-space:nowrap;
overflow:hidden;
text-overflow:ellipsis;
4、文本不能粘贴复制
-webkit-user-select: none;
-moz-user-select: none;
-ms-user-select: none;
user-select: none;
5、对象key以变量的形式展示
let KEY_VAR = 'name';
let obj = {
    [KEY_VAR] : '张三',
    gender : '男',
}
console.log(obj) // {name:'张三',gender:'男'
console.log(obj[KEY_VAR]) // '张三'
6、vue返回上一页
this.$router.go(-1);6.1 随机数区间数
Math.floor(Math.random()*(max-min+1)+min)6.2 滚动条样式
/* 滚动条所在容器 */
.scroll-container {
    margin: 10px;
    width: 500px;
    height: 150px;
    overflow: overlay;
    background-color: #eee;
    white-space: nowrap;
}

/* 滚动条整体 */
.scroll-container::-webkit-scrollbar {
    height: 20px;
    width: 20;
}
/* 两个滚动条交接处 -- x轴和y轴 */
.scroll-container::-webkit-scrollbar-corner {
    background-color: transparent;
}

/* 滚动条滑块 */
.scroll-container::-webkit-scrollbar-thumb {
    border-radius: 10px;
    -webkit-box-shadow: inset 0 0 5px rgba(0, 0, 0, 0.2);
    background: #535353;
}

/* 滚动条轨道 */
.scroll-container::-webkit-scrollbar-track {
    -webkit-box-shadow: inset 0 0 5px rgba(0, 0, 0, 0.2);
    border-radius: 10px;
    background: #ededed;
}

/* 滚动条两端按钮 */
.scroll-container::-webkit-scrollbar-button {
}
7、防抖节流:
//  封装防抖方法
export function debounce(func,wait) {
    let timeout;
    return function () {
        if (timeout) clearTimeout(timeout);
        timeout = setTimeout(() => {
            func.call(this)
        }, wait);
    }
}

//节流
export function throttle(func, wait) {
    let flag = true
    let timer;
    return function() {
        if (flag) {
        clearTimeout(timer)
        timer = setTimeout(() => {
                flag = true
                func.call(this)
            }, wait)
        }
        flag = false
    }
}

使用:
import {throttle} from '../throttle'

methods:{
// 节流函数
  _submitForm: throttle(function (_type, index, item) {
     ...
 }, 1000)
}


// 使用2 _input 为事件名称,record, index为触发事件传过来的参数,具体通过具体需求来写
	_input = debounce/throttle(
		(record, index) => {
            ...
			let res = await $api() // 异步网络请求
            ...
		},
		500
	)
8、滚动条隐藏
.mainR {
  overflow-y: auto;
}

.mainR ::-webkit-scrollbar {
  display: none !important;
}
9、文本域隐藏右下角图标,禁止拉伸
// 原生文本域
<textarea rows="2" cols="" style='resize: none;'></textarea>
// element-ui插件文本域(css样式)
.el-textarea >>> .el-textarea__inner {
  resize: none;
}
10、input 修改placehokder 样式
<div class="set_placeholder">
  <el-input
     v-model="value"
     placeholder="请输入"
     style="width: 100%"
     autocomplete="off" //关掉下边的提示框
     name="userName111" //上边没用的话,随便加个name,关掉下边的提示框
  />
</div>


.set_placeholder >>> ::-webkit-input-placeholder {
  color: rgba(82, 255, 255, 0.85) !important;
}

.set_placeholder >>> ::-moz-placeholder {
  color: rgba(82, 255, 255, 0.85) !important;
}

.set_placeholder >>> ::-ms-input-placeholder {
  color: rgba(82, 255, 255, 0.85) !important;
}
11、el-input 设置光标颜色和聚焦时边框颜色
/deep/.el-input__inner {
  /* 设置光标颜色 */
  caret-color: red;
}
/deep/.el-input__inner:focus {
  /* el-input输入时设置边框颜色 */
  border: red 1px solid;
}
12、数组删除
arr.splice(index, 1);
delete_doc_req111111(id, index, arr) {
  arr.splice(index, 1);
  if (arr) {
     if (arr.length) {
        if (index === arr.length) { // 删除的是最后一个
            this.id= arr[index - 1].id;
        } else {
            this.id= arr[index].id;
        }
      }
  }
},
splice() :向/从数组中添加/删除项目,然后返回被删除的项目。
splice() :向/从数组中添加/删除项目,然后返回被删除的项目。
let arr9 = [1, 2, 3, 4, 5, 6, 7, 8, 9]; // 原数组
let arr9_1 = arr9.splice(2, 2, '🍌', '🍉') //返回被删除的项目
console.log(arr9); // 改变原数组
console.log(arr9_1) //返回被删除的项目

slice:从已有的数组中返回选定的元素,返回一个新的数组,包含从 start(包括) 到 end (不包括该元素)的 arrayObject 中的元素。
let Arr = [1,2,3,4,5,6,7,8,9];
let Arr_1 = Arr.slice(4,7);
console.log(Arr);   // [1,2,3,4,5,6,7,8,9]  // 不改变原数组
console.log(Arr_1); // [5,6,7] // 返回一个新的数组 start(包括) 到 end (不包括该元素)
splice与slice区别:
共同点:均是删除数组元素并返回结果。
区别:splice会改变原数组,而slice不会。并且splice会导致数组塌陷。
一般来说:
slice是做截取用的;
splice是做删除、插入用的。
13、数组去重
// 数组去重
(function() {
	// 利用indexOf新旧数组查找,没有返回-1
	var arr1 = [1, 2, 2, 2, 2, 2, 3, 4, 5, 3, 4, 7];
	var newArr1 = [];
	for (var i = 0; i < arr1.length; i++) {
		//没有返回-1
		if (newArr1.indexOf(arr1[i]) == -1) {
			newArr1.push(arr1[i])
		}
	}
	console.log(newArr1);

	// 用了ES6   Set结构不能接收重复数据的特点
	var arr2 = [1, 9, 8, 8, 7, 2, 5, 3, 3, 3, 2, 3, 1, 4, 5, 444, 55, 22];
	var newArr2 = [...new Set(arr2)]; //利用了Set结构不能接收重复数据的特点
	console.log(newArr2);

	// 利用filter返回新数组(省去定义新数组),利用indexOf数组只能查找到第一个的下标,进行等比
	var arr3 = ['apple', 'apps', 'pear', 'apple', 'orange', 'apps'];
	var newArr3 = arr3.filter(function(item, index) {
		// console.log(arr3.indexOf(item));
		return arr3.indexOf(item) === index; // 因为indexOf 只能查找到第一个
	});
	console.log(newArr3);

	// 利用indexOf数组只能查找到第一个的下标,进行等比
	var arr4 = [1, 9, 8, 8, 7, 2, 5, 3, 3, 3, 2, 3, 1, 4, 5, 444, 55, 22];
	var newArr4 = [];
	for (var i = 0; i < arr4.length; i++) {
		//没有返回-1
		if (arr4.indexOf(arr4[i]) == i) {
			newArr4.push(arr4[i])
		}
	}
	console.log(newArr4);
})();15、includes() 方法用来判断一个数组是否包含一个指定的值
arr.includes(ctx);
16、判断数组是否为空的方法
Array.isArray(arr);
// Array.isArray() 用于确定传递的值是否是一个 Array。
// 判断数组是否为空的方法
const arr7 = [1,2,3]
const arr8 = []
const isNotEmpty = arr => Array.isArray(arr) && arr.length > 0;
console.log(isNotEmpty(arr7))
console.log(isNotEmpty(arr8))
console.log(Array.isArray(arr8))
17、检测数组 arr 的所有元素是否都不为空 : arr.every()方法
// 判断是否arr数组里元素全为空
function ispositive(element, index, array) {
	return !element;
}

function func() {
	var arr = ['1', '0', '', '', '',''];
	if(arr.every(ispositive)){
		console.log(true);
	}else{
		console.log(false);
	}
}
func();18、forEach方法跳出循环 ———————— 通过 try catch 抛出异常的方式跳出循环
// forEach方法跳出循环 ———————— 通过 try catch 抛出异常的方式跳出循环
let arr = [1,2,3,4,5,6,7,8,9];
let num = 6
try {
	arr.forEach((item, i)=> {
		console.log('item',item)
		if (item === num) {
		    throw new Error('LoopInterrupt');    //满足条件,跳出循环
		}
	})
} catch (e) {
    if (e.message !== "LoopInterrupt") throw e
    // return;
}
console.log('123跳')
19、字符串切割 str1.split('_') //通过下划线切割
// 字符串切割
let str1 = "https://abdc.csdn.cn/E/5/6/3_weixin_3952316416";
console.log(str1.split('_')[1].split('.')[0]);
20、字符串查找某一个值 .search() 方法
let stringObject = 'mdvkd,aslls世界顶级你的不忙了'
let regexp = '不'
// stringObject.search(regexp)
// 如果没有找到任何匹配的子串,则返回 -1。
console.log(stringObject.search(regexp) > -1);
20、正则匹配
let str2 = "https://abdc.csdn.cn/E/5/6/3_weixin_3952316416";
if (str2.match(/_/ig))console.log(true)
else console.log(false);21、正则匹配变量
主要是这两行代码
let rule = new RegExp(要匹配的变量)
let 结果 = rule.test(string要匹配的字符串变量或者常亮都可以)
let rule = new RegExp(key.keyword)
 res.data.forEach((v,i)=>{
     if(rule.test(v.hospitalName)){
        console.log(111111111111111)
     }
})
22、正则匹配到替换成
// 匹配到替换成
var s = "index.html";
var b = s.replace("html", "aaa");
console.log(b);
23、字符串变数组
// 字符串变数组
let str_1 = '1,2,3,4,8,7,9'
console.log([...str_2]);
console.log(Array.from(str_1.split(',').join('')));
console.log(str_1.split(',').join(''))
let str_2 = '1123585456'
console.log([...str_2]);
console.log([str_2]);24、foreach中使用await报错,这时选用for of可以使用await
let arr5 = ['a', 'b', 'c']
for (let item of arr5) {
	console.log(item)
}

// for of 获取下标
for (let [index, item] of arr5.entries()) {
	console.log(index, item)
}
// 0 "a"
// 1 "b"
// 2 "c"
25、uniapp ios安全区域css
padding-bottom: constant(safe-area-inset-bottom);
padding-bottom: env(safe-area-inset-bottom);
26、滚动条样式设置:(在overflow-y: scroll;时起效)
// 滚动条宽度
.leftLis::-webkit-scrollbar {
  width: 6px;
}
// 滚动条轨道
.leftLis::-webkit-scrollbar-track {
  background: rgb(239, 239, 239);
  border-radius: 2px;
}
// 小滑块
.leftLis::-webkit-scrollbar-thumb {
  background: #40a0ff49;
  border-radius: 10px;
}
.leftLis::-webkit-scrollbar-thumb:hover {
  background: #40a0ff;
}
27、uniapp中 scroll-view标签隐藏滚动条
.intelligent_chat ::-webkit-scrollbar {
		width: 0;
		height: 0;
		color: transparent;
		display: none;
}
28、rpx 转 px
uniapp 内置了 rpx 转 px 的方法,源码见下方:
// 100 为 100rpx的值
var px = uni.upx2px(100);
px 转 rpx
由于 uniapp 已经有 upx2px 的方法,可以简单的得出反向取值的公式,源码见下方:
// 200 为 px 的值,后面的两个 100 为计算比例使用
var rpx = 200/(uni.upx2px(100)/100);

// 验证上面rpx的值
var px = uni.upx2px(rpx);    // px的值 = 200
29、uniapp 底部安全距离 以及 转化rpx
uni.getSystemInfo({
	success: res => {
		this.anquanjuli = res.screenHeight - res.safeArea.bottom
		console.log(res.screenHeight - res.safeArea.bottom,'安全距离')
	},
	fail(err) {}
})
let systemInfo = uni.getSystemInfoSync()
this.pxToRpxScale = 750 / systemInfo.windowWidth;

例子:
// *this.pxToRpxScale 得出的是rpx
this.box_height = (res.windowHeight - this.inputHeight - this.anquanjuli)*this.pxToRpxScale;
30、vue 保存原有事件的默认值,且传参
@change="(e) => change_r(e, index)"
@change="(e) => change_r(e, index)"31、css禁止点击事件
color: #C8CACC;
cursor: not-allowed;
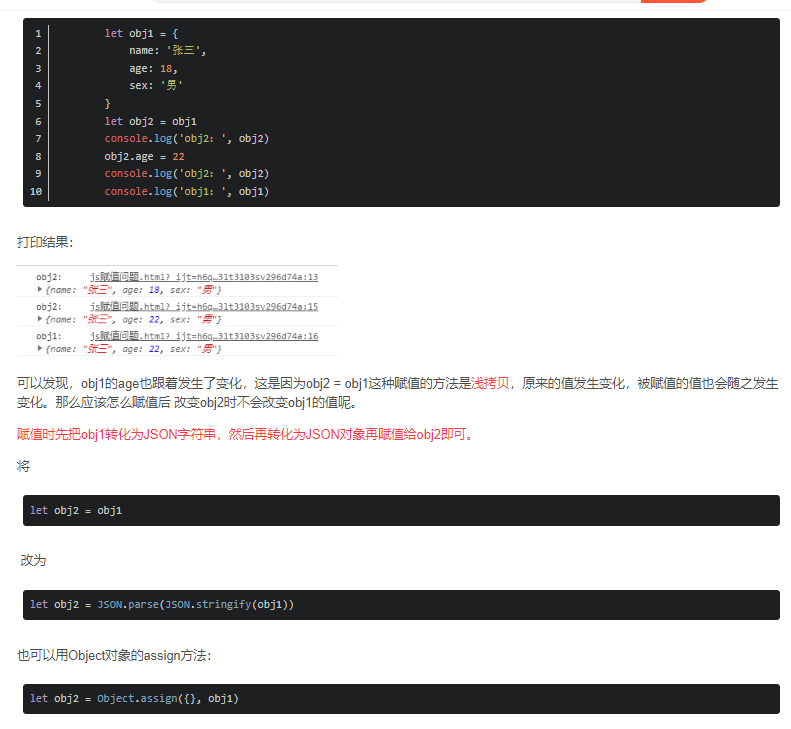
pointer-events: none;32、 js赋值后 改变现有数据会修改原来的数据的解决办法:(下图是问题再现,以及解决)其实就是运用深拷贝
第一种:let obj2 = JSON.parse(JSON.stringify(obj1))
第二种:let obj2 = Object.assign({}, obj1)
33、uniapp 顶部 通顶是设置状态栏(两种方式:一种设置class,用CSS,第二种动态设置高度)
css部分代码
height: var(--status-bar-height);
width: 100%;

也可以动态设置
this.iStatusBarHeight = uni.getSystemInfoSync().statusBarHeight;

<view :style="{ height: iStatusBarHeight + 'px' ,backgroundColor:'#fff'}" class="stat">
34、vue 左侧导航栏,点击选中 小图标用ui图案上的图片
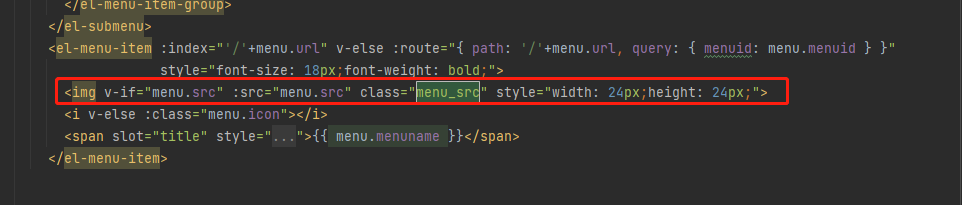
css部分:
.el-menu-item.is-active {
  color: #fff !important;
  background: #407FFF !important;
}
.menu_src {
  margin-right: 5px;
}
.is-active .menu_src {
  filter: drop-shadow(1000px 0 0 #fff);
  transform: translate(-1000px);
}
35、页面传值(传对象)
页面传值(传对象)
let data = encodeURIComponent(JSON.stringify(this.data))接受页面
let res= JSON.parse(decodeURIComponent(options.data));36、uniapp使用web-view传url
web-view跳转事件:
let url = encodeURIComponent(‘网址’);// eg:(`https://hhh.hdnskksksmsmsm.com/#/路由`)
uni.navigateTo({
	url: '../../toolbox/toolbox/heightChildren?url='+url
})
38、web-view跳转页面:
<template>
	<view>
		<web-view :src="urls" ></web-view>
	</view>

</template>

<script>
	export default {
		data() {
			return {
				urls:''
			}
		},
		onLoad(e) {
			let url = decodeURIComponent(e.url);
			this.urls = url;
		},
		methods: {
		}
	}
</script>

<style>

</style>
39、css宽度固定 文字两端对齐效果:
从这样 ![]() 变成这样
变成这样 ![]()
div {
width: 110rpx;
text-align: justify;
text-align-last: justify;
text-justify: distribute-all-lines; /*兼容ie*/
}
40.父级元素设置min-height,子元素设置 height 100% 不生效的问题
①方法一:父元素设置position: relative, 子元素设置 position:absolute
②方法二:给父元素加一层 box, 给 box 添加 flex 布局
③方法三:父元素添加 display: grid;
41.用css的background属性设置多段背景色
background: linear-gradient(90deg, #9acd32 0, #9acd32 50%, #F08080 0, #F08080 60%, #0ff 0, #0ff);

50% 第一个颜色占比,终止
10% 第二个颜色占比,终止在60%
40% 第三个颜色占比,终止在100%
颜色后面的是终止位置
43. css实现盒子四个拐角样式
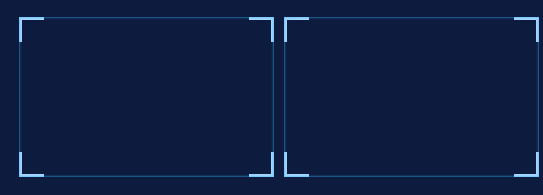
width: 255px;
height: 160px;

border: 0px solid #a7d5ff;
box-shadow: 0px 0px 2px 1px rgba(55, 184, 253, 0.5) inset;
background: linear-gradient(to left, #a7d5ff, #a7d5ff) left top no-repeat,
linear-gradient(to bottom, #a7d5ff, #a7d5ff) left top no-repeat,
linear-gradient(to left, #a7d5ff, #a7d5ff) right top no-repeat,
linear-gradient(to bottom, #a7d5ff, #a7d5ff) right top no-repeat,
linear-gradient(to left, #a7d5ff, #a7d5ff) right bottom no-repeat,
linear-gradient(to left, #a7d5ff, #a7d5ff) right bottom no-repeat,
linear-gradient(to left, #a7d5ff, #a7d5ff) left bottom no-repeat,
linear-gradient(to bottom, #a7d5ff, #a7d5ff) left bottom no-repeat;
background-size: 3px 25px, 25px 3px, 3px 25px, 25px 3px;
43. css字体渐变色
background-image:-webkit-linear-gradient(top, #bc2f08,#d75d10,#de6912);
-webkit-background-clip:text;
-webkit-text-fill-color:transparent;
44. el-tab出现边框的问题
//出现边框的问题
.el-tabs__item:focus.is-active.is-focus:not(:active){
  box-shadow: none;
}
位置写在 与 .el-tabs__item平级
45. JS数组对象——中文按照首字母排序(sort 、localeCompare)
根据中文首字母排序:
let arr = [
         {id:'sh',name:'上海'},
         {id:'bj',name:'北京'},
         {id:'gz',name:'广东'},
         {id:'sz',name:'深圳'}
      ]
arr.sort((a, b) => a['name'].localeCompare(b['name']))
console.log(arr) // 北京 广东 上海 深圳
46. vue动态设置伪元素:before的背景颜色
主要是这两行代码:
template部分
:style="{'--bgColor': item.color}"

style部分
:before {
    background-color: var(--bgColor);
}
template部分
:style="{'--bgColor': item.color}"
style部分
:before {
background-color: var(--bgColor);
}例子:
<div v-for="item in ['#00a8ff','#64fff0','#c2e0ff','#ed593b']" :key="item">
        <div
          class="box"
          :style="{'--bgColor': item}"
        >
          动态设置伪元素样式
        </div>
</div>


.box{
  color: #FFFFFF;
  display: flex;
  align-items: center;
}
.box:before {
  content: '';
  display: inline-block;
  width: 14px;
  height: 14px;
  border-radius: 50%;
  margin-right: 8px;
  background-color: var(--bgColor);
}


 被折叠的 条评论
为什么被折叠?
被折叠的 条评论
为什么被折叠?
 到【灌水乐园】发言


