


目录
目录
4、实现 Runnable, 重写 run, 使用匿名内部类
前言
上一篇文章我们讲了Java关于进程和线程的区别和联系,接下来给大家分享一些线程是如何创建的以及线程的一些基本用法!
一、线程创建的方式
1、继承Thread类
class MyThread extends Thread {
    @Override
    public void run() {
        while (true) {
            System.out.println("hello t");
            try {
                Thread.sleep(1000);
            } catch (InterruptedException e) {
                e.printStackTrace();
            }
        }
    }
}

public class ThreadDemo1 {
    public static void main(String[] args) {
        Thread t = new MyThread();
        t.start();
        while (true) {
            System.out.println("hello main");
            try {
                Thread.sleep(1000);
            } catch (InterruptedException e) {
                e.printStackTrace();
            }
        }
    }
}
2、实现Runnable接口
class MyRunnable implements Runnable {
    @Override
    public void run() {
        while (true) {
            System.out.println("hello t");
            try {
                Thread.sleep(1000);
            } catch (InterruptedException e) {
                e.printStackTrace();
            }
        }
    }
}

public class ThreadDemo2 {
    public static void main(String[] args) {
        MyRunnable myRunnable = new MyRunnable();
        Thread t = new Thread(myRunnable);
        t.start();
        while (true) {
            System.out.println("hello main");
            try {
                Thread.sleep(1000);
            } catch (InterruptedException e) {
                e.printStackTrace();
            }
        }
    }
}
3、继承Thread,重写run,使用匿名内部类
public class ThreadDemo3 {
    public static void main(String[] args) {
        Thread t = new Thread() {
            @Override
            public void run() {
                while (true) {
                    System.out.println("hello t");
                    try {
                        Thread.sleep(1000);
                    } catch (InterruptedException e) {
                        e.printStackTrace();
                    }
                }
            }
        };
        t.start();
        while (true) {
            System.out.println("hello main");
            try {
                Thread.sleep(1000);
            } catch (InterruptedException e) {
                e.printStackTrace();
            }
        }
    }
}
4、实现 Runnable, 重写 run, 使用匿名内部类
public class ThreadDemo4 {
    public static void main(String[] args) {
        Thread t = new Thread(new Runnable() {
            @Override
            public void run() {
                while (true) {
                    System.out.println("hello t");
                    try {
                        Thread.sleep(1000);
                    } catch (InterruptedException e) {
                        e.printStackTrace();
                    }
                }
            }
        });
        t.start();
        while (true) {
            System.out.println("hello main");
            try {
                Thread.sleep(1000);
            } catch (InterruptedException e) {
                e.printStackTrace();
            }
        }
    }
}
5、使用lambda表达式
public class ThreadDemo5 {
    public static void main(String[] args) {
        Thread t = new Thread(() -> {
            while (true) {
                System.out.println("hello t");
                try {
                    Thread.sleep(1000);
                } catch (InterruptedException e) {
                    e.printStackTrace();
                }
            }
        });
        t.start();
        while (true) {
            System.out.println("hello main");
            try {
                Thread.sleep(1000);
            } catch (InterruptedException e) {
                e.printStackTrace();
            }
        }
    }
}
6、使用Callable接口
import java.util.concurrent.Callable;
import java.util.concurrent.ExecutionException;
import java.util.concurrent.FutureTask;

public class ThreadDemo19 {
    public static void main(String[] args) throws ExecutionException, InterruptedException {
        //创建一个任务
        Callable<Integer> callable = new Callable<Integer>() {
            @Override
            public Integer call() throws Exception {
                int sum = 0;
                for (int i = 0; i <= 1000; i++) {
                    sum += i;
                }
                return sum;
            }
        };
        //找一个线程完成这个任务
        //Thread不能直接传入callable,需要再包装一层
        FutureTask<Integer> futureTask = new FutureTask<>(callable);
        Thread thread = new Thread(futureTask);
        thread.start();
        //此处get方法就是获取任务call方法返回值的结果
        //call方法是在thread线程调用的,get()是在主线程调用的,如何能保证调用get的时候,
        //thread线程的call方法是执行完毕了呢?
        //因为此处的get和jion类似,主线程调用get,会阻塞等待thread线程执行完毕
        System.out.println(futureTask.get());
    }
}
FutureTask是一个类,它实现了RunnableFuture接口。FutureTask可以用于包装一个实现了Callable接口的对象,这样我们就可以将一个Callable任务以Runnable的形式运行。
FutureTask本质上是一个任务包装器,它可以将一个实现了Callable接口的对象(任务)包装成一个实现了Runnable接口的对象。这样,我们就可以将一个任务(FutureTask)交给一个线程去执行。
当线程启动并运行FutureTask时,它实际上是在执行callable对象中定义的任务。另外,FutureTask实现了RunnableFuture接口,而此接口继承了Future接口,这意味着我们可以使用FutureTask对象来获取任务的结果,以及查询任务的执行状态(如任务是否已完成、是否已取消等)
理解Callable
Callable和Runnable相对,都是描述一个任务,Callable描述的是带有返回值的任务,Runnable描述的是不带有返回值的任务。
Callable通常需要搭配FutureTask来使用,FutureTask用来保存Callable的返回结果,因为Callable往往是在另一个线程中执行的,啥时候执行完并不确定,FutureTask就可以负责这个等待结果出来的工作。
二、线程的常见方法
1、start():启动当前线程,表面上调用start方法,实际是在调用线程里的run方法
2、run():线程类继承Thread类或者实现Runnable接口的时候,都要重新实现run方法,run方法是线程要执行的内容
3、currentThread:Thread类中的一个静态方法,获取当前执行的线程
4、setName设置线程的名字
5、getName读取线程的名字
6、join():当一个线程调用了join方法,这个线程就会被先执行,它执行结束后才会执行余下的线程
三、Thread类的常见属性的获取方法
1、getId():获取线程的ID
2、getName():获取线程的名字
3、getState():获取线程的状态
4、getPriority():获取线程的优先级
5、isDaemon():是否为后台线程(true/false)
注意:代码中手动创建的线程包括main方法都是前台线程,前台线程会阻止进程结束,前台线程工作未完成,进程是结束不了的;后台进程不会阻止进程结束,后台进程工作未完后,进程还是可以结束的
6、isAlive():判断线程是否存活(true/false)
注意:如果线程的run方法还没跑或者跑完了,isAlive就是false
如果线程的run方法正在运行,isAlive就是true
7、isInterrupted():判断线程是否被中断(true/false)
public class ThreadDemo6 {
    public static void main(String[] args) throws InterruptedException {
        Thread thread = new Thread(() -> {
            while (true) {
                System.out.println("hello");
                try {
                    Thread.sleep(1000);
                } catch (InterruptedException e) {
                    e.printStackTrace();
                }
            }
        },"线程");
        thread.setDaemon(true);
        thread.start();
        System.out.println("获取线程的Id:" + thread.getId());
        System.out.println("获取线程的名字:" + thread.getName());
        System.out.println("线程的状态:" + thread.getState());
        System.out.println("线程的优先级:" + thread.getPriority());
        System.out.println("是否是后台线程:" + thread.isDaemon());
        //thread.interrupt();
        System.out.println("线程是否被打断:" + thread.isInterrupted());
        System.out.println("线程是否存活:" + thread.isAlive());
    }
}
四、Thread类的构造方法
Thread() 创建线程对象
Thread(Runnable target) 使用Runnable对象创建线程对象
Thread(String name) 创建线程对象,并命名Thread(Runnable target, String name) 使用 Runnable 对象创建线程对象,并
五、线程方法的使用
5.1 中断一个线程
就是让一个线程停下来! 例如:我们给对方进行转账时,突然被告知对放是骗子,我们就需要赶紧停止转账!
目前常见的有以下两种方式:
1、通过共享的标记来进行沟通
2、通过interrupt()方法来通知
1、通过共享的标记来进行沟通
public class ThreadDemo8 {
    public static boolean isQuit = false;
    public static void main(String[] args) {
        //lambda表达式变量捕获规则:isQuit不能设置成局部变量,Java要求变量捕获的变量必须是final或者变量不能被修改
        Thread t1 = new Thread(()-> {
            while (!isQuit) {
                System.out.println("hello t");
                try {
                    Thread.sleep(1000);
                } catch (InterruptedException e) {
                    e.printStackTrace();
                }
            }
            System.out.println("t 线程终止");
        });
        t1.start();

        try {
            Thread.sleep(3000);
        } catch (InterruptedException e) {
            e.printStackTrace();
        }
        isQuit = true;
    }
}
2、通过interrupt()方法来通知
public class ThreadDemo8 {
    public static void main(String[] args) {
        Thread thread = new Thread(() -> {
            //currentThread是获取当前线程实例,此处得到的对象就是thread,
            //isInterrupted就是thread对象自带的一个标志位
            while (!Thread.currentThread().isInterrupted()) {
                System.out.println("hello thread");
                try {
                    Thread.sleep(1000);
                } catch (InterruptedException e) {
                    e.printStackTrace();
                }
            }
        });
        thread.start();
        try {
            Thread.sleep(3000);
        } catch (InterruptedException e) {
            e.printStackTrace();
        }
        //把thread内部的标志位设置成true
        thread.interrupt();
    }
}
代码运行截图: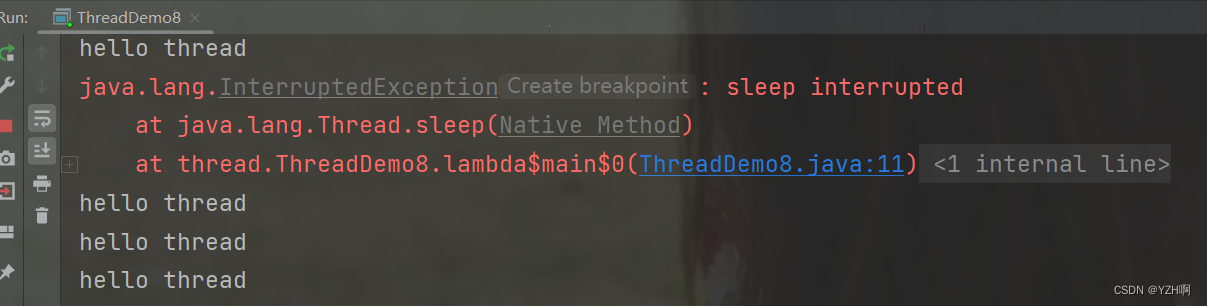
为什么代码执行hello thread,然后会抛出一个异常再继续执行呢?
interrupt()方法的作用:
1、设置标志位为true
2、如果该线程正在阻塞中(比如在执行sleep),此时就会把阻塞状态唤醒,通过抛异常的方式让sleep立即结束
为什么代码会继续执行呢?
因为此时sleep会进行清除标志位的操作,也就是将修改为true的标志位修改回false,这就导致下次循环,循环仍然可以继续执行了
5.2 等待一个线程
线程之间并发执行,操作系统对线程的调度由于是随机的,无法确定哪个线程先执行结束,所以我们就可以选择让一个线程等待另一个线程先执行完,等另一个线程先执行完再执行
例如:张三只有等李四转账成功,才决定是否存钱,这时我们需要一个方法明确等待线程的结束
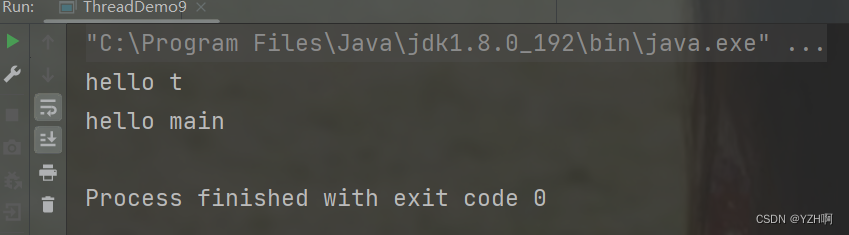
public class ThreadDemo9 {
    public static void main(String[] args) throws InterruptedException {
        Thread t = new Thread(() -> {
            System.out.println("hello t");
        });
        t.start();
        t.join();
        System.out.println("hello main");
    }
}
在代码中,如果没有t.join()方法,由于操作系统对线程间的调度是无序的,我们就无法确定是谁先执行,此处加了t.join()方法,main线程中调用了t.join,意思就是让main线程等待t线程先结束,再往下执行,其它线程不受影响。
5.3 获取当前线程引用
Thread.currentThread()方法:它是一个类方法,作用是获取当前线程的实例
public class ThreadDemo10 {
    public static void main(String[] args) {
        Thread thread = new Thread(() -> {
            System.out.println(Thread.currentThread().getName());
        },"thread线程");
        thread.start();
    }
}
5.4 休眠当前线程
sleep()方法
public class ThreadDemo11 {
    public static void main(String[] args) {
        Thread thread = new Thread(() -> {
            while (true) {
                System.out.println("hello thread");
                try {
                    Thread.sleep(1000);
                } catch (InterruptedException e) {
                    e.printStackTrace();
                }
            }
        });
        thread.start();
    }
}


 2万+
2万+


 被折叠的 条评论
为什么被折叠?
被折叠的 条评论
为什么被折叠?
 到【灌水乐园】发言


