


在Android中的列表视图(我们这里以RecyclerView为例)中有很多数据的时候,往往要采取限制数据条目显示,然后通过刷新再添加新的数据显示,这样看的就会比较美观,那么这种列表视图是怎么实现刷新的呢,我们一起来看看吧。
我们先看看美团的刷新

美团下拉/上拉都是支持刷新的,我们现在来实现一下吧,go
1.第一步
我们先创建一个空的Android项目
创建Android项目,Android Studio会有很多模板,我们现在不整那么多花里胡哨的,选择Empty Activity(空的模板),点击next下(下一步)

Name:这个就不用说了吧,这个是项目的名称
Package name:这个也是有一套标准的,没有域名的话直接用默认的
Save location:这个是项目存储的文件目录,自己定存放目录
Language:开发的语言,选择java,也可以用Kotlin,我用的是java
Minimum SDK:看下面的99.5%,这个没有要求,建议选普及率高的版本,我用的都是5.0
点击finsh就能构建出一个新项目了

2.第二步,引入第三方框架
 https://github.com/scwang90/SmartRefreshLayout
1.找到这个文件,点开,复制一下代码加入对应的地方,Android studio就可以自动下载包了
     implementation 'androidx.appcompat:appcompat:1.0.0'                 //必须 1.0.0 以上

    implementation  'io.github.scwang90:refresh-layout-kernel:2.0.6'      //核心必须依赖
    implementation  'io.github.scwang90:refresh-header-classics:2.0.6'    //经典刷新头
    implementation  'io.github.scwang90:refresh-header-radar:2.0.6'       //雷达刷新头
    implementation  'io.github.scwang90:refresh-header-falsify:2.0.6'     //虚拟刷新头
    implementation  'io.github.scwang90:refresh-header-material:2.0.6'    //谷歌刷新头
    implementation  'io.github.scwang90:refresh-header-two-level:2.0.6'   //二级刷新头
    implementation  'io.github.scwang90:refresh-footer-ball:2.0.6'        //球脉冲加载
implementation 'io.github.scwang90:refresh-footer-classics:2.0.6' //经典加载 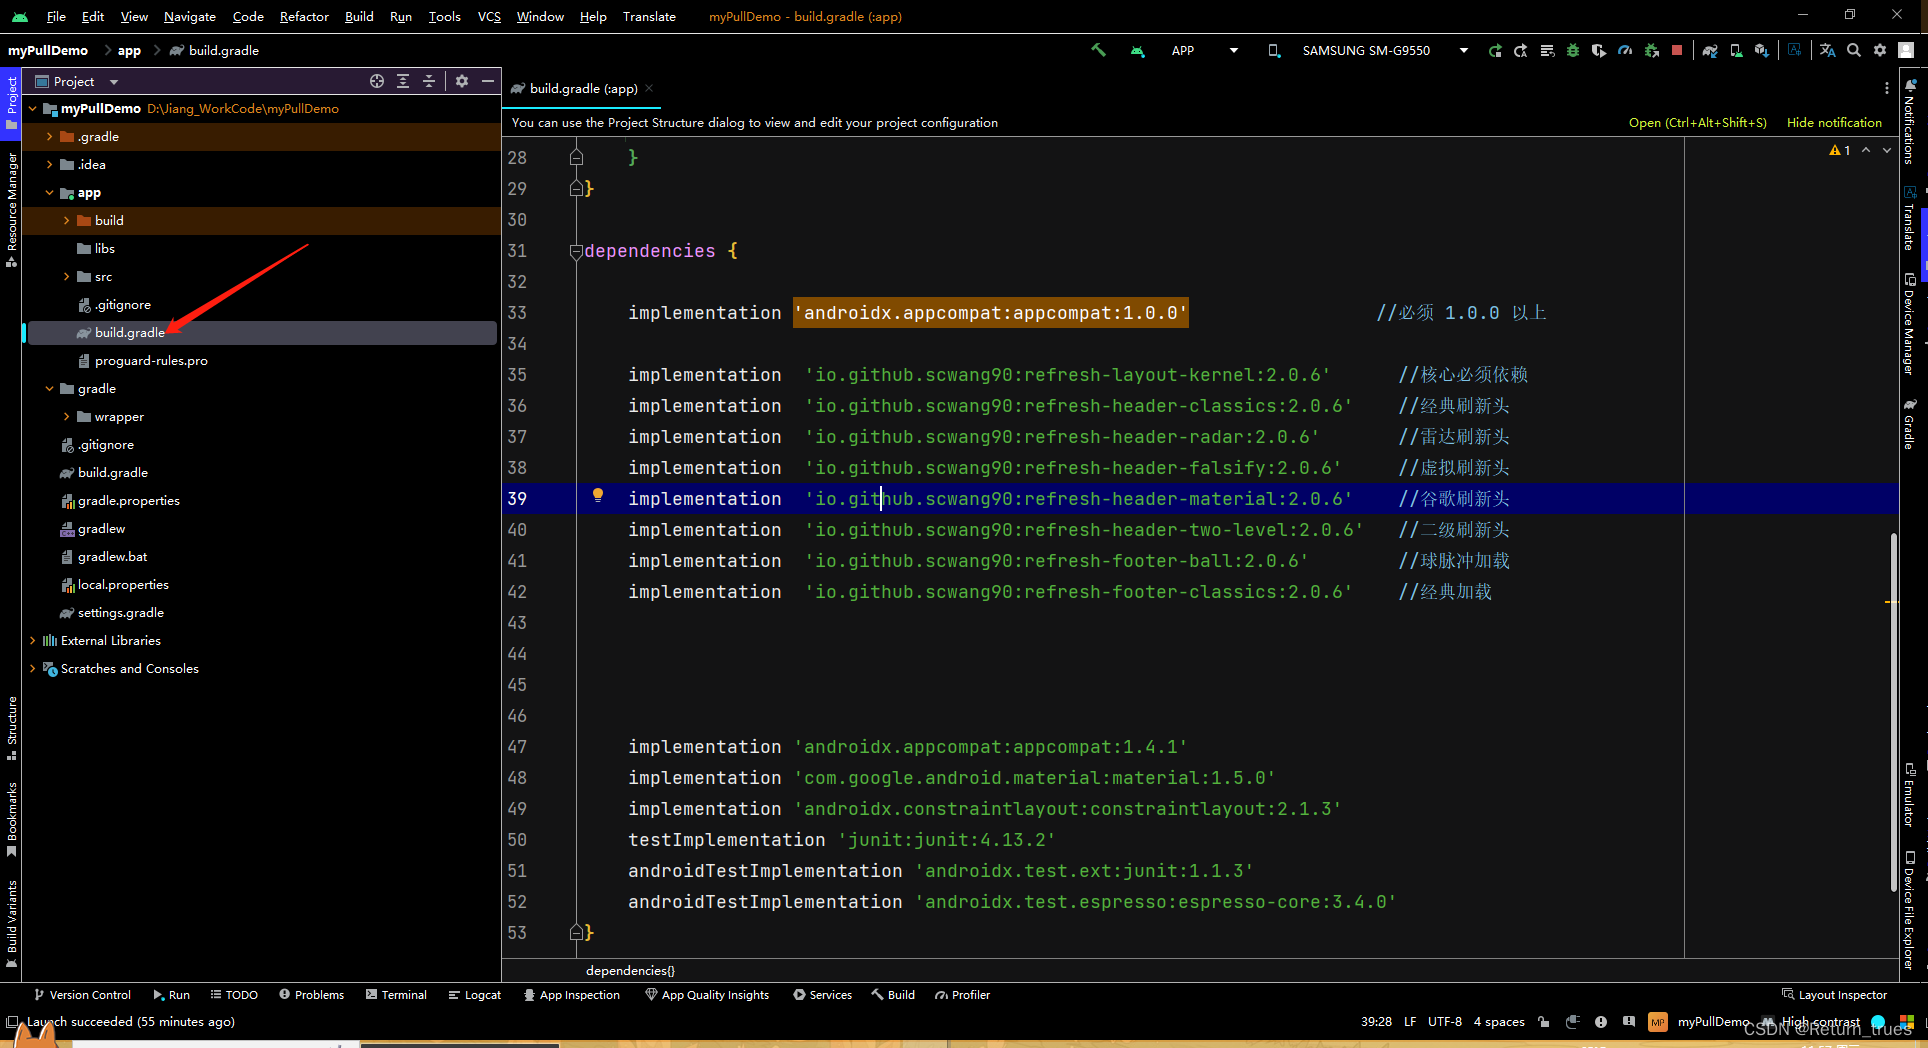
2.添加混淆文件里面的代码
android.useAndroidX=true
android.enableJetifier=true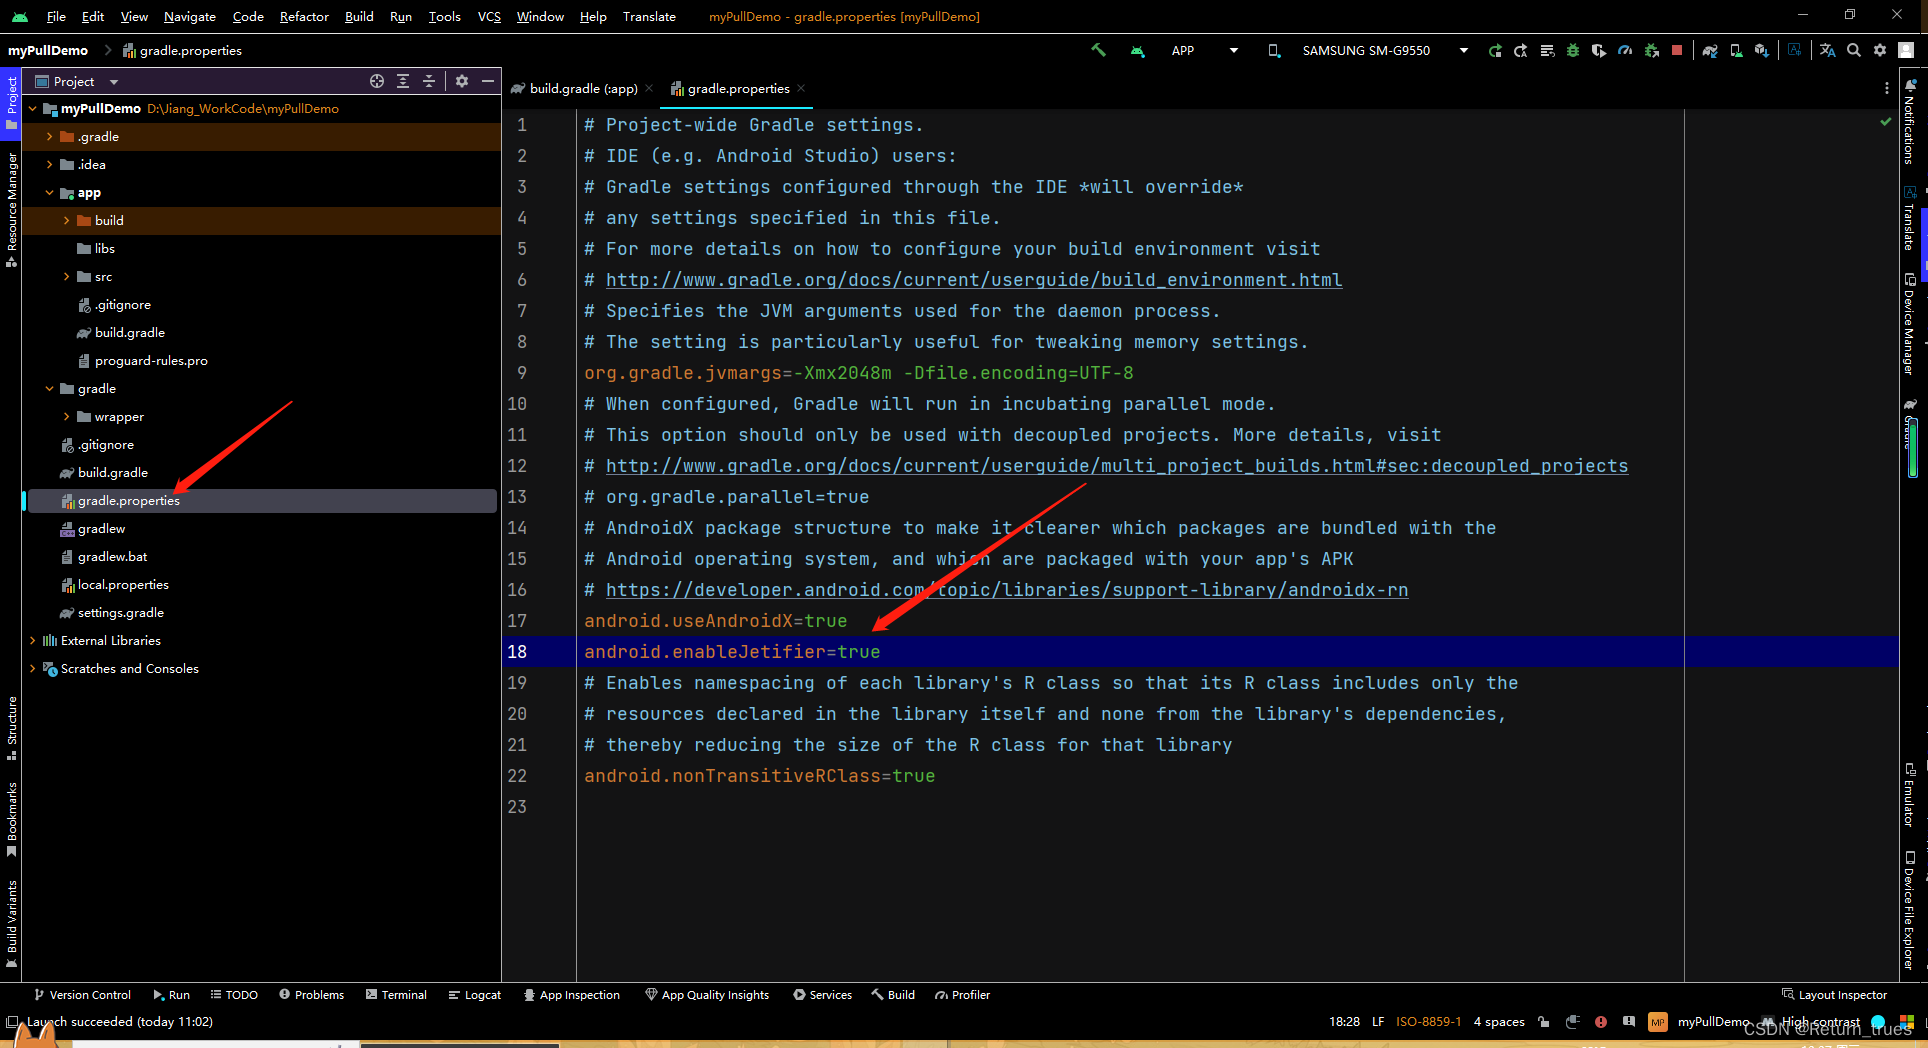
3. 第三步,找到MainActivity的布局文件
写布局代码
<?xml version="1.0" encoding="utf-8"?>
<androidx.constraintlayout.widget.ConstraintLayout xmlns:android="http://schemas.android.com/apk/res/android"
    xmlns:app="http://schemas.android.com/apk/res-auto"
    xmlns:tools="http://schemas.android.com/tools"
    android:layout_width="match_parent"
    android:layout_height="match_parent"
    tools:context=".MainActivity">

    <com.scwang.smart.refresh.layout.SmartRefreshLayout
        android:layout_width="match_parent"
        android:layout_height="match_parent"
        android:id="@+id/smart_refresh_layout">


        <androidx.recyclerview.widget.RecyclerView
            android:layout_width="match_parent"
            android:layout_height="match_parent"
            android:id="@+id/recycler_view">


        </androidx.recyclerview.widget.RecyclerView>

    </com.scwang.smart.refresh.layout.SmartRefreshLayout>

</androidx.constraintlayout.widget.ConstraintLayout>
先创建一个数据Bean类,DataBean.class
public class DataBean {

    private int image;
    private String title;

    public int getImage() {
        return image;
    }

    public void setImage(int image) {
        this.image = image;
    }

    public String getTitle() {
        return title;
    }

    public void setTitle(String title) {
        this.title = title;
    }
}
创建一个图片类,DataIcon.class
public class DataIcon {

    public static int[] icon = {
            R.mipmap.buqunguishu,
            R.mipmap.caidan,
            R.mipmap.daitihuo,
            R.mipmap.dingdanliebiao,
            R.mipmap.fanlitixian,
            R.mipmap.fenxianghaibao,
            R.mipmap.fuwu,
            R.mipmap.hexiaoyuanguanli,
            R.mipmap.huoli,
            R.mipmap.jifen,
            R.mipmap.maijiagouwuche,
            R.mipmap.neiyi
    };

}
在创建适配器所需的item布局文件,item_layout.xml
<?xml version="1.0" encoding="utf-8"?>
<androidx.constraintlayout.widget.ConstraintLayout xmlns:android="http://schemas.android.com/apk/res/android"
    android:layout_width="match_parent"
    android:layout_height="wrap_content"
    xmlns:app="http://schemas.android.com/apk/res-auto"
    android:layout_margin="5dp">

    <ImageView
        android:layout_width="wrap_content"
        android:layout_height="wrap_content"
        android:id="@+id/item_image"
        android:src="@mipmap/ic_launcher"
        android:scaleType="fitXY"
        app:layout_constraintTop_toTopOf="parent"
        app:layout_constraintLeft_toLeftOf="parent"/>

    <TextView
        android:layout_width="wrap_content"
        android:layout_height="wrap_content"
        android:id="@+id/item_text"
        android:text="这个是标题"
        app:layout_constraintLeft_toRightOf="@id/item_image"
        app:layout_constraintTop_toTopOf="parent"
        app:layout_constraintBottom_toBottomOf="parent"
        android:layout_marginLeft="20dp"/>


</androidx.constraintlayout.widget.ConstraintLayout>
然后创建适配器类,RecyclerViewAdapter.class
public class RecyclerViewAdapter extends RecyclerView.Adapter<RecyclerViewAdapter.RecyclerViewHolder> {

    private List<DataBean> data;

    //有参构造器,给外部传数据进来适配器
    public RecyclerViewAdapter(List<DataBean> data) {
        this.data = data;
    }

    //创建视图
    @Override
    public RecyclerViewAdapter.RecyclerViewHolder onCreateViewHolder(ViewGroup parent, int viewType) {
        View v = LayoutInflater.from(parent.getContext()).inflate(R.layout.item_layout, parent, false);
        return new RecyclerViewHolder(v);
    }

    //赋值操作
    @Override
    public void onBindViewHolder(RecyclerViewAdapter.RecyclerViewHolder holder, int position) {

        //给控件赋值
        holder.imageView.setImageResource(data.get(position).getImage());
        holder.textView.setText(data.get(position).getTitle());

    }

    //条目的数量
    @Override
    public int getItemCount() {
        return data.size();
    }

    //声明控件,绑定控件
    public class RecyclerViewHolder extends RecyclerView.ViewHolder {

        ImageView imageView;
        TextView textView;

        public RecyclerViewHolder(View v) {
            super(v);
            imageView = v.findViewById(R.id.item_image);
            textView = v.findViewById(R.id.item_text);
        }
    }
}
最后写上MainActivity.class的代码
public class MainActivity extends AppCompatActivity {

    private SmartRefreshLayout smartRefreshLayout;
    private RecyclerView recyclerView;

    private List<DataBean> data;
    private RecyclerViewAdapter adapter;

    @Override
    protected void onCreate(Bundle savedInstanceState) {
        super.onCreate(savedInstanceState);
        setContentView(R.layout.activity_main);

        data = new ArrayList<>();

        //初始化数据,真是开发是后台返回的数据,我们这里用假数据,自己创建
        setData();

        //初始化视图
        initView();

        //设置RecyclerView的适配器
        setAdapter(true, false);

        //设置刷新逻辑
        setRefresh();

    }

    /*
    * 设置刷新的方法
    * */
    private void setRefresh() {

        //设置头部刷新的样式
        smartRefreshLayout.setRefreshHeader(new BezierRadarHeader(this));
        //设置页脚刷新的样式
        smartRefreshLayout.setRefreshFooter(new BallPulseFooter(this));
        //设置头部刷新时间监听
        smartRefreshLayout.setOnRefreshListener(new OnRefreshListener() {
            @Override
            public void onRefresh(@NonNull RefreshLayout refreshLayout) {

                smartRefreshLayout.finishRefresh(2000/*,false*/);//传入false表示刷新失败
                //添加一条新数据,再最开头的位置
                addData();
                Toast.makeText(MainActivity.this, "刷新成功", Toast.LENGTH_SHORT).show();
            }
        });
        smartRefreshLayout.setOnLoadMoreListener(new OnLoadMoreListener() {
            @Override
            public void onLoadMore(@NonNull RefreshLayout refreshLayout) {

                smartRefreshLayout.finishLoadMore(2000);
                //添加一条新数据,再最后的位置
                addDatas();
                Toast.makeText(MainActivity.this, "刷新成功", Toast.LENGTH_SHORT).show();
            }
        });

    }

    /*
    * 添加一条新的数据
    * */
    private void addData() {

        DataBean dataBean = new DataBean();
        dataBean.setImage(R.mipmap.baobao);
        dataBean.setTitle("这是新添加的数据哦");
        data.add(0,dataBean);
        adapter.notifyDataSetChanged();

    }
    /*
     * 在最底添加一条新的数据
     * */
    private void addDatas() {
        DataBean dataBean = new DataBean();
        dataBean.setImage(R.mipmap.baobao);
        dataBean.setTitle("这是新添加的数据哦");
        data.add(data.size(),dataBean);
        adapter.notifyDataSetChanged();

    }


    /*
    * 初始化数据,自己创建数据
    * */
    private void setData() {

        for (int i = 0; i < DataIcon.icon.length; i++) {
            DataBean dataBean = new DataBean();
            dataBean.setImage(DataIcon.icon[i]);
            dataBean.setTitle("这是第"+ (i + 1) + "张图");
            data.add(dataBean);
        }


    }

    /**
     * 参数1:设置布局是否垂直 true:垂直 false:水平
     * 参数2:设置布局的方向 true:反向 false:正常
     * */
    private void setAdapter(boolean isVertical, boolean isReverse) {

        //创建一个适配器对象,传一个集合进去给适配器
        adapter = new RecyclerViewAdapter(data);
        //设置垂直还是水平,三元表达式
        LinearLayoutManager manager = new LinearLayoutManager(this);
        manager.setOrientation(isVertical? RecyclerView.VERTICAL:RecyclerView.HORIZONTAL);

        //设置方向
        manager.setReverseLayout(false);

        //把设置好的方向和排版给RecyclerView
        recyclerView.setLayoutManager(manager);

        //设置适配器器
        recyclerView.setAdapter(adapter);


    }

    private void initView() {

        //声明绑定控件
        smartRefreshLayout = findViewById(R.id.smart_refresh_layout);
        recyclerView = findViewById(R.id.recycler_view);

    }
}
运行代码展示
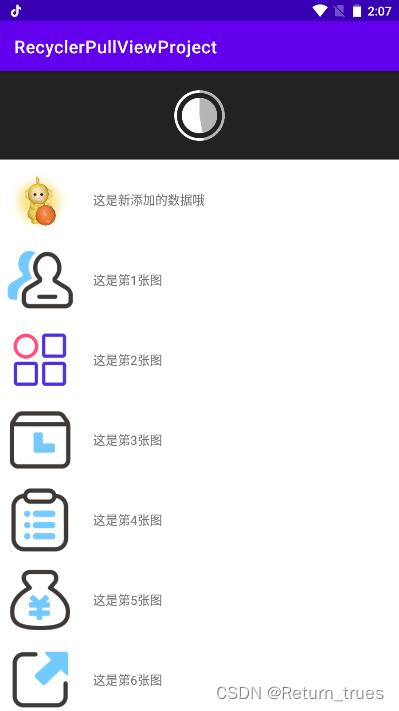
实在不行的可以在gitee拉源码哦,地址在这:https://gitee.com/li-jier/csdn_recycler-view.git
觉得有帮助的朋友,给小弟点个赞哦,谢谢~
祝大家在编码的路上一路风雨无阻,加油~


 2943
2943


 被折叠的 条评论
为什么被折叠?
被折叠的 条评论
为什么被折叠?
 到【灌水乐园】发言


