


该计算器使用Python tkinter模块开发
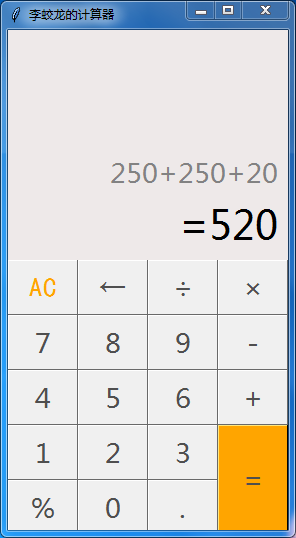
效果如下图
完整代码如下:
  1 import tkinter #导入tkinter模块
  2
  3 root  = tkinter.Tk()  4 root.minsize(280,500)
  5 root.title('李蛟龙的计算器')
  6
  7
  8 #1.界面布局
  9 #显示面板
 10 result = tkinter.StringVar() 11 result.set(0)                           #显示面板显示结果1,用于显示默认数字0
 12 result2 = tkinter.StringVar()           #显示面板显示结果2,用于显示计算过程
 13 result2.set('')
 14 #显示版
 15 label = tkinter.Label(root,font = ('微软雅黑',20),bg = '#EEE9E9',bd ='9',fg = '#828282',anchor = 'se',textvariable = result2) 16 label.place(width = 280,height = 170)
 17 label2 = tkinter.Label(root,font = ('微软雅黑',30),bg = '#EEE9E9',bd ='9',fg = 'black',anchor = 'se',textvariable = result) 18 label2.place(y = 170,width = 280,height = 60)
 19
 20
 21
 22
 23 #数字键按钮
 24
 25 btn7 = tkinter.Button(root,text = '7',font = ('微软雅黑',20),fg = ('#4F4F4F'),bd = 0.5,command = lambda : pressNum('7'))
 26 btn7.place(x = 0,y = 285,width = 70,height = 55)
 27 btn8 = tkinter.Button(root,text = '8',font = ('微软雅黑',20),fg = ('#4F4F4F'),bd = 0.5,command = lambda : pressNum('8'))
 28 btn8.place(x = 70,y = 285,width = 70,height = 55)
 29 btn9 = tkinter.Button(root,text = '9',font = ('微软雅黑',20),fg = ('#4F4F4F'),bd = 0.5,command = lambda : pressNum('9'))
 30 btn9.place(x = 140,y = 285,width = 70,height = 55)
 31
 32 btn4 = tkinter.Button(root,text = '4',font = ('微软雅黑',20),fg = ('#4F4F4F'),bd = 0.5,command = lambda : pressNum('4'))
 33 btn4.place(x = 0,y = 340,width = 70,height = 55)
 34 btn5 = tkinter.Button(root,text = '5',font = ('微软雅黑',20),fg = ('#4F4F4F'),bd = 0.5,command = lambda : pressNum('5'))
 35 btn5.place(x = 70,y = 340,width = 70,height = 55)
 36 btn6 = tkinter.Button(root,text = '6',font = ('微软雅黑',20),fg = ('#4F4F4F'),bd = 0.5,command = lambda : pressNum('6'))
 37 btn6.place(x = 140,y = 340,width = 70,height = 55)
 38
 39 btn1 = tkinter.Button(root,text = '1',font = ('微软雅黑',20),fg = ('#4F4F4F'),bd = 0.5,command = lambda : pressNum('1'))
 40 btn1.place(x = 0,y = 395,width = 70,height = 55)
 41 btn2 = tkinter.Button(root,text = '2',font = ('微软雅黑',20),fg = ('#4F4F4F'),bd = 0.5,command = lambda : pressNum('2'))
 42 btn2.place(x = 70,y = 395,width = 70,height = 55)
 43 btn3 = tkinter.Button(root,text = '3',font = ('微软雅黑',20),fg = ('#4F4F4F'),bd = 0.5,command = lambda : pressNum('3'))
 44 btn3.place(x = 140,y = 395,width = 70,height = 55)
 45 btn0 = tkinter.Button(root,text = '0',font = ('微软雅黑',20),fg = ('#4F4F4F'),bd = 0.5,command = lambda : pressNum('0'))
 46 btn0.place(x = 70,y = 450,width = 70,height = 55)
 47
 48
 49 #运算符号按钮
 50 btnac = tkinter.Button(root,text = 'AC',bd = 0.5,font = ('黑体',20),fg = 'orange',command = lambda :pressCompute('AC'))
 51 btnac.place(x = 0,y = 230,width = 70,height = 55)
 52 btnback = tkinter.Button(root,text = '←',font = ('微软雅黑',20),fg = '#4F4F4F',bd = 0.5,command = lambda:pressCompute('b'))
 53 btnback.place(x = 70,y = 230,width = 70,height = 55)
 54 btndivi = tkinter.Button(root,text = '÷',font = ('微软雅黑',20),fg = '#4F4F4F',bd = 0.5,command = lambda:pressCompute('/'))
 55 btndivi.place(x = 140,y = 230,width = 70,height = 55)
 56 btnmul = tkinter.Button(root,text ='×',font = ('微软雅黑',20),fg = "#4F4F4F",bd = 0.5,command = lambda:pressCompute('\*'))
 57 btnmul.place(x = 210,y = 230,width = 70,height = 55)
 58 btnsub = tkinter.Button(root,text = '\-',font = ('微软雅黑',20),fg = ('#4F4F4F'),bd = 0.5,command = lambda:pressCompute('\-'))
 59 btnsub.place(x = 210,y = 285,width = 70,height = 55)
 60 btnadd = tkinter.Button(root,text = '+',font = ('微软雅黑',20),fg = ('#4F4F4F'),bd = 0.5,command = lambda:pressCompute('+'))
 61 btnadd.place(x = 210,y = 340,width = 70,height = 55)
 62 btnequ = tkinter.Button(root,text = '\=',bg = 'orange',font = ('微软雅黑',20),fg = ('#4F4F4F'),bd = 0.5,command = lambda :pressEqual()) 63 btnequ.place(x = 210,y = 395,width = 70,height = 110)
 64 btnper = tkinter.Button(root,text = '%',font = ('微软雅黑',20),fg = ('#4F4F4F'),bd = 0.5,command = lambda:pressCompute('%'))
 65 btnper.place(x = 0,y = 450,width = 70,height = 55)
 66 btnpoint = tkinter.Button(root,text = '.',font = ('微软雅黑',20),fg = ('#4F4F4F'),bd = 0.5,command = lambda:pressCompute('.'))
 67 btnpoint.place(x = 140,y = 450,width = 70,height = 55)
 68
 69
 70
 71
 72 #操作函数
 73 lists = \[\]                            #设置一个变量 保存运算数字和符号的列表
 74 isPressSign = False                  #添加一个判断是否按下运算符号的标志,假设默认没有按下按钮
 75 isPressNum = False 76 #数字函数
 77 def pressNum(num):                   #设置一个数字函数 判断是否按下数字 并获取数字将数字写在显示版上
 78     global lists                     #全局化lists和按钮状态isPressSign
 79     global isPressSign 80     if isPressSign == False: 81         pass
 82     else:                            #重新将运算符号状态设置为否
 83         result.set(0)
 84         isPressSign = False 85
 86     #判断界面的数字是否为0
 87     oldnum = result.get()             #第一步
 88     if oldnum =='0':                 #如过界面上数字为0 则获取按下的数字
 89         result.set(num)
 90     else:                            #如果界面上的而数字不是0  则链接上新按下的数字
 91         newnum = oldnum + num 92         result.set(newnum)            #将按下的数字写到面板中
 93
 94
 95
 96
 97
 98
 99
100
101 #运算函数
102 def pressCompute(sign):
103     global lists
104     global isPressSign
105     num = result.get()              #获取界面数字
106     lists.append(num)               #保存界面获取的数字到列表中
107
108     lists.append(sign)              #讲按下的运算符号保存到列表中
109     isPressSign = True
110
111     if sign =='AC':                #如果按下的是'AC'按键,则清空列表内容,讲屏幕上的数字键设置为默认数字0
112 lists.clear()
113 result.set(0)
114     if sign =='b':                 #如果按下的是退格‘’,则选取当前数字第一位到倒数第二位
115         a = num\[0:-1\]
116 lists.clear()
117 result.set(a)
118
119
120
121 #获取运算结果函数
122 def pressEqual():
123     global lists
124     global isPressSign
125
126
127     curnum = result.get()           #设置当前数字变量,并获取添加到列表
128 lists.append(curnum)
129
130     computrStr = ''.join(lists)     #讲列表内容用join命令将字符串链接起来
131     endNum = eval(computrStr)       #用eval命令运算字符串中的内容
132 #    a = str(endNum)
133 #   b = '='+a                       #给运算结果前添加一个 ‘=’ 显示   不过这样写会有BUG 不能连续运算,这里注释,不要 =
134 #   c = b\[0:10\]                     #所有的运算结果取9位数
135     result.set(endNum)                   #讲运算结果显示到屏幕1
136     result2.set(computrStr)         #将运算过程显示到屏幕2
137     lists.clear()                   #清空列表内容
138
139
140
141
142 root.mainloop()


 4038
4038

 被折叠的 条评论
为什么被折叠?
被折叠的 条评论
为什么被折叠?
 到【灌水乐园】发言


