目录
前言
今天分享的是J2EE中的建模,希望对各位有所帮助
提示:以下是本篇文章正文内容,下面案例可供参考
一、建模
1)适用于什么时候:
当重复性的代码较多,对同一个xml文件需要重复的解析时,我们就要用到建模
2)建模原理:
以面向对象的思想操作xml文件
3)案例:
①将每一个标签当成一个对象,并且分析每一个对象的行为和属性,即建包处理
<?xml version="1.0" encoding="UTF-8"?>
<!-- config标签:可以包含0~N个action标签 -->
<config>
	<!-- action标签:可以饱含0~N个forward标签 path:以/开头的字符串,并且值必须唯一 非空 type:字符串,非空 -->
	<action path="/regAction" type="test.RegAction">
		<!-- forward标签:没有子标签; name:字符串,同一action标签下的forward标签name值不能相同 ; path:以/开头的字符串
			redirect:只能是false|true,允许空,默认值为false -->
		<forward name="failed" path="/reg.jsp" redirect="false" />
		<forward name="success" path="/login.jsp" redirect="true" />
	</action>

	<action path="/loginAction" type="test.LoginAction">
		<forward name="failed" path="/login.jsp" redirect="false" />
		<forward name="success" path="/main.jsp" redirect="true" />
	</action>
</config>
action建模:
package com.mgy.model;

import java.util.HashMap;
import java.util.Map;

/**
 * 对应action标签
 * @author Administrator
 *
 */
public class ActionModel {
//	<action path="/loginAction" type="test.action.LoginAction">
	private String path;
	private String type;
	private Map<String, ForwardModel> fMap=new HashMap<String, ForwardModel>();
	public String getPath() {
		return path;
	}
	public void setPath(String path) {
		this.path = path;
	}
	public String getType() {
		return type;
	}
	public void setType(String type) {
		this.type = type;
	}
	//两个行为,增加forwardModel对象,查找forwardModel对象
//	将一个新的forward标签对象加入容器
	public void push(ForwardModel forModel) {
		fMap.put(forModel.getName(), forModel);
	}
	public ForwardModel pop(String name) {
		return fMap.get(name);
	}
}
action中实例化map集合是因为action中有多个forward标签,而config的建模和action的建模略同,不同的是config没有属性。
forward建模:
package com.mgy.model;

/**
 * 对应forward标签
 * @author Administrator
 *
 */
public class ForwardModel {
//	<forward name="a" path="/index.jsp" redirect="false" />
	private String name;
	private String path;
	private boolean redirect;
	public String getName() {
		return name;
	}
	public void setName(String name) {
		this.name = name;
	}
	public String getPath() {
		return path;
	}
	public void setPath(String path) {
		this.path = path;
	}
	public boolean isRedirect() {
		return redirect;
	}
	public void setRedirect(boolean redirect) {
		this.redirect = redirect;
	}

}
4)工厂模式
sessionfactory
ConfigModelFactory就是用来生产configModel对象的
生产出来的ConfigModel对象就包含了config.xml中的配置内容
package com.mgy.model;

import java.io.InputStream;
import java.util.List;

import org.dom4j.Document;
import org.dom4j.DocumentException;
import org.dom4j.Element;
import org.dom4j.io.SAXReader;

public class ConfigModelFactory {
	public static ConfigModel bulid(String path) throws Exception {
		String defaultPath="/config.xml";
		InputStream in = ConfigModelFactory.class.getResourceAsStream(defaultPath);
		SAXReader sr=new SAXReader();
		Document doc = sr.read(in);
		List<Element> actionEles = doc.selectNodes("/config/action");
		ConfigModel fModel=new ConfigModel();
		for (Element actionEle : actionEles) {
			ActionModel actionModel = new ActionModel();
			actionModel.setPath(actionEle.attributeValue("path"));
			actionModel.setType(actionEle.attributeValue("type"));
//			将forwardmodel赋值并且添加到actionmodel中
			List<Element> forwardEles = actionEle.selectNodes("forward");
			for (Element element : forwardEles) {
				ForwardModel forwardModel = new ForwardModel();
				forwardModel.setName(element.attributeValue("name"));
				forwardModel.setPath(element.attributeValue("path"));
				forwardModel.setRedirect("true".equals(element.attributeValue("redirect")));
				actionModel.push(forwardModel);
			}
			fModel.push(actionModel);
		}
		return fModel;
	}
	public static ConfigModel bulid() throws Exception {
		String defaultPath="/config.xml";
		return bulid(defaultPath);
	}
}
调用:
package com.mgy.model;

public class Demo1 {
	public static void main(String[] args) throws Exception {
//		ConfigModel cModel=new ConfigModel();
		ConfigModel cModel=ConfigModelFactory.bulid();
		ActionModel actionModel = cModel.pop("/loginAction");
		System.out.println(actionModel.getType());
		ForwardModel forwardModel = actionModel.pop("b");
		System.out.println(forwardModel.getPath());
	}
}
效果:

二、案例
通过url-pattern读取到servlet-class的值
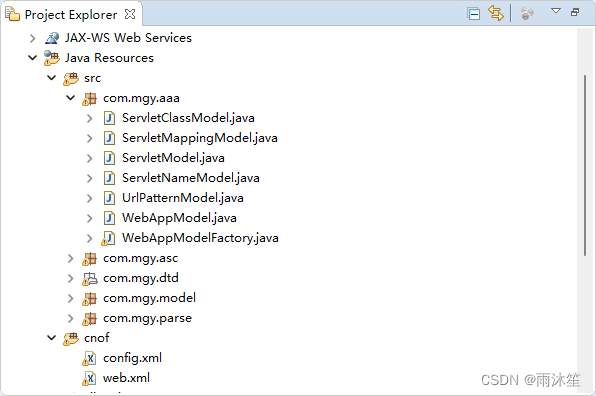
对web.xml进行建模,并且分析他们的属性和行为,以下便是所有建模的类

其中最难的就是WebAppModelFactory 该类,代码段如下
package com.mgy.aaa;

import java.io.InputStream;
import java.util.List;

import org.dom4j.Document;
import org.dom4j.DocumentException;
import org.dom4j.Element;
import org.dom4j.io.SAXReader;

public class WebAppModelFactory {
	public static WebAppModel bulid() throws Exception {
		String xmlPath = "/web.xml";
		return bulid(xmlPath);
	}

	public static WebAppModel bulid(String xmlPath) throws Exception{
		InputStream in = WebAppModelFactory.class.getResourceAsStream(xmlPath);
		SAXReader sr=new SAXReader();
		WebAppModel webAppModel=new WebAppModel();
		Document doc = sr.read(in);
		//将servelt的标签内容填充到webapp
		List<Element> selectEles = doc.selectNodes("/web-app/servlet");
		for (Element selectEle : selectEles) {
			/*
			 * 给ServletModel填充xml的内容
			 */
			ServletModel servletModel = new ServletModel();
			Element servletNameEle = (Element) selectEle.selectSingleNode("servlet-name");
			Element servletClassEle = (Element)selectEle.selectSingleNode("servlet-class");
			ServletNameModel servletNameModel = new ServletNameModel();
			ServletClassModel servletClassModel = new ServletClassModel();
			servletNameModel.setContext(servletNameEle.getText());
			servletClassModel.setContext(servletClassEle.getText());
			servletModel.setServletNameModel(servletNameModel);
			servletModel.setServletClassModel(servletClassModel);
			webAppModel.pushServletModel(servletModel);
		}
		//将servlet-mapping的标签内容填充到xml的内容中
		List<Element> servletMappingEles = doc.selectNodes("/web-app/servlet-mapping");
		for (Element servletMappingEle : servletMappingEles) {
			ServletMappingModel servletMappingModel = new ServletMappingModel();
			/*
			 * 给ServletMappingModel填充xml的内容
			 */
			ServletNameModel servletNameModel = new ServletNameModel();
			Element servletNameEle = (Element)servletMappingEle.selectSingleNode("servlet-name");

			servletNameModel.setContext(servletNameEle.getText());
			servletMappingModel.setServletNameModel(servletNameModel);

			List<Element> urlPatternEles = servletMappingEle.selectNodes("url-pattern");
			for (Element urlPatternEle : urlPatternEles) {
				UrlPatternModel urlPatternModel = new  UrlPatternModel();
				urlPatternModel.setContext(urlPatternEle.getText());
				servletMappingModel.pushUrlPatternModel(urlPatternModel);
			}
			webAppModel.pushServletMappingModel(servletMappingModel);
		}

		return webAppModel;
	}
	/**
	 * 通过浏览器输入的网址自动找到对应的后台处理类
	 * @param webAppModel	建模后的实体类
	 * @param url	浏览器访问的网址
	 * @return
	 */
	public static String getServletClassByUrl(WebAppModel webAppModel, String url) {
		String servletClass = "";
		/*
		 * 找到浏览器网址对应的servlet-name
		 */
		String servletName = "";
		List<ServletMappingModel> servletMappingModels = webAppModel.getServletMappingModels();
		for (ServletMappingModel servletMappingModel : servletMappingModels) {
			List<UrlPatternModel> urlPatternModels = servletMappingModel.getUrlPatternModels();
			for (UrlPatternModel urlPatternModel : urlPatternModels) {
				if(url.equals(urlPatternModel.getContext())) {
					ServletNameModel servletNameModel = servletMappingModel.getServletNameModel();
					servletName = servletNameModel.getContext();
				}
			}
		}

		/*
		 * 找到servlet-name对应的后台处理类
		 */
		List<ServletModel> servletModels = webAppModel.getServletModel();
		for (ServletModel servletModel : servletModels) {
			ServletNameModel servletNameModel = servletModel.getServletNameModel();
			if(servletName.equals(servletNameModel.getContext())) {
				ServletClassModel servletClassModel = servletModel.getServletClassModel();
				servletClass = servletClassModel.getContext();
			}
		}
		return servletClass;
	}

	public static void main(String[] args) throws Exception {
		WebAppModel webAppModel = WebAppModelFactory.bulid();
		String res = getServletClassByUrl(webAppModel, "/jrebelServlet");
		String res2 = getServletClassByUrl(webAppModel, "/jrebelServlet2");
		String res3 = getServletClassByUrl(webAppModel, "/jrebelServlet3");
		System.out.println(res);
		System.out.println(res2);
		System.out.println(res3);

	}
}
效果:

总结
以上就是今天要讲的内容,本文仅仅简单介绍了如何建模,建模最主要的就是分析xml文件中有多少标签、以及他们的属性和行为。


 99
99


 被折叠的 条评论
为什么被折叠?


