


目录
一、Spring事务管理概述
1、什么是Spring的事务管理?
在实际开发中,操作数据库时都会涉及到事务管理问题,为此Spring提供了专门用于事务处理的API。Spring的事务管理简化了传统的事务管理流程,并且在一定程度上减少了开发者的工作量。
2、事务管理的核心接口
在Spring的所有JAR包中,包含一个名为spring-tx-4.3.6.RELEASE的JAR包,该包就是Spring提供的用于事务管理的依赖包。在该JAR包的org.springframework.transaction包中,有3个接口文件PlatformTransactionNanager、TransactionDefinition和TransactionStatus

(1)PlatformTransactionNanager
PlatformTransactionManager 接口是Spring 提供的平台事务管理器,主要用于管理事务。该接口中提供了3个事务操作的方法,具体如下。
- TransactionStatus getTransaction ( TransactionDefinition definition ):用于获取事务状态信息。
- void commit ( TransactionStatus status ):用于提交事务。
- void rollback( TransactionStatus status ):用于回滚事务。
在上面的3个方法中,getTransaction ( TransactionDefinition definition )方法会根据TransactionDefinition参数返回一个TransactionStatus对象,TransactionStatus对象就表示一个事务,它被关联在当前执行的线程上。
PlatformTransactionManager接口只是代表事务管理的接口,它并不知道底层是如何管理事务的,它只需要事务管理提供上面的3个方法,但具体如何管理事务则由它的实现类来完成。
PlatformTransactionManager接口有许多不同的实现类,常见的几个实现类如下。
- org.springframework.jdbc.datasource.DataSourceTransactionManager:用于配置JDBC 数据源的事务管理器。
- org.springframework.orm.hibernate4.HibernateTransactionManager:用于配置 Hibernate的事务管理器。
- org.springframework.transaction.jta.JtaTransactionManager:用于配置全局事务管理器。
当底层采用不同的持久层技术时,系统只需使用不同的 PlatformTransactionManager实现类即可。
(2)TransactionDefinition
TransactionDefinition接口是事务定义(描述)的对象,该对象中定义了事务规则,并提供了获取事务相关信息的方法,具体如下。
- String getName():获取事务对象名称。
- int getlsolationLevel():获取事务的隔离级别。
- int getPropagationBehavior():获取事务的传播行为。
- int getTimeout():获取事务的超时时间。
- boolean isReadOnly():获取事务是否只读。
上述方法中,事务的传播行为是指在同一个方法中,不同操作前后所使用的事务。传播行为有很多种,具体如图所示。
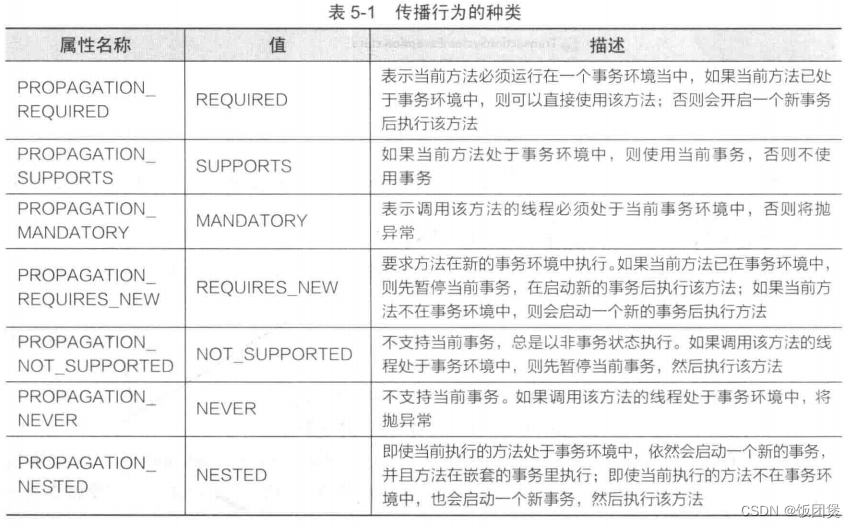
在事务管理过程中,传播行为可以控制是否需要创建事务以及如何创建事务,通常情况下,数据的查询不会影响原数据的改变,所以不需要进行事务管理,而对于数据的插入、更新和删除操作,必须进行事务管理。如果没有指定事务的传播行为,Spring 默认传播行为是REQUIRED。
(3)TransactionStatus
TransactionStatus 接口是事务的状态,它描述了某一时间点上事务的状态信息。该接口中包含6个方法,具体如下。
- void flush():刷新事务。
- boolean hasSavepoint():获取是否存在保存点。
- boolean isCompleted():获取事务是否完成。
- boolean isNewTransaction():获取是否是新事务。
- boolean isRollbackOnly():获取是否回滚。
- void setRollbackOnly():设置事务回滚。
二、声明式事务管理
Spring 中的事务管理分为两种方式:一种是传统的编程式事务管理,另一种是声明式事务管理。
- 编程式事务管理:是通过编写代码实现的事务管理,包括定义事务的开始、正常执行后的事务提交和异常时的事务回滚。
- 声明式事务管理:是通过 AOP技术实现的事务管理,其主要思想是将事务管理作为一个“切面”代码单独编写,然后通过AOP技术将事务管理的“切面”代码织入到业务目标类中。
声明式事务管理最大的优点在于开发者无须通过编程的方式来管理事务,只需在配置文件中进行相关的事务规则声明,就可以将事务规则应用到业务逻辑中。这使得开发人员可以更加专注于核心业务逻辑代码的编写,在一定程度上减少了工作量,提高了开发效率,所以在实际开发中,通常都推荐使用声明式事务管理。
Spring 的声明式事务管理可以通过两种方式来实现,一种是基于XML的方式,另一种是基于Annotation的方式。接下来的两个小节中,将对这两种声明式事务管理方式进行详细讲解。
1、基于XML方式的声明式事务
基于XML方式的声明式事务是在配置文件中通过<tx:advice>元素配置事务规则来实现的。当配置了事务的增强处理后,就可以通过编写的AOP配置,让Spring自动对目标生成代理。<tx:advice>元素及其子元素如下图所示: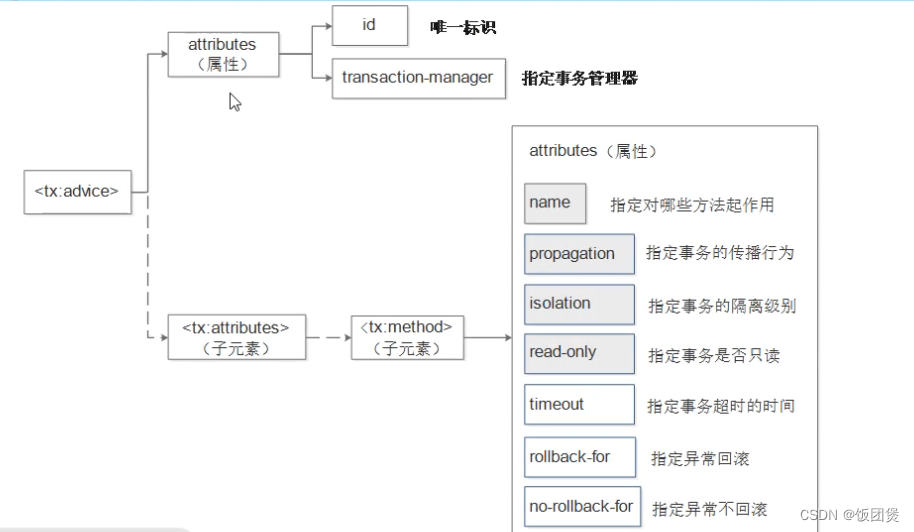
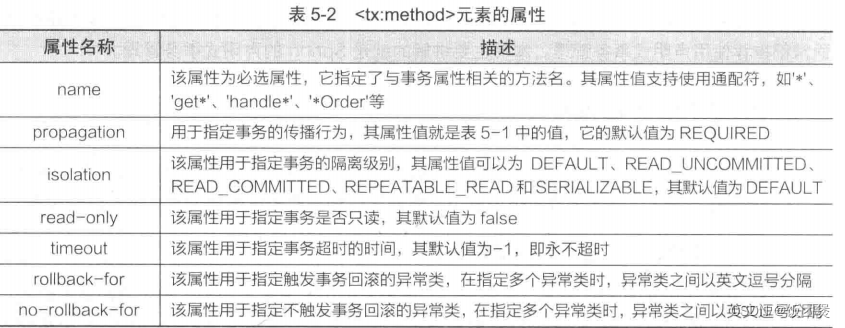
配置<tx:advice>元素的重点是配置<tx:method>子元素,上图中使用灰色标注的几个属性是<tx:method>元素中的常用属性。其属性描述具体如下:
本案例以上一章的项目代码和数据表为基础,编写一个模拟银行转账的程序,要求在转账时通过Spring对事务进行控制,其具体实现步骤如下。
( 1)在 Eclipse 中,创建一个名为 chapter05 的 Web项目,在项目的 lib目录中导入chapter04项目中的所有JAR包,并将AOP所需JAR包也导入到 lib目录中。导入后的 lib目录

(2)将 chapter04项目中的代码和配置文件复制到 chapter05 项目的 src目录下,并在AccountDao接口中,创建一个转账方法 transfer(),其代码如下所示。
//转账操作--转出人、转入人、转账金额
void transfer(String outUser,String inUser,Double money);
( 3 )在其实现类AccountDaolmpl中实现transfer()方法,编辑后的代码如下所示。
/**
*转账
* inUser:收款人* outUser:汇款人
*money:收款金额*/
public void transfer(String outUser,String inUser,Double money){
///先收款
String sql ="UPDATE account set balance=balance+? WHERE username=?";
this.jdbcTemplate.update(sql,money,inUser);
//转账中间出现异常,正常情况下出现异常,那上边执行的加钱操作已经完成,那应该加钱,但是不符合事务标准
//所有这种情况如果中间出现异常,则需要事务回滚,加的钱应该回滚到初始状态
int i = 5/0; //数据库注释InnoDB支持事务、 MylSAM不支持事务
//汇款
String sql2 = " UPDATE account set balance=balance-? WHERE username=?" ;
this.jdbcTemplate.update(sql2,money,outUser) ;}
( 4 )修改配置文件 applicationContext.xml,添加命名空间并编写事务管理的相关配置代码
<?xml version="1.0" encoding="UTF-8"?>
<beans xmlns="http://www.springframework.org/schema/beans"
xmlns:xsi="http://www.w3.org/2001/XMLSchema-instance"
xmlns:aop="http://www.springframework.org/schema/aop"
xmlns:tx="http://www.springframework.org/schema/tx"
xmlns:context="http://www.springframework.org/schema/context"
xsi:schemaLocation="http://www.springframework.org/schema/beans
http://www.springframework.org/schema/beans/spring-beans.xsd
http://www.springframework.org/schema/aop
http://www.springframework.org/schema/aop/spring-aop.xsd
http://www.springframework.org/schema/tx
http://www.springframework.org/schema/tx/spring-tx.xsd
http://www.springframework.org/schema/context
http://www.springframework.org/schema/context/spring-context.xsd">
<!--1.配置数据源,意思就是要连接一个什么样的数据库 -->
<bean id="dataSource" class="org.springframework.jdbc.datasource.DriverManagerDataSource">
<!-- 1.1数据库的驱动,像计算机连接打印机一样,同一台计算机可以连接任意品牌的
任意型号的打印机,只需要物理连接完成后,安装打印机驱动即可使用 -->
<property name="driverClassName" value="com.mysql.jdbc.Driver"></property>
<!-- 1.2数据库的url,告诉数据库在哪
jdbc:mysql://localhost:3306/数据库所在的服务地址和端口
spring数据库名称
-->
<property name="url" value="jdbc:mysql://localhost:3306/spring"></property>
<!-- 1.3数据库的用户名-->
<property name="username" value="root"></property>
<!-- 1.4数据库的密码-->
<property name="password" value="2023"></property>
</bean><!-- 配置JdbcTemplate 模板-->
<bean id="jdbcTemplate" class="org.springframework.jdbc.core.JdbcTemplate">
<property name="dataSource" ref="dataSource"></property>
</bean>
<bean id="accountDao" class="com.qingcheng.ssm.jdbc.AccountDaoImpl">
<property name="jdbcTemplate" ref="jdbcTemplate"></property>
</bean>
<!-- 事务管理器,依赖于数据源-->
<bean id="transactionManager" class="org.springframework.jdbc.datasource.DataSourceTransactionManager">
<property name="dataSource" ref="dataSource"></property>
</bean>
<!-- 编写通知:对事务进行增强,需要编写对切入点和具体执行的事务的细节 -->
<tx:advice id="txAdvice" transaction-manager="transactionManager">
<tx:attributes>
<!-- *代表任意方法名称 -->
<tx:method name="*" propagation="REQUIRED" isolation="DEFAULT" read-only="false"/>
</tx:attributes>
</tx:advice>
<!-- 编写aop,让spring自动对目标生成代理,需要使用AspectJ的表达式 -->
<aop:config><--切入点-->
<aop:pointcut expression="execution(* com.qingcheng.ssm.jdbc.*.*(..))" id="txPointCut"></aop:pointcut>
<--切面:将切入点与通知整合--><aop:advisor advice-ref="txAdvice" pointcut-ref="txPointCut"></aop:advisor>
</aop:config>
</beans>
(5 )在 com.itheima.jdbc包中,创建测试类TransactionTest,并在类中编写测试方法xmIlTest()
package com.itheima . j dbe;import org.junit.Test;
import org.springframework.context.ApplicationContext;import
org.springframework.context.support.classPathXmlApplicationcontext;//测试类
public class TransactionTest{@Test
public void xmlTest() {
ApplicationContext applicationContext = new ClassPathXmlApplicationContext("applicationContext.xml");//获取AccountDao实例
AccountDao accountDao = (AccountDao) applicationContext.getBean("accountDao");//调用实例中的转账方法
accountDao.transfer("Jack”, "Rose" , 100.0);//输出提示信息
System.out.println("转账成功");
}
}
结果,Junit控制台中报出了“/by zero”的算术异常信息。此时如果再次查询数据表account,会发现表中Jack和Rose的账户余额并没有发生任何变化,这说明Spring中的事务管理配置已经生效。
2、基于Annotation方式的声明式事务
Spring 的声明式事务管理还可以通过Annotation(注解)的方式来实现。这种方式的使用非常简单,开发者只需做两件事情:
1.在 Spring 容器中注册事务注解驱动,其代码如下。
<tx:annotation-driven transaction-manager="transactionManager"/>
2.在需要使用事务的Spring Bean类或者Bean类的方法上添加注解@Transactional。如果将注解添加在Bean类上,则表示事务的设置对整个Bean类的所有方法都起作用;如果将注解添加在Bean类中的某个方法上,则表示事务的设置只对该方法有效。
使用@Transactional注解时,可以通过其参数配置事务详情。@Transactional注解可配置的参数信息如表所示。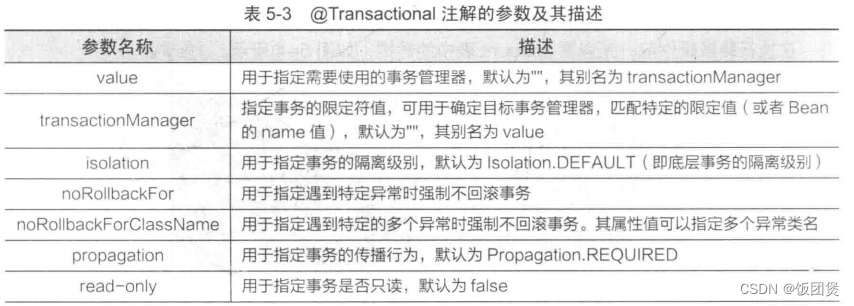
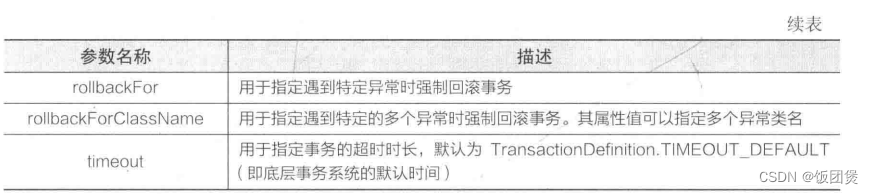
为了让读者更加清楚地掌握@Transactional注解的使用,接下来对上一小节的案例进行修改,以 Annotation方式来实现项目中的事务管理,具体实现步骤如下。
(1)在src目录下,创建一个Spring 配置文件 applicationContext-annotation.xml,在该文件中声明事务管理器等配置信息
<?xml version="1.0" encoding="UTF-8"?>
<beans xmlns="http://www.springframework.org/schema/beans"
xmlns:xsi="http://www.w3.org/2001/XMLSchema-instance"
xmlns:aop="http://www.springframework.org/schema/aop"
xmlns:tx="http://www.springframework.org/schema/tx"
xmlns:context="http://www.springframework.org/schema/context"
xsi:schemaLocation="http://www.springframework.org/schema/beans
http://www.springframework.org/schema/beans/spring-beans.xsd
http://www.springframework.org/schema/aop
http://www.springframework.org/schema/aop/spring-aop.xsd
http://www.springframework.org/schema/tx
http://www.springframework.org/schema/tx/spring-tx.xsd
http://www.springframework.org/schema/context
http://www.springframework.org/schema/context/spring-context.xsd">
<!--1.配置数据源,意思就是要连接一个什么样的数据库 -->
<bean id="dataSource" class="org.springframework.jdbc.datasource.DriverManagerDataSource">
<!-- 1.1数据库的驱动,像计算机连接打印机一样,同一台计算机可以连接任意品牌的
任意型号的打印机,只需要物理连接完成后,安装打印机驱动即可使用 -->
<property name="driverClassName" value="com.mysql.jdbc.Driver"></property>
<!-- 1.2数据库的url,告诉数据库在哪
jdbc:mysql://localhost:3306/数据库所在的服务地址和端口
spring数据库名称
-->
<property name="url" value="jdbc:mysql://localhost:3306/spring"></property>
<!-- 1.3数据库的用户名-->
<property name="username" value="root"></property>
<!-- 1.4数据库的密码-->
<property name="password" value="2023"></property>
</bean><!-- 配置JdbcTemplate 模板-->
<bean id="jdbcTemplate" class="org.springframework.jdbc.core.JdbcTemplate">
<property name="dataSource" ref="dataSource"></property>
</bean>
<bean id="accountDao" class="com.qingcheng.ssm.jdbc.AccountDaoImpl">
<property name="jdbcTemplate" ref="jdbcTemplate"></property>
</bean>
<!-- 事务管理器,依赖于数据源-->
<bean id="transactionManager" class="org.springframework.jdbc.datasource.DataSourceTransactionManager">
<property name="dataSource" ref="dataSource"></property>
</bean>
<!-- 注册事务管理驱动 -->
<tx:annotation-driven transaction-manager="transactionManager"></tx:annotation-driven>
</beans>
需要注意的是,如果案例中使用了注解式开发,则需要在配置文件中开启注解处理器,指定扫描哪些包下的注解。这里没有开启注解处理器是因为在配置文件中已经配置了AccountDaolmpl类的Bean,而@Transactional注解就配置在该Bean类中,所以可以直接生效。
(2)在AccountDaolmpl类的transfer()方法上添加事务注解,添加后的代码如下所示。
@Transactional(propagation = Propagation.REQUIRED,
isolation = Isolation.DEFAULT,readOnly = false)
public void transfer(String outUser, String inUser, Double money) {
///先收款
String sql ="UPDATE account set balance=balance+? WHERE username=?";
this.jdbcTemplate.update(sql,money,inUser);
//转账中间出现异常,正常情况下出现异常,那上边执行的加钱操作已经完成,那应该加钱,但是不符合事务标准
//所有这种情况如果中间出现异常,则需要事务回滚,加的钱应该回滚到初始状态
int i = 5/0; //数据库注释InnoDB支持事务、 MylSAM不支持事务
//汇款
String sql2 = " UPDATE account set balance=balance-? WHERE username=?" ;
this.jdbcTemplate.update(sql2,money,outUser) ;
}
( 3)在TransactionTest类中,创建测试方法 annotationTest(),编辑后的代码如下所示。
@Test
public void annotationTest() {
ApplicationContext applicationContext = new ClassPathXmlApplicationContext("applicationContext-annotation.xml");
AccountDao accountDao = (AccountDao) applicationContext.getBean("accountDao");
accountDao.transfer("Jack”, "Rose" , 100.0);
System.out.println("转账成功");
}
从上述代码可以看出,与XML 方式的测试方法相比,该方法只是对配置文件的名称进行了修改。程序执行后,会出现与XML方式同样的执行结果,这里就不再做重复演示,读者可自行测试。


 2737
2737


 被折叠的 条评论
为什么被折叠?
被折叠的 条评论
为什么被折叠?
 到【灌水乐园】发言


