这里首先介绍线程与进程的基本概念。
进程,操作系统中的最小单位。通过进程可以创建程序的应用。
线程,是进程中的最小单位,一个进程可能会包含多个线程,不同线程之间可能会同时执行,当不同线程同时触发时,就形成了多线程。
2.并发与并行
并发指的是同一处理器同一时间开始执行两个任务,与之相对应的是顺序,指的是处理器上一个任务完成后,才开始执行下一个任务。
并行指的是同一任务执行单元同时执行多个任务,与之相对应的是串行,指的是任务执行单元将多个任务前后排序,上一个任务完成后,才开始执行下一个任务。
总结:并行和并发是某一个线程在特定时刻以排他方式独占CPU资源,而在不同时刻,不同的线程占用CPU运行,从而实现在一段时间内同时执行多个线程的表象。
但当计算机处理器进入多核时代,严格所谓的并发与并行因为多处理器和多任务执行单元的发展而不复存在了。现在很多并行和并发更多指的是在软件层面上,进行算法和线程的优化以提升响应能力和处理能力,实现请求的快速响应和保障数据的一致性。
3.实现多线程的方式
3.1 继承Thread类
Thread类是Java当中的一个抽象类,实现多线程需要继承它,然后重写run方法。
在使用时,需要用新建一个类的对象,通过对象方法调用。
public MyThread extends Thread {

    //重写run方法
    public void run() {

   }
}

    public static void main(String[] args) {

         MyThread mythread = new MyThread();
         //启动线程
         mythread.start();

    }
3.2 实现Runnable接口
Runnable是Java中的一个接口,首先要先将线程接口实例化,再利用Thread类实现线程调用。
可以实现更高的灵活度,在实现继承的同时,还可以实现多接口和任务共享机制。
public MyRunnable implements Runnable {

    //重写run方法
    public void run() {

   }
}

 public static void main(String[] args) {

          MyRunnable myRunnable = new MyRunnable() ;
          Thread t1 = new Thread(myRunnable) ;
         //启动线程
         t1.start()
    }
3.3 在实现中run方法和start调用的区别
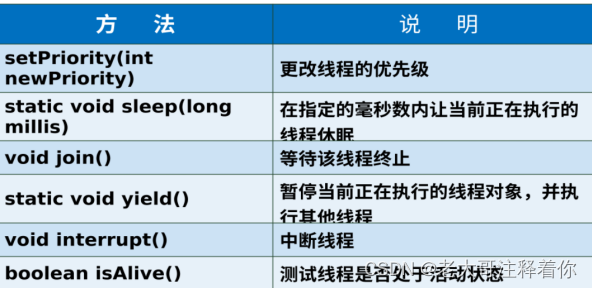
4.1 setPriority
更改线程的优先级,优先级是从1~10设置,默认是5.
Thread thread1 = new Thread(tr1,"线程优先级高") ;
 //设置线程的优先级
        thread1.setPriority(10);
        System.out.println(thread1.getPriority());
        thread1.start();
public class SleepTest extends Thread {

    public void sleep(){
        while (true) {

            //每秒睡一次
            try {
                Thread.sleep(1000);
            } catch (InterruptedException e) {
                throw new RuntimeException(e);
            }

            Date date = new Date();

            System.out.println(date);
        }
    }

    public void hello() {
        for (int i = 0; i < 30; i++) {
            System.out.println(Thread.currentThread().getName() + "=" + i);
        }
    }

    @Override
    public void run()  {
//        hello();
        for (int i = 0; i < 20; i++) {
            try {
                Thread.sleep(500);
            } catch (InterruptedException e) {
                throw new RuntimeException(e);
            }
            System.out.println(Thread.currentThread().getName() + "=" + i);
        }
    }

    public static void main(String[] args) {
        SleepTest st = new SleepTest() ;

        //调用
        st.start();

        SleepTest st1 = new SleepTest() ;

        //调用
        st1.start();

        SleepTest st2 = new SleepTest() ;

        //调用
        st2.start();

        SleepTest st3 = new SleepTest() ;

        //调用
        st3.start();


    }

}
4.3 join
public void sleep(){
        while (true) {
            //每秒睡一次
            try {
                Thread.sleep(1000);
           } catch (InterruptedException e) {
                throw new RuntimeException(e);
           }
            Date date = new Date();
            System.out.println(date);
       }
   }
main:
for (int i = 0; i < 10; i++) {
          System.out.println(Thread.currentThread().getName() + "=" + i);
            if(i == 5) {
                try {
                    st.join(); //强势性,插入执行后,其他线程全部等待
               } catch (InterruptedException e){
                    throw new RuntimeException(e);
               }
           }
}
4.4 yield
for (int i = 0; i < 10; i++) {

System.out.println(Thread.currentThread().getName() + "=" + i);
            if(i == 5) {
                Thread.yield();
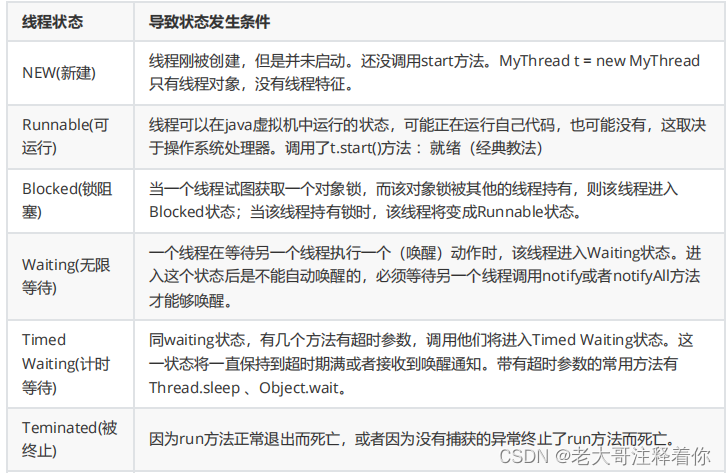
}
public class Test{
    public static void main(String[] args){
        for(int i = 1;i<=5;i++){
        Thread.sleep(1000);
        System.out.println(i)
        }
    }
}
//这时我们发现主线程执行到sleep方法会休眠1秒后再继续执行。5.2等待和唤醒
public class Demo1_wait {
        public static void main(String[] args) throws InterruptedException {
        // 步骤1 : 子线程开启,进入无限等待状态, 没有被唤醒,无法继续运行。
        new Thread(() -> {
        try {
            System.out.println("begin wait ....");
            synchronized ("") {
                    "".wait();
            }
            System.out.println("over");
            } catch (Exception e) {
        }
    }).start();
}
public class Demo2_notify {
public static void main(String[] args) throws InterruptedException {
// 步骤1 : 子线程开启,进入无限等待状态, 没有被唤醒,无法继续运行.
new Thread(() -> {
try {
System.out.println("begin wait ....");
synchronized ("") {
"".wait();
}
System.out.println("over");
} catch (Exception e) {
}
}).start();
//步骤2: 加入如下代码后, 3秒后,会执行notify方法, 唤醒wait中线程.
Thread.sleep(3000);
new Thread(() -> {
try {
synchronized ("") {
System.out.println("唤醒");
"".notify();
}
} catch (Exception e) {
}
}).start();
}
}public class BaoZiPu extends Thread{
private List<String> list ;
public BaoZiPu(String name,ArrayList<String> list){
super(name);
this.list = list;
}
@Override
public void run() {
int i = 0;
while(true){
//list作为锁对象
synchronized (list){
if(list.size()>0){
//存元素的线程进入到等待状态
try {
list.wait();
} catch (InterruptedException e) {
e.printStackTrace();
}
}
//如果线程没进入到等待状态 说明集合中没有元素
//向集合中添加元素
list.add("包子"+i++);
System.out.println(list);
//集合中已经有元素了 唤醒获取元素的线程
list.notify();
}
}
}
}
}消费包子类:
public class ChiHuo extends Thread {
    private List<String> list ;
    public ChiHuo(String name,ArrayList<String> list){
        super(name);
        this.list = list;
    }
    @Override
    public void run() {
//为了能看到效果 写个死循环
        while(true){
//由于使用的同一个集合 list作为锁对象
            synchronized (list){
//如果集合中没有元素 获取元素的线程进入到等待状态
                if(list.size()==0){
                    try {
                        list.wait();
                    } catch (InterruptedException e) {
                        e.printStackTrace();
                    }
                }
//如果集合中有元素 则获取元素的线程获取元素(删除)
                list.remove(0);
//打印集合 集合中没有元素了
                System.out.println(list);
//集合中已经没有元素 则唤醒添加元素的线程 向集合中添加元素
                list.notify();
            }
        }
    }
}
}
测试类:
public class Demo {
public static void main(String[] args) {
//等待唤醒案例
List<String> list = new ArrayList<>();
// 创建线程对象
BaoZiPu bzp = new BaoZiPu("包子铺",list);
ChiHuo ch = new ChiHuo("吃货",list);
// 开启线程
bzp.start();
ch.start();
}
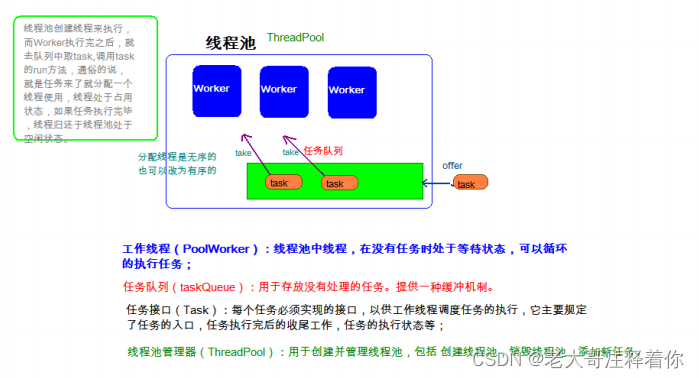
}
public class MyRunnable implements Runnable {
    @Override
    public void run() {
        System.out.println("我要一个教练");
        try {
            Thread.sleep(2000);
        } catch (InterruptedException e) {
            e.printStackTrace();
        }
        System.out.println("教练来了: " + Thread.currentThread().getName());
        System.out.println("教我游泳,交完后,教练回到了游泳池");
    }
}public class ThreadPoolDemo {
public static void main(String[] args) {
// 创建线程池对象
ExecutorService service = Executors.newFixedThreadPool(2);//包含2个线程对象
// 创建Runnable实例对象
MyRunnable r = new MyRunnable();
//自己创建线程对象的方式
// Thread t = new Thread(r);
// t.start(); ---> 调用MyRunnable中的run()
// 从线程池中获取线程对象,然后调用MyRunnable中的run()
service.submit(r);
// 再获取个线程对象,调用MyRunnable中的run()
service.submit(r);
service.submit(r);
// 注意:submit方法调用结束后,程序并不终止,是因为线程池控制了线程的关闭。
// 将使用完的线程又归还到了线程池中
// 关闭线程池
//service.shutdown();
}
}public class Lock {
public static void main(String[] args) {
//1.创建锁对象
Lock lock = new ReentrantLock();
//2.加锁
lock.lock();
try {
System.out.println("你好,现在锁上了");
} finally {
//3.释放锁
lock.unlock();
}
}
}7.2死锁
死锁指的是在多线程程序中,使用了多把锁,造成线程之间相互等待,程序不往下走了。
产生死锁可能的原因有:
1.有多把锁
2.有多个线程
3.有同步代码块嵌套
public class DeadLock implements Runnable{

    private Object obj1 = new Object() ;

    private Object obj2 = new Object() ;


    @Override
    public void run() {

        synchronized (obj1) {
            synchronized (obj2) {

            }
        }


        synchronized (obj2) {
            synchronized (obj1) {

            }
        }

    }
}
8 并发包
8.1 并发包的基本概念
public class Const {
    public static HashMap<String,String> map = new HashMap<>();
}
public void run() {
for (int i = 0; i < 500000; i++) {
Const.map.put(this.getName() + (i + 1), this.getName() + i + 1);
}
System.out.println(this.getName() + " 结束!");
}测试类:
public class Demo {
    public static void main(String[] args) throws InterruptedException {
        Thread1A a1 = new Thread1A();
        Thread1A a2 = new Thread1A();
        a1.setName("线程1-");
        a2.setName("线程2-");
        a1.start();
        a2.start();
//休息10秒,确保两个线程执行完毕
        Thread.sleep(1000 * 5);
//打印集合大小
        System.out.println("Map大小:" + Const.map.size());
    }
}public class Const {
public static Hashtable<String,String> map = new Hashtable<>();
} public void run() {
long start = System.currentTimeMillis();
for (int i = 0; i < 500000; i++) {
Const.map.put(this.getName() + (i + 1), this.getName() + i + 1);
}
long end = System.currentTimeMillis();
System.out.println(this.getName() + " 结束!用时:" + (end - start) + " 毫秒");
}测试类:
public class Demo {
public static void main(String[] args) throws InterruptedException {
Thread1A a1 = new Thread1A();
Thread1A a2 = new Thread1A();
a1.setName("线程1-");
a2.setName("线程2-");
a1.start();
a2.start();
//休息10秒,确保两个线程执行完毕
Thread.sleep(1000 * 5);
//打印集合大小
System.out.println("Map大小:" + Const.map.size());
}
}public class Const {
public static ConcurrentHashMap<String,String> map = new ConcurrentHashMap<>();
} public void run() {
long start = System.currentTimeMillis();
for (int i = 0; i < 500000; i++) {
Const.map.put(this.getName() + (i + 1), this.getName() + i + 1);
}
long end = System.currentTimeMillis();
System.out.println(this.getName() + " 结束!用时:" + (end - start) + " 毫秒");
}测试类:
    public void run() {
        long start = System.currentTimeMillis();
        for (int i = 0; i < 500000; i++) {
            Const.map.put(this.getName() + (i + 1), this.getName() + i + 1);
        }
        long end = System.currentTimeMillis();
        System.out.println(this.getName() + " 结束!用时:" + (end - start) + " 毫秒");
}public class VolatileAtomicThread implements Runnable {
// 定义一个int类型的遍历
private int count = 0 ;
@Override
public void run() {
// 对该变量进行++操作,100次
for(int x = 0 ; x < 100 ; x++) {
count++ ;
System.out.println("count =========>>>> " + count);
}
}
}
public class VolatileAtomicThreadDemo {
public static void main(String[] args) {
// 创建VolatileAtomicThread对象
VolatileAtomicThread volatileAtomicThread = new VolatileAtomicThread() ;
// 开启100个线程对count进行++操作
for(int x = 0 ; x < 100 ; x++) {
new Thread(volatileAtomicThread).start();
}
}
}9.2问题原理说明
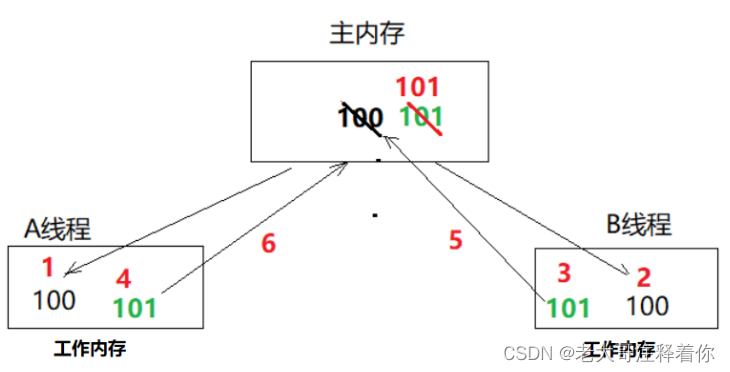
// 定义一个int类型的变量
private volatile int count = 0 ;public class VolatileAtomicThread implements Runnable {
// 定义一个int类型的变量
private volatile int count = 0 ;
private static final Object obj = new Object();
@Override
public void run() {
// 对该变量进行++操作,100次
for(int x = 0 ; x < 100 ; x++) {
synchronized (obj) {
count++ ;
System.out.println("count =========>>>> " + count);
}
}
}
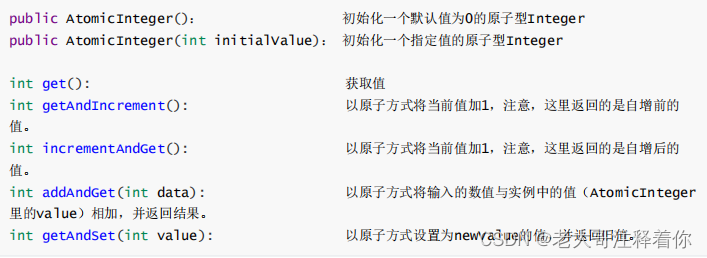
}9.5原子类
9.6 CAS机制:


 2862
2862

 被折叠的 条评论
为什么被折叠?


