


本篇文章适用于熟练掌握Vue2的小伙伴们,不想重新学习Vue3,那看本篇文章就够啦!希望大家收获多多!!
Vue3是向下兼容的,可以运行Vue2代码
一、页面区别
Vue2定义属性方法
<template>
<div >
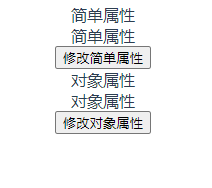
<div>简单属性</div>
<div>{{ msg }}</div>
<div><button @click="updateMsg">修改简单属性</button></div>
<div>对象属性</div>
<div>{{ ObjMsg.msg }}</div>
<div><button @click="updateObjMsg">修改对象属性</button></div>
</div>
</template>
<script>
export default {
name: "namePage",
data() {
return {
msg: "简单属性",
ObjMsg: {
msg: "对象属性",
},
};
},
methods: {
updateMsg() {
this.msg = "修改简单属性";
},
updateObjMsg() {
this.ObjMsg.msg = "修改对象属性";
},
},
};
</script>
<style lang="scss" scoped></style>
Vue3组合式API定义属性方法
不用定义method、data 更方便
<template>
  <div >
    <div>简单属性</div>
    <div>{{ msg }}</div>
    <div><button @click="updateMsg">修改简单属性</button></div>

    <div>对象属性</div>
    <div>{{ ObjMsg.msg }}</div>
    <div><button @click="updateObjMsg">修改对象属性</button></div>
  </div>
</template>

<script setup>
//需要导入ref 和reactive
import { ref, reactive } from 'vue'

//ref定义简单属性
const msg = ref('简单属性')
const updateMsg = () => {
  //注意:没有this对象了
  msg.value = '修改了简单属性'
}


//reactive定义对象属性
const ObjMsg = reactive({
  msg: '对象属性'
})
const updateObjMsg = () => {
  ObjMsg.msg = '修改了对象属性'
}

  //reactive也可以使用ref(最终都是转为ref的)但是需要使用.value来访问
// const ObjMsg = ref({
//   msg: '对象属性'
// })
// const updateObjMsg = () => {
//   ObjMsg.value.msg = '修改了对象属性'
// }
</script>

<style scoped>

</style>
详解<script setup>
<script setup> 是 Vue 3 中引入的一种新的脚本编写方式,它允许您以更加简洁的方式编写 Vue 组件。<script setup> 提供了一种声明式的方式来定义组件的逻辑,同时它还支持组合 API,使得代码更加简洁和易于理解。
<script setup> 的基本用法:
导入组合 API:
直接在 <script setup> 中导入 Vue 的组合 API,如 ref、reactive 等。
定义响应式状态:
使用 ref 或 reactive 定义响应式状态。
定义方法:
直接定义方法,无需像传统的 Vue 选项 API 那样将方法放在 methods 对象中。
自动暴露:
<script setup> 中定义的所有顶级变量和函数都会自动暴露给模板使用,无需显式地使用 export default。
类型声明:
可以使用 TypeScript 进行类型声明。
结果
上方两种效果相同
二、router使用的区别
vue2中使用router
定义router
import Vue from "vue";
import VueRouter from "vue-router";
import newPage from "../views/vuePage.vue";
import indexPage from "../views/indexPage.vue";

Vue.use(VueRouter);

const routes = [
    {
        path: '/',
        name: 'indexPage',
        component: indexPage
    },
    {
        path: '/newPage',
        name: 'newPage',
        component: newPage
    },
];
const router = new VueRouter({
    mode: 'history',
    base: process.env.BASE_URL,
    routes
});

export default router;
在main.js中引入router
import Vue from 'vue'
import App from './App.vue'
import router from './router'

 Vue.config.productionTip = false

new Vue({
  router,//注册路由
  render: h => h(App),
}).$mount('#app')
在vue中使用router
//template中
<el-button class="button1" type="danger" @click="goToVue">Vue基础</el-button>
//method中
goToVue() {
        // 使用编程式导航跳转到 /newPage 页面
        this.$router.push({
          path: '/newPage'
        })
      },
Vue3使用router
定义router
// src/router/index.js
import { createRouter, createWebHistory } from 'vue-router';

// 导入组件
import HelloWorld from '../components/HelloWorld.vue';


// 定义路由
const routes = [
  { path: '/', component: HelloWorld },

];

// 创建路由器实例
const router = createRouter({
  history: createWebHistory(),
  routes,
});

// 导出路由器
export default router;
在main.js中使用
import { createApp } from 'vue'
import App from './App.vue'
import router from './router'; // 导入路由配置
// createApp(App).mount('#app')
// 引入全局样式
const app = createApp(App);

// 使用路由
app.use(router);

// 挂载根组件
app.mount('#app');
在vue中使用router
<template>
      <button @click="toHellow">跳转</button>
</template>

  <script setup>
  //需要导入router
  import { useRouter ,useRoute} from 'vue-router'
  const router = useRouter();
  const route = useRoute();

  const toHellow = () => {
    //注意:没有this对象了
    //跳转
    console.log('当前页面路由', route.path)
    router.push('/HelloWorld')
  }


  </script>

  <style scoped>

  </style>
三、全局变量方法和变量
vue2中定义全局变量
main.js中定义
定义Utils的isEmpty方法并Vue.prototype.Utils = Utils;
import Vue from 'vue'
import App from './App.vue'
import router from './router'
import ElementUI from 'element-ui'
import 'element-ui/lib/theme-chalk/index.css'

Vue.use(ElementUI)
// Vue.config.productionTip = false


//定义全局变量isEmpty
const Utils = {
  isEmpty:(value) =>{
    if(value === null || value === undefined || value === ''){
      return true;
    }else{
      return false;

    }
  }
}
Vue.prototype.Utils = Utils;

new Vue({
  router,//注册路由
  render: h => h(App),
}).$mount('#app')
页面使用
 created() {
      let a="new"
      console.log("调用全局变量判断是否为空",this.Utils.isEmpty(a))
    },
Vue3中定义全局变量(方法)
main.js中定义
import { createApp } from 'vue'
import App from './App.vue'
import router from './router'; // 导入路由配置
// createApp(App).mount('#app')

//定义全局变量isEmpty
const Utils = {
    isEmpty:(value) =>{
      if(value === null || value === undefined || value === ''){
        return true;
      }else{
        return false;

      }
    }
  }

// 引入全局样式
const app = createApp(App);


app.config.globalProperties.$utils = Utils;

// 使用路由
app.use(router);

// 挂载根组件
app.mount('#app');
页面使用
通过代理
import { useRouter, useRoute } from 'vue-router'
import { getCurrentInstance } from 'vue';
const { proxy } = getCurrentInstance();
const init = () => {
    let a="aaaaa"
    console.log('当前页面实例', proxy.Utils.isEmpty(a))
}
init()
四、watch监听属性
vue2的watch监听属性
<template>
<div>
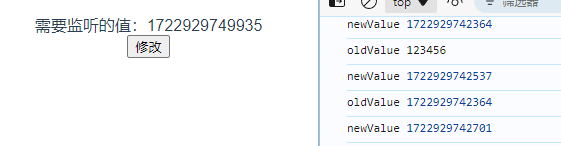
<div>需要监听的值:{{msg}}</div>
<button @click="updateMsg">修改</button>
</div>
</template>
<script>
export default {
name: "pPage",
data() {
return {
msg: "123456"
}
},
methods: {
updateMsg() {
this.msg = new Date().getTime();
}
},
watch: {
//简单形式
// msg(newValue, oldValue) {
// console.log("newValue", newValue);
// console.log("oldValue", oldValue);
// }
//对象形式
msg: {
deep: true,
immediate: true,//初始化是否执行
handler(newValue, oldValue) {
console.log("newValue", newValue);
console.log("oldValue", oldValue);
},
}
}
}
</script>
<style scoped>
</style>
Vue3的watch监听属性
<template>
    <div>需要监听的值:{{ msg }}</div>
    <button @click="toChange">改变</button>
</template>

<script setup>

import { ref,watch } from 'vue';
const msg = ref('1111')
const toChange = () => {
    msg.value = new Date().getTime();
}
//简单的没有其他设置的监听
// watch(msg, (newVal, oldVal) => {
//     console.log('监听msg变化', newVal, oldVal)
// })
//对象形式
watch(msg, (newVal, oldVal) => {
    console.log('监听msg变化', newVal, oldVal)
}, {
    immediate: true,
    deep: true
})
</script>

<style scoped></style>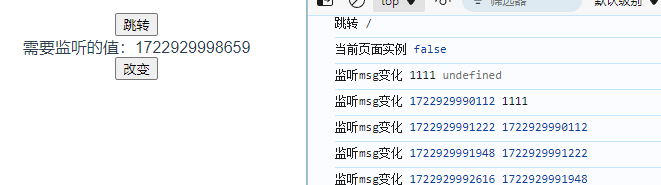
区别总结
语法差异:
Vue 2 中,watch 是定义在组件的选项对象中的。
Vue 3 中,使用 Composition API 的 watch 函数。
配置选项:
Vue 2 中,你可以直接在 watch 的对象形式中指定 deep 和 immediate 选项。
Vue 3 中,这些选项同样可以通过第三个参数传递给 watch 函数。
回调函数:
Vue 2 中,简单的回调函数可以直接定义在 watch 对象中。
Vue 3 中,回调函数作为 watch 函数的第一个参数。
监听的对象:
Vue 2 中,watch 直接监听数据属性。
Vue 3 中,通常监听通过 Composition API 创建的响应式引用。
五、生命周期
vue2中的生命周期
export default {
  data() {
    return {
      message: 'Hello Vue!'
    };
  },
  created() {
    console.log('Component created.');
  },
  mounted() {
    console.log('Component mounted.');
  },
  beforeDestroy() {
    console.log('Component will be destroyed.');
  },
  destroyed() {
    console.log('Component destroyed.');
  },
  methods: {
    updateMsg() {
      this.msg = new Date().getTime();
    }
  },
};
vue3中的生命周期
import { onMounted, onBeforeUnmount, ref } from 'vue';

export default {
  setup() {
    const message = ref('Hello Vue!');

    onMounted(() => {
      console.log('Component mounted.');
    });

    onBeforeUnmount(() => {
      console.log('Component will be unmounted.');
    });

    return {
      message
    };
  }
};
主要区别
1、Composition API 的引入:
Vue 3 引入了 Composition API,其中 setup 函数取代了 beforeCreate 和 created 钩子的功能。
setup 函数在组件初始化时调用,可以接收 props 参数,并返回模板中使用的数据、计算属性、方法等。
2、生命周期钩子的名称变更:
beforeDestroy 更名为 beforeUnmount。
destroyed 更名为 unmounted。
3、生命周期钩子的移除:
Vue 3 移除了 beforeCreate 和 created 钩子,因为它们的功能被 setup 所替代。
4、生命周期钩子的新增:
Vue 3 并没有新增生命周期钩子,但通过 Composition API 提供了更多的灵活性。
Vue 2 的生命周期钩子如下所示:
创建阶段 beforeCreate created beforeMount mounted
更新阶段 beforeUpdate updated
销毁阶段 beforeDestroy destroyed
错误处理 errorCaptured
异步组件 activated deactivated
服务端渲染 serverPrefetch
Vue 3 的生命周期钩子如下所示:
创建阶段 setup (Composition API)
beforeCreate 和 created 被 setup 替代
挂载阶段 beforeMount mounted
更新阶段 beforeUpdate updated
销毁阶段 beforeUnmount unmounted
错误处理 errorCaptured
异步组件 activated deactivated
服务端渲染 serverPrefetch
六、父子组件的调用
Vue2父子组件间的调用
1、父组件给子组件传值使用props
父组件:
<div>
    <SonPage  msg="通过props传递值---父=>子" ></SonPage>
    <h1>父组件</h1>
  </div>
子组件
<div :style="{border: '1px solid red'}">
  <h1>子组件</h1>

  <div>我是父组件传入的参数:{{ msg }}</div>
</div>
<script>
export default {
  props: {
    msg: {
      type: String,
    }
  },
  name: "SonPage",
}
</script>
2、父组件调用子组件方法
父组件
使用 this.$refs.sonRef.子组件方法名。父组件在使用子组件时要加ref,上下一致
<template>
  <div>
    <SonPage ref="sonRef" ></SonPage>
    <h1>父组件</h1>
    <button @click="opSon">我要调用子组件</button>
  </div>
</template>

<script>
import SonPage from "@/views/SonPage";

export default {
  name: "pPage",
  components: {SonPage},

  methods: {
    opSon() {
      this.$refs.sonRef.ParentOpSon("我是父组件调用子组件方法传入的参数");
    },
  },
}
</script>
子组件
<template>
  <div :style="{border: '1px solid red'}">
    <h1>子组件</h1>
    <div>这里是父组件调用子组件方法传入的参数:{{ msg2 }}</div>
  </div>
</template>

<script>
export default {
  name: "SonPage",
  data() {
    return {
      msg2: ""
    }
  },
  methods: {
    ParentOpSon(parentMsg) {
      this.msg2 = parentMsg;
    },
  },
}
</script>

<style scoped>

</style>
结果:
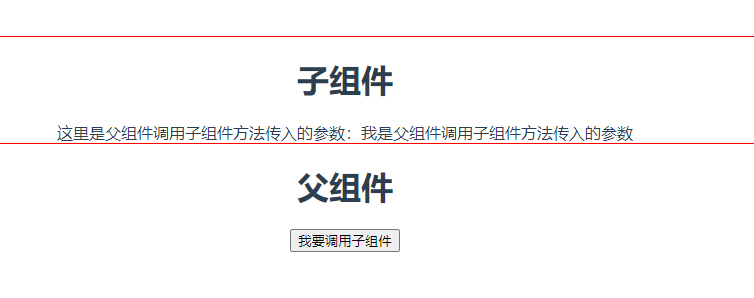
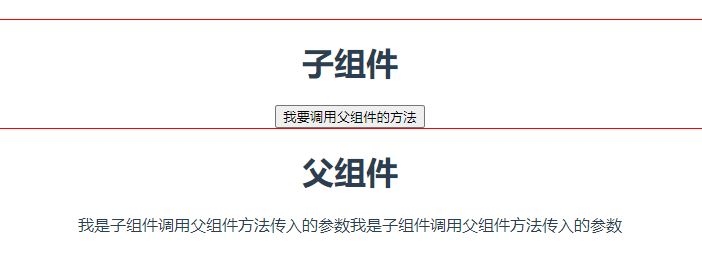
3、子组件调用父组件方法
父组件
使用子组件标签上加@【子组件的this.$emit中第一个参数名】。方法使用 e就是子组件的参数
<template>
  <div>
    <SonPage @opParent="parentMethod"></SonPage>
    <h1>父组件</h1>
    <div>我是子组件调用父组件方法传入的参数{{ sonMsg }}</div>
  </div>
</template>
<script>
import SonPage from "@/views/SonPage";

export default {
  name: "pPage",
  components: {SonPage},
  data() {
    return {
      sonMsg: ""
    }
  },
  methods: {
    parentMethod(e) {
      console.log(e);
      this.sonMsg = e;
    }
  },

}
</script>

<style scoped>

</style>
子组件
子组件中使用this.$emit("父组件标签上的@的名"," 调用父组件方法的参数")
<template>
  <div :style="{border: '1px solid red'}">
    <h1>子组件</h1>
    <button @click="opParent">我要调用父组件的方法</button>
  </div>
</template>

<script>
export default {
  name: "SonPage",
  data() {
    return {
      msg2: ""
    }
  },
  methods: {
    opParent() {
      this.$emit("opParent", "我是子组件调用父组件方法传入的参数")
    }
  },
}
</script>

<style scoped>

</style>
结果:
Vue3父子组件间的调用
1、父组件给子组件传值使用
父组件
注意::msg
<template>
    <button @click="toHellow">跳转</button>
    <div>
    <SonPage :msg="myMsg"></SonPage>
    <h1>父组件</h1>
  </div>
</template>

<script setup>
import SonPage from './sonPage.vue'
const myMsg = '我是父组件传入的参数'
</script>

<style scoped></style>
子组件
注意使用 <script setup>和defineProps
<template>
    <div :style="{border: '1px solid red'}">
      <h1>子组件</h1>
      <div>这里是父组件传入的参数:{{ msg }}</div>
    </div>
  </template>
  <script setup>
  import { defineProps } from 'vue';
 defineProps({
        msg: {
        type: String,
        default: ''
      }
  })
  </script>
  <style scoped>
  </style>
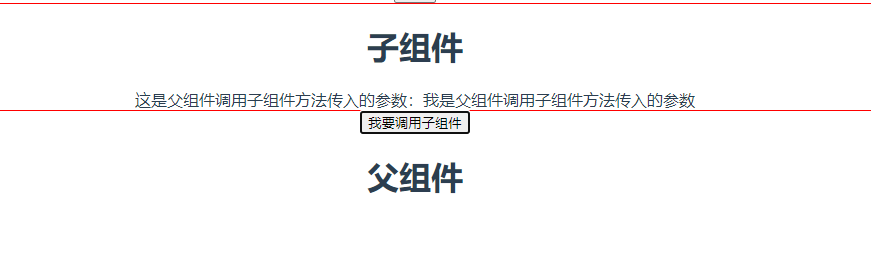
2、父组件调用子组件方法
父组件
父组件中的子组件标签需要添加ref并定义, ref.vue.子组件名字(参数) 即可调用成功
<template>
    <div>
    <SonPage ref="sonRef"></SonPage>
    <button @click="opSon">我要调用子组件</button>
  </div>
    <h1>父组件</h1>
</template>

<script setup>
import SonPage from './sonPage.vue'
import { ref } from 'vue'
const sonRef = ref();

const opSon = () => {
    sonRef.value.ParentOPSon('我是父组件调用子组件方法传入的参数')
}
</script>

<style scoped></style>
子组件
定义一个方法,并且使用defineExpose导出
<template>
    <div :style="{border: '1px solid red'}">
      <h1>子组件</h1>
  <div>这是父组件调用子组件方法传入的参数:{{msg2}}</div>
    </div>
  </template>

  <script setup>
import { ref , defineExpose} from 'vue';
const msg2 = ref('');
const ParentOPSon= (parentMsg)=>{
  msg2.value=parentMsg
}

//导出给父组件调用
defineExpose({
  ParentOPSon
})

  </script>
  <style scoped></style>
结果
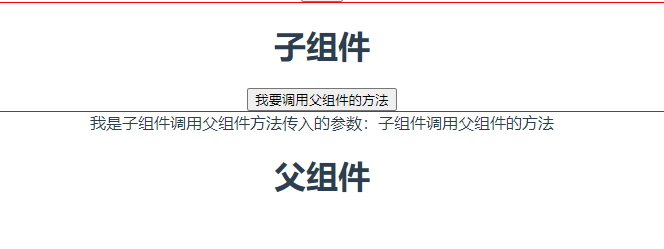
3、子组件调用父组件方法
父组件
通过 <SonPage @opParent="onOpParent" /> 注册了对 opParent 事件的监听,并定义了一个 parentMethod 方法来处理这个事件。
<template>
    <div>
        <SonPage @opParent="parentMethod"></SonPage>
    </div>
    <div>我是子组件调用父组件方法传入的参数:{{ sonMsg }}</div>
    <h1>父组件</h1>
</template>

<script setup>
import SonPage from './sonPage.vue'
import { ref } from 'vue'
const sonMsg = ref();
//子组件调用父组件方法
const parentMethod = (e) => {
    console.log('子组件调用父组件方法传入的参数', e)
    sonMsg.value = e
}
</script>

<style scoped></style>
子组件
注意在 defineEmits 中明确地声明您想要触发的所有自定义事件。
使用emit('opParent', '子组件调用父组件的方法');调用父组件方法,第一个参数需要与父组件中@名字一样
<template>
    <div :style="{border: '1px solid red'}">
      <h1>子组件</h1>
      <button @click="opParentFF">我要调用父组件的方法</button>
    </div>
  </template>

  <script setup>
import { defineEmits } from 'vue';
//声明自定义事件
const emit = defineEmits(['opParent']);
const opParentFF = () => {
  console.log('子组件调用父组件的方法');
  // 调用父组件的方法
  emit('opParent', '子组件调用父组件的方法');
};

  </script>
  <style scoped></style>
结果
看到这里就基本结束喽,如有变化后期会及时更新的~
本人小白一个
可能存在部分问题
欢迎大家批评指正哦~


 5298
5298

 被折叠的 条评论
为什么被折叠?
被折叠的 条评论
为什么被折叠?
 到【灌水乐园】发言


