


1.UnitTest框架与Pytest框架对⽐
1) unittest框架介绍
Unittest则是Python语⾔的标准单元测试框架。 Unittest⽀持⾃动化测试,测试⽤例的初 始化、关闭和测试⽤例的聚合等功能,它有⼀个很重要的特性:它是通过类(class)的⽅ 式,将测试⽤例组织在⼀起
2) pytest框架介绍:
Pytest是Python的另⼀个第三⽅单元测试库。提供更简单、更灵活、更强⼤的测试 框架,以便于编写和执⾏测试⽤例。它提供了许多有⽤的功能和插件,能够⾃动发现 测试⽤例、丰富的断⾔⽀持、参数化测试、丰富的插件系统等等,使得测试更加容易 管
理和执⾏。

pytest 安装和配置:
1.使⽤命令进⾏安装: pip install pytest 2.验证安装成功的命令: pytest --version 3.运 ⾏模式的配置,把pycharm的运⾏模式改为pytest
pytest框架默认的⽤例运⾏规则:
1.pytest将在当前⽬录及其⼦⽬录中运⾏所有格式为 test**.py 或者 **test.py ⽂件
2.测试⽅法/测试函数 默认必须是 test开头
3.测试类必须是 Test开头
4. 测试类不能有构造⽅法__init__
2.Pytest的常⽤应⽤
断⾔pytest
借助Python的运算符号 和 assert关键字 来实现的。
def test_kkk_01():
print("kkk")
# 测试相等
assert 1 == 2 
pytest框架的常⽤参数:
-s 输出打印信息到控制台:pytest.main(['-s'])
" -s" 参数 ⽤于关闭捕捉,从⽽输出打印信息到控制台
-v ⽤于显示具体的⽤例执⾏信息:pytest.main(['-v'])
-k 运⾏名称中包含某字符串的测试⽤例:pytest.main(['-k','kkk'])
-q 简化输出信息:pytest.main(['-q'])
-x 失败就退出:pytest.main(['-x'])
指定⽬录以及特定类或⽅法执⾏:
pytest.main(['-s','./doc/test_112233.py::TestShopping::test03'])
⽣成简单的测试报告:
pytest.main(['--junit-xml=./report/junit_report01.xml'])
⽤例失败控制:
在第N个很⽤例失败之后,结束测试执⾏:
pytest.main(['--maxfail=2'])
通过标记表达式取执⾏:
这条命令会执⾏被装饰器 @pytest.mark.smoke 装饰的所有测试⽤例
注:需要先在pytest.ini ⽂件中注册⾃定义标记
pytest.main(['-m','smoke'])

多进程运⾏⽤例:
# 单线程运行方式
    # pytest.main(['-vs', 'test_02 多线程执行用例.py'])

    # 将测试执行发送给多个cpu
    # pytest.main(['-vs', '-n', '3', 'test_02 多线程执行用例.py'])

    # 使用与计算机具有cpu内核一样多的进程
    # pytest.main(['-vs', '-n', 'auto', 'test_02 多线程执行用例.py'])
重新运⾏失败⽤例:
 # 在每次重跑之间,增加⼀次延迟时间
    pytest.main(['--reruns', '3','--reruns-delay','2','test_rerun.py'])

    # 重新运⾏所有测试失败⽤例
    pytest.main(['--reruns', '3', 'test_rerun.py'])
pytest的 setup 和 teardown 函数
setup_module/teardown_module: 在当前⽂件中,所有的⽤例执⾏之前执⾏
# ---> 在当前⽂件中,所有的⽤例执⾏之前/后执⾏
# def setup_module(module):
# print("setup_module --->")
# #
# def teardown_module(module):
# print("teardown_module --->")
setup_function/teardown_function: 在每个测试函数之前和之后执⾏
# ---> 在每个测试函数之前和之后执⾏
# def setup_function(function):
# print("setup_function --->")
# #
# def teardown_function(function):
# print("teardown_function --->")
setup_method/teardown_method:在每个测试函数之前和之后执⾏(现在常用的方法)
# ---> 在每个测试函数之前和之后执⾏(在类中每次都执⾏,在类的外⾯,只执⾏⼀次)
class TestDemo:
def setup_method(self):
print("setup --->")
def teardown_method(self):
print("teardown --->")
# --- 测试⽤例 ---
def test_multiply_3_4(self):
print("test_multiply_3_4")
assert multiply(3, 4) == 12
修改pytest框架的基本规则
我们在pytest.ini中修改规则
[pytest]
addopts = -vs
testpaths = ./testcase_set
python_files = demo_*.py
python_classes = Demo*
python_functions = demo*
[pytest]
; 01 命令行参数,默认加到执行过程中
addopts = -vs
; 02 指定要运行的测试目录
testpaths = ./testcase_set
; 03 指定要运行的测试文件规则
python_files = demo_*.py
; 04 指定要运行的类名规则
python_classes = Demo_*
; 05 指定要运行的测试用例名称规则
python_functions = demo*
3.Pytest⾼阶⽤法之函数数据参数化
parametrize⽅法:
parametrize(argnames, argvalues, indirect=False, ids=None, scope=None)

argnames:参数名
argvalues:参数对应值,类型必须为list
当参数为⼀个时格式: [value]
当参数个数⼤于⼀个时,格式为:[(param_value1,param_value2.....),
(param_value1,param_value2.....)]

使用方法
@pytest.mark.parametrize(argnames,argvalues)
代码示例:(单个参数)
import pytest


def get_data():
    return [("qsdd的账号", "qsdd的密码"), ("wang的账号", "wang的密码"), ("yeye的账号", "yeye的密码")]


@pytest.mark.parametrize('get_value', get_data())  # 第一个值,用引号括起来,是自定义的参数
def test_login01(get_value):
    print(f"获取的账号信息:{get_value[0]}")
    print(f"获取的密码信息:{get_value[1]}")


if __name__ == '__main__':
    pytest.main(['-vs', 'test_01 单个参数接收函数传值.py'])
多个参数:
""""""

import pytest


def get_data():
    return [("qsdd的账号", "qsdd的密码"), ("wang的账号", "wang的密码"), ("yeye的账号", "yeye的密码")]


@pytest.mark.parametrize('get_value', get_data())  # 第一个值,用引号括起来,是自定义的参数
def test_login01(get_value):
    print(f"获取的账号信息:{get_value[0]}")
    print(f"获取的密码信息:{get_value[1]}")


if __name__ == '__main__':
    pytest.main(['-vs', 'test_01 单个参数接收函数传值.py'])
引用框架的装饰器完成单个传值
""""""

import pytest


@pytest.mark.parametrize('get_value', [("qsdd的账号", "qsdd的密码"), ("qq的账号", "qq的密码"), ("ss的账号", "ss的密码")])
def test_login01(get_value):
    print(f"获取的账号信息:{get_value[0]}")
    print(f"获取的密码信息:{get_value[1]}")


if __name__ == '__main__':
    pytest.main(['-vs', 'test_03 引用框架的装饰器完成单个传值.py'])
引用框架的装饰器完成多个传值
""""""

import pytest


@pytest.mark.parametrize('username, password', [("qsdd的账号", "qsdd的密码"), ("qs的账号", "qs的密码"), ("dd的账号", "dd的密码")])
def test_login01(username, password):
    print(f"获取的账号信息:{username}")
    print(f"获取的密码信息:{password}")


if __name__ == '__main__':
    pytest.main(['-vs', 'test_04 引用框架的装饰器完成多个传值.py'])
4.Pytest之Fixture介绍
什么是fixture:在软件测试中, Fixture 是⼀种⽤于管理测试环境和测试数据的机制。它允许在测试函数或⽅法运⾏之前和之后执⾏特定的代码,以确保测试的可重复性和⼀致性。 Fixture 主要⽤于设置测试环境、准备测试数据、执⾏清理操作等,以便测试能够按预期运⾏
简单理解: 就是可以⽤它对需要执⾏的测试⽤例,设置前置或者后置操作
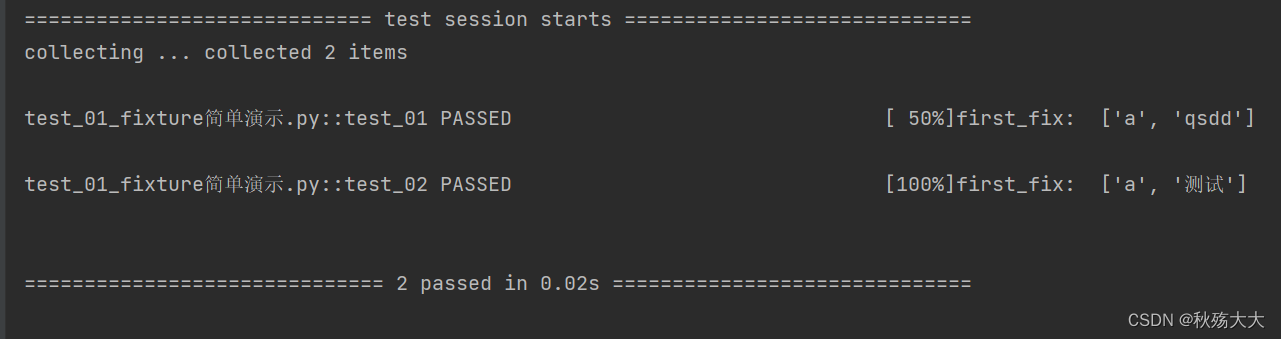
示例如下
""""""
import pytest

"""
    fixturn 快速入门
"""


@pytest.fixture
def first_fix():
    return ['a']


def test_01(first_fix):
    first_fix.append("qsdd")
    print("first_fix: ", first_fix)


def test_02(first_fix):
    first_fix.append("测试")
    print("first_fix: ", first_fix)


if __name__ == '__main__':
    pytest.main(['-vs', "test_01_fixture简单演示.py"])
2.fixture配置作⽤域
""""""
import pytest

"""
# 知识拓展:

1.当用例很多的时候,每次通过传参来调用fixture,会很麻烦。
fixture里面有个参数autouse,默认是False,没有开启的,
可以设置为True开启自动使用fixture功能,
这样用例就不用每次都去传参了。

2.fixture里面还有个参数,scope,
定义被标记方法的作用域:session > module > class > function

3."function":作用于每个测试方法,每个test都运行一次
4."class":作⽤于整个类,每个class的所有test只运⾏⼀次 ⼀个类中可以有多个⽅法
5."module":作⽤于整个模块,每个module的所有test只运⾏⼀次;每⼀个.py⽂件调⽤⼀次,该⽂件内⼜有多个
function和class
6."session":作⽤于整个session(慎⽤),每个session只运⾏⼀次;是多个⽂件调⽤⼀次,可以跨.py⽂件调⽤,每
个.py⽂件就是module
"""


@pytest.fixture(autouse=True, scope="session")
def fix01():
    print("session 级别的fixture")


@pytest.fixture(autouse=True, scope="module")
def fix02():
    print("module 级别的fixture")


@pytest.fixture(autouse=True, scope="class")
def fix03():
    print("class 级别的fixture")


# 测试用例:

def test_a():
    print("test_a 用例执行")


def test_d():
    print("test_d 用例执行")


class TestCase:
    def test_b(self):
        print("test_b 用例执行")

    def test_c(self):
        print("test_c 用例执行")


if __name__ == '__main__':
    pytest.main(['-vs', "test_02_fixture的作用域.py"])
5.Conftest.py(重要)
conftest.py是pytest特有的本地测试配置⽂件,既可以⽤来设置项⽬级的Fixture,也可以⽤来导⼊外部插件,还可以⽤来指定Hook函数(钩⼦函数)
conftest.py⽂件名称是固定 , pytest会⾃动识别该⽂件, 只作⽤于它所在的⽬录及⼦⽬录
""""""
import pytest

"""
    不能自定义名称: conftest.py
"""


@pytest.fixture
def fix1():
    print("conftest 中的 fix1 方法")
""""""
import pytest


def test01(fix1):
    print("test01 测试用例执行")
    assert 1 == 1


if __name__ == '__main__':
    pytest.main(['-vs'])

结果看出,可以调用conftest中的函数
6.Conftest.py+fixture+yield 实现⽤例前置后置
提前在conftest.py中配置好前置、后置操作(通过conftest.py+fixture+yield,可轻松实现⽤例前置后置,包括项⽬级的
""""""
import pytest


def test01(fix1):
    print("test01 测试用例执行")


if __name__ == '__main__':
    pytest.main(['-vs'])
""""""
import pytest


@pytest.fixture
def fix1():
    a = "123"
    print("\n 测试用例的前置步骤/条件")

    yield a

    print("\n 测试用例的后置步骤/条件")


 1012
1012


 被折叠的 条评论
为什么被折叠?
被折叠的 条评论
为什么被折叠?
 到【灌水乐园】发言


