element树状图性能优化(vue+html版本)

首先需要注意的是:

在普通的html页面(非vue脚手架幻境下)使用此组件时,将vue-easy-tree.js文件引入,在注册组件的时候不要采取驼峰命名法,采用下划线分割的形式!

vue脚手架环境下使用:

npm下载
npm install @wchbrad/vue-easy-tree
页面中使用(可以不用此组件的css样式使用element默认样式,需引入)
<template>
  <div class="hello">
    <div class="ve-tree" style="height:calc(100vh - 20px)">
    <vue-easy-tree
      ref="tree"
      node-key="id"
      show-checkbox
      height="calc(100vh - 20px)"
      :data="treeData"
      :props="props"
      :check-strictly="true"
    ></vue-easy-tree>
  </div>
  </div>
</template>

<script>
import VueEasyTree from "@wchbrad/vue-easy-tree";
import "../assets/index.scss";
import team from "../json/team.json";
export default {
  name: "HelloWorld",
  components: {
    VueEasyTree
  },
  data() {
    return {
      props: {
        label: "title",
        children: "children"
      },
      treeData: team
    };
  },
  methods: {
    handleClick(val) {
      console.log(val);
    },
    getData() {
      console.log(this.$refs.tree);
    }
  },
  mounted() {
    console.log(VueEasyTree);
  }
};
</script>

<!-- Add "scoped" attribute to limit CSS to this component only -->
<style scoped>
h1,
h2 {
  font-weight: normal;
}

ul {
  list-style-type: none;
  padding: 0;
}

li {
  display: inline-block;
  margin: 0 10px;
}

a {
  color: #42b983;
}
</style>

普通html页面使用(页面需要引入vue):

首先将下载下来的包里面的vue-easy-tree.js文件放到项目下
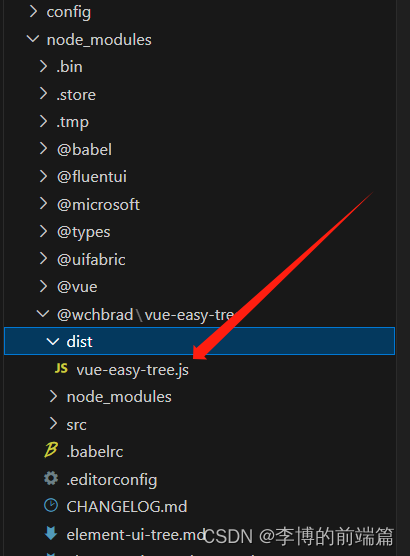
页面中使用
<!DOCTYPE html>
<html lang="en">

<head>
    <meta charset="UTF-8">
    <meta name="viewport" content="width=device-width, initial-scale=1.0">
    <title>Document</title>
    <script src="./js/vue-2.6.10-vue.min.js"></script>
    <script src="./js/vue-easy-tree.js"></script>
    <script src="./json/team.js"></script>
    <!-- <link rel="stylesheet" href="./css/scss/index.scss"> -->
    <link rel="stylesheet" href="./css/theme-chalk/index.css">
    <style>
        h1,
        h2 {
            font-weight: normal;
        }

        ul {
            list-style-type: none;
            padding: 0;
        }

        li {
            display: inline-block;
            margin: 0 10px;
        }

        a {
            color: #42b983;
        }
    </style>
</head>

<body>
    <div id="app">
        <div class="ve-tree" style="height: calc(100vh - 20px);">
            <vue_easy_tree ref="tree" node-key="id" show-checkbox height="calc(100vh - 20px)" :data="treeData"
                :props="props" :check-strictly="true" @check-change="handleClick"></vue_easy_tree>
        </div>

    </div>
    <script>
        new Vue({   
            el: '#app',
            components: {
                vue_easy_tree: window['vue-easy-tree'].default
            },
            data: {
                props: {
                    label: "title",
                    children: "children"
                },
                treeData: tree,
            },
            methods: {
                handleClick(val) {
                    console.log(val);
                },
                getData() {
                    //获取选中的节点
                    let ids = this.$refs.tree.getCheckedKeys()
                }
            },
        })
    </script>
</body>

</html>

  • 0
    点赞
  • 0
    收藏
    觉得还不错? 一键收藏
  • 0
    评论
好的,针对您的问题,以下是实现 Vue+Element-UI上传片并压缩的基本步骤: 1. 安装依赖 在项目中安装 Element-UI 和插件 vue-image-crop-upload 以及片压缩库,可使用以下命令: ``` npm install element-ui vue-image-crop-upload compressjs --save ``` 2. 引入 Element-UI 在 main.js 中引入 Element-UI: ```javascript import Vue from 'vue' import ElementUI from 'element-ui' import 'element-ui/lib/theme-chalk/index.css' Vue.use(ElementUI) ``` 3. 使用 vue-image-crop-upload 在需要上传片的组件中使用 vue-image-crop-upload,可使用以下代码: ```vue <template> <div> <vue-image-crop-upload ref="upload" :url="uploadUrl" :headers="uploadHeaders" :size="size" :accept="accept" :beforeUpload="beforeUpload" :cropConfig="cropConfig" :compressConfig="compressConfig" @input="handleInput" @crop-success="handleCropSuccess" > <el-button size="small" type="primary">上传片</el-button> </vue-image-crop-upload> </div> </template> <script> import VueImageCropUpload from 'vue-image-crop-upload' export default { components: { VueImageCropUpload }, data() { return { uploadUrl: 'xxx', // 上传地址 uploadHeaders: { // 上传请求头 Authorization: 'Bearer ' + getToken() }, size: 1024 * 1024 * 2, // 上传片大小限制 accept: '.jpg,.jpeg,.png', // 上传片格式限制 cropConfig: { // 片裁剪配置 aspectRatio: 1 / 1, autoCropArea: 1, viewMode: 1, zoomable: false, guides: false, dragMode: 'move', cropBoxResizable: false, crop: () => {} }, compressConfig: { // 片压缩配置 targetSize: 1024 * 1024, // 目标大小 quality: 0.7, // 压缩质量 mimeType: 'image/jpeg' // 输出格式 } } }, methods: { beforeUpload(file) { // 文件上传前的回调函数 this.$refs.upload.startUpload() }, handleInput(file) { // 文件选择后的回调函数 this.$refs.upload.showCrop() }, handleCropSuccess(blob, file) { // 片裁剪成功后的回调函数 this.compressImage(blob, file) // 压缩片 }, compressImage(blob, file) { // 片压缩 const reader = new FileReader() reader.readAsDataURL(blob) reader.onload = (e) => { const base64 = e.target.result const compressedBlob = Compress.compress(base64, this.compressConfig) const compressedFile = new File([compressedBlob], file.name, { type: compressedBlob.type }) this.$emit('upload', compressedFile) // 触发上传事件 } } } } </script> ``` 4. 完成上传 在父组件中监听上传事件,使用 axios 或其他方法上传文件至服务器: ```vue <template> <div> <upload :action="uploadUrl" @upload="handleUpload"></upload> </div> </template> <script> import axios from 'axios' import Upload from './Upload.vue' export default { components: { Upload }, data() { return { uploadUrl: 'xxx' // 上传地址 } }, methods: { handleUpload(file) { const formData = new FormData() formData.append('file', file) axios.post(this.uploadUrl, formData).then(response => { console.log(response.data) }) } } } </script> ``` 以上就是实现 Vue+Element-UI上传片并压缩的基本步骤,您可以根据您的具体需求进行修改和优化。

“相关推荐”对你有帮助么?

  • 非常没帮助
  • 没帮助
  • 一般
  • 有帮助
  • 非常有帮助
提交
评论
添加红包

请填写红包祝福语或标题

红包个数最小为10个

红包金额最低5元

当前余额3.43前往充值 >
需支付:10.00
成就一亿技术人!
领取后你会自动成为博主和红包主的粉丝 规则
hope_wisdom
发出的红包
实付
使用余额支付
点击重新获取
扫码支付
钱包余额 0

抵扣说明:

1.余额是钱包充值的虚拟货币,按照1:1的比例进行支付金额的抵扣。
2.余额无法直接购买下载,可以购买VIP、付费专栏及课程。

余额充值