


快来加入班级,一人一个鸿蒙纪念礼盒~~:华为开发者学堂
问题现象
Flex布局使用时,Flex的高度会默认最大高度。当前需要实现场景:当子项超过最大高度时,Flex会自动撑开到最大高度,当子项高度小于最大高度时,保持Flex为子项高度。Flex可显示固定行数,当内容多出固定行数时,可点击按钮进行展开与收缩。
背景知识
- Flex是以弹性方式布局子组件的容器组件,提供更加有效的方式对容器内的子元素进行排列、对齐和分配剩余空间。
- aboutToAppear生命周期函数在创建自定义组件的新实例后,在执行其build()函数之前执行。
- constraintSize方法设置约束尺寸,组件布局时,进行尺寸范围限制。
- 组件区域变化事件onAreaChange会在组件区域变化时触发该回调。仅会响应由布局变化所导致的组件大小、位置发生变化时的回调。
- MeasureText.measureText用于计算指定文本的宽度。
- display.getDefaultDisplaySyncdisplay.getDefaultDisplaySync获取当前默认的display对象。Display屏幕实例。描述display对象的属性和方法。
解决方案
- 场景一:当按钮位于Flex布局外时。
可以使用Flex布局来实现标签流布局,并通过配置最大显示行数来决定是否显示按钮。
具体的实现步骤如下:
- 设置Flex容器:在主组件中,使用Flex容器来包裹所有标签。设置Flex容器的flexDirection为Row,并启用wrap属性,使标签能够换行显示。
- 动态计算标签布局:在自定义组件的生命周期函数(如aboutToAppear)中,计算每个标签的宽度和高度。根据Flex容器的宽度和每个标签的最大宽度,确定每行可以显示的标签数量。
- 控制最大显示行数:使用constraintSize方法设置Flex容器的最大高度为maxHeight,当内容超过该高度时,显示按钮。
- 实现角标按钮点击事件:当内容超过最大显示行数时,显示按钮。点击按钮时,切换布局的高度,展开或收缩内容。
const childMaxWidth: number = 325 // 为了方便后续计算,这里的宽度数值为px

@Component
struct TextItem {
@State message: string = ''
@Prop fontSizeData: number

build() {
Text(this.message)
.fontSize(this.fontSizeData)
.margin({ left: 10, top: 10 })
.backgroundColor('#c4c2cc')
.constraintSize({ maxWidth: childMaxWidth + 'px' })
.maxLines(1)
.textOverflow({ overflow: TextOverflow.Ellipsis })
.padding({ left: 5, right: 5 })
.height(40)
}
}

@Entry
@Component
struct Index2 {
@State FlexWidth: string = '80%';
@State heightControl: number | string = 0;
@State maxHeight: number = 0; // 最大行数对应的最大高度
@State maxNumber: number = 2; // 最大行数
@State ButtonText: string = '∨';
@State AllData: string[] = ['1111', '2211', '3331', '44444', '51115', '666', '7777']
@State fontSizeData: number = 30
@State isShowButton: boolean = false
aboutToAppear(): void {
this.maxHeight = this.maxNumber * 50
this.heightControl = this.maxHeight
if (this.AllData.length > 0) {
if (this.maxNumber > 0) {
let count = this.AllData.length
let lineCount = count / 3
if (lineCount > this.maxNumber) {
this.isShowButton = true
}
}
}
}

build() {
Row() {
Column() {
Flex({ wrap: FlexWrap.Wrap }) {
ForEach(
this.AllData,
(item: string) => {
TextItem({ message: item, fontSizeData: this.fontSizeData })
}
)
}
.constraintSize({ maxHeight: this.heightControl })
.border({ width: 1 })
.width(this.FlexWidth)
.margin({ left: '5%' })
.padding({ bottom: 10 })
.clip(true)

Button(this.ButtonText)
.onClick(() => {
if (this.heightControl === this.maxHeight) {
this.heightControl = '100%'
this.ButtonText = '^'
} else {
this.heightControl = this.maxHeight
this.ButtonText = 'v'
}
})
.width(40)
.height(30)
.margin({ left: 10, top: 10 })
.visibility(this.isShowButton ? Visibility.Visible : Visibility.Hidden)
}
.width('100%')
}
.height('100%')
}
}
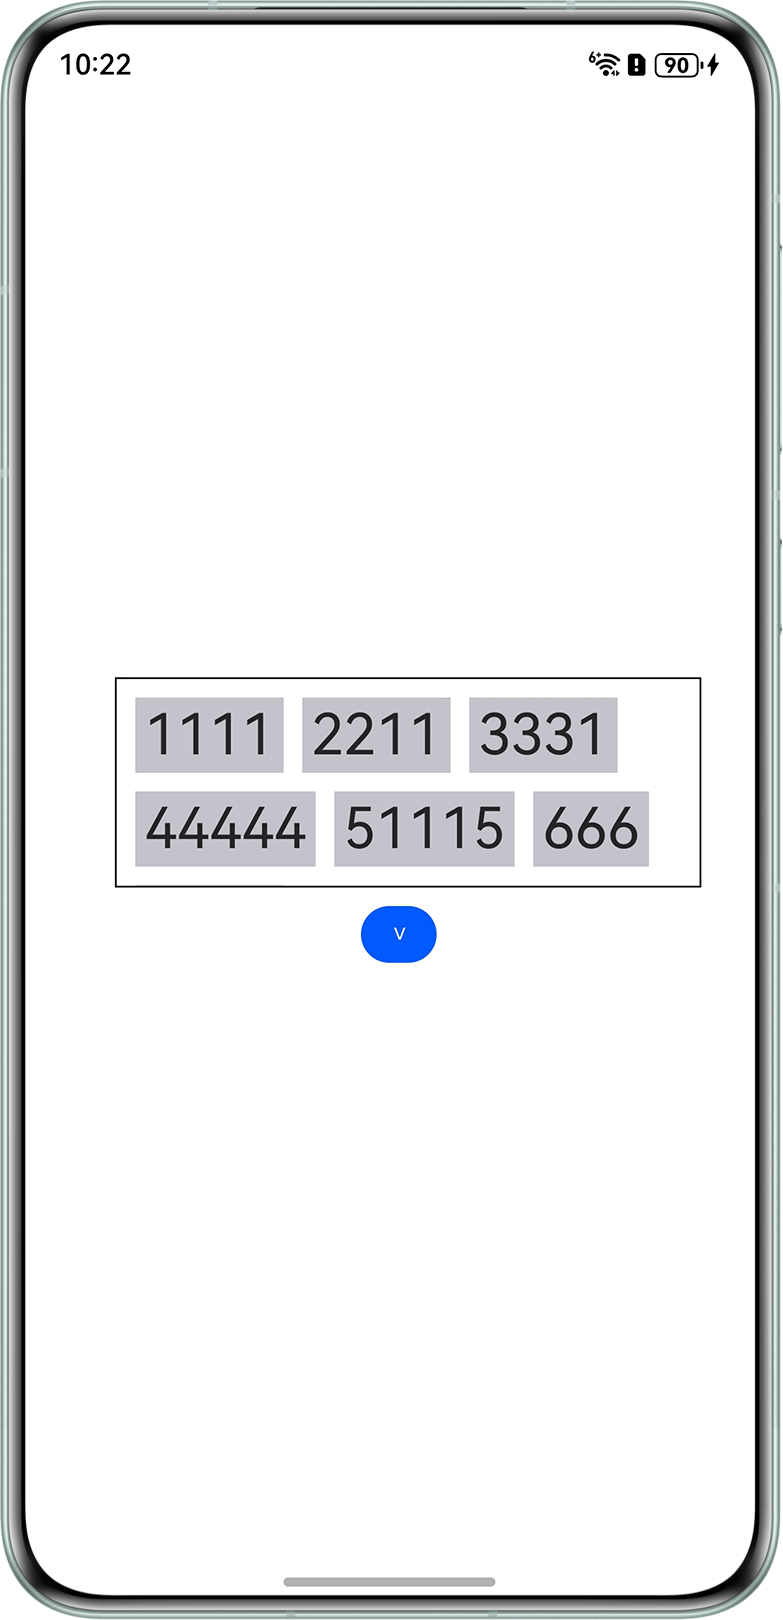
当内容超过Flex组件最大显示行数时,按钮会显示。
效果预览:
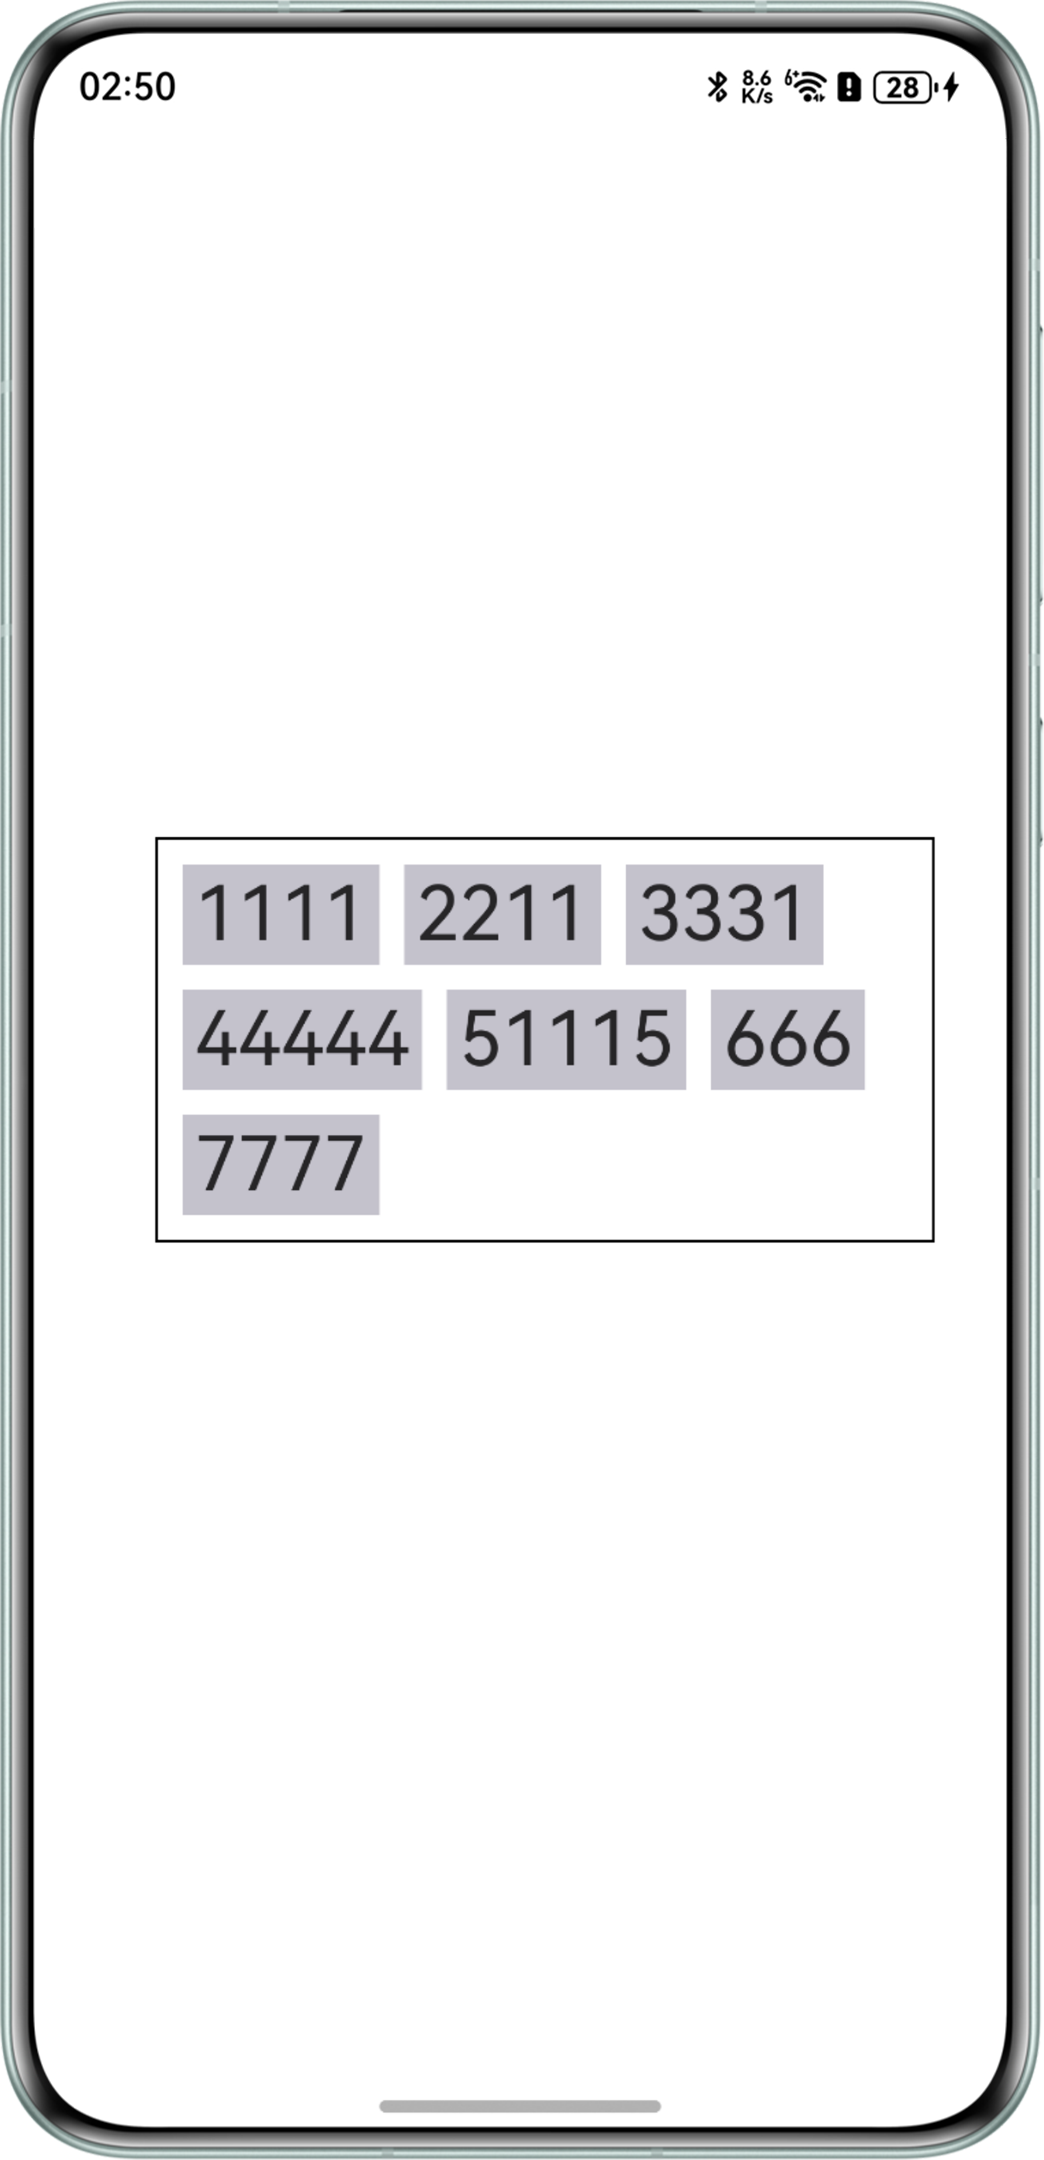
如果将Flex组件最大行数改为3,此时内容不超过最大显示行数时,按钮不会显示。
效果预览:
- 场景二:当按钮位于Flex布局内时,按钮将与其他TextItem一起进行渲染。
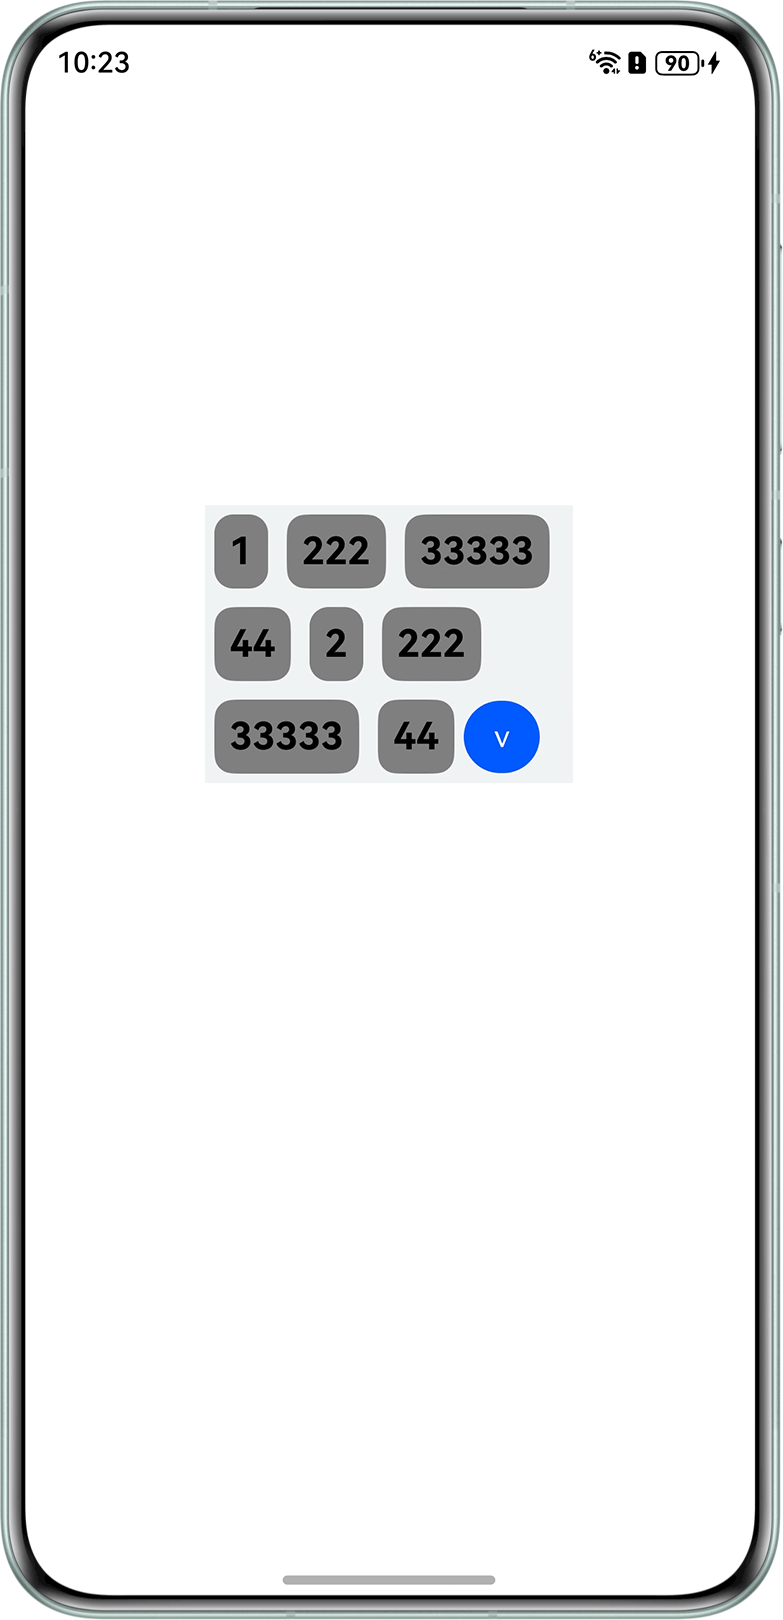
方案一:通过onAreaChange回调,收集各子项宽度和Flex组件自身宽度,通过自定义方法计算得出最大行数能容纳的子项个数,查看最后一行是否能放置折叠按钮,若不能,则削减子项个数,直到能为止。
@Entry
@Component
struct FlexTest {
@State message: string = 'Hello World';
@State allDataList: string[] =
['1', '222', '33333', '44', '2', '222', '33333', '44', '1', '222', '33333', '44', '222', '33333']
@State showDataList: string[] = []
@State isShowAll: boolean = true
private cutIndex: number = 0
private flexWidth: number = 0
private itemWidthList: number[] = []
private isInit: boolean = false
aboutToAppear(): void {
this.initItemList()
}

initItemList() {
this.showDataList = this.allDataList
this.itemWidthList = new Array<number>(this.allDataList.length)
for (let i = 0; i < this.itemWidthList.length; i++) {
this.itemWidthList[i] = 0
}
this.isInit = false
}

isDrawFinish() {
let isFinish = true;
for (let i = 0; i < this.itemWidthList.length; i++) {
if (this.itemWidthList[i] == 0) {
isFinish = false
}
}
if (this.flexWidth == 0) {
isFinish = false;
}

if (isFinish) {
this.isInit = true
this.calculateCutIndex(3)
this.transformExpendList(false)
}
}

transformExpendList(showAll: boolean) {
if (showAll) {
this.isShowAll = true
this.showDataList = this.allDataList
} else {
this.isShowAll = false
this.showDataList = this.allDataList.slice(0, this.cutIndex)
}
}

// maxLine指布局需要保留的最大行数
calculateCutIndex(maxLine: number) {
let layer = 1;
let curLength = 0;
for (let i = 0; i < this.itemWidthList.length; i++) {
curLength += this.itemWidthList[i]
if (curLength > this.flexWidth) {
if (layer == maxLine) {
curLength -= this.itemWidthList[i]
this.cutIndex = i
break;
} else {
layer += 1
curLength = this.itemWidthList[i]
}
}
}

// 查看maxLine当前剩余的宽度是否足以容纳按钮,不能则掏空到能为止
let buttonWidth = 40
let empty = this.flexWidth - curLength
while (empty <= buttonWidth) {
empty += this.itemWidthList[this.cutIndex]
this.cutIndex--
}
}

build() {
Column() {
Flex({ wrap: FlexWrap.Wrap, alignItems: ItemAlign.Center }) {
ForEach(this.showDataList, (item: string, index: number) => {
Text(item)
.fontSize(20)
.fontWeight(FontWeight.Bold)
.fontColor(Color.Black)
.backgroundColor(Color.Gray)
.borderRadius(10)
.padding(8)
.margin(5)
.id(`item_${index}`)
.onAreaChange((oldValue: Area, newValue: Area) => {
if (!this.isInit && newValue.width != 0) {
this.itemWidthList[index] = Number(newValue.width) + 10 // item宽度加上两边margin
this.isDrawFinish()
}
})
})
Button() {
Text(this.isShowAll ? '^' : 'v')
.padding(10)
.fontColor(Color.White)
.borderRadius(5)
}
.width(40)
.onClick(() => {
this.transformExpendList(!this.isShowAll)
})
}
.onAreaChange((oldValue: Area, newValue: Area) => {
if (!this.isInit && newValue.width != 0) {
this.flexWidth = Number(newValue.width)
this.isDrawFinish()
}
})
.backgroundColor('#f1f3f5')
.id('flex')
.width('50%')
}
.height('100%')
.width('100%')
.justifyContent(FlexAlign.Start)
}
}
效果预览:
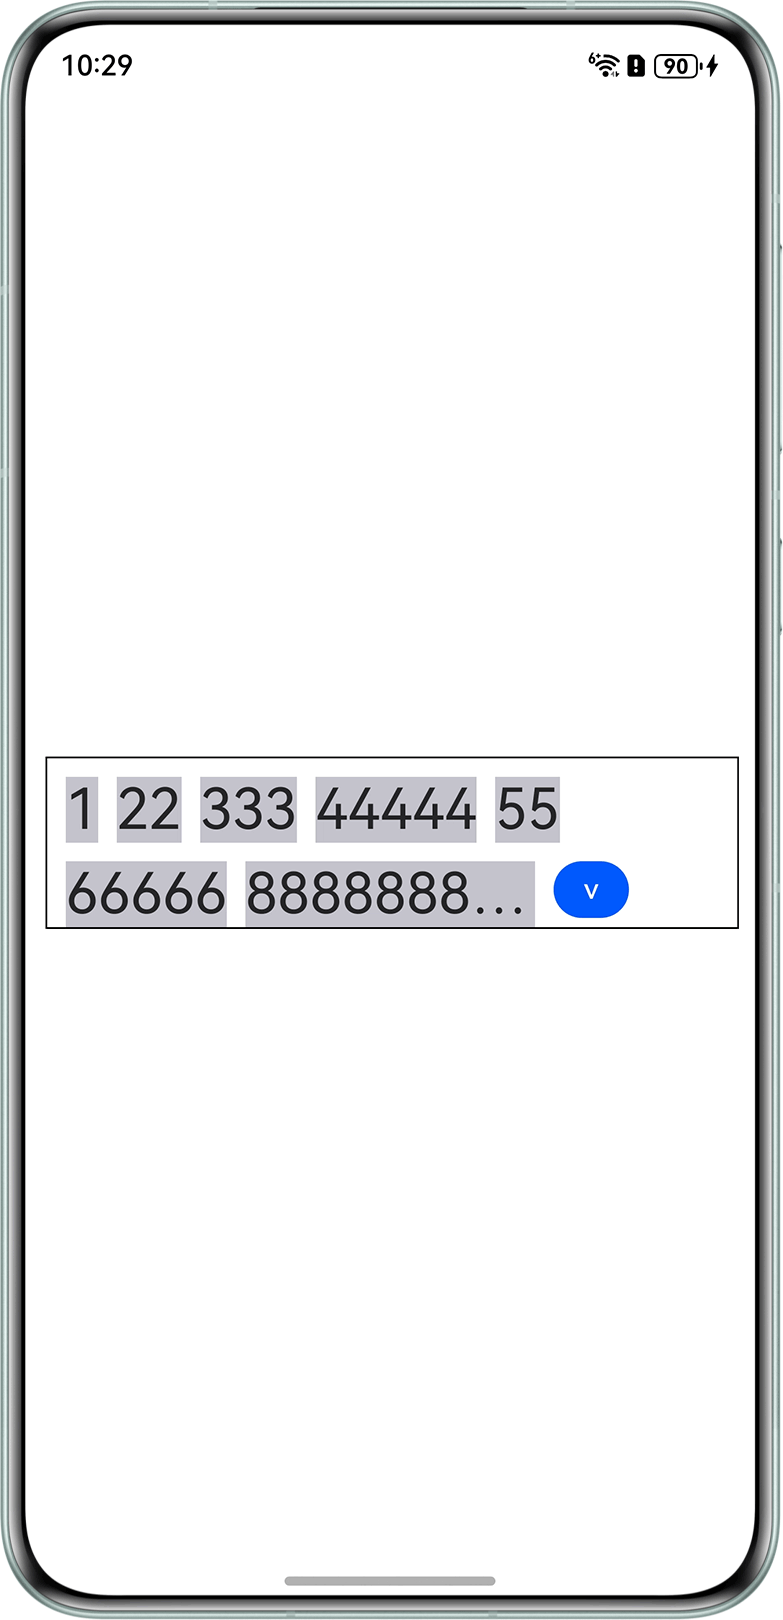
方案二:通过display.getDefaultDisplaySync获取屏幕的宽度,MeasureText.measureText获取文本子项的宽度,自定义方法计算每行显示的子项,实现Flex布局与展开收缩功能。
import { display } from '@kit.ArkUI'
import measure from '@ohos.measure'

let displayClass: display.Display | null = null
let componentWidth: number = 0
const childMaxWidth: number = 500
try {
displayClass = display.getDefaultDisplaySync()
componentWidth = displayClass.width
console.info('Flex_overNumber displayClass.width:' + displayClass.width)
} catch (exception) {
console.error(`FlexOverNumber Failed to obtain the default display object. Code: + ${exception}`);
}

@Entry
@Component
struct FlexOverNumber {
@State @Watch('IndexChange') index: number = 0
@State @Watch('textChange') message: string = ''
@State FlexWidth: string = '80%'
@State newIndex: number = 0
@State heightControl: number | string = 100
@State ButtonText: string = '∨'
@State AllData: string[] =
['1', '22', '333', '44444', '55', '66666', '8888888888888', '99', '7777', '1111', '6666', '88888', '99999']
@State SomeData: string[] = []
@State ShowData: string[] = []
@State fontSizeData: number = 30
@State AllWidth: number = 0
@State textWidth: number = 0
@State restrictWidth: number = 0

IndexChange() {
if (this.AllWidth >= (this.restrictWidth - childMaxWidth) && this.AllWidth <= (this.restrictWidth)) {
this.newIndex = this.index
console.info('FlexOverNumber text1 newIndex', this.newIndex)
console.info('FlexOverNumber text1 change', this.newIndex)
}
}

textChange() {
let content: string = this.message
this.textWidth = measure.measureText({ textContent: content, fontSize: this.fontSizeData })
if (this.textWidth > childMaxWidth) {
this.AllWidth += childMaxWidth
} else {
this.AllWidth += this.textWidth
}
console.info('FlexOverNumber text1 content', content)
console.info('FlexOverNumber text1 Width', this.textWidth)
}

aboutToAppear(): void {
if (componentWidth != 0) {
this.restrictWidth = componentWidth * 1.2
console.info('Flex_overNumber text1 componentWidth', componentWidth)
console.info('Flex_overNumber text1 restrictWidth', this.restrictWidth)
}
for (let i = 0; i < this.AllData.length; i++) {
this.message = this.AllData[i]
this.index = i
}
console.info('text1 change newIndex', this.newIndex)
this.SomeData = this.AllData.slice(0, this.newIndex + 1)
this.ShowData = this.SomeData
}

build() {
Row() {
Column() {
Flex({ wrap: FlexWrap.Wrap }) {
ForEach(this.ShowData, (item: string) => {
TextItem({ message: item, fontSizeData: this.fontSizeData })
})
Button(this.ButtonText).onClick(() => {
if (this.heightControl === 100) {
this.heightControl = '100%'
this.ButtonText = '^'
this.ShowData = this.AllData
} else {
this.heightControl = 100
this.ButtonText = 'v'
this.ShowData = this.SomeData
}
}).width(40).height(30).margin({ left: 10, top: 10 })
}
.constraintSize({ maxHeight: this.heightControl })
.border({ width: 1 })
.width(this.FlexWidth)
.margin({ left: '5%' })
.clip(true)
}.width('100%')
}.height('100%')
}
}

@Component
struct TextItem {
@State message: string = ''
@Prop fontSizeData: number

build() {
Text(this.message)
.fontSize(this.fontSizeData)
.margin({ left: 10, top: 10 })
.backgroundColor('#c4c2cc')
.constraintSize({ maxWidth: childMaxWidth + 'px' })
.maxLines(1)
.textOverflow({ overflow: TextOverflow.Ellipsis })
}
}
效果预览:
总结
| 解决方案 | 适用场景 | 说明 |
|---|---|---|
| 标签流布局 | 按钮位于Flex布局外。 | 可以大大降低代码的难度和代码量,便于维护。 |
| onAreaChange回调 | 按钮位于Flex布局内。 | 使用循环遍历的方式依次渲染每一个子项,当Flex内子项不多时适用。 |
| 直接计算每行显示的子项数量 | 按钮位于Flex布局内。 | 当Flex内子项过多时,使用计算的方式直接求出按钮的所在位置,可以提高代码运行的效率。 |


 602
602

 被折叠的 条评论
为什么被折叠?
被折叠的 条评论
为什么被折叠?
 到【灌水乐园】发言


