


Packet Tracer - 综合技能练习
地址分配表
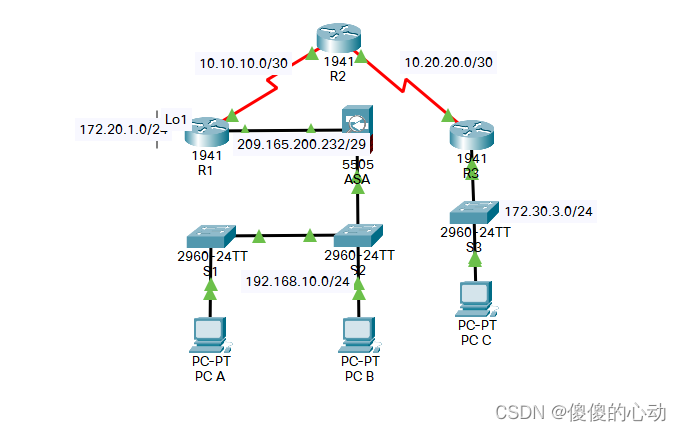
| 设备 | 接口 | IP 地址 | 子网掩码 | 默认网关 |
| R1 | G0/0 | 209.165.200.233 | 255.255.255.248 | 不适用 |
| S0/0/0 (DCE) | 10.10.10.1 | 255.255.255.252 | 不适用 | |
| 环回接口 1 | 172.20.1.1 | 255.255.255.0 | 不适用 | |
| R2 | S0/0/0 | 10.10.10.2 | 255.255.255.252 | 不适用 |
| S0/0/1 (DCE) | 10.20.20.2 | 255.255.255.252 | 不适用 | |
| R3 | G0/1 | 172.30.3.1 | 255.255.255.0 | 不适用 |
| S0/0/1 | 10.20.20.1 | 255.255.255.252 | 不适用 | |
| S1 | VLAN 1 | 192.168.10.11 | 255.255.255.0 | 192.168.10.1 |
| S2 | VLAN 1 | 192.168.10.12 | 255.255.255.0 | 192.168.10.1 |
| S3 | VLAN 1 | 172.30.3.11 | 255.255.255.0 | 172.30.3.1 |
| ASA | VLAN 1 (E0/1) | 192.168.10.1 | 255.255.255.0 | 不适用 |
| VLAN 2 (E0/0) | 209.165.200.234 | 255.255.255.248 | 不适用 | |
| PC-A | NIC | 192.168.10.2 | 255.255.255.0 | 192.168.10.1 |
| PC-B | NIC | 192.168.10.3 | 255.255.255.0 | 192.168.10.1 |
| PC-C | NIC | 172.30.3.3 | 255.255.255.0 | 172.30.3.1 |
目标
· 配置基本的路由器安全性
· 配置基本的交换机安全性
· 配置 AAA 本地认证
· 配置 SSH
· 防御登录攻击
· 配置站点间 IPsec VPN
· 配置防火墙和 IPS 设置
· 配置 ASA 基本安全性和防火墙设置
拓扑图
场景
本总结练习 考察您在本课程中获得的许多技能。 路由器和交换机预先配置了基本设备设置,例如 IP 地址分配和路由。您需要使用 CLI 配置各种 IOS 功能,包括 AAA、SSH 和基于区域的策略防火墙 (ZPF),以保护路由器的安全。 您需要配置 R1 和 R3 之间的站点间 VPN。您需要保护 网络上的交换机的安全。此外,还需要在 ASA 上配置防火墙 功能。
要求
注意:并非所有安全功能都会在所有设备上配置 ,但是在生产网络中会配置所有安全功能。
配置基本路由器安全
· 在 R1 上执行下列配置:
o 最小 密码长度为 10 个字符。
o 加密 明文密码。
o 特权 EXEC 模式的加密密码为 ciscoenapa55。
o 控制台 线路密码为 ciscoconpa55,超时值为 15 分钟,控制台 消息不应中断命令输入。
o 当日消息 (MOTD) 横幅应包括 unauthorized(未经授权)一词。
R1>en
R1#conf t
Enter configuration commands, one per line. End with CNTL/Z.
R1(config)#se
R1(config)#secur
R1(config)#secur?
secure security
R1(config)#securi
R1(config)#security pa
R1(config)#security passwords m
R1(config)#security passwords min-length 10
R1(config)#enable secret ciscoenpa55
R1(config)#servic
R1(config)#service pa
R1(config)#service password-encryption
R1(config)#line c
R1(config)#line console 0
R1(config-line)#password ciscoenpa55
R1(config-line)#login
R1(config-line)#exec-timeout 15 0
R1(config-line)#logging synchronous
R1(config-line)#exit
R1(config)#banner motd $ Unauthorized access strictly prohibited and prosecuted to the full extent of the law!$
· 在 R2 上执行下列配置:
o 特权 EXEC 模式的加密密码为 ciscoenapa55。
o VTY 线路 密码为 ciscovtypa55,超时值为 15 分钟并且 需要登录。
R2>en
R2#conf t
Enter configuration commands, one per line. End with CNTL/Z.
R2(config)#enable secret ciscoenapa55
R2(config)#line vty 0 4
R2(config-line)#password ciscovtypa55
R2(config-line)#exec-timeout 15 0
R2(config-line)#login
R2(config-line)#exit
配置基本的交换机安全性
· 在 S1 上执行下列配置:
o 加密 明文密码。
o 特权 EXEC 模式的加密密码为 ciscoenapa55。
o 控制台 线路密码为 ciscoconpa55,超时值为 5 分钟,控制台 消息不应中断命令输入。
o VTY 线路 密码为 ciscovtypa55,超时值为 5 分钟并且 需要登录。
o MOTD 横幅 应包括 unauthorized(未经授权)一词。
S1>enable
S1#conf t
Enter configuration commands, one per line. End with CNTL/Z.
S1(config)#service password-encryption
S1(config)#enable secret ciscoenapa55
S1(config)#line console 0
S1(config-line)#password ciscoconpa55
S1(config-line)#exec-timeout 5 0
S1(config-line)#login
S1(config-line)#logging synchronous
S1(config-line)#exit
S1(config)#line vty 0 15
S1(config-line)#password ciscovtypa55
S1(config-line)#exec-timeout 5 0
S1(config-line)#login
S1(config-line)#exit
S1(config)#banner motd $ Unauthorized access strictly prohibited and prosecuted to the full extent of the law! $
· 使用以下设置配置 S1 和 S2 之间的中继:
o 将模式 设置为中继并将 VLAN 99 指定为本征 VLAN。
o 禁用 DTP 帧的生成。
S1(config)#interface f0/1
S1(config-if)#switchport mode trunk
S1(config-if)#switchport trunk native vlan 99
S1(config-if)#switchport nonegotiate
S2(config)#interface f0/1
S2(config-if)#switchport mode trunk
S2(config-if)#switchport trunk native vlan 99
S2(config-if)#switchport nonegotiate
· 使用以下端口设置配置 S1:
o F0/6 应仅允许访问模式,设置为 PortFast 并启用 BPDU 防护。
o F0/6 使用 基本的默认端口安全性,并将动态获知的 MAC 地址添加到 运行配置中。
o 应禁用所有其他 端口。
注意:虽然没有选中所有端口,但 教师可能想要检验所有未使用的端口是否禁用。
S1(config-if)#interface f0/6
S1(config-if)#switchport mode access
S1(config-if)#spanning-tree portfast
S1(config-if)#spanning-tree bpduguard enable
S1(config-if)#shutdown
S1(config-if)#switchport port-security
S1(config-if)#switchport port-security mac-address sticky
S1(config-if)#no shutdown
S1(config-if)#exit
S1(config)#interface range f0/2-5,f0/7-24,g0/1-2
S1(config-if-range)#shutdown
配置 AAA 本地认证
· 在 R1 上执行下列配置:
o 创建 一个本地用户账户 Admin01,加密密码为 Admin01pa55, 权限级别为 15。
o 启用 AAA 服务。
o 实施 AAA 服务时,使用本地数据库作为第一选项,然后使用启用 密码作为备用选项。
R1(config)#username Admin01 privilege 15 secret Admin01pa55
R1(config)#aaa new-model
R1(config)#aaa authentication login default local enable
配置 SSH
· 在 R1 上执行下列配置:
o 域名为 ccnasecurity.com
o 应使用 1024 位模数生成 RSA 密钥。
o 只允许 使用 SSH 第 2 版。
o VTY 线路 上只允许使用 SSH。
R1(config)#ip domain-name ccnasecurity.com
R1(config)#crypto key generate rsa
The name for the keys will be: R1.ccnasecurity.com
Choose the size of the key modulus in the range of 360 to 2048 for your
General Purpose Keys. Choosing a key modulus greater than 512 may take
a few minutes.
How many bits in the modulus [512]: 1024
% Generating 1024 bit RSA keys, keys will be non-exportable...[OK]
R1(config)#ip ssh version 2
*Mar 1 0:24:56.377: %SSH-5-ENABLED: SSH 1.99 has been enabled
R1(config)#line vty 0 4
R1(config-line)#transport input ssh
· 验证 PC-C 是否可以使用 SSH 远程访问 R1 (209.165.200.233)。
防御登录攻击
· 在 R1 上执行下列配置:
o 如果用户 在 30 秒的时间范围内两次登录都失败了,请禁用登录 1 分钟。
o 记录所有 失败的登录尝试。
R1(config)#login block-for 60 attempts 2 within 30
R1(config)#login on-failure log
配置站点间 IPsec VPN
注意:部分 VPN 配置不评分。但是,您应该能够验证 IPsec VPN 隧道之间的连接。
· 在 R1 上启用安全技术包许可证。
o 在重新加载之前先保存 运行配置。
· 在 R1 上执行下列配置:
o 创建 访问列表以确定 R1 上需要关注的流量。
o 配置 ACL 101 以允许从 R1 Lo1 网络到 R3 G0/1 LAN 的流量。
· 在 R1 上配置 crypto isakmp policy 10 第 1 阶段属性 性以及共享加密密钥 ciscovpnpa55。使用以下 参数:
o 密钥 分配方法:ISAKMP
o 加密: aes 256
o 散列:sha
o 认证验证 方法:pre-shared
o密钥 交换:DH 组 5
o IKE SA 生命周期:3600
o ISAKMP 密钥:ciscovpnpa55
· 创建 转换集 VPN-SET 以使用 esp-aes 256 和 esp-sha-hmac。 然后创建将所有第 2 阶段参数捆绑 在一起的加密映射 CMAP。使用序号 10 并将其确定为 ipsec-isakmp 映射。使用以下参数:
o 转换 集: VPN-SET
o转换 加密:esp-aes 256
o转换 认证:esp-sha-hmac
o 完全 向前保密 (PFS):group5
o加密映射 名称:CMAP
o SA 建立: ipsec isakmp
o 将 加密映射 (CMAP) 绑定到传出接口。
· 验证是否启用了安全技术包许可证。在 R3 上重复 站点间 VPN 配置,以便它们镜像 R1 中的所有 配置。
· 从 PC-C 上的 R1 ping 通 Lo1 接口 (172.20.1.1),使用 show crypto ipsec sa 命令验证包的的数量是否大于 0,若 大于 0 则表明 IPsec VPN 隧道正在工作。
R1(config)#access-list 101 permit ip 172.20.1.0 0.0.0.255 172.30.3.0 0.0.0.255
R1(config)#crypto isakmp policy 10
R1(config-isakmp)#encryption aes 256
R1(config-isakmp)#authentication pre-share
R1(config-isakmp)#hash sha
R1(config-isakmp)#group 5
R1(config-isakmp)#lifetime 3600
R1(config-isakmp)#exit
R1(config)#crypto isakmp key ciscovpnpa55 address 10.20.20.1
R1(config)#crypto ipsec transform-set VPN-SET esp-aes 256 esp-sha-hmac
R1(config)#crypto map CMAP 10 ipsec-isakmp
% NOTE: This new crypto map will remain disabled until a peer
and a valid access list have been configured.
R1(config-crypto-map)#set peer 10.20.20.1
R1(config-crypto-map)#set pfs group5
R1(config-crypto-map)#set transform-set VPN-SET
R1(config-crypto-map)#match address 101
R1(config-crypto-map)#exit
R1(config)#interface S0/0/0
R1(config-if)#crypto map CMAP
*Jan 3 07:16:26.785: %CRYPTO-6-ISAKMP_ON_OFF: ISAKMP is ON
R1(config-if)#exit
R1(config)#end
R3>en
R3#conf t
Enter configuration commands, one per line. End with CNTL/Z.
R3(config)#access-list 101 permit ip 172.30.3.0 0.0.0.255 172.20.1.0 0.0.0.255
R3(config)#crypto isakmp policy 10
R3(config-isakmp)#encryption aes 256
R3(config-isakmp)#authentication pre-share
R3(config-isakmp)#hash sha
R3(config-isakmp)#group 5
R3(config-isakmp)#lifetime 3600
R3(config-isakmp)#exit
R3(config)#crypto isakmp key ciscovpnpa55 address 10.10.10.1
R3(config)#crypto ipsec transform-set VPN-SET esp-aes 256 esp-sha-hmac
R3(config)#crypto map CMAP 10 ipsec-isakmp
% NOTE: This new crypto map will remain disabled until a peer
and a valid access list have been configured.
R3(config-crypto-map)#set peer 10.10.10.1
R3(config-crypto-map)#set transform-set VPN-SET
R3(config-crypto-map)#match address 101
R3(config-crypto-map)#exit
R3(config)#interface S0/0/1
R3(config-if)#crypto map CMAP
*Jan 3 07:16:26.785: %CRYPTO-6-ISAKMP_ON_OFF: ISAKMP is ON
R3(config-if)#end
配置防火墙和 IPS 设置
· 使用以下要求在 R3 上配置 ZPF:
o 创建名为 IN-ZONE 和 OUT-ZONE 的区域。
o 创建 用于定义内部流量的 ACL 编号 110,允许从 172.30.3.0/24 源网络传送到 任何目的地的所有 IP 协议。
· 创建名为 INTERNAL-CLASS-MAP 的类映射,使用 match-all 选项和 ACL 110。
· 创建名为 IN-2-OUT-PMAP 的策略映射,使用 类映射 INTERNAL-CLASS-MAP 来检查所有匹配的流量。
· 创建名为 IN-2-OUT-ZPAIR 的区域对,将 IN-ZONE 指定为源区域,将 OUT-ZONE 指定为目的区域。
o 指定 IN-2-OUT-PMAP 策略映射用于检查两个区域之间的流量。
o 将 G0/1 指定为 IN-ZONE 成员,将 S0/0/1 指定为OUT-ZONE 成员。
R3(config)#zone security IN-ZONE
R3(config-sec-zone)#zone security OUT-ZONE
R3(config-sec-zone)#exit
R3(config)#zone security OUT-ZONE
R3(config-sec-zone)#exit
R3(config)#access-list 110 permit ip 172.30.3.0 0.0.0.255 any
R3(config)#access-list 110 deny ip any any
R3(config)#class-map type inspect match-all INTERNAL-CLASS-MAP
R3(config-cmap)#match access-group 110
R3(config-cmap)#exit
R3(config)#policy-map type inspect IN-2-OUT-PMAP
R3(config-pmap)#class type inspect INTERNAL-CLASS-MAP
R3(config-pmap-c)#inspect
%No specific protocol configured in class INTERNAL-CLASS-MAP for inspection. All protocols will be inspected
R3(config-pmap-c)#exit
R3(config-pmap)#policy-map type inspect IN-2-OUT-PMAP
class-default System default class matching otherwise unclassified packets
type type of the class-map
R3(config-pmap)#exit
R3(config)#zone-pair security IN-2-OUT-ZPAIR source IN-ZONE destination OUT-ZONE
R3(config-sec-zone-pair)#service-policy type inspect IN-2-OUT-PMAP
R3(config-sec-zone-pair)#exit
R3(config)#interface g0/1
R3(config-if)#zone-member security IN-ZONE
R3(config-if)#exit
R3(config)#interface s0/0/1
R3(config-if)#zone-member security OUT-ZONE
R3(config-if)#exit
R3(config)#end
· 使用以下要求在 R3 上配置 IPS:
注意:在 Packet Tracer 中,路由器已导入并实施了签名文件。 它们是闪存 中的默认 XML 文件。出于此原因,不需要配置加密 公钥和完成签名文件的手动导入。
o 在名为 ipsdir 的闪存中创建目录并将其设置为存储 IPS 签名的位置。
o 创建名为 IPS-RULE 的 IPS 规则。
o 使用 retired true 命令停用全部签名类别(签名版本中的所有 签名)。
o 使用 retired false 命令取消停用 IOS_IPS Basic 类别。
o 在 S0/0/1 接口的入站方向应用 该规则。
R3#mkdir ipsdir
Create directory filename [ipsdir]?
Created dir flash:ipsdir
R3#conf t
Enter configuration commands, one per line. End with CNTL/Z.
R3(config)#ip ips config location flash:ipsdir
R3(config)#ip ips name IPS-RULE
R3(config)#ip ips signature-category
R3(config-ips-category)#category all
R3(config-ips-category-action)#retired true
R3(config-ips-category-action)#exit
R3(config-ips-category)#category ios_ips basic
R3(config-ips-category-action)#retired false
R3(config-ips-category-action)#exit
R3(config-ips-category)#exit
Do you want to accept these changes? [confirm]
Applying Category configuration to signatures ...
%IPS-6-ENGINE_BUILDING: atomic-ip - 288 signatures - 6 of 13 engines
%IPS-6-ENGINE_READY: atomic-ip - build time 30 ms - packets for this engine will be scanned
R3(config)#interface s0/0/1
R3(config-if)#ip ips IPS-RULE in
R3(config-if)#
%IPS-6-ENGINE_BUILDS_STARTED: 00:45:30 UTC 3月 01 1993
%IPS-6-ENGINE_BUILDING: atomic-ip - 3 signatures - 1 of 13 engines
%IPS-6-ENGINE_READY: atomic-ip - build time 8 ms - packets for this engine will be scanned
%IPS-6-ALL_ENGINE_BUILDS_COMPLETE: elapsed time 8 ms
R3(config-if)#
配置 ASA 基本安全性和防火墙设置
· 使用以下设置配置 VLAN 接口:
o 对于 VLAN 1 接口,将地址分配配置为使用 192.168.10.1/24。
o 对于 VLAN 2 接口,删除默认 DHCP 设置并将地址分配配置为 使用 209.165.200.234/29。
· 使用以下设置配置主机名、域名、启用密码和控制台 密码:
o ASA 主机名为 CCNAS-ASA。
o 域名为 ccnasecurity.com。
o 启用模式密码为 ciscoenapa55。
· 创建用户并将 AAA 配置为使用本地数据库进行 远程认证。
o 配置名为 admin 的本地用户账户,密码为 adminpa55。请 勿使用加密属性。
o 将 AAA 配置为使用本地 ASA 数据库进行 SSH 用户认证。
o 允许从外部主机 172.30.3.3 访问 SSH ,超时值为 10 分钟。
· 使用以下设置将 ASA 配置为 DHCP 服务器:
o 向内部 DHCP 客户端分配从 192.168.10.5 到 192.168.10.30 的 IP 地址。
o 启用 DHCP 以侦听 DHCP 客户端请求。
· 配置静态路由和 NAT。
o 创建 创建到下一跳路由器 (R1) IP 地址的静态默认路由。
o 创建 名为 inside-net 的网络对象,并使用 subnet 和 nat 命令向其分配属性。
o 创建 到外部接口的动态 NAT 转换。
· 使用 以下设置修改 ASA 上的思科模块化策略框架 (MPF):
o 将 class-map inspection_default 配置为 match default-inspection-traffic,然后退出到全局配置模式。
o 配置 策略映射列表 global_policy。输入 class inspection_default ,并输入命令 inspect icmp。然后退出到全局 配置模式。
o 配置 MPF 服务策略,以在全局范围内应用 global_policy。
ciscoasa>en
Password:
ciscoasa#conf t
ciscoasa(config)#interface vlan 1
ciscoasa(config-if)#nameif inside
ciscoasa(config-if)#security-level 100
ciscoasa(config-if)#ip address 192.168.10.1 255.255.255.0
ciscoasa(config-if)#interface vlan 2
ciscoasa(config-if)#nameif outside
ciscoasa(config-if)#security-level 0
ciscoasa(config-if)#no ip address dhcp
WARNING: DHCPD bindings cleared on interface 'outside', address pool removed
ciscoasa(config-if)#ip address 209.165.200.234 255.255.255.248
ciscoasa(config-if)#exit
ciscoasa(config)#hostname CCNAS-ASA
CCNAS-ASA(config)#domain-name ccnasecurity.com
CCNAS-ASA(config)#enable password ciscoenapa55
CCNAS-ASA(config)#username admin password adminpa55
CCNAS-ASA(config)#aaa authentication ssh console LOCAL
CCNAS-ASA(config)#ssh 192.168.10.0 255.255.255.0 inside
CCNAS-ASA(config)#ssh 172.30.3.3 255.255.255.255 outside
CCNAS-ASA(config)#ssh timeout 10
CCNAS-ASA(config)#dhcpd address 192.168.10.5-192.168.10.30 inside
CCNAS-ASA(config)#dhcpd enable inside
CCNAS-ASA(config)#route outside 0.0.0.0 0.0.0.0 209.165.200.233
CCNAS-ASA(config)#object network inside-net
CCNAS-ASA(config-network-object)#subnet 192.168.10.0 255.255.255.0
CCNAS-ASA(config-network-object)#nat (inside,outside) dynamic interface
CCNAS-ASA(config-network-object)#exit
CCNAS-ASA#conf t
CCNAS-ASA(config)#class-map inspection_default
CCNAS-ASA(config-cmap)#match default-inspection-traffic
CCNAS-ASA(config-cmap)#exit
CCNAS-ASA(config)#policy-map global_policy
CCNAS-ASA(config-pmap)#class inspection_default
CCNAS-ASA(config-pmap-c)#inspect icmp
CCNAS-ASA(config-pmap-c)#exit
CCNAS-ASA(config)#service-policy global_policy global
CCNAS-ASA(config)#
实验脚本:
!-------------------------------
!配置基本路由器安全
!-------------------------------
!R1
conf t

security passwords min-length 10

enable secret ciscoenapa55

service password-encryption

line console 0

password ciscoconpa55

exec-timeout 15 0

login

logging synchronous

banner motd $Unauthorized access strictly prohibited and prosecuted to the full extent of the law!$

end
!R2
conf t

enable secret ciscoenapa55

line vty 0 4

password ciscovtypa55

exec-timeout 15 0

login

end
!-------------------------
!配置基本的交换机安全性
!-------------------------
!S1
conf t

service password-encryption

enable secret ciscoenapa55

line console 0

password ciscoconpa55

exec-timeout 5 0

login

logging synchronous

line vty 0 15

password ciscovtypa55

exec-timeout 5 0

login

banner motd $Unauthorized access strictly prohibited and prosecuted to the full extent of the law!$

end!中继
!S1 and S2
conf t

interface FastEthernet 0/1

switchport mode trunk

switchport trunk native vlan 99

switchport nonegotiate

end!S1 端口安全
conf t

interface FastEthernet 0/6

switchport mode access

spanning-tree portfast

spanning-tree bpduguard enable

shutdown

switchport port-security

switchport port-security mac-address sticky

no shutdown

interface range f0/2 – 5 , f0/7 – 24 , g0/1 - 2

shutdown

end
!----------------------------------
!配置 AAA 本地认证
!----------------------------------
!R1
conf t

username Admin01 privilege 15 secret Admin01pa55

aaa new-model

aaa authentication login default local enable

end
!-------------------------
!配置 SSH
!-------------------------
!R1
conf t

ip domain-name ccnasecurity.com

crypto key generate rsa

1024

ip ssh version 2

line vty 0 4

transport input ssh

end
!----------------------------
!防御登录攻击
!----------------------------
!R1
conf t

login block-for 60 attempts 2 within 30

login on-failure log
end
!---------------------------------
!配置站点间 IPsec VPN
!---------------------------------
!R1
conf t

access-list 101 permit ip 172.20.1.0 0.0.0.255 172.30.3.0 0.0.0.255

crypto isakmp policy 10

encryption aes 256

authentication pre-share

hash sha

group 5

lifetime 3600

exit

crypto isakmp key ciscovpnpa55 address 10.20.20.1

crypto ipsec transform-set VPN-SET esp-aes 256 esp-sha-hmac

crypto map CMAP 10 ipsec-isakmp

set peer 10.20.20.1

set pfs group5

set transform-set VPN-SET

match address 101

exit

interface S0/0/0

crypto map CMAP

end
!R3
conf t

access-list 101 permit ip 172.30.3.0 0.0.0.255 172.20.1.0 0.0.0.255

crypto isakmp policy 10

encryption aes 256

authentication pre-share

hash sha

group 5

lifetime 3600

exit

crypto isakmp key ciscovpnpa55 address 10.10.10.1

crypto ipsec transform-set VPN-SET esp-aes 256 esp-sha-hmac

crypto map CMAP 10 ipsec-isakmp

set peer 10.10.10.1

set transform-set VPN-SET

match address 101

exit

interface S0/0/1

crypto map CMAP

end
!-----------------------------------
!配置防火墙和 IPS 设置
!-----------------------------------
!R3
conf t

!Firewall configs

zone security IN-ZONE

zone security OUT-ZONE

access-list 110 permit ip 172.30.3.0 0.0.0.255 any

access-list 110 deny ip any any

class-map type inspect match-all INTERNAL-CLASS-MAP

match access-group 110

exit

policy-map type inspect IN-2-OUT-PMAP

class type inspect INTERNAL-CLASS-MAP

inspect

zone-pair security IN-2-OUT-ZPAIR source IN-ZONE destination OUT-ZONE

service-policy type inspect IN-2-OUT-PMAP

exit

interface g0/1

zone-member security IN-ZONE

exit

interface s0/0/1

zone-member security OUT-ZONE

end
!配置IPS
mkdir ipsdir

conf t

ip ips config location flash:ipsdir

ip ips name IPS-RULE

ip ips signature-category

category all

retired true

exit

category ios_ips basic

retired false

exit

<Enter>

interface s0/0/1

ip ips IPS-RULE in
!--------------------------------------------------
!配置 ASA 基本安全性和防火墙设置
!--------------------------------------------------
!CCNAS-ASA
enable

<Enter>

conf t

interface vlan 1

nameif inside

security-level 100

ip address 192.168.10.1 255.255.255.0

interface vlan 2

nameif outside

security-level 0

no ip address dhcp

ip address 209.165.200.234 255.255.255.248

exit

hostname CCNAS-ASA

domain-name ccnasecurity.com

enable password ciscoenapa55

username admin password adminpa55

aaa authentication ssh console LOCAL

ssh 192.168.10.0 255.255.255.0 inside

ssh 172.30.3.3 255.255.255.255 outside

ssh timeout 10

dhcpd address 192.168.10.5-192.168.10.30 inside

dhcpd enable inside

route outside 0.0.0.0 0.0.0.0 209.165.200.233

object network inside-net

subnet 192.168.10.0 255.255.255.0

nat (inside,outside) dynamic interface

exit

conf t

class-map inspection_default

match default-inspection-traffic

exit

policy-map global_policy

class inspection_default

inspect icmp

exit

service-policy global_policy global
实验链接:https://pan.baidu.com/s/1urVfIaOtOyJGxqh7XS2adQ?pwd=1131
提取码:1131
--来自百度网盘超级会员V2的分享


 2万+
2万+

 被折叠的 条评论
为什么被折叠?
被折叠的 条评论
为什么被折叠?
 到【灌水乐园】发言


