


我们在从github上拉取到fabric源码之后,在fabric文件夹下有一个scripts文件夹,进入到此文件夹之后有一个bootstrap.sh文件(此文件是shell脚本文件,内含了一系列的shell命令),执行此文件夹,会拉取到一个新的文件夹,即fabric-samples文件夹

(图中蓝色为文件夹,绿色为可执行脚本),进入到此文件夹中

注意chaincode文件夹,这是我们在搭建实例网络的时候使用到的链码,即智能合约,此后我们进入first-network文件夹,此文件夹才是我们启动实例网络真正需要配置的文件夹。
(补充一点:我们在执行bootstrap.sh文件,需要vim以下,更改拉去的版本,需要更改两个值,一个是fabric-samples文件夹,一个是ca文件夹,但是需要注意的是,1.4版本ca文件不再通过文件夹的形式拉去,因此找不到ca文件夹是正常的,问了一下chat哈哈哈)
好,我们进入此文件夹,如图

我们将重点放在以下几个文件和文件夹中:
- crypto-config.yaml 文件
- configtx.yaml 文件
- docker-compose-cli.yaml 文件(有的也叫docker-compose.yaml)
- base文件夹
- channel-artifacts文件夹
- crypto-config文件夹
- byfn.sh脚本文件
好,我们乱序讲解一下:
首先byfn.sh文件实际上就是集成了手动搭建fabric网络的所有命令,我们只需要依次执行以下两个命令就可以完成fabric搭建,即 ./byfh.sh generate 以及 ./byfn.sh up 。但是看此文章的兄弟们肯定是对其具体的操作过程感兴趣,毕竟进行fabric开发还是需要自己搭建fabric网络的,因此在讲之后的所有的文件之前我们需要先了解一下搭建的流程。
我们在讲解之后文件之前,先把搭建流程简单说一下
首先,从组成成员来说,实例网络中的组成成员主要包括:
- 组织,以及组织中的节点
- 创世区块
- 管道
- 锚节点
因此,我们如果要搭建网络,首先要有以上的一些基本成员,此成员是通过文件的形式给出的。
此后,我们有了相关的文件之后,就要发挥docker的作用了。先简单介绍一下docker,docker其实也可以把他看成一种虚拟机,但是比虚拟机又有一系列的优点,初次尝试搭建fabric的兄弟们可以不用具体了解什么是docker,只需要知道docker是fabric网络搭建的操作环境(就像我们作画,docker就是画布,而画就是fabric网络,我们通过docker命令,对fabric这幅“画”进行操作搭建),具体的可以找找相关博文。
我们回归话题,有了一系列的组成成员文件之后,就需要将这些成员文件搬运到docker中了,因此我们需要“映射文件”,所谓映射文件就是通过执行此文件,将我们本机目标路径下的文件映射复制到docker的指定路径目录下。
之后我们启动docker进入到docker中,在对docker进行操作。好,之后的对docker操作,具体搭建的话题话题先暂停,不然话题引得太长就收不回来了,我们先看看之后的文件。
crypto-config.yaml 文件:
OrdererOrgs:
  # ---------------------------------------------------------------------------
  # Orderer
  # ---------------------------------------------------------------------------
  - Name: Orderer
    Domain: example.com
    # ---------------------------------------------------------------------------
    # "Specs" - See PeerOrgs below for complete description
    # ---------------------------------------------------------------------------
    Specs:
      - Hostname: orderer
# ---------------------------------------------------------------------------
# "PeerOrgs" - Definition of organizations managing peer nodes
# ---------------------------------------------------------------------------
PeerOrgs:
  # ---------------------------------------------------------------------------
  # Org1
  # ---------------------------------------------------------------------------
  - Name: Org1
    Domain: org1.example.com
    EnableNodeOUs: true

    Template:
      Count: 2
      # Start: 5
      # Hostname: {{.Prefix}}{{.Index}} # default
    # ---------------------------------------------------------------------------
    # "Users"
    # ---------------------------------------------------------------------------
    # Count: The number of user accounts _in addition_ to Admin
    # ---------------------------------------------------------------------------
    Users:
      Count: 1
  # ---------------------------------------------------------------------------
  # Org2: See "Org1" for full specification
  # ---------------------------------------------------------------------------
  - Name: Org2
    Domain: org2.example.com
    EnableNodeOUs: true
    Template:
      Count: 2
    Users:
      Count: 1
我们会看到里面有两个大组织,一个是OrdererOrgs,一个是PeerOrgs,其中PeerOrgs有两个小组织,一个是Org1,一个是Orgs2,其实执行的之后是三个组织,即Orderer、Orgs1、Orgs2,具体的文件讲解就不在细聊了,可以自己找相关博文,需要注意一点的是,Orgs1和Orgs2的Users的数量是1,但是实际上执行后会出现两个用户证书(关于证书,之后细说),系统会自动的生成一个管理员用户。
之后将此文件执行:
cryptogen generate --config=crypto-config.yaml (其实 --config之后的命令是起到了文件指定的作用)
执行之后,我们的first-network文件夹下变多了一个新的文件夹,即crypto-config文件夹,里面包含了两个子文件夹,分别是OrderOrganizations和PeerOrganizations,里面包含了每个节点的ca证书文件。
这里我简单扩充一下:fabric的节点分为三种,客户端节点cli,peer节点,和Order节点,所有的节点都有自己为一的身份标识,及证书和对应的私钥,通过Ca机构颁发,放在msp中,因此我们可以把msp看成所有节点的账号,通过ca证书和私钥唯一标识节点。因此,如果我们想创建节点组织,本质上是需要创建其对应的msp,即ca证书和相关私钥。
再来简单对不同节点的功能进行说明,既然分出来了不同的节点,那么说明其在fabric网络中的作用也是不一样的,不同于比特币和以太坊pow、pos共识机制,fabric对于共识算法以及区块的排序并非所有节点共同参与,而是单独设置相关节点专门负责区块排序,因此Order节点就发挥了此项作用,fabric中有三种排序机制,分别是solo,kafka,raft,我们事例网络中采用的solo机制,即只有一个排序节点,其他的可自行chat一下;peer节点用于存放区块链账本,和链码,及智能合约,注意,fabric中链码和账本是分开的,此外Order节点只负责排序,不负责账本存储,真正存储的是PeerOrgs节点,真正实现链码调用的也是peer节点,此外peer节点还有锚节点的作用,用于与其他组织之间进行沟通,以及领导节点的作用,这是在raft共识算法中需要的节点,solo不需要;而cli客户端节点则是负责构建fabric,channel的安装,管道的安装,链码的安装以及初始化,链码的调用,因此可以推出,之后我们在docker搭建的时候使用cli身份进行搭建,注意,我们使用cli客户端连接后是连接到了某个Peer节点,通过对cli的操作,来操作你所指定peer节点,所以我们需要在之后的配置文件中配置你所指定的peer节点。
configtx.yaml 文件
除了组织节点,我们还需要通道和创世区块,锚节点,因此我们需要通过配置执行此文件来获得相关的文件,首先看看此文件内容:
Organizations:

    # SampleOrg defines an MSP using the sampleconfig.  It should never be used
    # in production but may be used as a template for other definitions
    - &OrdererOrg
        # DefaultOrg defines the organization which is used in the sampleconfig
        # of the fabric.git development environment
        Name: OrdererOrg

        # ID to load the MSP definition as
        ID: OrdererMSP

        # MSPDir is the filesystem path which contains the MSP configuration
        MSPDir: crypto-config/ordererOrganizations/example.com/msp

        # Policies defines the set of policies at this level of the config tree
        # For organization policies, their canonical path is usually
        #   /Channel/<Application|Orderer>/<OrgName>/<PolicyName>
        Policies:
            Readers:
                Type: Signature
                Rule: "OR('OrdererMSP.member')"
            Writers:
                Type: Signature
                Rule: "OR('OrdererMSP.member')"
            Admins:
                Type: Signature
                Rule: "OR('OrdererMSP.admin')"

    - &Org1
        # DefaultOrg defines the organization which is used in the sampleconfig
        # of the fabric.git development environment
        Name: Org1MSP

        # ID to load the MSP definition as
        ID: Org1MSP

        MSPDir: crypto-config/peerOrganizations/org1.example.com/msp

        # Policies defines the set of policies at this level of the config tree
        # For organization policies, their canonical path is usually
        #   /Channel/<Application|Orderer>/<OrgName>/<PolicyName>
        Policies:
            Readers:
                Type: Signature
                Rule: "OR('Org1MSP.admin', 'Org1MSP.peer', 'Org1MSP.client')"
            Writers:
                Type: Signature
                Rule: "OR('Org1MSP.admin', 'Org1MSP.client')"
            Admins:
                Type: Signature
                Rule: "OR('Org1MSP.admin')"

        # leave this flag set to true.
        AnchorPeers:
            # AnchorPeers defines the location of peers which can be used
            # for cross org gossip communication.  Note, this value is only
            # encoded in the genesis block in the Application section context
            - Host: peer0.org1.example.com
              Port: 7051

    - &Org2
        # DefaultOrg defines the organization which is used in the sampleconfig
        # of the fabric.git development environment
        Name: Org2MSP

        # ID to load the MSP definition as
        ID: Org2MSP

        MSPDir: crypto-config/peerOrganizations/org2.example.com/msp

        # Policies defines the set of policies at this level of the config tree
        # For organization policies, their canonical path is usually
        #   /Channel/<Application|Orderer>/<OrgName>/<PolicyName>
        Policies:
            Readers:
                Type: Signature
                Rule: "OR('Org2MSP.admin', 'Org2MSP.peer', 'Org2MSP.client')"
            Writers:
                Type: Signature
                Rule: "OR('Org2MSP.admin', 'Org2MSP.client')"
            Admins:
                Type: Signature
                Rule: "OR('Org2MSP.admin')"

        AnchorPeers:
            # AnchorPeers defines the location of peers which can be used
            # for cross org gossip communication.  Note, this value is only
            # encoded in the genesis block in the Application section context
            - Host: peer0.org2.example.com
              Port: 7051


Capabilities:
    # Channel capabilities apply to both the orderers and the peers and must be
    # supported by both.
    # Set the value of the capability to true to require it.
    Channel: &ChannelCapabilities
        # V1.3 for Channel is a catchall flag for behavior which has been
        # determined to be desired for all orderers and peers running at the v1.3.x
        # level, but which would be incompatible with orderers and peers from
        # prior releases.
        # Prior to enabling V1.3 channel capabilities, ensure that all
        # orderers and peers on a channel are at v1.3.0 or later.
        V1_3: true

    # Orderer capabilities apply only to the orderers, and may be safely
    # used with prior release peers.
    # Set the value of the capability to true to require it.
    Orderer: &OrdererCapabilities
        # V1.1 for Orderer is a catchall flag for behavior which has been
        # determined to be desired for all orderers running at the v1.1.x
        # level, but which would be incompatible with orderers from prior releases.
        # Prior to enabling V1.1 orderer capabilities, ensure that all
        # orderers on a channel are at v1.1.0 or later.
        V1_1: true

    # Application capabilities apply only to the peer network, and may be safely
    # used with prior release orderers.
    # Set the value of the capability to true to require it.
    Application: &ApplicationCapabilities
        # V1.3 for Application enables the new non-backwards compatible
        # features and fixes of fabric v1.3.
        V1_3: true
        # V1.2 for Application enables the new non-backwards compatible
        # features and fixes of fabric v1.2 (note, this need not be set if
        # later version capabilities are set)
        V1_2: false
        # V1.1 for Application enables the new non-backwards compatible
        # features and fixes of fabric v1.1 (note, this need not be set if
        # later version capabilities are set).
        V1_1: false


Application: &ApplicationDefaults

    # Organizations is the list of orgs which are defined as participants on
    # the application side of the network
    Organizations:

    # Policies defines the set of policies at this level of the config tree
    # For Application policies, their canonical path is
    #   /Channel/Application/<PolicyName>
    Policies:
        Readers:
            Type: ImplicitMeta
            Rule: "ANY Readers"
        Writers:
            Type: ImplicitMeta
            Rule: "ANY Writers"
        Admins:
            Type: ImplicitMeta
            Rule: "MAJORITY Admins"

    Capabilities:
        <<: *ApplicationCapabilities


Orderer: &OrdererDefaults

    # Orderer Type: The orderer implementation to start
    # Available types are "solo" and "kafka"
    OrdererType: solo

    Addresses:
        - orderer.example.com:7050

    # Batch Timeout: The amount of time to wait before creating a batch
    BatchTimeout: 2s

    # Batch Size: Controls the number of messages batched into a block
    BatchSize:

        # Max Message Count: The maximum number of messages to permit in a batch
        MaxMessageCount: 10

        # Absolute Max Bytes: The absolute maximum number of bytes allowed for
        # the serialized messages in a batch.
        AbsoluteMaxBytes: 99 MB

        # Preferred Max Bytes: The preferred maximum number of bytes allowed for
        # the serialized messages in a batch. A message larger than the preferred
        # max bytes will result in a batch larger than preferred max bytes.
        PreferredMaxBytes: 512 KB

    Kafka:
        # Brokers: A list of Kafka brokers to which the orderer connects
        # NOTE: Use IP:port notation
        Brokers:
            - 127.0.0.1:9092

    # Organizations is the list of orgs which are defined as participants on
    # the orderer side of the network
    Organizations:

    # Policies defines the set of policies at this level of the config tree
    # For Orderer policies, their canonical path is
    #   /Channel/Orderer/<PolicyName>
    Policies:
        Readers:
            Type: ImplicitMeta
            Rule: "ANY Readers"
        Writers:
            Type: ImplicitMeta
            Rule: "ANY Writers"
        Admins:
            Type: ImplicitMeta
            Rule: "MAJORITY Admins"
        # BlockValidation specifies what signatures must be included in the block
        # from the orderer for the peer to validate it.
        BlockValidation:
            Type: ImplicitMeta
            Rule: "ANY Writers"

################################################################################
#
#   CHANNEL
#
#   This section defines the values to encode into a config transaction or
#   genesis block for channel related parameters.
#
################################################################################
Channel: &ChannelDefaults
    # Policies defines the set of policies at this level of the config tree
    # For Channel policies, their canonical path is
    #   /Channel/<PolicyName>
    Policies:
        # Who may invoke the 'Deliver' API
        Readers:
            Type: ImplicitMeta
            Rule: "ANY Readers"
        # Who may invoke the 'Broadcast' API
        Writers:
            Type: ImplicitMeta
            Rule: "ANY Writers"
        # By default, who may modify elements at this config level
        Admins:
            Type: ImplicitMeta
            Rule: "MAJORITY Admins"

    # Capabilities describes the channel level capabilities, see the
    # dedicated Capabilities section elsewhere in this file for a full
    # description
    Capabilities:
        <<: *ChannelCapabilities

################################################################################
#
#   Profile
#
#   - Different configuration profiles may be encoded here to be specified
#   as parameters to the configtxgen tool
#
################################################################################
Profiles:

    TwoOrgsOrdererGenesis:
        <<: *ChannelDefaults
        Orderer:
            <<: *OrdererDefaults
            Organizations:
                - *OrdererOrg
            Capabilities:
                <<: *OrdererCapabilities
        Consortiums:
            SampleConsortium:
                Organizations:
                    - *Org1
                    - *Org2
    TwoOrgsChannel:
        Consortium: SampleConsortium
        Application:
            <<: *ApplicationDefaults
            Organizations:
                - *Org1
                - *Org2
            Capabilities:
                <<: *ApplicationCapabilities

    SampleDevModeKafka:
        <<: *ChannelDefaults
        Capabilities:
            <<: *ChannelCapabilities
        Orderer:
            <<: *OrdererDefaults
            OrdererType: kafka
            Kafka:
                Brokers:
                - kafka.example.com:9092

            Organizations:
            - *OrdererOrg
            Capabilities:
                <<: *OrdererCapabilities
        Application:
            <<: *ApplicationDefaults
            Organizations:
            - <<: *OrdererOrg
        Consortiums:
            SampleConsortium:
                Organizations:
                - *Org1
                - *Org2
很长,但不用头秃,我们会发现有很多注释哈哈哈
不是,他是有结构的,简单划分一下,首先是两个组织信息,除了name和ID项,还出现了Msp项,其对应的目录及刚刚生成的文件夹目录,设置谁为锚节点,而Policies暂且不必管,除去两个组织,我们会看到一个Capabilities项,此项是说明兼并,即是否之前的fabric版本也可以使用,我们会看到之后有v1_2 / v1_3 等等,true表示可以使用,反之不行;Application暂且不用管,我们重点看看Order项,此项规定了Order节点的共识算法,区块生成时间,区块大小,有一个KafKa,不必管,其是当选择KafKa算法的时候的配置,这里我们选择了solo;Channel配置之后我们会看到有个Profiles,这个相当于主函数的作用,之前的所有配置相当于设置好相关参数,通过调用Profiles里面的项,变回自动生成相关的文件,我们会看到有个Genesis项和Channel项,这两个是实际生成block和Channel文件的实际操作项,KafKa不必管他。
好,简单分析了相关文件之后我们通过命令生成相关的文件:
生成block文件命令:configtxgen -profile TwoOrgsOrdererGenesis -outputBlock ./genesis.block(创世区块文件名)
生成Channel文件命令:configtxgen -profile TwoOrgsChannel -outputCreateChannelTx channel.tx (文件名) -channelID channel(管道名)
还记得文件中的Profiles项吗,命令中就用到了。之后我们就会在first-network文件夹中看到两根文件,Genesis.block文件和channel.tx文件,
根据需要我们还可以生成相关的锚节点文件(在配置文件中每个Orgs中规定了Anchor项),每个组织一个
生成Org1的Anchor文件命令: configtxgen -profile TwoOrgsChannel -outputAnchorPeersUpdate Org1MSP_Panchors.tx -channelID channel -asOrg Org1MSP
生成Org2的Anchor文件命令: configtxgen -profile TwoOrgsChannel -outputAnchorPeersUpdate Org1MSP_Panchors.tx -channelID channel -asOrg Org2MSP
注意channelID是你之前创建channel文件时使用的ID。
好,我们新建一个名为channel-artifacts的文件夹,然后将这四个文件放进去,如图:

好,现在只剩下docker-compose-cli.yaml文件和base文件夹没有说明。之前提到过,我们在创建好所有的区块链网络的组织成员之后,需要在docker环境中进行搭建,因此需要进行虚拟机到docker的文件映射,而docker-compose-cli.yaml文件便起到了这个作用,而此文件实际上是一个命令操作的调用文件,实际调用的命令在base文件夹中(可以将其想象成Java包函数和主函数的调用关系),在base文件夹中的
两个文件:

下面来详细看看docker-compose-cli文件的内容:
version: '2'

volumes:
  orderer.example.com:
  peer0.org1.example.com:
  peer1.org1.example.com:
  peer0.org2.example.com:
  peer1.org2.example.com:

networks:
  byfn:

services:

  orderer.example.com:
    extends:
      file:   base/docker-compose-base.yaml
      service: orderer.example.com
    container_name: orderer.example.com
    networks:
      - byfn

  peer0.org1.example.com:
    container_name: peer0.org1.example.com
    extends:
      file:  base/docker-compose-base.yaml
      service: peer0.org1.example.com
    networks:
      - byfn

  peer1.org1.example.com:
    container_name: peer1.org1.example.com
    extends:
      file:  base/docker-compose-base.yaml
      service: peer1.org1.example.com
    networks:
      - byfn

  peer0.org2.example.com:
    container_name: peer0.org2.example.com
    extends:
      file:  base/docker-compose-base.yaml
      service: peer0.org2.example.com
    networks:
      - byfn

  peer1.org2.example.com:
    container_name: peer1.org2.example.com
    extends:
      file:  base/docker-compose-base.yaml
      service: peer1.org2.example.com
    networks:
      - byfn

  cli:
    container_name: cli
    image: hyperledger/fabric-tools:$IMAGE_TAG
    tty: true
    stdin_open: true
    environment:
      - GOPATH=/opt/gopath
      - CORE_VM_ENDPOINT=unix:///host/var/run/docker.sock
      #- FABRIC_LOGGING_SPEC=DEBUG
      - FABRIC_LOGGING_SPEC=INFO
      - CORE_PEER_ID=cli
      - CORE_PEER_ADDRESS=peer0.org1.example.com:7051
      - CORE_PEER_LOCALMSPID=Org1MSP
      - CORE_PEER_TLS_ENABLED=true
      - CORE_PEER_TLS_CERT_FILE=/opt/gopath/src/github.com/hyperledger/fabric/peer/crypto/peerOrganizations/org1.example.com/peers/peer0.org1.example.com/tls/server.crt
      - CORE_PEER_TLS_KEY_FILE=/opt/gopath/src/github.com/hyperledger/fabric/peer/crypto/peerOrganizations/org1.example.com/peers/peer0.org1.example.com/tls/server.key
      - CORE_PEER_TLS_ROOTCERT_FILE=/opt/gopath/src/github.com/hyperledger/fabric/peer/crypto/peerOrganizations/org1.example.com/peers/peer0.org1.example.com/tls/ca.crt
      - CORE_PEER_MSPCONFIGPATH=/opt/gopath/src/github.com/hyperledger/fabric/peer/crypto/peerOrganizations/org1.example.com/users/Admin@org1.example.com/msp
    working_dir: /opt/gopath/src/github.com/hyperledger/fabric/peer
    command: /bin/bash
    volumes:
        - /var/run/:/host/var/run/
        - ./../chaincode/:/opt/gopath/src/github.com/chaincode
        - ./crypto-config:/opt/gopath/src/github.com/hyperledger/fabric/peer/crypto/
        - ./scripts:/opt/gopath/src/github.com/hyperledger/fabric/peer/scripts/
        - ./channel-artifacts:/opt/gopath/src/github.com/hyperledger/fabric/peer/channel-artifacts
    depends_on:
      - orderer.example.com
      - peer0.org1.example.com
      - peer1.org1.example.com
      - peer0.org2.example.com
      - peer1.org2.example.com
    networks:
      - byfn
好,下面简单说说此文件的内容:
首先volume项,有五个以域名形式表示的服务,其实是就是docker的映射,我们在通过docker调用此种命令的时候,实际上就是调用了此文件的这五个命令。而之后文件又对这五个命令分别进行的解释,我们重点看看extends项的file项,发现有个路径,路径指向了base文件夹下的docker-compose-base.yaml文件,之后我们详细看看此文件,先重点看看cli项,其实docker-compose-base.yaml文件内容与cli项的大差不差,那么我们具体看看cli项。
之前说了,我们需要将我们本机目标路径下的文件映射复制到docker的指定路径目录下,因此此项就具体规定了cli节点相关文件(例如证书文件 .ca,密钥文件.key等等)在虚拟机上的具体目录,当我们创建docker的时候会自动生成此文件中描述的文件目录并将虚拟机的文件映射到docker目录中,我们来看看。
首先看volums项,此项的描述规则是:“ 虚拟机的相对路径 :docker的绝对路径 ”,我们会看到crypto-config文件夹、scripts文件夹、channel-artifacts文件夹等等的相对路径(相对于first-network文件夹)映射到docker中的绝对路径,注意如果你的虚拟机下的相对路径不一样,需要修改,否则会出现映射错误。
我们再向上看working_dir:此设定表示我们当以用户的身份进入docker时,进入到目录深度,注意我们在搭建fabric时是以cli节点进行搭建的,因此此项需要设置。
再向上看:environment项中 :
- CORE_PEER_ADDRESS 你所指定的peer节点
- CORE_PEER_LOCALMSPID 你所指定的节点所属组织的MSP
- CORE_PEER_TLS_ENABLED 是否使用TLS加密,如果使用,则需要之后给出证书和密钥的路径
- CORE_PEER_TLS_CERT_FILE 证书的路径
- CORE_PEER_TLS_KEY_FILE 密钥文件路径
- CORE_PEER_TLS_ROOTCERT_FILE 根证书路径
- CORE_PEER_MSPCONFIGPATH 管理员路径
我给出的解释并非详细,但是需要记住一点即映射的路径一定要确定好,虚拟机上的路径正确,docker路径符合规则。具体解释可以找相关博文。
我们在来看看docker-compose-base.yaml文件
version: '2'

services:

  orderer.example.com:
    container_name: orderer.example.com
    image: hyperledger/fabric-orderer:$IMAGE_TAG

    environment:
      - FABRIC_LOGGING_SPEC=INFO
      - ORDERER_GENERAL_LISTENADDRESS=0.0.0.0
      - ORDERER_GENERAL_GENESISMETHOD=file
      - ORDERER_GENERAL_GENESISFILE=/var/hyperledger/orderer/orderer.genesis.block
      - ORDERER_GENERAL_LOCALMSPID=OrdererMSP
      - ORDERER_GENERAL_LOCALMSPDIR=/var/hyperledger/orderer/msp
      # enabled TLS
      - ORDERER_GENERAL_TLS_ENABLED=true
      - ORDERER_GENERAL_TLS_PRIVATEKEY=/var/hyperledger/orderer/tls/server.key
      - ORDERER_GENERAL_TLS_CERTIFICATE=/var/hyperledger/orderer/tls/server.crt
      - ORDERER_GENERAL_TLS_ROOTCAS=[/var/hyperledger/orderer/tls/ca.crt]
      - ORDERER_KAFKA_TOPIC_REPLICATIONFACTOR=1
      - ORDERER_KAFKA_VERBOSE=true
    working_dir: /opt/gopath/src/github.com/hyperledger/fabric
    command: orderer
    volumes:
    - ../channel-artifacts/genesis.block:/var/hyperledger/orderer/orderer.genesis.block
    - ../crypto-config/ordererOrganizations/example.com/orderers/orderer.example.com/msp:/var/hyperledger/orderer/msp
    - ../crypto-config/ordererOrganizations/example.com/orderers/orderer.example.com/tls/:/var/hyperledger/orderer/tls
    - orderer.example.com:/var/hyperledger/production/orderer
    ports:
      - 7050:7050

  peer0.org1.example.com:
    container_name: peer0.org1.example.com
    extends:
      file: peer-base.yaml
      service: peer-base
    environment:
      - CORE_PEER_ID=peer0.org1.example.com
      - CORE_PEER_ADDRESS=peer0.org1.example.com:7051
      - CORE_PEER_GOSSIP_BOOTSTRAP=peer1.org1.example.com:7051
      - CORE_PEER_GOSSIP_EXTERNALENDPOINT=peer0.org1.example.com:7051
      - CORE_PEER_LOCALMSPID=Org1MSP
    volumes:
        - /var/run/:/host/var/run/
        - ../crypto-config/peerOrganizations/org1.example.com/peers/peer0.org1.example.com/msp:/etc/hyperledger/fabric/msp
        - ../crypto-config/peerOrganizations/org1.example.com/peers/peer0.org1.example.com/tls:/etc/hyperledger/fabric/tls
        - peer0.org1.example.com:/var/hyperledger/production
    ports:
      - 7051:7051
      - 7053:7053

  peer1.org1.example.com:
    container_name: peer1.org1.example.com
    extends:
      file: peer-base.yaml
      service: peer-base
    environment:
      - CORE_PEER_ID=peer1.org1.example.com
      - CORE_PEER_ADDRESS=peer1.org1.example.com:7051
      - CORE_PEER_GOSSIP_EXTERNALENDPOINT=peer1.org1.example.com:7051
      - CORE_PEER_GOSSIP_BOOTSTRAP=peer0.org1.example.com:7051
      - CORE_PEER_LOCALMSPID=Org1MSP
    volumes:
        - /var/run/:/host/var/run/
        - ../crypto-config/peerOrganizations/org1.example.com/peers/peer1.org1.example.com/msp:/etc/hyperledger/fabric/msp
        - ../crypto-config/peerOrganizations/org1.example.com/peers/peer1.org1.example.com/tls:/etc/hyperledger/fabric/tls
        - peer1.org1.example.com:/var/hyperledger/production

    ports:
      - 8051:7051
      - 8053:7053

  peer0.org2.example.com:
    container_name: peer0.org2.example.com
    extends:
      file: peer-base.yaml
      service: peer-base
    environment:
      - CORE_PEER_ID=peer0.org2.example.com
      - CORE_PEER_ADDRESS=peer0.org2.example.com:7051
      - CORE_PEER_GOSSIP_EXTERNALENDPOINT=peer0.org2.example.com:7051
      - CORE_PEER_GOSSIP_BOOTSTRAP=peer1.org2.example.com:7051
      - CORE_PEER_LOCALMSPID=Org2MSP
    volumes:
        - /var/run/:/host/var/run/
        - ../crypto-config/peerOrganizations/org2.example.com/peers/peer0.org2.example.com/msp:/etc/hyperledger/fabric/msp
        - ../crypto-config/peerOrganizations/org2.example.com/peers/peer0.org2.example.com/tls:/etc/hyperledger/fabric/tls
        - peer0.org2.example.com:/var/hyperledger/production
    ports:
      - 9051:7051
      - 9053:7053

  peer1.org2.example.com:
    container_name: peer1.org2.example.com
    extends:
      file: peer-base.yaml
      service: peer-base
    environment:
      - CORE_PEER_ID=peer1.org2.example.com
      - CORE_PEER_ADDRESS=peer1.org2.example.com:7051
      - CORE_PEER_GOSSIP_EXTERNALENDPOINT=peer1.org2.example.com:7051
      - CORE_PEER_GOSSIP_BOOTSTRAP=peer0.org2.example.com:7051
      - CORE_PEER_LOCALMSPID=Org2MSP
    volumes:
        - /var/run/:/host/var/run/
        - ../crypto-config/peerOrganizations/org2.example.com/peers/peer1.org2.example.com/msp:/etc/hyperledger/fabric/msp
        - ../crypto-config/peerOrganizations/org2.example.com/peers/peer1.org2.example.com/tls:/etc/hyperledger/fabric/tls
        - peer1.org2.example.com:/var/hyperledger/production
    ports:
      - 10051:7051
      - 10053:7053
我们会发现,与docker-compose-cli.yaml 中的cli项的配置基本一样,peer-base.yaml文件也基本一样,就不在描述了。
好,那么文件配置完成后,我们便可以进入docker进行网络搭建了。
首先,我们启动docker,即执行docker-compose-cli.yaml文件
命令: docker-compose -f docker-compose-cli.yaml up -d
此命令执行后我们会看到如下显示: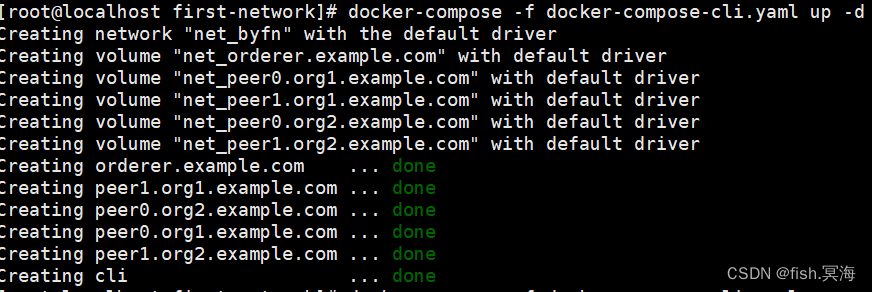
docker会开6个容器分别对应每个节点,其启动的顺序也是按照docker-compose-cli.yaml文件设置的,但是done的顺序可能不同。注意,启动不意味着真正的启动成功我们需要通过一下命令产看一下是否全部成功启动
命令: docker-compose -f docker-compose-cli.yaml ps
查看一下docker状态:
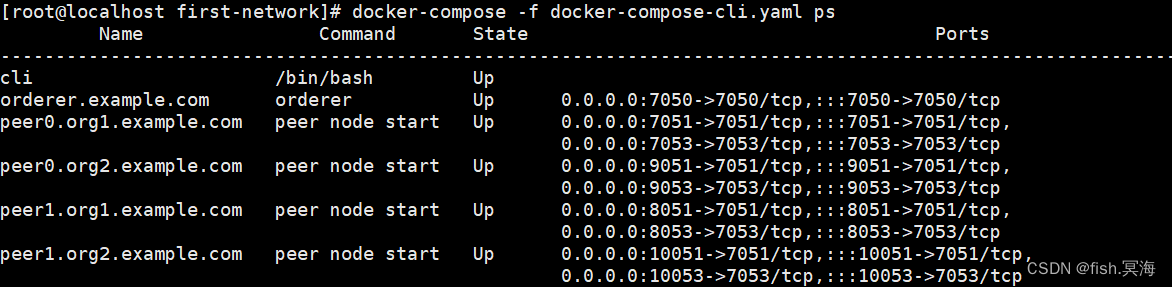
我们如果看到State是up状态说明启动成功,如果启动不成功其状态会显示 :Exit 2(不一定是2,但只要是正整数,就出现了错误),此时我们需要看一下相关容器启动的日志:docker logs contain_ID/Name ,还记得docker-compose-cli.yaml文件中cli项中environment项中的FABRIC_LOGGING_SPEC=INFO吗?此环境变量设定让我们可以查看每个contain的日志情况。
(我之前在启动的时候Order节点出现了exit 2 的情况,通过日志查看是Genesis.block文件出错,将此文件删除重新生成之后启动成功)
下一步就是环境搭建了,因此我们需要进入客户端
命令:docker exec -it cli bash
输入后,我们便进入了cli容器的一个目录中了,具体是什么目录由working_dir环境变量设置,而通过ls我们可以看到三个文件夹:

这便是我们之前在docker-compose-cli.yaml文件中设置的映射文件。
ok,那么之后来梳理一下fabric环境搭建过程 :
- 创建通道
- 将每个节点加入到通道中
- 将链码安装到每个节点中
- 找任意一个节点进行链码的初始化
1、创建通道:
我们要通过Order节点进行channel的创建,因为Order负责对区块链的排序与分发,因此order是所有通道中最先加入的节点
命令: peer channel create -o orderer.example.com:7050 -c channel -f ./channel-artifacts/channel.tx --tls true --cafile /opt/gopath/src/github.com/hyperledger/fabric/peer/crypto/ordererOrganizations/example.com/tlsca/tlsca.example.com-cert.pem
-o 表示order节点的域名加端口号
-f 表示所使用到的通道文件
--tls 表示是否进行TLS加密(因为我们在之前的配置文件中设置了true,因此必须选true)
--cafile 表示order节点的证书路径,注意:1、必须是绝对路径 2、找 后缀为.pem的文件
正常情况下如图:

2、将每个节点加入到channel中。
所有的节点都是在channel中工作的,因此我们需要将每个节点添加到channel中,目前cli客户端节点连接的节点可以通过
命令:echo $CORE_PEER_ADDRESS
查看,然后通过使用一下命令,将peer节点添加到channel中
命令:peer channel join -b channel.block
成功则如下所示:
之后我们需要切换cli节点所指向的peer节点,即需要改变docker-compose-cli.ymal文件中相关环境变量的配置,我们不能直接修改此文件,而是在shell窗口对如下变量的进行操作,主要是msp,和证书密钥的路径需要修改
      export CORE_PEER_ADDRESS=peer0.org1.example.com:7051
      export CORE_PEER_LOCALMSPID=Org1MSP
      export CORE_PEER_TLS_CERT_FILE=/opt/gopath/src/github.com/hyperledger/fabric/peer/crypto/peerOrganizations/org1.example.com/peers/peer0.org1.example.com/tls/server.crt
      export CORE_PEER_TLS_KEY_FILE=/opt/gopath/src/github.com/hyperledger/fabric/peer/crypto/peerOrganizations/org1.example.com/peers/peer0.org1.example.com/tls/server.key
      export CORE_PEER_TLS_ROOTCERT_FILE=/opt/gopath/src/github.com/hyperledger/fabric/peer/crypto/peerOrganizations/org1.example.com/peers/peer0.org1.example.com/tls/ca.crt
      export CORE_PEER_MSPCONFIGPATH=/opt/gopath/src/github.com/hyperledger/fabric/peer/crypto/peerOrganizations/org1.example.com/users/Admin@org1.example.com/msp

      export CORE_PEER_ADDRESS=peer1.org1.example.com:7051
      export CORE_PEER_LOCALMSPID=Org1MSP
      export CORE_PEER_TLS_CERT_FILE=/opt/gopath/src/github.com/hyperledger/fabric/peer/crypto/peerOrganizations/org1.example.com/peers/peer1.org1.example.com/tls/server.crt
      export CORE_PEER_TLS_KEY_FILE=/opt/gopath/src/github.com/hyperledger/fabric/peer/crypto/peerOrganizations/org1.example.com/peers/peer1.org1.example.com/tls/server.key
      export CORE_PEER_TLS_ROOTCERT_FILE=/opt/gopath/src/github.com/hyperledger/fabric/peer/crypto/peerOrganizations/org1.example.com/peers/peer1.org1.example.com/tls/ca.crt
      export CORE_PEER_MSPCONFIGPATH=/opt/gopath/src/github.com/hyperledger/fabric/peer/crypto/peerOrganizations/org1.example.com/users/Admin@org1.example.com/msp

      export CORE_PEER_ADDRESS=peer0.org2.example.com:7051
      export CORE_PEER_LOCALMSPID=Org2MSP
      export CORE_PEER_TLS_CERT_FILE=/opt/gopath/src/github.com/hyperledger/fabric/peer/crypto/peerOrganizations/org2.example.com/peers/peer0.org2.example.com/tls/server.crt
      export CORE_PEER_TLS_KEY_FILE=/opt/gopath/src/github.com/hyperledger/fabric/peer/crypto/peerOrganizations/org2.example.com/peers/peer0.org2.example.com/tls/server.key
      export CORE_PEER_TLS_ROOTCERT_FILE=/opt/gopath/src/github.com/hyperledger/fabric/peer/crypto/peerOrganizations/org2.example.com/peers/peer0.org2.example.com/tls/ca.crt
      export CORE_PEER_MSPCONFIGPATH=/opt/gopath/src/github.com/hyperledger/fabric/peer/crypto/peerOrganizations/org2.example.com/users/Admin@org2.example.com/msp

      export CORE_PEER_ADDRESS=peer1.org2.example.com:7051
      export CORE_PEER_LOCALMSPID=Org2MSP
      export CORE_PEER_TLS_CERT_FILE=/opt/gopath/src/github.com/hyperledger/fabric/peer/crypto/peerOrganizations/org2.example.com/peers/peer1.org2.example.com/tls/server.crt
      export CORE_PEER_TLS_KEY_FILE=/opt/gopath/src/github.com/hyperledger/fabric/peer/crypto/peerOrganizations/org2.example.com/peers/peer1.org2.example.com/tls/server.key
      export CORE_PEER_TLS_ROOTCERT_FILE=/opt/gopath/src/github.com/hyperledger/fabric/peer/crypto/peerOrganizations/org2.example.com/peers/peer1.org2.example.com/tls/ca.crt
      export CORE_PEER_MSPCONFIGPATH=/opt/gopath/src/github.com/hyperledger/fabric/peer/crypto/peerOrganizations/org2.example.com/users/Admin@org2.example.com/msp
修改后如果不放心可以通过echo $变量名 查看变量的值,之后重复加入操作即可
命令:peer channel join -b channel.block
3、将链码安装到每个节点中。可以得出,还需要依次进行环境变量的修改,因此我们可以在切换到每个节点后,先加入通道,在直接安装链码即可
命令:peer chaincode install -n chain -v 1.0 -l golang -p /op
t/gopath/src/github.com/chaincode/chaincode_example02/go
- -n 链码名 (之前在生成链码文件的时候设置了链码名)
- -v 链码版本 (自己设置,主要是用于在实际开发中后续链码的升级与维护)
- -l 链码语言 默认的是golang,可以设置Java,nodejs
- -p 文件路径
成功后如图:

4、链码的初始化:
并非每个peer节点都需要对链码进行初始化,只需一个即可
命令:peer chaincode instantiate -o orderer.example.com:7050 --tls true --cafile /opt/gopath/src/github.com/hyperledger/fabric/peer/crypto/ordererOrganizations/example.com/msp/tlscacerts/tlsca.example.com-cert.pem -C channel -n chain -l golang -v 1.0 -c '{"Args":["init","a","100","b","0"]}' -P "AND ('Org1MSP.member', 'Org2MSP.member')"
之前一直的参数就不在赘述了
- -c 这是初始化的参数,里面Args和init是固定的,之后的四个参数是不定了,根据具体的初始化函数决定,链码的初始化函数的函数名一般为init,因此中括号中的第一个参数是函数名,之后的四个参数为初始化函数的实参。
- -P 表示背书策略。背书策略表示当之后用户调用此链码的时候都必须那些组织中或者哪些节点进行调用

注意,我之前已经初始化过链码因此,在进行初始化的时候就会返回exist,即只能初始化一次。
至此,fabric1.4环境搭建完成。
完成后通过以下命令退出:
命令: exit
命令: docker-compose -f docker-compose-cli.yaml down -v
背书策略的具体规则如下:
-
简单的背书策略:要求所有的组织都必须对交易进行背书。
- OR('Org1MSP.member', 'Org2MSP.member', 'Org3MSP.member')在此示例中,至少需要三个组织中的任何一个对交易进行背书。
-
复杂的背书策略:要求特定组织中的特定成员对交易进行背书。
- AND('Org1MSP.member', OR('Org2MSP.admin', 'Org2MSP.member'))在此示例中,交易需要由
Org1MSP中的任何成员和Org2MSP中的管理员或成员进行背书。 -
自定义背书策略:可以根据需要编写自定义的背书策略逻辑。
- OR( AND('Org1MSP.member', 'Org2MSP.member'), AND('Org1MSP.member', 'Org3MSP.member'), AND('Org2MSP.member', 'Org3MSP.member') )在此示例中,交易需要由
Org1MSP和Org2MSP中的任何成员,或者由Org1MSP和Org3MSP中的任何成员,或者由Org2MSP和Org3MSP中的任何成员进行背书。
补充:
说一下可能出现的问题:
fabric 创建通道的时候报以下错误:Error: failed to create deliver client: orderer client failed to connect to orderer.example.com:7050: failed to create new connection: context deadline exceeded
对于此问题有如下几种可能性:
首先你的虚拟机如果是桥接模式,或者防火墙打开的情况下出现的问题;
之后,可能是你的容器在启动的过程中出现了启动失败的情况,可以docker-compose ps一下,如果有启动问题,通过docker logs <containers_id> 来看一下你的日志,找到问题,修正
如果都没问题,那么你退出docker,关掉docker所有容器,再重新启动(最后一个很重要,可能是你在搭建过程中网断了重新联网,或者换网,或者你的虚拟机挂起之后又重新链接,或者你的电脑再你走后进入休眠状态,你再重新启动的时候就可能出现此种情况,包括在链码安装的时候也是一样的)


 259
259


 被折叠的 条评论
为什么被折叠?
被折叠的 条评论
为什么被折叠?
 到【灌水乐园】发言


