


使用腾讯云人脸识别接口,基于优图祖母模型。
一、准备工作
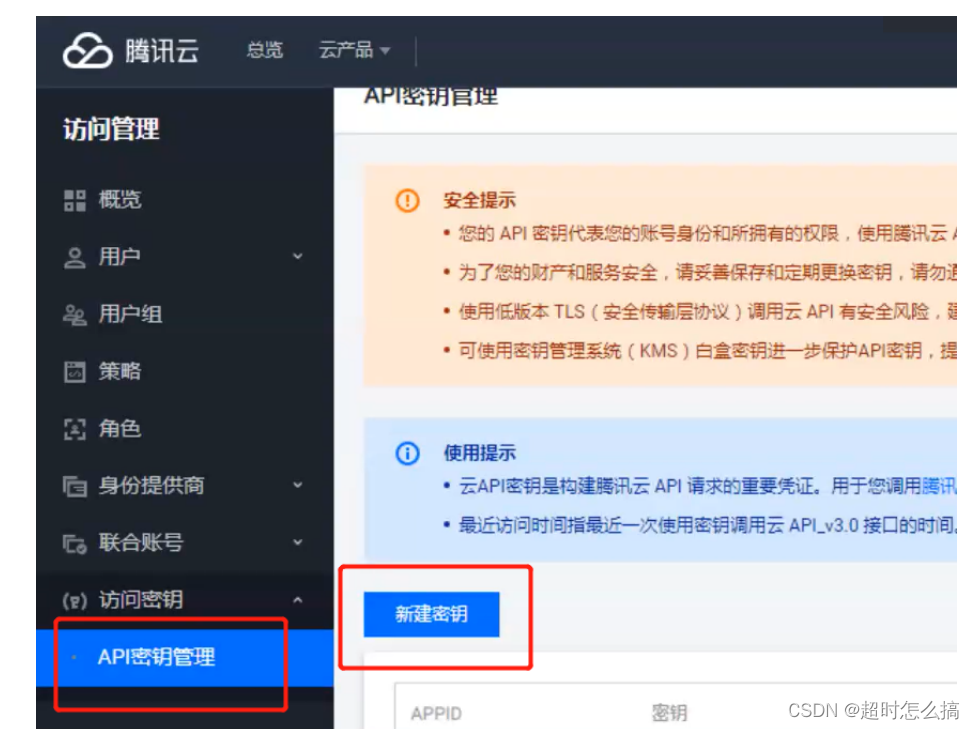
人脸识别账号
申请腾讯云服务器账号,生成自己的秘钥。记录秘钥和秘钥ID。
创建人员库
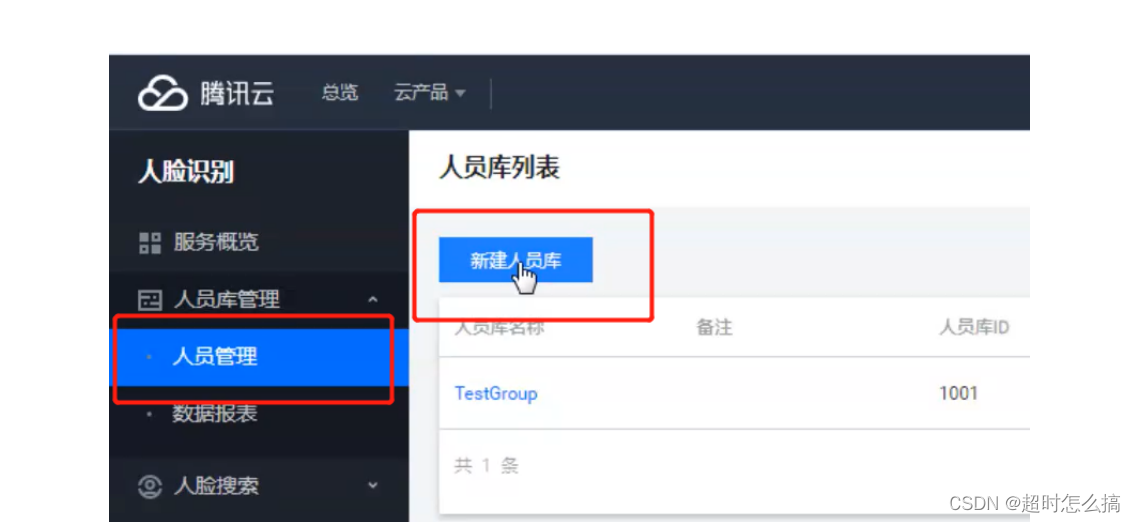

记下人员库id
在配置文件application.yml中添加配置。
plateocr:
  SecretId: 秘钥ID
  SecretKey: 秘钥
  serverIp: iai.tencentcloudapi.com
  area: ap-guangzhou #人脸识别服务器所在区域,官方推荐就近
  groupId: 1 #刚才创建的人脸库ID
  used: true  #表示人脸识别是否开启
  passPercent: 80 #通过率,相似率到达多少算通过
  nonceStr: 123456 #随机数
二、录入人脸的类
需要用到的类:
1.Base64Util :自己写的base64工具类,用于将base64解码写到本地磁盘。
package com.qcby.mycommunity_003.util;

import org.apache.commons.codec.binary.Base64;

import java.io.*;
import java.net.HttpURLConnection;
import java.net.URL;

public class Base64Util {
    /**
     * 将二进制数据编码为BASE64字符串
     *
     * @param binaryData
     * @return
     */
    public static String encode(byte[] binaryData) {
        try {
            return new String(Base64.encodeBase64(binaryData), "UTF-8");
        } catch (UnsupportedEncodingException e) {
            return null;
        }
    }

    /**
     * 将BASE64字符串恢复为二进制数据
     *
     * @param base64String
     * @return
     */
    public static byte[] decode(String base64String) {
        try {
            return Base64.decodeBase64(base64String.getBytes("UTF-8"));
        } catch (UnsupportedEncodingException e) {
            return null;
        }
    }

    /**
     * 将文件转成base64 字符串
     *
     *  path文件路径
     * @return *
     * @throws Exception
     */

    public static String encodeBase64File(String path) throws Exception {
        File file = new File(path);
        FileInputStream inputFile = new FileInputStream(file);
        byte[] buffer = new byte[(int) file.length()];
        inputFile.read(buffer);
        inputFile.close();
        return encode(buffer);
    }
    //读取网络图片
    public static String encodeBase64URLFile(String path) throws Exception {
        URL url = new URL(path);
        HttpURLConnection conn = (HttpURLConnection)url.openConnection();
        conn.setRequestMethod("GET");
        conn.setConnectTimeout(5*1000);
        InputStream is = conn.getInputStream();
        byte[] data = readInputStream(is);
        is.close();
        conn.disconnect();
        return encode(data);
    }
    public static byte[] readInputStream(InputStream inStream) throws Exception{
        ByteArrayOutputStream outStream = new ByteArrayOutputStream();
        //创建一个Buffer字符串
        byte[] buffer = new byte[1024];
        //每次读取的字符串长度,如果为-1,代表全部读取完毕
        int len = 0;
        //使用一个输入流从buffer里把数据读取出来
        while( (len=inStream.read(buffer)) != -1 ){
            //用输出流往buffer里写入数据,中间参数代表从哪个位置开始读,len代表读取的长度
            outStream.write(buffer, 0, len);
        }
        //关闭输入流
        inStream.close();
        //把outStream里的数据写入内存
        return outStream.toByteArray();
    }
    /**
     * 将base64字符解码保存文件
     *
     * @param base64Code
     * @param targetPath
     * @throws Exception
     */

    public static void decoderBase64File(String base64Code, String targetPath) throws Exception {
        byte[] buffer = decode(base64Code);
        FileOutputStream out = new FileOutputStream(targetPath);
        out.write(buffer);
        out.close();
    }

    /**
     * 将base64字符保存文本文件
     *
     * @param base64Code
     * @param targetPath
     * @throws Exception
     */

    public static void toFile(String base64Code, String targetPath) throws Exception {

        byte[] buffer = base64Code.getBytes();
        FileOutputStream out = new FileOutputStream(targetPath);
        out.write(buffer);
        out.close();
    }
}
2.RootResp 类,封装腾讯人脸识别返回的信息。
import com.alibaba.fastjson.JSON;

public class RootResp {
    //腾讯api返回的状态码,如果是0代表添加成功,否则会有异常码
    private int ret = 0;

    public int getRet() {
        return this.ret;
    }

    public void setRet(int ret) {
        this.ret = ret;
    }

    private String msg;

    public String getMsg() {
        return this.msg;
    }

    public void setMsg(String msg) {
        this.msg = msg;
    }

    private Object data;

    public Object getData() {
        return this.data;
    }

    public void setData(Object data) {
        this.data = data;
    }

    @Override
    public String toString() {
        return JSON.toJSONString(this);
    }
}
3.FaceApi :调用api接口
import com.alibaba.fastjson.JSONArray;
import com.alibaba.fastjson.JSONObject;
import com.qcby.mycommunity_003.configuration.ApiConfiguration;
import com.tencentcloudapi.common.Credential;
import com.tencentcloudapi.common.exception.TencentCloudSDKException;
import com.tencentcloudapi.common.profile.ClientProfile;
import com.tencentcloudapi.common.profile.HttpProfile;
import com.tencentcloudapi.iai.v20180301.IaiClient;
import com.tencentcloudapi.iai.v20180301.models.*;
import org.apache.log4j.Logger;
public class FaceApi {
private Logger logger = Logger.getLogger(FaceApi.class);
//人脸分析
public RootResp detectFace(ApiConfiguration config, String url) {
RootResp result = new RootResp();
try{
Credential cred = new Credential(config.getSecretId(), config.getSecretKey());
HttpProfile httpProfile = new HttpProfile();
httpProfile.setEndpoint(config.getServerIp());
ClientProfile clientProfile = new ClientProfile();
clientProfile.setHttpProfile(httpProfile);
IaiClient client = new IaiClient(cred, config.getArea(), clientProfile);
JSONObject paramObj = new JSONObject();
paramObj.put("Url", url);
paramObj.put("MaxFaceNum",1);
paramObj.put("MinFaceSize",34);
paramObj.put("NeedFaceAttributes",0);
paramObj.put("NeedQualityDetection",1);
DetectFaceRequest req = DetectFaceRequest.fromJsonString(paramObj.toJSONString(),DetectFaceRequest.class);
DetectFaceResponse resp = client.DetectFace(req);
result.setData(DetectFaceResponse.toJsonString(resp));
} catch (TencentCloudSDKException e) {
result.setRet(-1);
result.setMsg(e.toString());
logger.error(e.toString());
}
logger.info(result);
return result;
}
//添加个体
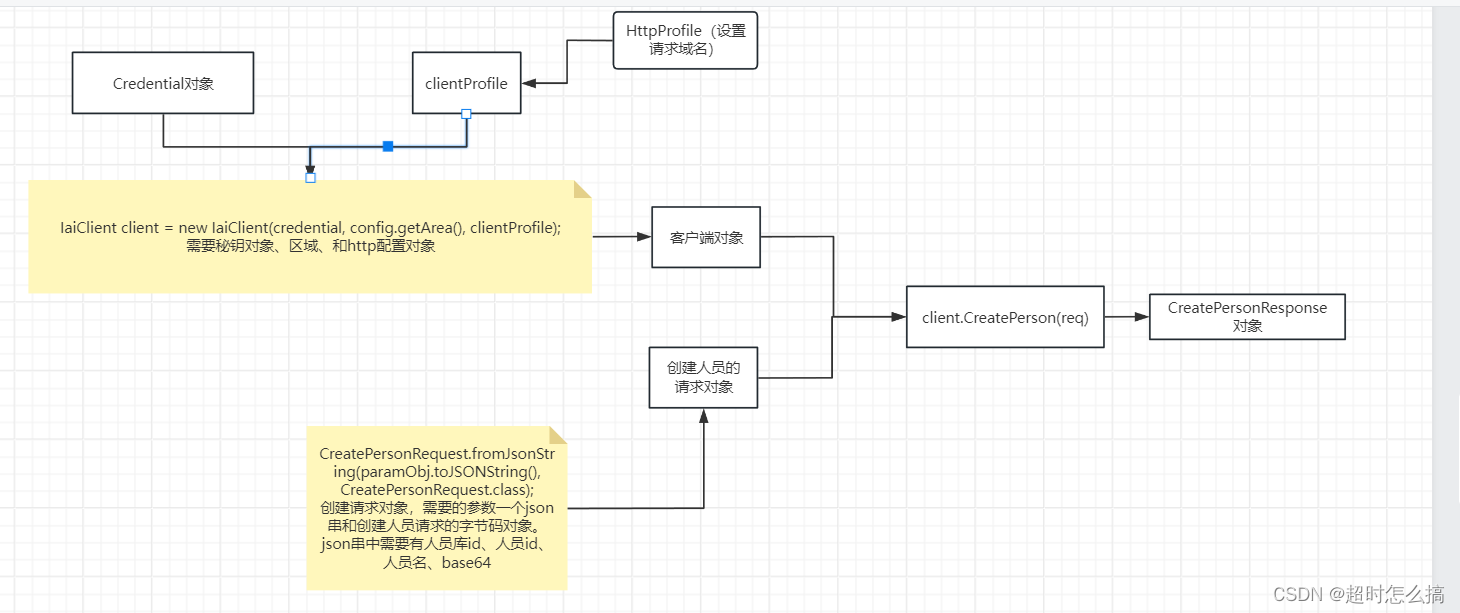
public RootResp newperson(ApiConfiguration config, String personId, String personName, String image) {
RootResp result = new RootResp();
try{
//访问腾讯云服务所需要的秘钥信息,进行身份验证和授权凭证
Credential cred = new Credential(config.getSecretId(), config.getSecretKey());
//设置与腾讯云服务通信的http配置
HttpProfile httpProfile = new HttpProfile();
//配置接口请求域名
httpProfile.setEndpoint(config.getServerIp());
//配置客户端相关参数,包括http配置
ClientProfile clientProfile = new ClientProfile();
clientProfile.setHttpProfile(httpProfile);
//和腾讯云人脸服务进行通信
IaiClient client = new IaiClient(cred, config.getArea(), clientProfile);
JSONObject paramObj = new JSONObject();
paramObj.put("GroupId", config.getGroupId());
paramObj.put("PersonId", config.getPersonIdPre() + personId);
paramObj.put("PersonName", personName);
paramObj.put("Image", image);
//调取创建person的请求
CreatePersonRequest req = CreatePersonRequest.fromJsonString(paramObj.toJSONString(), CreatePersonRequest.class);
//响应回来的数据转成json
CreatePersonResponse resp = client.CreatePerson(req);
result.setData(CreatePersonResponse.toJsonString(resp));
} catch (TencentCloudSDKException e) {
result.setRet(-1);
result.setMsg(e.toString());
logger.error(e.toString());
}
logger.info(result);
return result;
}
//删除个体
public RootResp delperson(ApiConfiguration config, String personId) {
RootResp result = new RootResp();
try{
Credential cred = new Credential(config.getSecretId(), config.getSecretKey());
HttpProfile httpProfile = new HttpProfile();
httpProfile.setEndpoint(config.getServerIp());
ClientProfile clientProfile = new ClientProfile();
clientProfile.setHttpProfile(httpProfile);
IaiClient client = new IaiClient(cred, config.getArea(), clientProfile);
JSONObject paramObj = new JSONObject();
paramObj.put("PersonId", config.getPersonIdPre() + personId);
DeletePersonRequest req = DeletePersonRequest.fromJsonString(paramObj.toJSONString(), DeletePersonRequest.class);
DeletePersonResponse resp = client.DeletePerson(req);
result.setData(DeletePersonResponse.toJsonString(resp));
} catch (TencentCloudSDKException e) {
result.setRet(-1);
result.setMsg(e.toString());
logger.error(e.toString());
}
logger.info(result);
return result;
}
//增加人脸
public RootResp addface(ApiConfiguration config, String personId, String image) {
RootResp result = new RootResp();
try{
Credential cred = new Credential(config.getSecretId(), config.getSecretKey());
HttpProfile httpProfile = new HttpProfile();
httpProfile.setEndpoint(config.getServerIp());
ClientProfile clientProfile = new ClientProfile();
clientProfile.setHttpProfile(httpProfile);
IaiClient client = new IaiClient(cred, config.getArea(), clientProfile);
JSONObject paramObj = new JSONObject();
JSONArray images = new JSONArray();
images.add(image);
paramObj.put("PersonId", config.getPersonIdPre() + personId);
paramObj.put("Images", images);
CreateFaceRequest req = CreateFaceRequest.fromJsonString(paramObj.toJSONString(), CreateFaceRequest.class);
CreateFaceResponse resp = client.CreateFace(req);
result.setData(CreateFaceResponse.toJsonString(resp));
} catch (TencentCloudSDKException e) {
result.setRet(-1);
result.setMsg(e.toString());
logger.error(e.toString());
}
logger.info(result);
return result;
}
//删除人脸
public RootResp delface(ApiConfiguration config, String personId, String faceId) {
RootResp result = new RootResp();
try{
Credential cred = new Credential(config.getSecretId(), config.getSecretKey());
HttpProfile httpProfile = new HttpProfile();
httpProfile.setEndpoint(config.getServerIp());
ClientProfile clientProfile = new ClientProfile();
clientProfile.setHttpProfile(httpProfile);
IaiClient client = new IaiClient(cred, config.getArea(), clientProfile);
JSONObject paramObj = new JSONObject();
JSONArray faces = new JSONArray();
faces.add(faceId);
paramObj.put("PersonId", config.getPersonIdPre() + personId);
paramObj.put("FaceIds", faces);
DeleteFaceRequest req = DeleteFaceRequest.fromJsonString(paramObj.toJSONString(), DeleteFaceRequest.class);
DeleteFaceResponse resp = client.DeleteFace(req);
result.setData(DeleteFaceResponse.toJsonString(resp));
} catch (TencentCloudSDKException e) {
result.setRet(-1);
result.setMsg(e.toString());
logger.error(e.toString());
}
logger.info(result);
return result;
}
//人脸验证
public RootResp faceVerify(ApiConfiguration config, String personId, String image) {
RootResp result = new RootResp();
try{
Credential cred = new Credential(config.getSecretId(), config.getSecretKey());
HttpProfile httpProfile = new HttpProfile();
httpProfile.setEndpoint(config.getServerIp());
ClientProfile clientProfile = new ClientProfile();
clientProfile.setHttpProfile(httpProfile);
IaiClient client = new IaiClient(cred, config.getArea(), clientProfile);
JSONObject paramObj = new JSONObject();
paramObj.put("PersonId", config.getPersonIdPre() + personId);
paramObj.put("Image", image);
VerifyFaceRequest req = VerifyFaceRequest.fromJsonString(paramObj.toJSONString(), VerifyFaceRequest.class);
VerifyFaceResponse resp = client.VerifyFace(req);
result.setData(VerifyFaceResponse.toJsonString(resp));
} catch (TencentCloudSDKException e) {
result.setRet(-1);
result.setMsg(e.toString());
logger.error(e.toString());
}
logger.info(result);
return result;
}
//人员搜索按库返回
public RootResp searchPersonsReturnsByGroup(ApiConfiguration config, String image) {
RootResp result = new RootResp();
try{
Credential cred = new Credential(config.getSecretId(), config.getSecretKey());
HttpProfile httpProfile = new HttpProfile();
httpProfile.setEndpoint(config.getServerIp());
ClientProfile clientProfile = new ClientProfile();
clientProfile.setHttpProfile(httpProfile);
IaiClient client = new IaiClient(cred, config.getArea(), clientProfile);
JSONObject paramObj = new JSONObject();
paramObj.put("GroupIds", new String[] {config.getGroupId()});
paramObj.put("Image", image);
//最多返回的最相似人员数目
paramObj.put("MaxPersonNumPerGroup", 5);
//返回人员具体信息
paramObj.put("NeedPersonInfo", 1);
//最多识别的人脸数目
paramObj.put("MaxFaceNum", 1);
SearchFacesReturnsByGroupRequest req = SearchFacesReturnsByGroupRequest.fromJsonString(paramObj.toJSONString(), SearchFacesReturnsByGroupRequest.class);
SearchFacesReturnsByGroupResponse resp = client.SearchFacesReturnsByGroup(req);
result.setData(VerifyFaceResponse.toJsonString(resp));
} catch (TencentCloudSDKException e) {
result.setRet(-1);
result.setMsg(e.toString());
logger.error(e.toString());
}
logger.info(result);
return result;
}
}
4.ApiConfiguration :封装配置信息(调用腾讯接口需要的部分参数)
import io.swagger.annotations.ApiModel;
import io.swagger.annotations.ApiModelProperty;
import lombok.Data;
import org.springframework.boot.context.properties.ConfigurationProperties;
import org.springframework.stereotype.Component;

@ConfigurationProperties(value="plateocr")
@Component
@Data
@ApiModel(value = "ApiConfiguration",description = "人脸识别参数描述")
public class ApiConfiguration {

    @ApiModelProperty("人脸识别secretId")
    private String secretId;
    @ApiModelProperty("人脸识别secretKey")
    private String secretKey;
    //	服务器ip
    @ApiModelProperty("人脸识别服务器ip")
    private String serverIp;
    //	服务器区域
    @ApiModelProperty("人脸识别服务器区域")
    private String area;
    //	默认分组
    @ApiModelProperty("人脸识别默认分组")
    private String groupId;
    //	用户id前缀,这个属性在配置文件里面没有
    @ApiModelProperty("人脸识别用户id前缀")
    private String personIdPre;
    //	随机数
    @ApiModelProperty("人脸识别随机数")
    private String nonceStr;
    //	是否使用
    @ApiModelProperty("人脸识别,是否启用人脸识别功能")
    private boolean used = false;
    //	识别准确率
    @ApiModelProperty("人脸识别比对准确度,如符合80%就识别通过")
    private float passPercent;

}
5.表现层代码
@PostMapping("/addPerson")
    public Result addFace(@RequestBody AddFaceVo personFaceForm){
        //1============严谨性判断
        Person person = personService.getById(personFaceForm.getPersonId());
        if(person==null){
            return Result.error("居民不存在");
        }
        if(personFaceForm.getFileBase64()==null||personFaceForm.getFileBase64().equals("")){
          return Result.error("请上传base64编码的文件");
        }
        //1.腾讯接口使用的是腾讯优图祖母模型,
        if(apiConfiguration.isUsed()){
            //**************方法一:调用腾讯api识别。
            String faceId = newPerson(personFaceForm, person.getUserName());
            String faceBase = personFaceForm.getFileBase64().substring(0, 60);
//            ************方法二:自己模拟判断是不是人脸图片************:
//            String faceId = RandomUtil.getBitRandom();
            //如果不是头像(这一行如果不注释就报错)
//            if(faceBase.equals("iVBORw0KGgoAAAANSUhEUgAAAoAAAAHgCAYAAAA10dzkAAAAAXNSR0IArs4c")) {
//                return Result.error("人脸识别失败");
//            }
            //2.存到本地的文件夹内
//            //存储头像
            String filename = faceId + "." + personFaceForm.getExtName();
//            String savePath = face + filename;
//            try {
//                Base64Util.decoderBase64File(personFaceForm.getFileBase64(), savePath);
//            } catch (Exception e) {
//                e.printStackTrace();
//            }
            //**********************这是方法一结束*****************:
            //生成头像访问路径
            String faceUrl = urlPrefix + "community/upload/face/" + filename;
            person.setFaceUrl(faceUrl);
            person.setState(2);
            person.setFaceBase(faceBase);
            //3.存到数据库中(包括base64编码存储)
            //更新人脸识别状态及图片地址
            this.personService.updateById(person);
            return Result.ok();
        }
        return Result.error("未开启人脸识别");
    }

    /**
     * 腾讯api接口相关
     * @param vo
     * @param personName
     * @return
     */
    private String newPerson(AddFaceVo vo,String personName) {
        String faceId = null;
        String faceBase64 = vo.getFileBase64();
        String extname = vo.getExtName();
        String personId = vo.getPersonId()+"";
        String savePath = face;
        if (faceBase64!=null && !faceBase64.equals("")) {
            FaceApi faceApi = new FaceApi();
            RootResp resp = faceApi.newperson(apiConfiguration, personId, personName, faceBase64);
            if(resp.getRet()==0) {
                JSONObject data = JSON.parseObject(resp.getData().toString());
                faceId = data.getString("FaceId");
                if(faceId!=null) {
                    String filename = faceId + "." + extname;
                    savePath += filename;
                    try {
                        //调用自定义工具类,将base64编码文件解码,并报存在指定路径
                        Base64Util.decoderBase64File(faceBase64, savePath);
                    } catch (Exception e) {
                        e.printStackTrace();
                    }
                }
            }
            else {
                return faceId;
            }
        }
        return faceId;
    }
6.接收前端传递参数的类
import lombok.Data;

@Data
public class AddFaceVo {
    private Integer personId;
    private String extName;
    private String fileBase64;
}
三、录入人脸的流程
1.调用腾讯api
调用api需要的参数有:
配置文件中配置的秘钥、秘钥id、服务器ip、区域、人脸库id、是否开启、精确度、随机数
人员id、人员姓名、图片的base64码
2.如果腾讯接口返回的状态码是0,就说明保存成功,将图片存到本地。
3.更新数据库,存base64编码。
四、人脸识别
1.表现层代码
  //1判断是不是在人员库存在)
//        (1)调用腾讯AI接口(
        FaceApi faceApi = new FaceApi();
        RootResp resp = faceApi.searchPersonsReturnsByGroup(apiConfiguration, inOutFaceForm.getFileBase64());
        String msg = "";
//        封装人员信息的json对象
        JSONObject personInfo = null;
//        (2)根据状态码,如果是0就是在人员库
        if(resp.getRet() == 0) {
            JSONObject object = JSONObject.parseObject(resp.getData().toString());
            JSONArray resultsReturnsByGroup = object.getJSONArray("ResultsReturnsByGroup");
            JSONObject returnsByGroupJSONObject = resultsReturnsByGroup.getJSONObject(0);
            JSONArray groupCandidates = returnsByGroupJSONObject.getJSONArray("GroupCandidates");
            JSONObject groupCandidatesJSONObject = groupCandidates.getJSONObject(0);
            JSONArray candidates = groupCandidatesJSONObject.getJSONArray("Candidates");
//            (3)拿到全部人员库对象,匹配数据库人员信息
            String personId ="";
            String faceId = "";
            String personName = "";
            String faceUrl = "";
            long pid = 0;
            Person p = null, p1 = null;
            for(int i = 0;i < candidates.size();i++) {
               personInfo= candidates.getJSONObject(i);
                personId = personInfo.getString("PersonId");
                faceId = personInfo.getString("FaceId");
                personName = personInfo.getString("PersonName");
                personId = personId.substring(4);
                pid = Integer.parseInt(personId);
                p = personService.getById(pid);
                if(p == null)
                    continue;
                else
                    p1 = p;
                faceUrl = p.getFaceUrl();
                if(faceUrl == null || faceUrl.equals("")){
                    continue;
                }
                faceUrl = faceUrl.substring(faceUrl.lastIndexOf("/")+1,faceUrl.lastIndexOf("."));
                if(faceId.equals(faceUrl)) {
                    break;
                }
            }
//          (4)
            if(p==null) {
                return Result.ok().put("data","人员信息不存在");
            }
            if(inOutFaceForm.getCommunityId() != p.getCommunityId()) {
                return Result.ok().put("data","对不起,你不是本小区居民,请与系统管理员联系。");
            }
//        (5)创建出入记录对象,封装
            InOutRecord inoutrecord = new InOutRecord();
            inoutrecord.setCommunityId(p.getCommunityId());
            inoutrecord.setPersonId(p.getPersonId());
            try {
                //保存图片
                String newFileName = UUID.randomUUID()+"." + inOutFaceForm.getExtName();
                String fileName = face + newFileName;
                Base64Util.decoderBase64File(inOutFaceForm.getFileBase64(),fileName);
                String basePath = urlPrefix + "community/upload/face/" + newFileName;
                //查找系统中是否有该人员的出入场信息
                InOutRecord inoutrecord1 = this.inOutRecordMapper.getInOutRecord(inoutrecord);
//        (6)根据出去等于null来查,如果查不到就新建一个对象,查到了就是出去小区
                //进入小区
                if(inoutrecord1 == null) {
                    inoutrecord.setInPic(basePath);
                    this.inOutRecordMapper.insert(inoutrecord);
                    return Result.ok().put("status", "success").put("data", "【"+p.getUserName() + "】进入小区");
                    //离开小区
                } else {
                    inoutrecord1.setOutPic(basePath);
                    inoutrecord1.setOutTime(new Date());
                    this.inOutRecordMapper.updateById(inoutrecord1);
                    return Result.ok().put("status", "success").put("data", "【"+p.getUserName() + "】离开小区");
                }
            } catch (Exception e) {
                e.printStackTrace();
            }
        }else{
            msg = "人脸识别失败,错误码=" + resp.getRet() + "," + resp.getMsg();
        }
        return Result.ok().put("data",msg);
五、人脸识别流程
1.调用腾讯接口进行比对

2.根据状态码,判断是不是存在相似度通过的人脸。如果存在就和根据查找到的人员id来查找数据库中对应的id的人员的姓名。如果姓名也和人员库返回的一致就通过。
3.如需做进出登记,就在进出登记数据表中存入信息。
如果本id下是有“出”是null的就表示改人员是出小区,否则就新建一条记录,表示进小区。


 4806
4806


 被折叠的 条评论
为什么被折叠?
被折叠的 条评论
为什么被折叠?
 到【灌水乐园】发言


