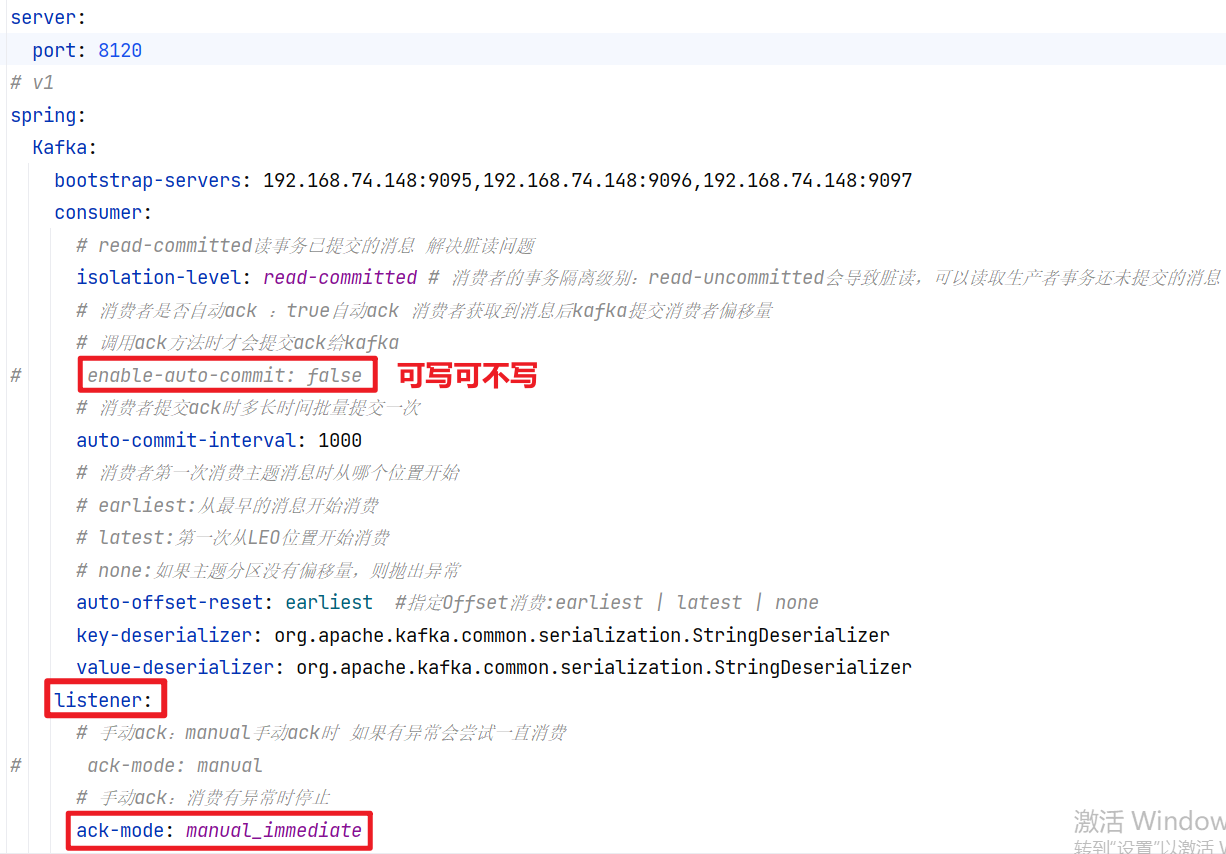
server :
port : 8120
spring :
Kafka :
bootstrap-servers : 192.168.74.148: 9095 , 192.168.74.148: 9096 , 192.168.74.148: 9097
consumer :
isolation-level : read- committed
auto-commit-interval : 1000
auto-offset-reset : earliest
key-deserializer : org.apache.kafka.common.serialization.StringDeserializer
value-deserializer : org.apache.kafka.common.serialization.StringDeserializer
listener :
ack-mode : manual_immediate
package com. atguigu. spring. kafka. consumer. listener ;
import org. apache. kafka. clients. consumer. ConsumerRecord ;
import org. springframework. boot. autoconfigure. jms. JmsProperties ;
import org. springframework. kafka. annotation. KafkaListener ;
import org. springframework. kafka. annotation. TopicPartition ;
import org. springframework. kafka. support. Acknowledgment ;
import org. springframework. stereotype. Component ;
@Component
public class MyKafkaListenerAck {
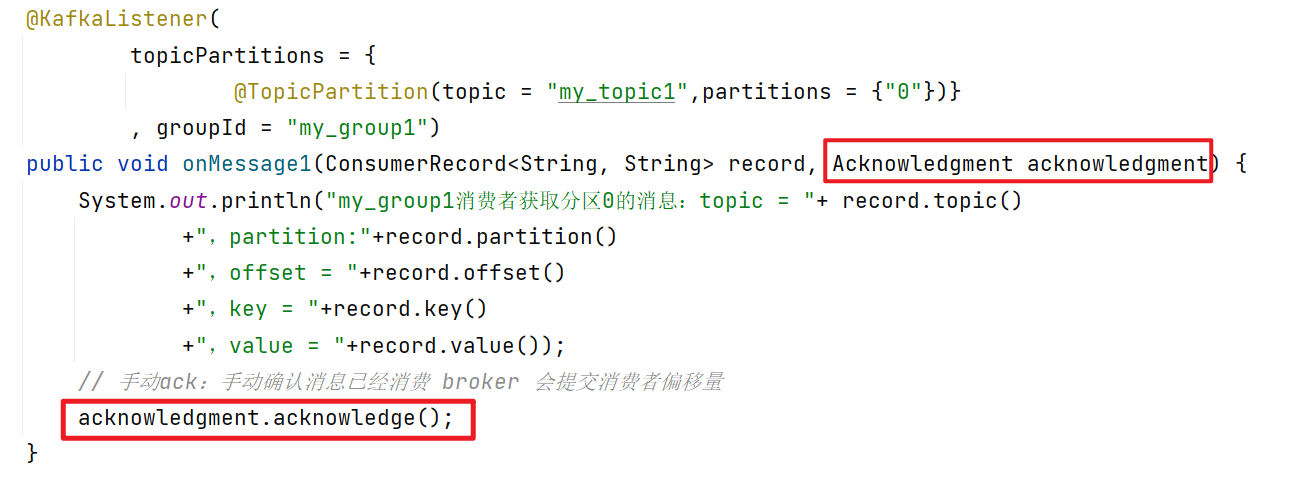
@KafkaListener (
topicPartitions = {
@TopicPartition ( topic = "my_topic1" , partitions = { "0" } ) }
, groupId = "my_group1" )
public void onMessage1 ( ConsumerRecord < String , String > , Acknowledgment acknowledgment) {
System . out. println ( "my_group1消费者获取分区0的消息:topic = " + record. topic ( )
+ ",partition:" + record. partition ( )
+ ",offset = " + record. offset ( )
+ ",key = " + record. key ( )
+ ",value = " + record. value ( ) ) ;
acknowledgment. acknowledge ( ) ;
}
}
package com. atguigu. spring. kafka. consumer. config ;
import org. apache. kafka. clients. admin. NewTopic ;
import org. springframework. context. annotation. Bean ;
import org. springframework. context. annotation. Configuration ;
import org. springframework. kafka. config. TopicBuilder ;
@Configuration
public class MyKafkaConfig {
@Bean
public NewTopic springTestPartitionTopic ( ) {
return TopicBuilder . name ( "my_topic1" )
. partitions ( 3 )
. replicas ( 3 )
. build ( ) ;
}
}
package com. atguigu. spring. kafka. consumer ;
import jakarta. annotation. Resource ;
import org. junit. jupiter. api. Test ;
import org. springframework. boot. test. context. SpringBootTest ;
import org. springframework. kafka. core. KafkaTemplate ;
@SpringBootTest
class SpringKafkaConsumerApplicationTests {
@Resource
KafkaTemplate kafkaTemplate;
@Test
void contextLoads ( ) {
for ( int i = 0 ; i < 10 ; i++ ) {
kafkaTemplate. send ( "my_topic1" , i% 3 , "" , "指定ack-mode: manual_immediate消费" + i) ;
}
}
}
package com. atguigu. spring. kafka. consumer ;
import org. springframework. boot. SpringApplication ;
import org. springframework. boot. autoconfigure. SpringBootApplication ;
@SpringBootApplication
public class SpringKafkaConsumerApplication {
public static void main ( String [ ] args) {
SpringApplication . run ( SpringKafkaConsumerApplication . class , args) ;
}
}
< configuration> < loggername = " org.apache.kafka.clients" level = " debug" /> </ configuration> <?xml version="1.0" encoding="UTF-8"?>
< projectxmlns = " http://maven.apache.org/POM/4.0.0" xmlns: xsi= " http://www.w3.org/2001/XMLSchema-instance" xsi: schemaLocation= " http://maven.apache.org/POM/4.0.0 https://maven.apache.org/xsd/maven-4.0.0.xsd" > < modelVersion> </ modelVersion> < parent> < groupId> </ groupId> < artifactId> </ artifactId> < version> </ version> < relativePath/> </ parent> < groupId> </ groupId> < artifactId> </ artifactId> < version> </ version> < name> </ name> < description> </ description> < properties> < java.version> </ java.version> </ properties> < dependencies> < dependency> < groupId> </ groupId> < artifactId> </ artifactId> </ dependency> < dependency> < groupId> </ groupId> < artifactId> </ artifactId> < scope> </ scope> </ dependency> < dependency> < groupId> </ groupId> < artifactId> </ artifactId> </ dependency> < dependency> < groupId> </ groupId> < artifactId> </ artifactId> </ dependency> </ dependencies> < build> < plugins> < plugin> < groupId> </ groupId> < artifactId> </ artifactId> </ plugin> </ plugins> </ build> </ project> . ____ _ __ _ _
/\ \ / ___'_ __ _ _(_)_ __ __ _ \ \ \ \
( ( )\___ | ' _ | '_| | ' _ \ / _` | \ \ \ \
\ \ / ___) | | _) | | | | | || ( _| | ) ) ) )
' | ____| .__| _| | _| _| | _\ __, | / / / /
== == == == = | _| == == == == == == == | ___/= /_/_/_/
:: Spring Boot :: ( v3.0.5)
my_group1消费者获取分区0的消息:topic = my_topic1,partition:0,offset = 0 ,key = ,value = 指定ack-mode: manual_immediate消费0
my_group1消费者获取分区0的消息:topic = my_topic1,partition:0,offset = 1 ,key = ,value = 指定ack-mode: manual_immediate消费3
my_group1消费者获取分区0的消息:topic = my_topic1,partition:0,offset = 2 ,key = ,value = 指定ack-mode: manual_immediate消费6
my_group1消费者获取分区0的消息:topic = my_topic1,partition:0,offset = 3 ,key = ,value = 指定ack-mode: manual_immediate消费9
. ____ _ __ _ _
/\ \ / ___'_ __ _ _(_)_ __ __ _ \ \ \ \
( ( )\___ | ' _ | '_| | ' _ \ / _` | \ \ \ \
\ \ / ___) | | _) | | | | | || ( _| | ) ) ) )
' | ____| .__| _| | _| _| | _\ __, | / / / /
== == == == = | _| == == == == == == == | ___/= /_/_/_/
:: Spring Boot :: ( v3.0.5)


 1144
1144

 被折叠的 条评论
为什么被折叠?
被折叠的 条评论
为什么被折叠?
 到【灌水乐园】发言


