


本文总结certbot申请证书全过程及对各种问题进行解决
1 安装过程
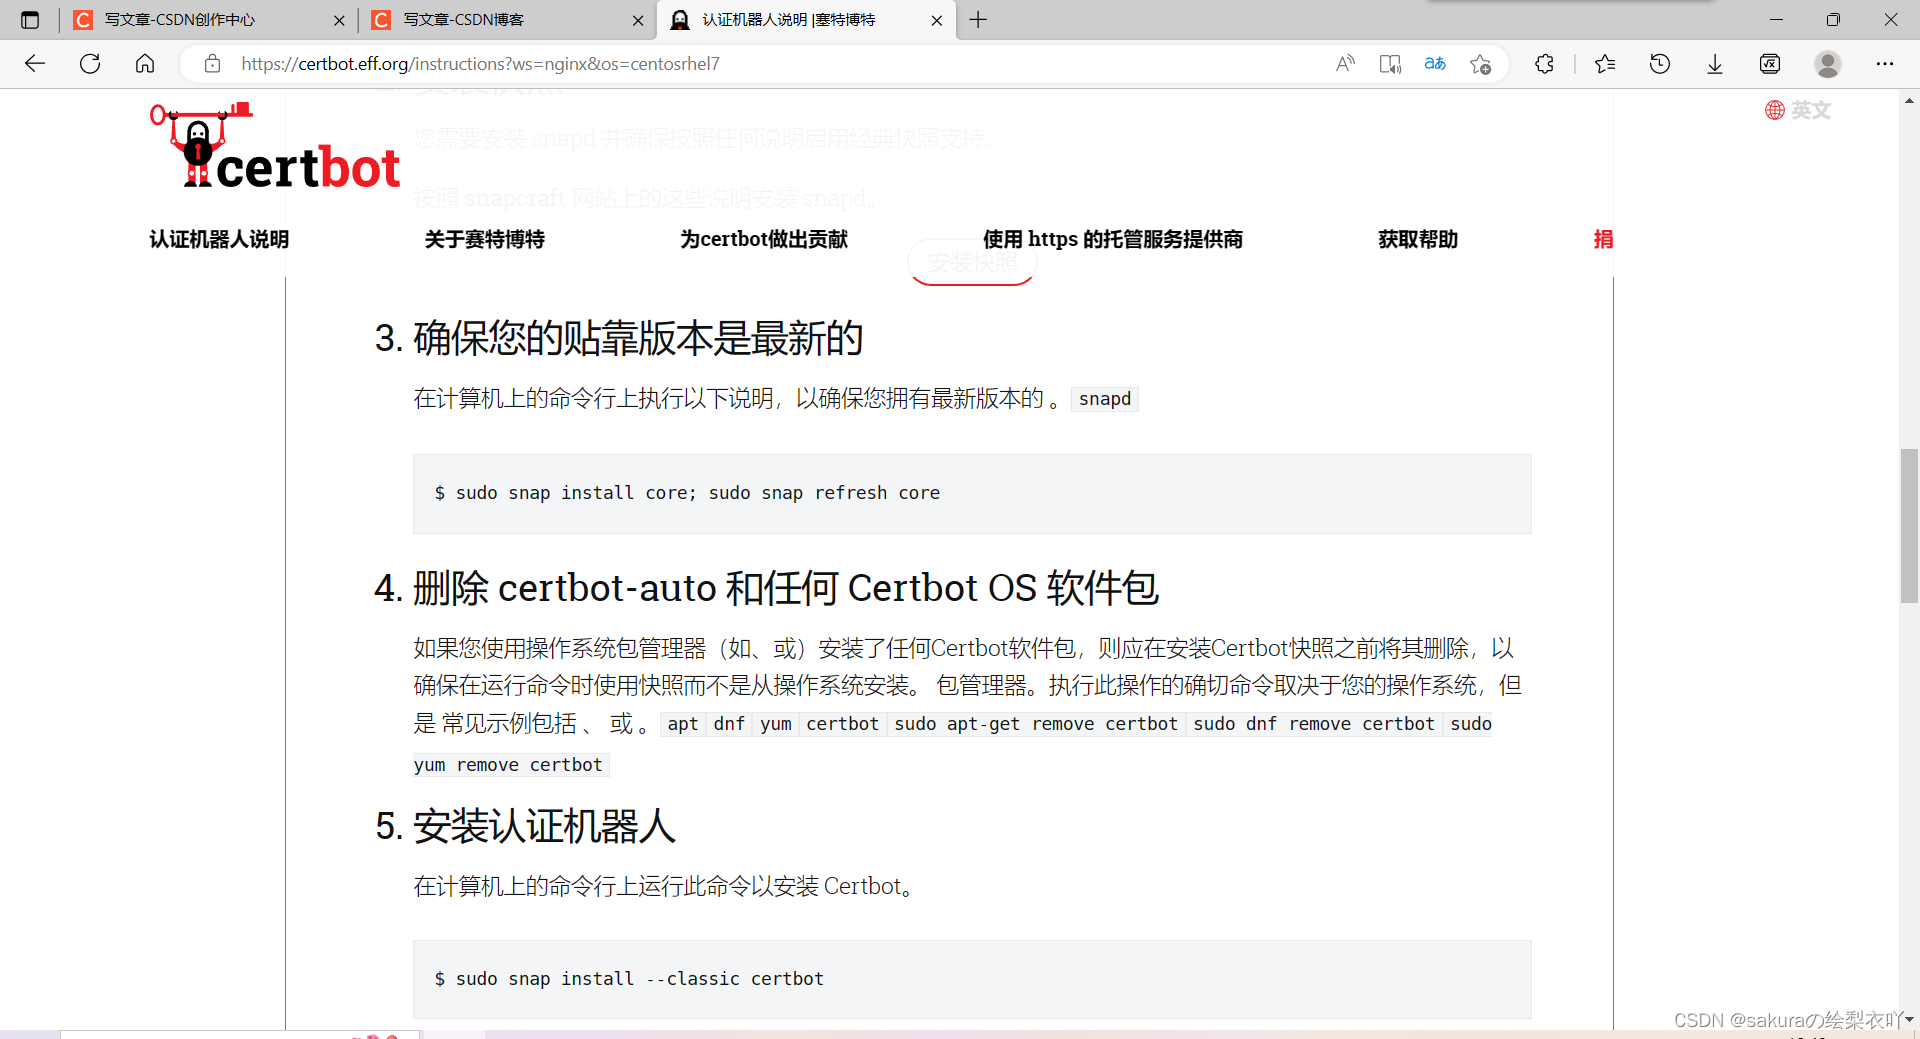
由于服务器版本不同,本文对centos7操作系统进行操作演示,其他操作系统也会给出安装过程
- 进入官网Certbot官网地址
- 找到对应版本,本文选用的是CentOS 7下的Nginx应用。其他操作系统自选
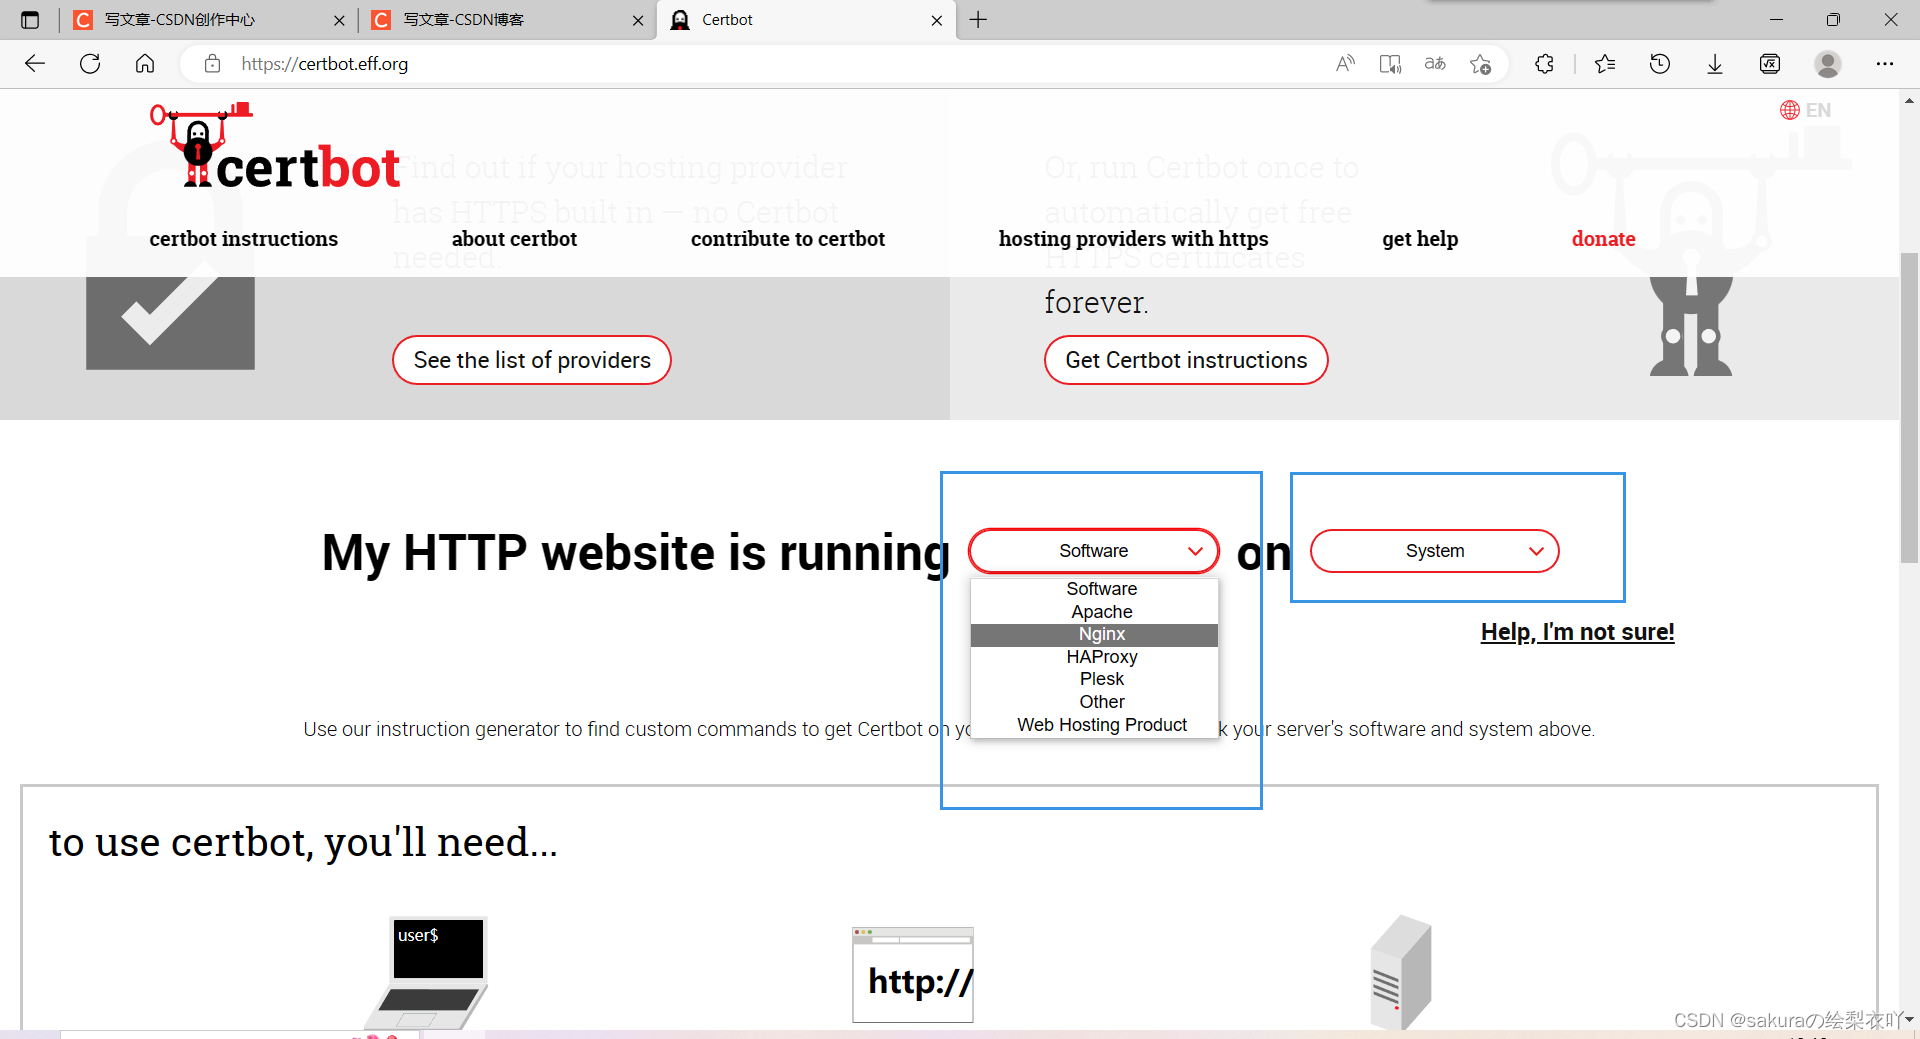
- 选好后会自动跳转到安装流程,跟着官网的安装流程一步一步操作即可
- 官网说明了过期自动申请的操作
2 问题解决
- 使用sudo certbot --nginx申请后的具体翻译版本,本段来自博客使用Certbot安装免费https:
[root@iz2zeb4argxs74khdclp2dz sbin]# sudo certbot --nginx
Saving debug log to /var/log/letsencrypt/letsencrypt.log
Plugins selected: Authenticator nginx, Installer nginx
Enter email address (used for urgent renewal and security notices) (Enter 'c' to
cancel):   // 1)设置邮箱,用于安全提示
Starting new HTTPS connection (1): acme-v02.api.letsencrypt.org

- - - - - - - - - - - - - - - - - - - - - - - - - - - - - - - - - - - - - - - -
Please read the Terms of Service at
https://letsencrypt.org/documents/LE-SA-v1.2-November-15-2017.pdf. You must
agree in order to register with the ACME server at
https://acme-v02.api.letsencrypt.org/directory
- - - - - - - - - - - - - - - - - - - - - - - - - - - - - - - - - - - - - - - -
(A)gree/(C)ancel: a    // 2)同意协议

- - - - - - - - - - - - - - - - - - - - - - - - - - - - - - - - - - - - - - - -
Would you be willing to share your email address with the Electronic Frontier
Foundation, a founding partner of the Let's Encrypt project and the non-profit
organization that develops Certbot? We'd like to send you email about our work
encrypting the web, EFF news, campaigns, and ways to support digital freedom.
- - - - - - - - - - - - - - - - - - - - - - - - - - - - - - - - - - - - - - - -
(Y)es/(N)o: n    // 3)不共享你的邮箱

Which names would you like to activate HTTPS for?
- - - - - - - - - - - - - - - - - - - - - - - - - - - - - - - - - - - - - - - -
1: admin.talkilla.jiushiyaokuaile.cn
2: consultant.talkilla.jiushiyaokuaile.cn
3: student.talkilla.jiushiyaokuaile.cn
4: teacher.talkilla.jiushiyaokuaile.cn
5: wechat.talkilla.jiushiyaokuaile.cn
- - - - - - - - - - - - - - - - - - - - - - - - - - - - - - - - - - - - - - - -
Select the appropriate numbers separated by commas and/or spaces, or leave input
blank to select all options shown (Enter 'c' to cancel): 1 2 3 4 5
// 4)选择需要激活https的域名
Obtaining a new certificate
Performing the following challenges:
http-01 challenge for admin.talkilla.jiushiyaokuaile.cn
http-01 challenge for consultant.talkilla.jiushiyaokuaile.cn
http-01 challenge for student.talkilla.jiushiyaokuaile.cn
http-01 challenge for teacher.talkilla.jiushiyaokuaile.cn
http-01 challenge for wechat.talkilla.jiushiyaokuaile.cn
Waiting for verification...
Cleaning up challenges
Deploying Certificate to VirtualHost /usr/local/nginx/conf/conf.d/admin-talkilla.conf
Deploying Certificate to VirtualHost /usr/local/nginx/conf/conf.d/consultant-talkilla.conf
Deploying Certificate to VirtualHost /usr/local/nginx/conf/conf.d/student-talkilla.conf
Deploying Certificate to VirtualHost /usr/local/nginx/conf/conf.d/teacher-talkilla.conf
Deploying Certificate to VirtualHost /usr/local/nginx/conf/conf.d/wechat-talkilla.conf

Please choose whether or not to redirect HTTP traffic to HTTPS, removing HTTP access.
- - - - - - - - - - - - - - - - - - - - - - - - - - - - - - - - - - - - - - - -
1: No redirect - Make no further changes to the webserver configuration.
2: Redirect - Make all requests redirect to secure HTTPS access. Choose this for
new sites, or if you're confident your site works on HTTPS. You can undo this
change by editing your web server's configuration.
- - - - - - - - - - - - - - - - - - - - - - - - - - - - - - - - - - - - - - - -
Select the appropriate number [1-2] then [enter] (press 'c' to cancel):
2  // 5)设置是否将http自动重定向到https,1否2是
Redirecting all traffic on port 80 to ssl in /usr/local/nginx/conf/conf.d/admin-talkilla-http.conf
Redirecting all traffic on port 80 to ssl in /usr/local/nginx/conf/conf.d/consultant-talkilla.conf
Redirecting all traffic on port 80 to ssl in /usr/local/nginx/conf/conf.d/student-talkilla.conf
Redirecting all traffic on port 80 to ssl in /usr/local/nginx/conf/conf.d/teacher-talkilla.conf
Redirecting all traffic on port 80 to ssl in /usr/local/nginx/conf/conf.d/wechat-talkilla.conf

- - - - - - - - - - - - - - - - - - - - - - - - - - - - - - - - - - - - - - - -
Congratulations! You have successfully enabled
https://admin.talkilla.jiushiyaokuaile.cn,
https://consultant.talkilla.jiushiyaokuaile.cn,
https://student.talkilla.jiushiyaokuaile.cn,
https://teacher.talkilla.jiushiyaokuaile.cn, and
https://wechat.talkilla.jiushiyaokuaile.cn

You should test your configuration at:
https://www.ssllabs.com/ssltest/analyze.html?d=admin.talkilla.jiushiyaokuaile.cn
https://www.ssllabs.com/ssltest/analyze.html?d=consultant.talkilla.jiushiyaokuaile.cn
https://www.ssllabs.com/ssltest/analyze.html?d=student.talkilla.jiushiyaokuaile.cn
https://www.ssllabs.com/ssltest/analyze.html?d=teacher.talkilla.jiushiyaokuaile.cn
https://www.ssllabs.com/ssltest/analyze.html?d=wechat.talkilla.jiushiyaokuaile.cn
- - - - - - - - - - - - - - - - - - - - - - - - - - - - - - - - - - - - - - - -

IMPORTANT NOTES:
 - Congratulations! Your certificate and chain have been saved at:
   /etc/letsencrypt/live/admin.talkilla.jiushiyaokuaile.cn/fullchain.pem
   Your key file has been saved at:
   /etc/letsencrypt/live/admin.talkilla.jiushiyaokuaile.cn/privkey.pem
   Your cert will expire on 2020-01-06. To obtain a new or tweaked
   version of this certificate in the future, simply run certbot again
   with the "certonly" option. To non-interactively renew *all* of
   your certificates, run "certbot renew"
 - Your account credentials have been saved in your Certbot
   configuration directory at /etc/letsencrypt. You should make a
   secure backup of this folder now. This configuration directory will
   also contain certificates and private keys obtained by Certbot so
   making regular backups of this folder is ideal.
 - If you like Certbot, please consider supporting our work by:

   Donating to ISRG / Let's Encrypt:   https://letsencrypt.org/donate
   Donating to EFF:                    https://eff.org/donate-le
- Could not automatically find a matching server block for Set the server_name dirinstaller.
原因是没有在nginx中配置域名信息,可以按照如下操作:
sudo vim /etc/nginx/nginx.conf
然后找到
 server {
        server_name  ;
        }
    }
最后添加你自己的域名
 server {
        server_name  www.baidu.com baidu.com;
        }
    }
保存退出
再次sudo certbot --nginx
没问题的话就会显示你的域名了,然后就可按照问题一中的内容设置


 4301
4301


 被折叠的 条评论
为什么被折叠?
被折叠的 条评论
为什么被折叠?
 到【灌水乐园】发言


