


1、文件查看:查看/opt/passwd文件的第6行
命令:head -6 /opt/passwd | tail -1
head: 是用于查看文件的前几行内容的命令。
-6: 是head命令的选项,用于指定显示文件的前6行。
/opt/passwd: 是要查看的文件路径。在这个例子中,它指定为/opt/passwd,表示要查看名为passwd的文件,位于/opt目录下。
tail: 是用于查看文件的后几行内容的命令。
-1: 是tail命令的选项,用于指定显示文件的最后1行。
|: 是管道操作符,用于将前一个命令的输出作为后一个命令的输入。

2、文件查找
(1)在当前目录及子目录中,查找大写字母开头的txt文件
find命令:‘.’表示当前目录;-name用于指定查找文件名的格式;‘【A-Z】*txt’代表文件名

(2)在/etc及其子目录中,查找host开头的文件

(3)在$HOME目录及其子目录中,查找所有文件

(4)忽略文件名大小写查找a.txt

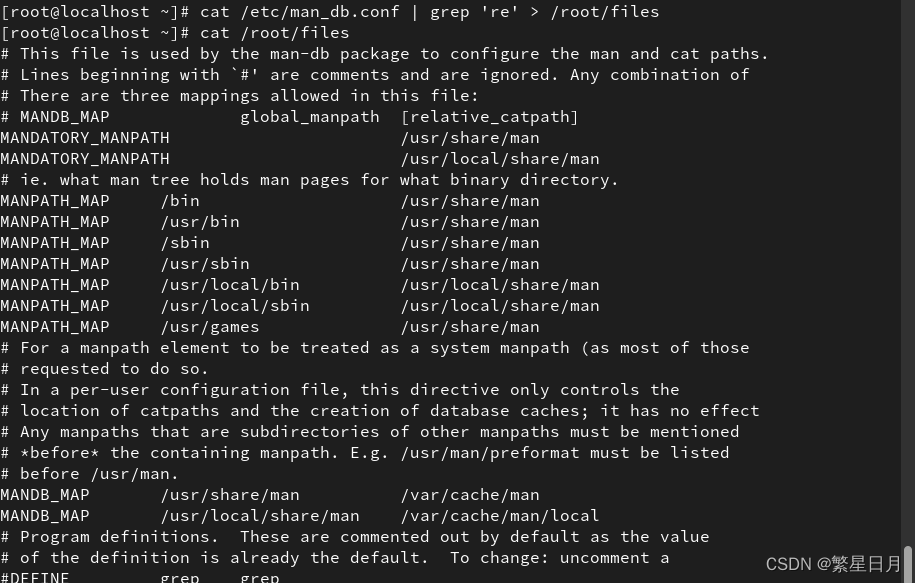
3、查找文件 /etc/man_db.conf 中包含字符串 re 的所有行。将所有这些行的副本按原始顺序放在文件/root/files 中
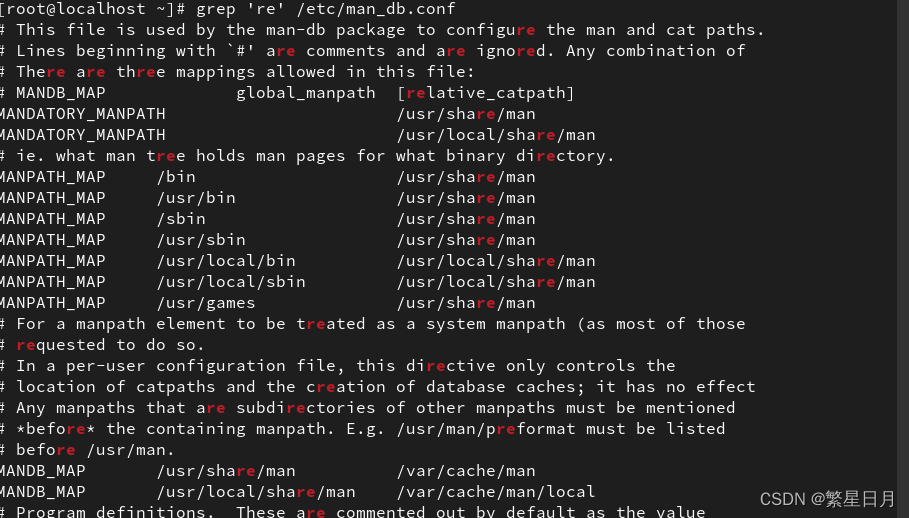
在/etc/man_db.conf文件中搜索包含字符串're'的行,并将搜索结果保存到/root/files文件中,以便稍后查看或处理搜索结果。 grep命令则是过滤包含‘re’字符串的行
4、将整个 /etc 目录下的文件全部打包并用 gzip 压缩成/back/etcback.tar.gz
新建目录指令:mkdir /back
命令:tar czf /back/etcback.tar.gz /etc
tar: 是用于创建、提取或查看 tar 归档文件的命令。czf: 是 tar 命令的选项,用于指定创建压缩文件。
c: 表示创建一个新的归档文件。z: 表示使用 gzip 压缩。f: 后面紧跟归档文件的名称,指定要创建的压缩文件的名称。

5、使当前用户永久生效的命令别名:写一个命令命为hello,实现的功能为每输入一次hello命令,就有hello,everyone写入文件/file.txt中。
命令:alias hello='echo hello,everyone >> /file.txt'
alias: 是用于创建别名的命令。hello: 是要创建的别名的名称。在这个例子中,它指定为"hello"。'echo hello,everyone >> /file.txt': 是别名的定义,指定了当输入"hello"时要执行的操作。在这个例子中,它是一个echo命令,用于在终端输出 "hello,everyone" 字符串,并使用>>将这个字符串追加到名为"/file.txt"的文件中。


6、创建mygroup组群,再创建myuser用户,并且此用户属于mygroup组群,接着以myuser身份登录,创建ex和hv两个文件于/home/myuser目录,并使hv文件的同组用户是root。请依次写出相应执行的命令。
命令:useradd -G mygroup myuser
useradd: 是用于创建用户的命令。-G mygroup: 是useradd命令的选项,用于指定将用户添加到的用户组。
mygroup: 是用户组的名称。在这个例子中,它是一个名为 "mygroup" 的用户组,该用户组将成为 "myuser" 用户的附加组。如果用户组不存在,该命令会报错。myuser: 是要创建的用户名。在这个例子中,它是一个名为 "myuser" 的用户,该用户将添加到 "mygroup" 用户组中。

gpasswd: 是用于管理用户组的命令。-a: 是gpasswd命令的选项,用于向用户组添加成员。root: 是要添加为成员的用户名。在这个例子中,它是一个名为 "root" 的用户,该用户将被添加为 "mygroup" 用户组的成员。mygroup: 是用户组的名称。在这个例子中,它是一个名为 "mygroup" 的用户组,"root" 用户将成为该用户组的成员。

7、设置权限,要求如下:创建g1组,要求创建一个属于redhat用户g1组的文件redhat.txt
[root@localhost test]# groupadd g1
[root@localhost test]# useradd redhat
[root@localhost test]# passwd redhat
Changing password for user redhat.
New password:
BAD PASSWORD: The password is shorter than 8 characters
Retype new password:
passwd: all authentication tokens updated successfully.
[root@localhost test]# usermod -g g1 redhat
[root@localhost test]# id redhat
uid=1011(redhat) gid=1011(g1) groups=1011(g1)
[root@localhost test]# touch redhat.txt
[root@localhost test]# ll redhat.txt
-rw-r--r--. 1 root root 0 Jul 18 08:19 redhat.txt
[root@localhost test]# chown -c redhat:g1 redhat.txt
changed ownership of 'redhat.txt' from root:root to redhat:g1
[root@localhost test]# ll redhat.txt
-rw-r--r--. 1 redhat g1 0 Jul 18 08:19 redhat.txt
基本的日常练习
1.在/目录下创建一个临时目录tes
[root@localhost ~]# mkdir /test
[root@localhost ~]# cd /
[root@localhost /]# ll
total 24
dr-xr-xr-x.   2 root root    6 Aug  9  2021 afs
lrwxrwxrwx.   1 root root    7 Aug  9  2021 bin -> usr/bin
dr-xr-xr-x.   5 root root 4096 Jul 17 00:00 boot
drwxr-xr-x.  20 root root 3420 Jul 16 23:59 dev
drwxr-xr-x. 133 root root 8192 Jul 17 00:01 etc
drwxr-xr-x.   3 root root   17 Jul 17 00:01 home
2.在临时目录test下创建五个文件,文件名分别为passwd,group,bashrc,profile,sshd_config
[root@localhost /]# touch /test/{passwd,group,bashrc,profile,ssh_config}
[root@localhost /]# tree /test/
/test/
├── bashrc
├── group
├── passwd
├── profile
└── ssh_config

0 directories, 5 files
3.在/test创建/etc/motd的软链接,文件名为motd.soft;创建/etc/motd的硬链接为motd.hard
[root@localhost /]# cd /test/
[root@localhost test]# ln -s /etc/motd motd.soft
[root@localhost test]# ll
total 0
-rw-r--r--. 1 root root 0 Jul 17 00:05 bashrc
-rw-r--r--. 1 root root 0 Jul 17 00:05 group
lrwxrwxrwx. 1 root root 9 Jul 17 00:06 motd.soft -> /etc/motd
-rw-r--r--. 1 root root 0 Jul 17 00:05 passwd
-rw-r--r--. 1 root root 0 Jul 17 00:05 profile
-rw-r--r--. 1 root root 0 Jul 17 00:05 ssh_config
[root@localhost test]# ln /etc/motd motd.hard
[root@localhost test]# ll
total 0
-rw-r--r--. 1 root root 0 Jul 17 00:05 bashrc
-rw-r--r--. 1 root root 0 Jul 17 00:05 group
-rw-r--r--. 2 root root 0 Jun 23  2020 motd.hard
lrwxrwxrwx. 1 root root 9 Jul 17 00:06 motd.soft -> /etc/motd
-rw-r--r--. 1 root root 0 Jul 17 00:05 passwd
-rw-r--r--. 1 root root 0 Jul 17 00:05 profile
-rw-r--r--. 1 root root 0 Jul 17 00:05 ssh_config
4.已知系统发行版本在/etc/redhat-release文件中,uname -r 可以查看内版本,请将系统内核版本信息,发行版本信息,写入到/test/motd.soft文件中
[root@localhost /]# cd ~
[root@localhost ~]# cat /etc/redhat-release
Red Hat Enterprise Linux release 9.2 (Plow)
[root@localhost ~]# echo "$(uname -r)" > /test/motd.soft
[root@localhost ~]# echo "$(cat /etc/redhat-release)" >> /test/motd.soft
[root@localhost test]# ls
bashrc  file  group  motd.hard  motd.soft  passwd  profile  ssh_config
[root@localhost test]# cd /motd.soft
-bash: cd: /motd.soft: No such file or directory
[root@localhost test]# cat motd.soft
5.14.0-284.11.1.el9_2.x86_64
Red Hat Enterprise Linux release 9.2 (Plow)
localhost.localdomain
/bin/bash
5.将当前主机名和用户的当前SHELL信息 追加到/test/motd.hard
[root@localhost ~]# echo "$(hostname)" >> /test/motd.hard
[root@localhost ~]# echo "$(echo $SHELL)" >> /test/motd.hard
[root@localhost ~]# ls / > /test/file
[root@localhost test]# cat motd.hard
5.14.0-284.11.1.el9_2.x86_64
Red Hat Enterprise Linux release 9.2 (Plow)
localhost.localdomain
/bin/bash
6.将根目录下的文件的文件名写入/test/file文件中
[root@localhost ~]# ls / > /test/file
7.将当前工作目录的详细信息追加到/test/file文件中
[root@localhost ~]# ls -al >> /test/file
压缩的相关命令:
1.创建一个名为zipTestDir的压缩包,
for i in {1..4};: 这是一个循环语句,它会在变量i中依次迭代数字 1 到 4。do: 用于标识循环体的开始。echo test$i > test$i.test;: 这是一个命令,它将字符串 "test" 后面连接上变量i的值,并将结果输出到名为 "test<i>.test" 的文件中。例如,当i的值为 1 时,输出的内容为 "test1",保存到名为 "test1.test" 的文件中。done: 用于标识循环体的结束。
然后将以test开头的文件移到压缩包里
‘test*’就代表是以test开头的文件
[root@localhost ~]# mkdir zipTestDir
[root@localhost ~]# for i in {1..4};do echo test$i > test$i.test;done
[root@localhost ~]# ls
 1.txt   a                 bashrc  'test$.test'   test2.test   test4.test   ͼƬ
 2.txt   anaconda-ks.cfg   NULL     test1.test    test3.test   zipTestDir
[root@localhost ~]# mv test* zipTestDir/
[root@localhost ~]# ls
1.txt  2.txt  a  anaconda-ks.cfg  bashrc  NULL  zipTestDir  ͼƬ
[root@localhost ~]# cd zipTestDir/
[root@localhost zipTestDir]# ls
'test$.test'   test1.test   test2.test   test3.test   test4.test
2.zip zipTestDir.zip zipTestDir/ 是一个命令,用于将名为 "zipTestDir" 的目录及其内容压缩为名为 "zipTestDir.zip" 的 ZIP 文件。
[root@localhost ~]# zip zipTestDir.zip zipTestDir/
  adding: zipTestDir/ (stored 0%)
[root@localhost ~]# ls
1.txt  2.txt  a  anaconda-ks.cfg  bashrc  NULL  zipTestDir  zipTestDir.zip  ͼƬ
3.
命令:unzip zipTestDir.zip -d testdir
unzip: 是用于解压缩ZIP文件的命令。zipTestDir.zip: 是要解压缩的ZIP文件的名称。在这个例子中,它指定为 "zipTestDir.zip"。-d: 是unzip命令的选项,用于指定解压缩的目标目录。testdir: 是解压缩的目标目录的路径。在这个例子中,它是一个名为 "testdir" 的目录,即解压缩后的文件将会被提取到 "testdir" 目录中。
zip zipTestDir.zip zipTestDir/ -r
zip: 是用于创建ZIP文件的命令。zipTestDir.zip: 是要创建的ZIP文件的名称。在这个例子中,它将被命名为 "zipTestDir.zip"。zipTestDir/: 是要压缩的目录的路径。在这个例子中,它指定了 "zipTestDir" 目录,表示要压缩名为 "zipTestDir" 的目录及其内容。-r: 是zip命令的选项,用于递归地压缩目录及其内容。
命令:unzip zipTestDir.zip -d testdir
将zip TestDir.zip的压缩文件解压到testdir目录中
-s:unzip的命令选项,指定解压缩的压缩目录
[root@localhost ~]# unzip zipTestDir.zip -d testdir
Archive:  zipTestDir.zip
   creating: testdir/zipTestDir/
[root@localhost ~]# ls
1.txt  2.txt  a  anaconda-ks.cfg  bashrc  NULL  testdir  zipTestDir  zipTestDir.zip  ͼƬ
[root@localhost ~]# cd zipTestDir/
[root@localhost zipTestDir]# ls
'test$.test'   test1.test   test2.test   test3.test   test4.test
[root@localhost zipTestDir]# cd ~
[root@localhost ~]# zip zipTestDir.zip zipTestDir/ -r
updating: zipTestDir/ (stored 0%)
  adding: zipTestDir/test$.test (stored 0%)
  adding: zipTestDir/test1.test (stored 0%)
  adding: zipTestDir/test2.test (stored 0%)
  adding: zipTestDir/test3.test (stored 0%)
  adding: zipTestDir/test4.test (stored 0%)
[root@localhost ~]# unzip zipTestDir.zip -d testdir
Archive:  zipTestDir.zip
 extracting: testdir/zipTestDir/test$.test
 extracting: testdir/zipTestDir/test1.test
 extracting: testdir/zipTestDir/test2.test
 extracting: testdir/zipTestDir/test3.test
 extracting: testdir/zipTestDir/test4.test
[root@localhost ~]# tree testdir/
testdir/
└── zipTestDir
    ├── test$.test
    ├── test1.test
    ├── test2.test
    ├── test3.test
    └── test4.test

1 directory, 5 files
命令: zip zip.zip zipTestDir/ -r -x zipTestDir/test4.test
zip: 是用于创建ZIP文件的命令。zip.zip: 是要创建的ZIP文件的名称。在这个例子中,它将被命名为 "zip.zip"。zipTestDir/: 是要压缩的目录的路径。在这个例子中,它指定了 "zipTestDir" 目录,表示要压缩名为 "zipTestDir" 的目录及其内容。-r: 是zip命令的选项,用于递归地压缩目录及其内容。
-r表示递归操作,意味着压缩目录时会包含其所有子目录和文件。-x zipTestDir/test4.test: 是zip命令的选项,用于指定要排除(不压缩)的文件或目录。
zipTestDir/test4.test: 是要排除的文件路径。在这个例子中,它指定排除名为 "zipTestDir/test4.test" 的文件。
[root@localhost ~]# zip zip.zip zipTestDir/ -r -x zipTestDir/test4.test
  adding: zipTestDir/ (stored 0%)
  adding: zipTestDir/test$.test (stored 0%)
  adding: zipTestDir/test1.test (stored 0%)
  adding: zipTestDir/test2.test (stored 0%)
  adding: zipTestDir/test3.test (stored 0%)
[root@localhost ~]# zip zip.zip zipTestDir/* -x zipTestDir/test4.test
updating: zipTestDir/test$.test (stored 0%)
updating: zipTestDir/test1.test (stored 0%)
updating: zipTestDir/test2.test (stored 0%)
updating: zipTestDir/test3.test (stored 0%)
对 指定的"z/test1.test" 文件进行压缩,压缩后的文件将命名为 "z/test1.test.gz"。原文件 "test1.test" 将被替换为压缩后的版本 "test1.test.gz"。压缩后的文件会自动添加 ".gz" 扩展名,并且原文件会被删除。如果你想保留原文件,可以在命令中加入
-k选项(如gzip -k z/test1.test),这样原文件不会被删除,同时生成一个压缩文件。
gunzip:解压缩命令
[root@localhost ~]# gzip z.gzip z
gzip: z.gzip: No such file or directory
gzip: z is a directory -- ignored
[root@localhost ~]# gzip z/test1.test
[root@localhost ~]# tree z
z
├── test$.test
├── test1.test.gz
├── test2.test
├── test3.test
└── test4.test

0 directories, 5 files
[root@localhost ~]# gzip z
gzip: z is a directory -- ignored
[root@localhost ~]# gzip z/*
gzip: z/test1.test.gz already has .gz suffix -- unchanged
[root@localhost ~]# gunzip z/test1.test.gz
[root@localhost ~]# ls
1.txt  2.txt  a  anaconda-ks.cfg  bashrc  NULL  testdir  z  ͼƬ
[root@localhost ~]# tree z
z
├── test$.test.gz
├── test1.test
├── test2.test.gz
├── test3.test.gz
└── test4.test.gz

0 directories, 5 files


 338
338


 被折叠的 条评论
为什么被折叠?
被折叠的 条评论
为什么被折叠?
 到【灌水乐园】发言


