


一、项目背景与目标

1. 项目背景
最近欢乐钓鱼大师在抖音大火,我也毫无例外的下载了这款游戏并评鉴了这款游戏,在小小的屏幕上抛出自信满满的一杆!游戏福利待遇很好(真不是广告),什么体力、付费可以购买的道具,一直在赠送,在这游戏里面,时间>中度氪金。花钱买道具是完完全全没有必要。但是也就是这个原因,这款游戏占用了大量时间,于是乎我就想做一个能自动钓鱼的辅助,自用不公开,这个博客也只是提供少量代码和思路,不公开完整代码影响公司的收益。
2. 项目目标
实现欢乐钓鱼大师页面的自动切换,进入渔场后实现自动钓鱼,冒出藏宝图等界面会自动关闭,识别体力能够无体力停止钓鱼等等。
二、技术栈与工具
- Python
- Yolov5
- 大漠训练集制作软件
- OCR 文字识别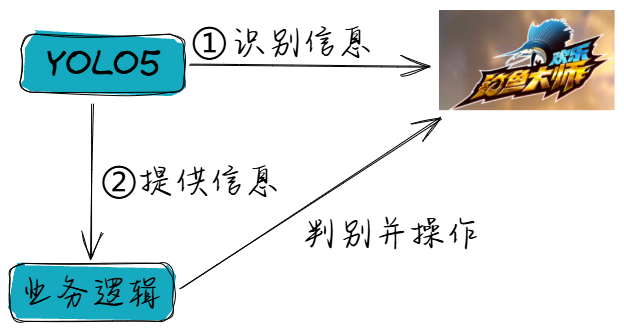
四、具体实现
1. 训练集的制作并训练
共制作了353个图片大小的训练集,有16个类别。
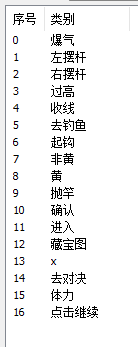
并进行人工标注所有的图片,这个在其他人的博客有很多教程了,我就不多说了。
使用yolov5_n模型,训练完得到yolov5n_best.pt文件。
2. 模拟器窗口捕获
利用按键精灵或者其他能获得窗口句柄的软件,
global hwnd
    global hwndChild2
    hwnd = win32gui.FindWindow(None, 'BlueStacks')
    hwndChild = win32gui.GetWindow(hwnd, win32con.GW_CHILD)
    hwndChild2 = win32gui.GetWindow(hwndChild, win32con.GW_CHILD)
    if not hwndChild2:
        print("Window not found.")
        return
绑定窗口句柄后去捕获视频流。
def capture_window_by_handle(hwnd):
    try:
        wDC = win32gui.GetWindowDC(hwnd)
        dcObj = win32ui.CreateDCFromHandle(wDC)
        cDC = dcObj.CreateCompatibleDC()
        rect = win32gui.GetWindowRect(hwnd)
        width, height = rect[2] - rect[0], rect[3] - rect[1]

        bmp = win32ui.CreateBitmap()
        bmp.CreateCompatibleBitmap(dcObj, width, height)
        cDC.SelectObject(bmp)
        cDC.BitBlt((0, 0), (width, height), dcObj, (0, 0), win32con.SRCCOPY)

        bmpinfo = bmp.GetInfo()
        bmpstr = bmp.GetBitmapBits(True)
        img = Image.frombuffer('RGB', (bmpinfo['bmWidth'], bmpinfo['bmHeight']), bmpstr, 'raw', 'BGRX', 0, 1)
        open_cv_image = np.array(img)
        open_cv_image = cv2.cvtColor(open_cv_image, cv2.COLOR_BGR2RGB)

        # 释放资源
        dcObj.DeleteDC()
        cDC.DeleteDC()
        win32gui.ReleaseDC(hwnd, wDC)
        win32gui.DeleteObject(bmp.GetHandle())

        return open_cv_image
    except Exception as e:
        print(f"Error in capture_window_by_handle: {e}")
        return None
3. 使用yolo模型进行识别,并展示
使用训练好的模型,实时展现识别效果,并制作操作界面
def process_frame(frame, hwnd):
    labels = []
    xyxys = []
    if frame is not None:
        det, names = YOLOv5Detector.detect_image(frame, weights='yolov5n_best.pt')
        frame_copy = frame.copy()
        for *xyxy, conf, cls in det:
            label = f'{names[int(cls)]} {conf:.2f}'

            label1 = names[int(cls)]
            labels.append(label1)

            xyxy = [int(coord) for coord in xyxy]
            xyxys.append(xyxy)
            cv2.rectangle(frame_copy, (xyxy[0], xyxy[1]), (xyxy[2], xyxy[3]), (0, 255, 0), 2)
            img_pil = Image.fromarray(frame_copy)
            draw = ImageDraw.Draw(img_pil)

            font = ImageFont.truetype("simsun.ttc", 20, encoding="utf-8")
            draw.text((xyxy[0], xyxy[1] - 30), label, font=font, fill=(0, 255, 0, 0))
            frame_copy = np.array(img_pil)

        #  in 图像上显示体力值 and 页面信息
        frame_copy = put_chinese_text(frame_copy, f"当前体力值为: {tili}", (10, 30), font_size=20, color=(0, 255, 0))
        frame_copy = put_chinese_text(frame_copy, f"当前页面为: {yemian}", (10, 70), font_size=20, color=(0, 255, 0))

        click_thread = threading.Thread(target=click_to, args=(labels, xyxys, hwnd))
        click_thread.start()

    return frame_copy
def put_chinese_text(image, text, position, font_path='simsun.ttc', font_size=20, color=(0, 255, 0)):
    # Convert OpenCV image (BGR) to PIL image (RGB)
    image_pil = Image.fromarray(cv2.cvtColor(image, cv2.COLOR_BGR2RGB))
    draw = ImageDraw.Draw(image_pil)

    # Load font
    font = ImageFont.truetype(font_path, font_size)

    # Draw text
    draw.text(position, text, font=font, fill=color)

    # Convert PIL image back to OpenCV image
    image = cv2.cvtColor(np.array(image_pil), cv2.COLOR_RGB2BGR)
    return image
4. 确定界面和进行操作
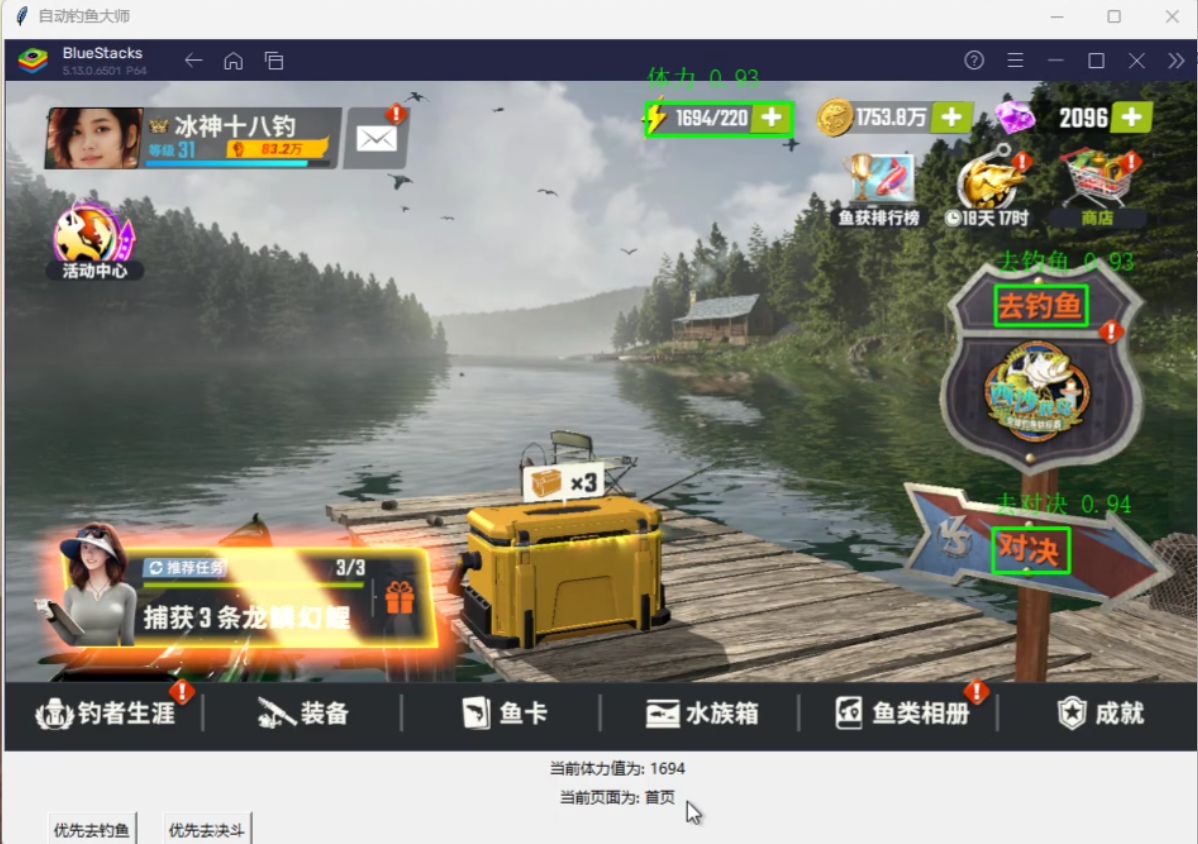
根据识别的结果,一个页面有哪些元素,来确定当前处于哪个界面,然后根据业务逻辑进行选择点击哪个识别的中心位置。
def click_to(labels, xyxy, hwnd):
global press_c_key
global tili
global yemian
global mubiao
global is_holding
# 检查体力并更新
if tili == 1:
if '体力' in labels:
index = labels.index('体力')
bbox = xyxy[index]
x1, y1, x2, y2 = bbox
hwnd_dc = win32gui.GetWindowDC(hwnd)
mfc_dc = win32ui.CreateDCFromHandle(hwnd_dc)
save_dc = mfc_dc.CreateCompatibleDC()
save_bitmap = win32ui.CreateBitmap()
save_bitmap.CreateCompatibleBitmap(mfc_dc, x2 - x1, y2 - y1)
save_dc.SelectObject(save_bitmap)
save_dc.BitBlt((0, 0), (x2 - x1, y2 - y1), mfc_dc, (x1, y1), win32con.SRCCOPY)
bmpinfo = save_bitmap.GetInfo()
bmpstr = save_bitmap.GetBitmapBits(True)
img = Image.frombuffer('RGB', (bmpinfo['bmWidth'], bmpinfo['bmHeight']), bmpstr, 'raw', 'BGRX', 0, 1)
open_cv_image = np.array(img)
open_cv_image = cv2.cvtColor(open_cv_image, cv2.COLOR_BGR2RGB)
mfc_dc.DeleteDC()
save_dc.DeleteDC()
win32gui.ReleaseDC(hwnd, hwnd_dc)
win32gui.DeleteObject(save_bitmap.GetHandle())
tili_now, tili_max = get_tili(open_cv_image)
tili = tili_now
print(f"当前体力:{tili_now}, 最大体力:{tili_max}")
else:
if tili is not None and tili < 10:
print("体力不足,需要等待恢复")
return
# 首页操作
if '去对决' in labels and '体力' in labels and '去钓鱼' in labels:
print(" in 首页")
update_yemian(1)
if mubiao == 1:
index = labels.index('去钓鱼')
x, y = get_click_coordinates(labels, xyxy, index)
send_mouse_event(x, y, win32con.WM_LBUTTONDOWN)
time.sleep(0.05)
send_mouse_event(x, y, win32con.WM_LBUTTONUP)
print("已点击去钓鱼")
elif mubiao == 2:
index = labels.index('去对决')
x, y = get_click_coordinates(labels, xyxy, index)
send_mouse_event(x, y, win32con.WM_LBUTTONDOWN)
time.sleep(0.05)
send_mouse_event(x, y, win32con.WM_LBUTTONUP)
print("已点击去对决")
if mubiao == 3:
return
time.sleep(3)
# 渔场选择界面
if '进入' in labels and '体力' in labels:
print("渔场选择界面")
update_yemian(2)
index = labels.index('进入')
x, y = get_click_coordinates(labels, xyxy, index)
send_mouse_event(x, y, win32con.WM_LBUTTONDOWN)
time.sleep(0.05)
send_mouse_event(x, y, win32con.WM_LBUTTONUP)
print("已点击进入")
time.sleep(2)
# 渔场里面
if 'x' in labels and '体力' in labels and '抛竿' in labels:
print("等待抛竿界面")
update_yemian(3)
index = labels.index('抛竿')
x, y = get_click_coordinates(labels, xyxy, index)
send_mouse_event(x, y, win32con.WM_LBUTTONDOWN)
time.sleep(0.05)
send_mouse_event(x, y, win32con.WM_LBUTTONUP)
# 确保松开'C'键
press_c_key = False
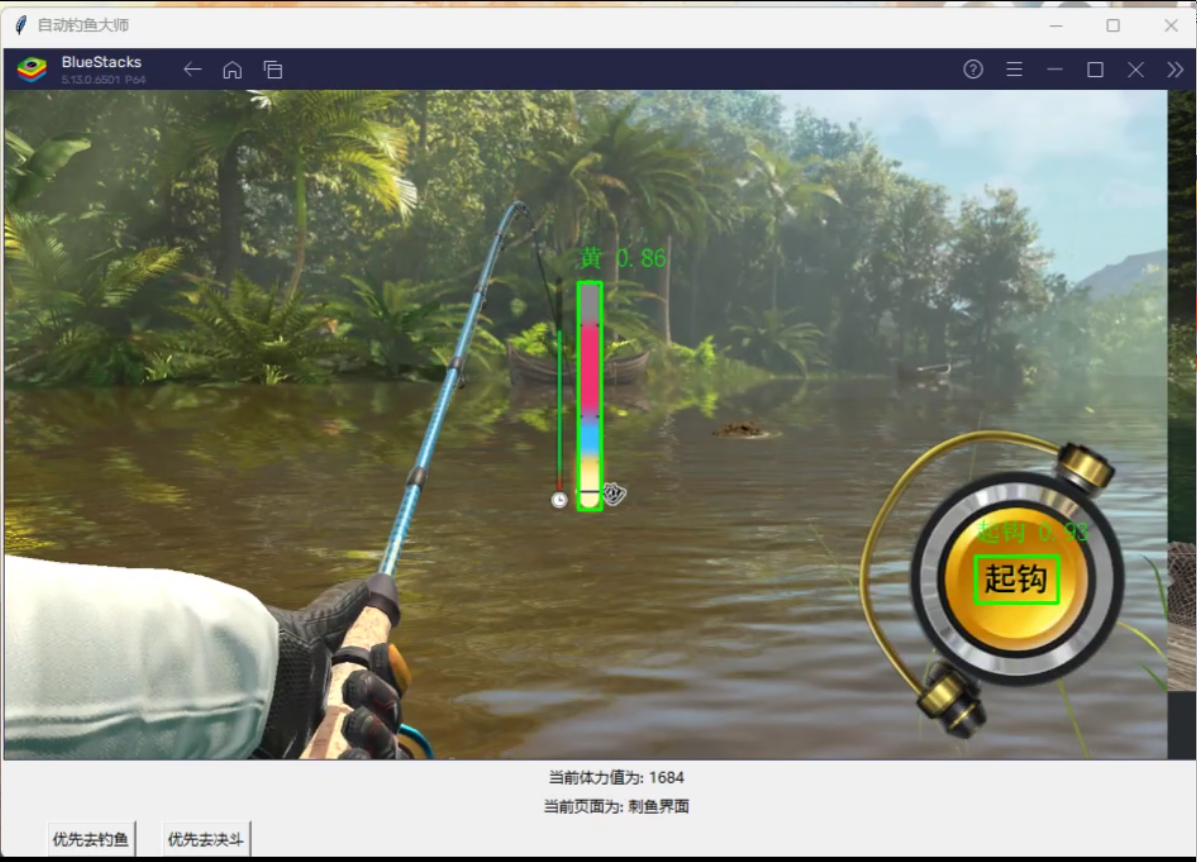
# 刺鱼界面
if '黄' in labels or '非黄' in labels or '起钩' in labels:
update_yemian(5)
if '黄' in labels and '起钩' in labels:
index = labels.index('起钩')
x, y = get_click_coordinates(labels, xyxy, index)
send_mouse_event(x, y, win32con.WM_LBUTTONDOWN)
time.sleep(0.01)
send_mouse_event(x, y, win32con.WM_LBUTTONUP)
print("已起钩")
time.sleep(1)
if '非黄' in labels or '起钩' in labels:
print("未到时机")
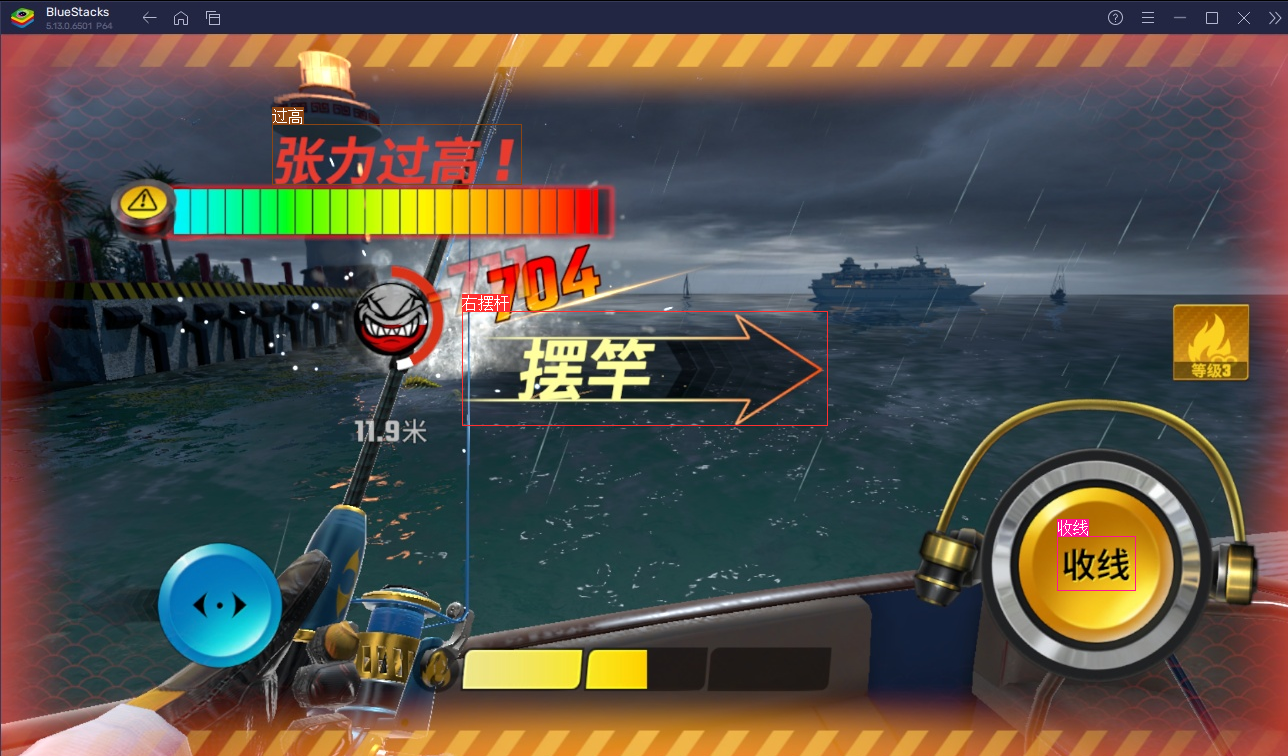
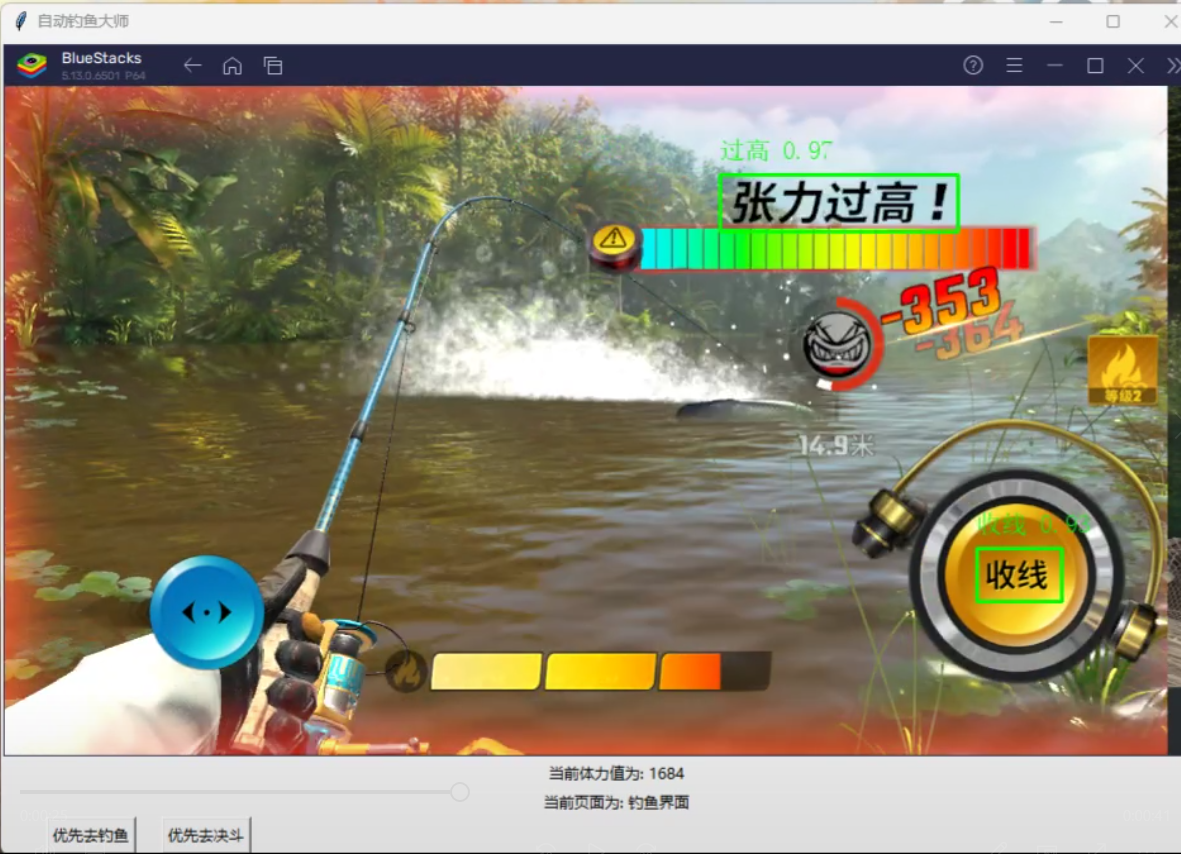
# 钓鱼界面
if '收线' in labels or ('左摆杆' in labels or '右摆杆' in labels) or '爆气' in labels or '过高' in labels:
update_yemian(6)
print("钓鱼界面")
if '左摆杆' in labels and '收线' in labels:
send_key_event(ord('V'))
print("左摆杆")
if '右摆杆' in labels and '收线' in labels:
send_key_event(ord('B'))
print("右摆杆")
if '爆气' in labels:
send_key_event(ord('W'))
print("爆气")
# 处理按键操作
if '收线' in labels:
index = labels.index('收线')
x, y = get_click_coordinates(labels, xyxy, index)
if '过高' in labels:
print("松手")
release_click_c() # 松开鼠标
time.sleep(0.5)
else:
if not is_holding:
print("开始长按")
click_and_hold_c() # 开始长按
else:
print("持续长按")
# 确认界面 and 其他界面操作
if len(labels) == 1 and (labels[0] == '进入' or labels[0] == '确认'):
update_yemian(7)
print("确认界面")
index = labels.index(labels[0])
x, y = get_click_coordinates(labels, xyxy, index)
send_mouse_event(x, y, win32con.WM_LBUTTONDOWN)
time.sleep(0.05)
send_mouse_event(x, y, win32con.WM_LBUTTONUP)
print(f"已{labels[0]}")
time.sleep(1)
# 藏宝图界面
if('x' in labels and '去钓鱼' in labels) or '藏宝图' in labels:
update_yemian(8)
print("藏宝图界面")
index = labels.index('x')
x, y = get_click_coordinates(labels, xyxy, index)
send_mouse_event(x, y, win32con.WM_LBUTTONDOWN)
time.sleep(0.05)
send_mouse_event(x, y, win32con.WM_LBUTTONUP)
print("已关闭")
time.sleep(1)
# 重新抛竿界面
if '非黄' in labels and '确认' in labels:
update_yemian(9)
print("重新抛竿界面")
index = labels.index('确认')
x, y = get_click_coordinates(labels, xyxy, index)
send_mouse_event(x, y, win32con.WM_LBUTTONDOWN)
time.sleep(0.05)
send_mouse_event(x, y, win32con.WM_LBUTTONUP)
print("重新抛竿")
time.sleep(1)
更新体力:
def update_yemian(new_yemian):
    global tili, yemian
    if yemian == 3 and new_yemian == 5:
        tili -= 10
        print("体力减少10")
    if yemian == 6 and new_yemian == 7:
        print("松手")
        release_click_c()  # 停止长按
    yemian = new_yemian
计算中心点:
def get_click_coordinates(labels, xyxy, index):
    global hwndChild2
    bbox = xyxy[index]
    x_center = (bbox[0] + bbox[2]) // 2
    y_center = (bbox[1] + bbox[3]) // 2

    # 获取窗口位置
    rect = win32gui.GetWindowRect(hwndChild2)
    window_x = rect[0]
    window_y = rect[1]

    # 计算屏幕坐标
    screen_x = window_x + x_center
    screen_y = window_y + y_center

    return screen_x, screen_y
5. 对YOLO的detect.py文件处理
我也忘了改了哪些东西了,想知道可以对照官方的detcet. py看一下,增加了返回结果,对视频流的处理等适配处理。
    # 初始化返回结果的列表
    results = []

    source = str(source)
    save_img = not nosave and not source.endswith('.txt')  # save inference images
    is_file = Path(source).suffix[1:] in (IMG_FORMATS + VID_FORMATS)
    is_url = source.lower().startswith(('rtsp://', 'rtmp://', 'http://', 'https://'))
    webcam = source.isnumeric() or source.endswith('.txt') or (is_url and not is_file)
    screenshot = source.lower().startswith('screen')
    if is_url and is_file:
        source = check_file(source)  # download

    # Directories
    save_dir = increment_path(Path(project) / name, exist_ok=exist_ok)  # increment run
    (save_dir / 'labels' if save_txt else save_dir).mkdir(parents=True, exist_ok=True)  # make dir

    # Load model
    device = select_device(device)
    model = DetectMultiBackend(weights, device=device, dnn=dnn, data=data, fp16=half)
    stride, names, pt = model.stride, model.names, model.pt
    imgsz = check_img_size(imgsz, s=stride)  # check image size

    # Dataloader
    bs = 1  # batch_size
    if isinstance(source, np.ndarray):  # 检查是否为内存中的图像
        im0s = source  # 原始图像
        im = torch.from_numpy(source).to(model.device)
        im = im.half() if model.fp16 else im.float()  # uint8 to fp16/32
        im /= 255  # 0 - 255 to 0.0 - 1.0
        if len(im.shape) == 3:
            im = im[None]  # expand for batch dim
        dataset = [(None, im, im0s, None, '')]  # 构建伪数据集
    elif webcam:
        view_img = check_imshow(warn=True)
        dataset = LoadStreams(source, img_size=imgsz, stride=stride, auto=pt, vid_stride=vid_stride)
        bs = len(dataset)
    elif screenshot:
        dataset = LoadScreenshots(source, img_size=imgsz, stride=stride, auto=pt)
    else:
        dataset = LoadImages(source, img_size=imgsz, stride=stride, auto=pt, vid_stride=vid_stride)
    vid_path, vid_writer = [None] * bs, [None] * bs

    # Run inference
    model.warmup(imgsz=(1 if pt or model.triton else bs, 3, *imgsz))  # warmup
    seen, windows, dt = 0, [], (Profile(), Profile(), Profile())
    for path, im, im0s, vid_cap, s in dataset:
        with dt[0]:
            im = torch.from_numpy(im).to(model.device) if isinstance(im, np.ndarray) else im.to(model.device)
            im = im.half() if model.fp16 else im.float()  # uint8 to fp16/32
            im /= 255  # 0 - 255 to 0.0 - 1.0
            if len(im.shape) == 3:
                im = im[None]  # expand for batch dim

        # Inference
        with dt[1]:
            visualize = increment_path(save_dir / Path(path).stem, mkdir=True) if visualize else False
            pred = model(im, augment=augment, visualize=visualize)

        # NMS
        with dt[2]:
            pred = non_max_suppression(pred, conf_thres, iou_thres, classes, agnostic_nms, max_det=max_det)

        # Second-stage classifier (optional)
        # pred = utils.general.apply_classifier(pred, classifier_model, im, im0s)

        # Process predictions
        for i, det in enumerate(pred):  # per image
            seen += 1
            if webcam:  # batch_size >= 1
                p, im0, frame = path[i], im0s[i].copy(), dataset.count
                s += f'{i}: '
            else:
                p, im0, frame = path, im0s.copy(), getattr(dataset, 'frame', 0)

            p = Path(p)  # to Path
            save_path = str(save_dir / p.name)  # im.jpg
            txt_path = str(save_dir / 'labels' / p.stem) + ('' if dataset.mode == 'image' else f'_{frame}')  # im.txt
            s += '%gx%g ' % im.shape[2:]  # print string
            gn = torch.tensor(im0.shape)[[1, 0, 1, 0]]  # normalization gain whwh
            imc = im0.copy() if save_crop else im0  # for save_crop
            annotator = Annotator(im0, line_width=line_thickness, example=str(names))
            if len(det):
                # Rescale boxes from img_size to im0 size
                det[:, :4] = scale_boxes(im.shape[2:], det[:, :4], im0.shape).round()

                # Print results
                for c in det[:, 5].unique():
                    n = (det[:, 5] == c).sum()  # detections per class
                    s += f"{n} {names[int(c)]}{'s' * (n > 1)}, "  # add to string

                # Write results
                for *xyxy, conf, cls in reversed(det):
                    if save_txt:  # Write to file
                        xywh = (xyxy2xywh(torch.tensor(xyxy).view(1, 4)) / gn).view(-1).tolist()  # normalized xywh
                        line = (cls, *xywh, conf) if save_conf else (cls, *xywh)  # label format
                        with open(f'{txt_path}.txt', 'a') as f:
                            f.write(('%g ' * len(line)).rstrip() % line + '\n')

                    if save_img or save_crop or view_img:  # Add bbox to image
                        c = int(cls)  # integer class
                        label = None if hide_labels else (names[c] if hide_conf else f'{names[c]} {conf:.2f}')
                        annotator.box_label(xyxy, label, color=colors(c, True))
                    if save_crop:
                        save_one_box(xyxy, imc, file=save_dir / 'crops' / names[c] / f'{p.stem}.jpg', BGR=True)

                    # 将检测结果添加到结果列表
                    results.append({
                        'box': xyxy,
                        'confidence': conf,
                        'class': cls,
                        'class_name': names[int(cls)]
                    })

            # Stream results
            im0 = annotator.result()
            if view_img:
                if platform.system() == 'Linux' and p not in windows:
                    windows.append(p)
                    cv2.namedWindow(str(p), cv2.WINDOW_NORMAL | cv2.WINDOW_KEEPRATIO)  # allow window resize (Linux)
                    cv2.resizeWindow(str(p), im0.shape[1], im0.shape[0])
                cv2.imshow(str(p), im0)
                cv2.waitKey(1)  # 1 millisecond

            # Save results (image with detections)
            if save_img:
                if dataset.mode == 'image':
                    cv2.imwrite(save_path, im0)
                else:  # 'video' or 'stream'
                    if vid_path[i] != save_path:  # new video
                        vid_path[i] = save_path
                        if isinstance(vid_writer[i], cv2.VideoWriter):
                            vid_writer[i].release()  # release previous video writer
                        if vid_cap:  # video
                            fps = vid_cap.get(cv2.CAP_PROP_FPS)
                            w = int(vid_cap.get(cv2.CAP_PROP_FRAME_WIDTH))
                            h = int(vid_cap.get(cv2.CAP_PROP_FRAME_HEIGHT))
                        else:  # stream
                            fps, w, h = 30, im0.shape[1], im0.shape[0]
                        save_path = str(Path(save_path).with_suffix('.mp4'))  # force *.mp4 suffix on results videos
                        vid_writer[i] = cv2.VideoWriter(save_path, cv2.VideoWriter_fourcc(*'mp4v'), fps, (w, h))
                    vid_writer[i].write(im0)

        # Print time (inference-only)
        LOGGER.info(f"{s}{'' if len(det) else '(no detections), '}{dt[1].dt * 1E3:.1f}ms")

    # Print results
    t = tuple(x.t / seen * 1E3 for x in dt)  # speeds per image
    LOGGER.info(f'Speed: %.1fms pre-process, %.1fms inference, %.1fms NMS per image at shape {(1, 3, *imgsz)}' % t)
    if save_txt or save_img:
        s = f"\n{len(list(save_dir.glob('labels/*.txt')))} labels saved to {save_dir / 'labels'}" if save_txt else ''
        LOGGER.info(f"Results saved to {colorstr('bold', save_dir)}{s}")
    if update:
        strip_optimizer(weights[0])  # update model (to fix SourceChangeWarning)

    # 返回结果
    return results
五、个人收获与心得体会
代码肯定不止这些部分,核心代码就是上面哪些了。这个游戏真的很好玩,感觉能解解打工钓鱼佬的馋,在这推荐一下这款游戏,希望官方不要制裁我T^T,通过这个脚本的制作,我更加深入的了解了Yolo模型,也学会了去制作训练集,去训练模型,对模型的使用等等,对Python的各种库的熟悉程度也增加了。代码不会完整公布的,不用私聊我找我要代码!绝对不损害游戏公司的利益!


 1821
1821

 被折叠的 条评论
为什么被折叠?
被折叠的 条评论
为什么被折叠?
 到【灌水乐园】发言


