


Docker概述
Docker为什么会出现?
环境配置十分麻烦,每个机器都需要部署环境,docker提供一整套项目+环境
十分轻巧
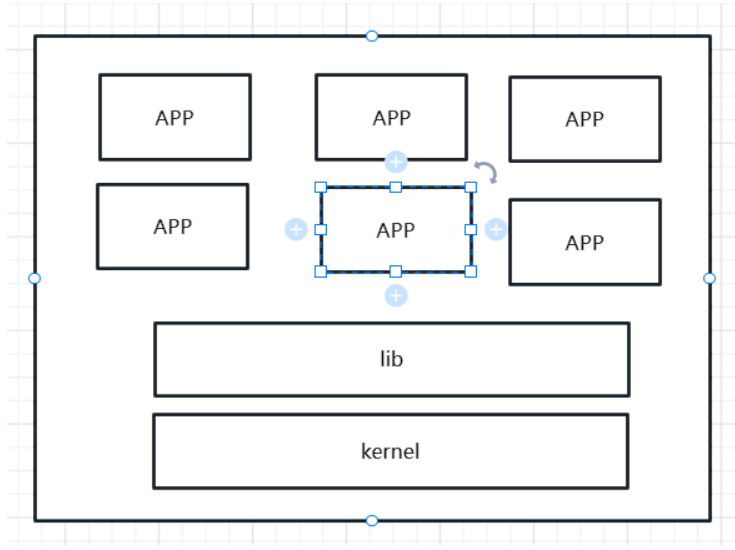
在容器技术之前,我们都使用虚拟机技术
虚拟机:在windows中安装一个vmware,通过这个软件我们可以虚拟出来一台或者多台电脑,笨重
虚拟机也属于虚拟化技术,Docker容器技术,也是一种虚拟化技术!
vm: linux centos原生镜像(一个电脑!)隔离:需要开启多个虚拟机
docker:隔离,镜像十分轻巧,运行镜像就可以,几个M,秒级启动
Docker能干嘛
之前的虚拟机技术
虚拟机技术缺点:
1、资源占用十分多
2、冗余步骤多
3、启动很慢!
容器化技术
容器化技术不是模拟的一个完整的操作系统
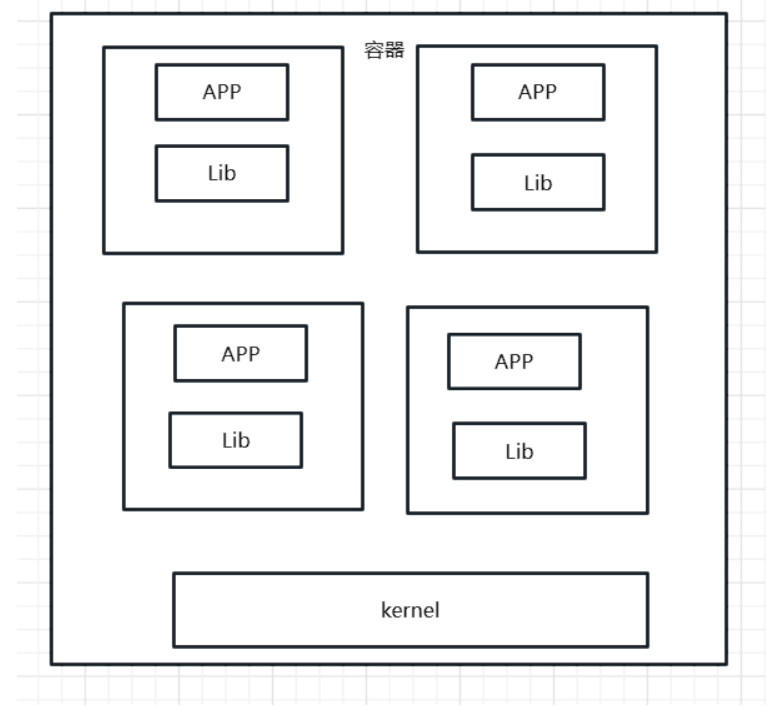
比较Docker和虚拟机技术的不同:
传统虚拟机,虚拟出一条硬件,运行一个完整的的操作系统,然后在这个系统上安装和运行软件
容器内的应用直接运行在宿主机上的内容,容器是没有自己的内核的,也没有虚拟我们的硬件,所以轻便了
每个容器间是互相隔离的,每个容器内部都有一个属于自己的文件系统,互不影响。
DevOps (开发、运维)
应用更快速的交付和部署
传统:一堆帮助文档、安装程序
Docker:打包镜像发布测试,一键运行
更便捷的升级和扩缩容
使用了Docker之后,我们部署应用就和搭积木一样
项目打包为一个镜像,扩展 服务器A| 服务器B
更简单的系统运维
在容器化之后,我们的开发,测试环境都是高度一致的。
更高效的计算资源利用
Docker是内核级别的虚拟化,可以在一个物理机上运行很多的容器实例!服务器的性能可以被压榨到极致!
Docker安装
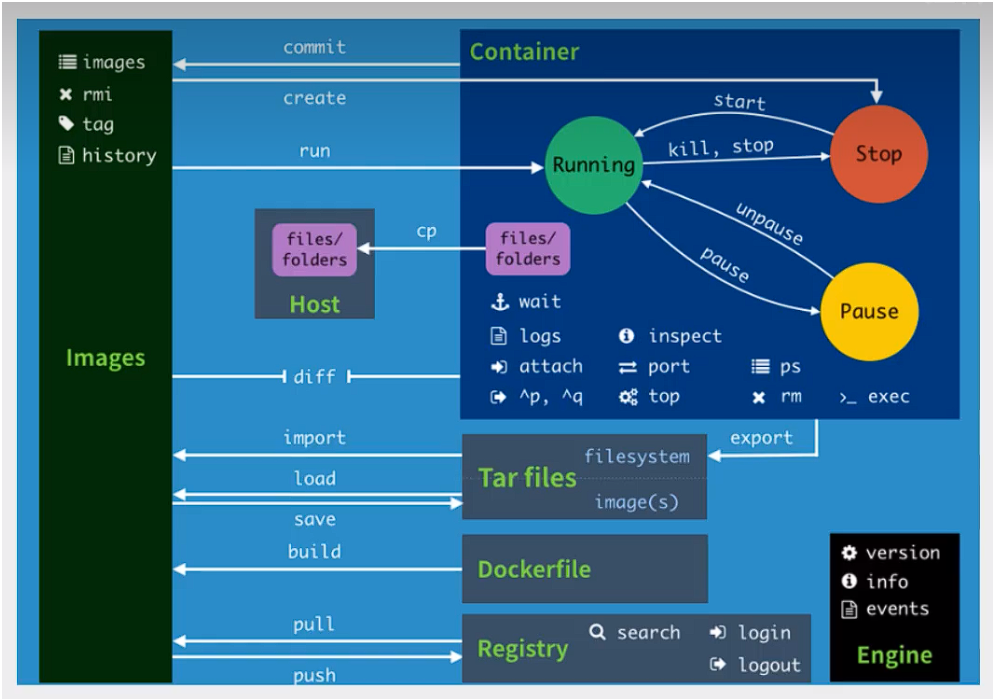
Docker的基本组成
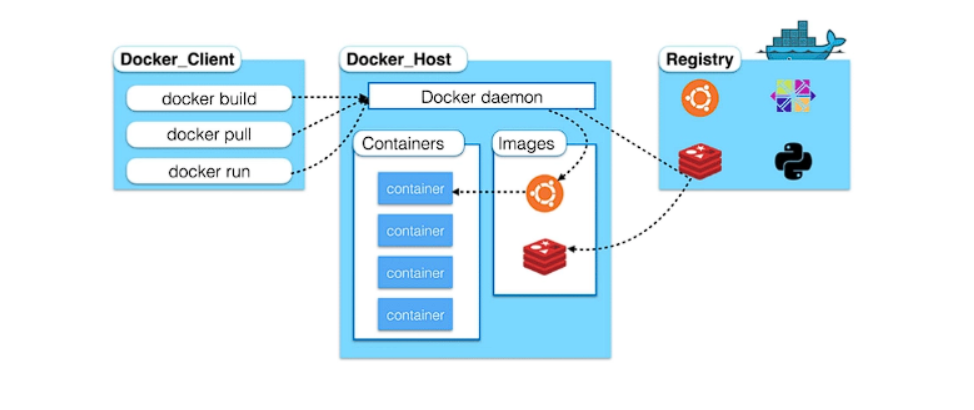
镜像(image):
docker镜像就好比是一个模板,可以通过这个模板来创建容器服务,tomcat镜像--->run--->tomcat01容器(提供服务器),通过这个镜像可以创建多个容器(最终服务运行或者项目运行就是在容器中的)。
容器(container):
Docker利用容器技术,独立运行一个或者一个组应用,通过镜像来创建。
启动,停止,删除,基本命令!
目前可以吧这个容器理解为就是一个简易的linux系统
仓库(repository):
仓库就是存放镜像的地方!
仓库分为公有仓库和私有仓库。
Docker Hub(默认是国外的)
阿里云。。。都有容器服务器(配置镜像加速)
安装Docker
环境准备
1、需要会一点点的linux的基础
2、CentOS 7,不同版本的linux可以参考官方安装文档
3、使用Xshell连接远程服务器
环境查看
#系统内核是3.10 以上的
[root@aliyun ~]# uname -r
3.10.0-1160.81.1.el7.x86_64
#系统版本
[root@aliyun ~]# uname -a
Linux aliyun 3.10.0-1160.81.1.el7.x86_64 #1 SMP Fri Dec 16 17:29:43 UTC 2022 x86_64 x86_64 x86_64 GNU/Linux
[root@aliyun ~]# uname -r
3.10.0-1160.81.1.el7.x86_64
[root@aliyun ~]# ^C
[root@aliyun ~]# cat /etc/os-release
NAME="CentOS Linux"
VERSION="7 (Core)"
ID="centos"
ID_LIKE="rhel fedora"
VERSION_ID="7"
PRETTY_NAME="CentOS Linux 7 (Core)"
ANSI_COLOR="0;31"
CPE_NAME="cpe:/o:centos:centos:7"
HOME_URL="https://www.centos.org/"
BUG_REPORT_URL="https://bugs.centos.org/"
CENTOS_MANTISBT_PROJECT="CentOS-7"
CENTOS_MANTISBT_PROJECT_VERSION="7"
REDHAT_SUPPORT_PRODUCT="centos"
REDHAT_SUPPORT_PRODUCT_VERSION="7"安装
帮助文档:
# 1、卸载旧的版本
yum remove docker \
        docker-client \
        docker-client-latest \
        docker-common \
        docker-latest \
        docker-latest-logrotate \
        docker-logrotate \
        docker-engine
# 2、需要的安装包
yum install -y yum-utils# 3、设置镜像仓库
yum-config-manager \
--add-repo \
https://download.docker.com/linux/centos/docker-ce.repo #默认是国外的
yum-config-manager \
--add-repo \
http://mirrors.aliyun.com/docker-ce/linux/centos/docker-ce.repo #阿里云的# 更新yum软件包索引
yum makecache fast# 4、安装docker相关的源 docker-ce: 社区 ee:企业版
sudo yum install docker-ce docker-ce-cli containerd.io
# 5、启动Docker
systemctl start docker
# 6、使用docker version检查是否安装成功
[root@aliyun ~]# docker version
Client: Docker Engine - Community
Version: 23.0.1
API version: 1.42
Go version: go1.19.5
Git commit: a5ee5b1
Built: Thu Feb 919:51:00 2023
OS/Arch: linux/amd64
Context: default
Server: Docker Engine - Community
Engine:
Version: 23.0.1
API version: 1.42 (minimum version 1.12)
Go version: go1.19.5
Git commit: bc3805a
Built: Thu Feb 919:48:42 2023
OS/Arch: linux/amd64
Experimental: false
containerd:
Version: 1.6.16
GitCommit: 31aa4358a36870b21a992d3ad2bef29e1d693bec
runc:
Version: 1.1.4
GitCommit: v1.1.4-0-g5fd4c4d
docker-init:
Version: 0.19.0
GitCommit: de40ad0
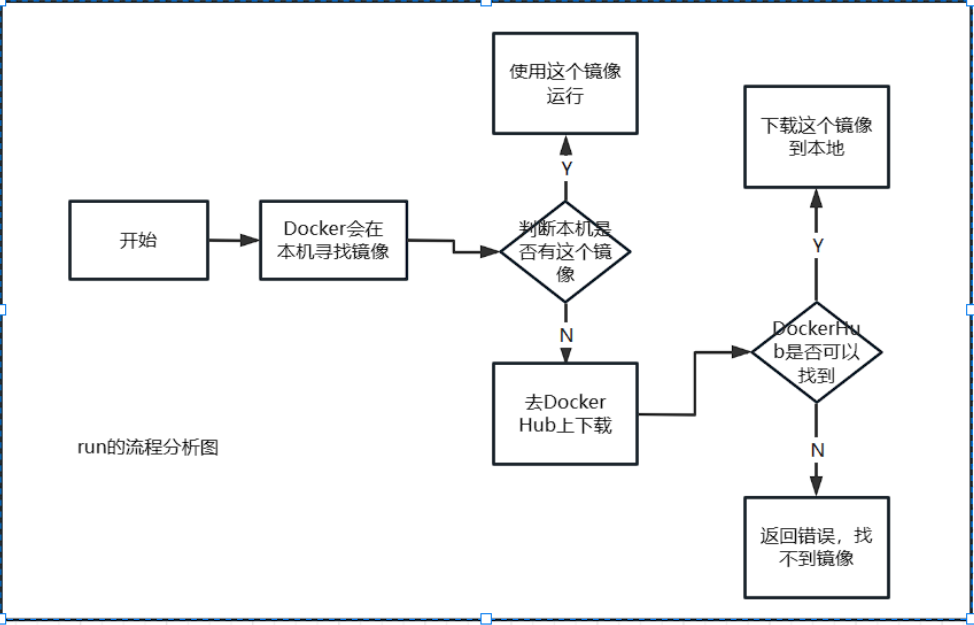
# 7、使用docker run hello-world
[root@aliyun ~]# docker run hello-world
Unable to find image 'hello-world:latest' locally
latest: Pulling from library/hello-world
2db29710123e: Pull complete
Digest: sha256:6e8b6f026e0b9c419ea0fd02d3905dd0952ad1feea67543f525c73a0a790fefb
Status: Downloaded newer image for hello-world:latest
Hello from Docker!
This message shows that your installation appears to be working correctly.
To generate this message, Docker took the following steps:
1. The Docker client contacted the Docker daemon.
2. The Docker daemon pulled the "hello-world" image from the Docker Hub.
(amd64)
3. The Docker daemon created a new container from that image which runs the
executable that produces the output you are currently reading.
4. The Docker daemon streamed that output to the Docker client, which sent it
to your terminal.
To try something more ambitious, you can run an Ubuntu container with:
$ docker run -it ubuntu bash
Share images, automate workflows, and more with a free Docker ID:
https://hub.docker.com/
For more examples and ideas, visit:
https://docs.docker.com/get-started/
# 8、查看一下下载的hello-world镜像
[root@aliyun ~]# docker images
REPOSITORY                    TAG       IMAGE ID       CREATED         SIZE
kalilinux/kali-last-release   latest    ce17425f8da3   3 days ago      118MB
hello-world                   latest    feb5d9fea6a5   17 months ago   13.3kB
centos                        latest    5d0da3dc9764   17 months ago   231MB
了解:卸载docker
# 1、卸载依赖
yum remove docker-ce docker-ce-cli containerd.io# 2、删除资源
rm -rf /var/lib/docker #/var/lib/docker 默认工作路径
阿里云镜像加速
1、登陆阿里云找到容器服务
2、找到镜像加速器地址
3、使用提供的命令配置使用
回顾Hello-world
底层原理
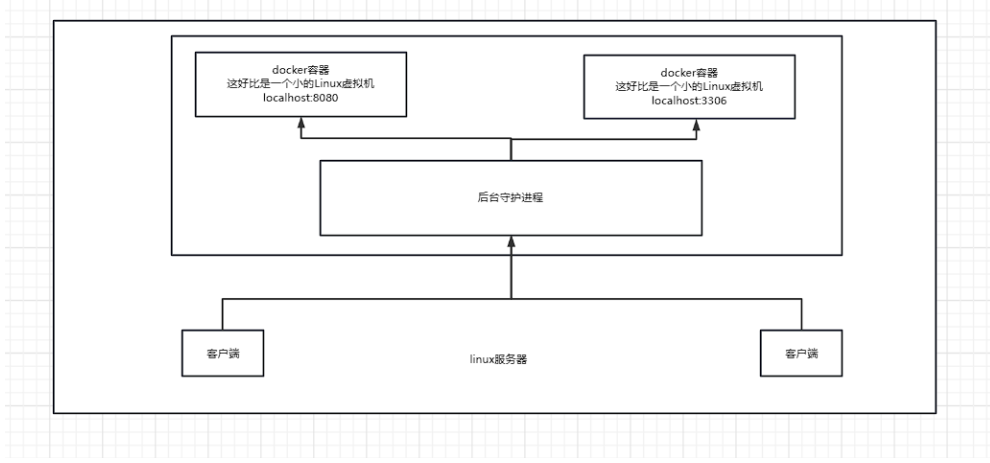
Docker是怎么工作的
Docker是一个Client-Server结构的系统,Docker的守护进程运行在主机上,通过Socket从客户端访问。
DockerServer接收到DockerClient的指令,就会执行这个命令!
Docker为什么比虚拟机快
1、Docker有着比虚拟机更少的抽象层。
2、Docker利用的是宿主机的内核,VM需要Guest OS。
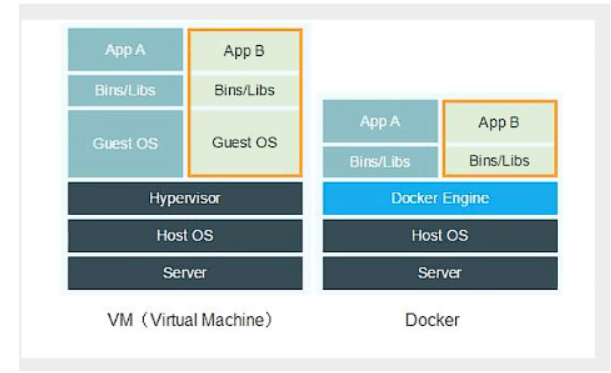
所以说新建一个容器时,docker不需要像虚拟机一样重新加载一个操作系统内核,避免引导。虚拟机是加载Guest OS,分钟级别的,而docker是利用宿主机的操作系统,省略了这个复杂的过程,秒级!

docker的常用命令
帮助命令
docker version #显示docker版本信息
docker info #显示docker的系统信息,包括镜像和容器数量
docker 命令 --help #帮助命令
镜像命令
docker images 查看所有本地主机上的镜像
[root@aliyun ~]# docker images
REPOSITORY TAG IMAGE ID CREATED SIZE
kalilinux/kali-last-release latest ce17425f8da3 3 days ago 118MB
hello-world latest feb5d9fea6a5 17 months ago 13.3kB
centos latest 5d0da3dc9764 17 months ago 231MB
#解释
REPOSITORY 镜像的仓库源
TAG 镜像的标签
IMAGE ID 镜像的ID
CREATED 镜像的创建时间
SIZE 镜像的大小
#可选项
-a,--all #列出所有的镜像
-q,--quiet #只显示镜像的IDdocker search 搜索镜像
[root@aliyun ~]# docker search mysql
NAME                            DESCRIPTION                                     STARS     OFFICIAL   AUTOMATED
mysql                           MySQL is a widely used, open-source relation…   13837     [OK]
mariadb                         MariaDB Server is a high performing open sou…   5279      [OK]
percona                         Percona Server is a fork of the MySQL relati…   599       [OK]
phpmyadmin                      phpMyAdmin - A web interface for MySQL and M…   742       [OK]
#可选项,通过收藏来过滤
    --filter=STARS=3000 #搜索出来的镜像STARS大于等于3000

[root@aliyun ~]# docker search  mysql --filter=STARS=3000
NAME      DESCRIPTION                                     STARS     OFFICIAL   AUTOMATED
mysql     MySQL is a widely used, open-source relation…   13837     [OK]
mariadb   MariaDB Server is a high performing open sou…   5279      [OK]
docker pull 下载镜像
#下载镜像 docker pull 镜像名[:tag]
[root@aliyun ~]# docker pull mysql
Using default tag: latest #如果不写版本tag,默认就是latest
latest: Pulling from library/mysql
197c1adcd755: Pull complete #分层下载,docker image的核心 联合文件系统
45f2e353f7d2: Pull complete
68ec6ece42ef: Pull complete
cfa4d9a7b88e: Pull complete
64cab5858b1d: Pull complete
92fcd248d982: Pull complete
88635e83312d: Pull complete
43f0427259d9: Pull complete
79828698a290: Pull complete
a8854781893e: Pull complete
6c8bdf3091d9: Pull complete
Digest: sha256:8653a170e0b0df19ea95055267def2615fc53c62df529e3750817c1a886485f0 #签名
Status: Downloaded newer image for mysql:latest
docker.io/library/mysql:latest #真实下载地址
#等价下载方式
docker pull mysql
docker pull docker.io/library/mysql:latest
#指定版本下载
[root@aliyun ~]# docker pull mysql:5.7
5.7: Pulling from library/mysql
e048d0a38742: Pull complete
c7847c8a41cb: Pull complete
351a550f260d: Pull complete
8ce196d9d34f: Pull complete
17febb6f2030: Pull complete
d4e426841fb4: Pull complete
fda41038b9f8: Pull complete
f47aac56b41b: Pull complete
a4a90c369737: Pull complete
97091252395b: Pull complete
84fac29d61e9: Pull complete
Digest: sha256:8cf035b14977b26f4a47d98e85949a7dd35e641f88fc24aa4b466b36beecf9d6
Status: Downloaded newer image for mysql:5.7
docker.io/library/mysql:5.7docker rmi 删除镜像
dokcer rmi -f 镜像ID  #删除单个镜像
dokcer rmi -f 镜像ID 镜像ID 镜像ID    #删除多个镜像
docker rmi -f$(docker images -aq)  #删除全部镜像
容器命令
说明:我们有了镜像才可以创建容器,linux,下载一个centos镜像来测试学习
docker pull centos
新建容器并启动
docker run [可选参数] image
#参数说明
--name="Name" #容器名字 tomcat01 tomcat02,用来区分容器
-d #后台方式运行
-it #使用交互方式运行,进入容器查看内容
-p #指定容器的端口 -p 8080:8080
-p ip:主机端口:容器端口
-p 主机端口:容器端口(常用)
-p 容器端口
容器端口
-p #随机指定端口
#尝试启动并进入容器
[root@aliyun ~]# docker run -it centos /bin/bash
[root@36fa03ca57a8 /]# ls #查看容器内的centos,基础版本,很多命令都是不完善的!
bin etc lib lost+found mnt proc run srv tmp var
dev home lib64 media opt root sbin sys usr
#从容器中退出
[root@36fa03ca57a8 /]# exit
exit列出所有的运行容器
#docker ps 命令
#列出当前正在运行的容器
-a #列出当前正在运行的容器+历史运行过的容器
-n=? #显示最近创建过的容器
-q #只显示容器的编号
[root@aliyun ~]# docker ps
CONTAINER ID IMAGE COMMAND CREATED STATUS PORTS NAMES
[root@aliyun ~]# docker ps -a
CONTAINER ID IMAGE COMMAND CREATED STATUS PORTS NAMES
36fa03ca57a8 centos "/bin/bash" 6 minutes ago Exited (0) About a minute ago recursing_pasteur
fd541e8a0975 hello-world "/hello" 8 minutes ago Exited (0) 8 minutes ago practical_dhawan退出容器
exit # 直接容器退出并停止
Ctrl+Q+P # 容器不停止退出
[root@aliyun ~]# docker run -it centos /bin/bash
[root@8b8f12e6217f /]# exit #使用exit退出
exit
[root@aliyun ~]# docker ps
CONTAINER ID IMAGE COMMAND CREATED STATUS PORTS NAMES
[root@aliyun ~]# docker run -it centos /bin/bash
[root@af80f382f3f5 /]# [root@aliyun ~]# #使用CTRL+Q+P退出
[root@aliyun ~]# docker ps
CONTAINER ID IMAGE COMMAND CREATED STATUS PORTS NAMES
af80f382f3f5 centos "/bin/bash" 17 seconds ago Up 16 seconds youthful_meninsky
[root@aliyun ~]# 删除容器
docker rm 容器id                  # 删除指定的容器,不能删除正在运行的容器,需要强制删除使用-f
docker rm-f$(docker ps -aq)   # 删除所有容器   -f强制
docker ps-aq |xargs docker rm  # 删除所有容器
启动、重启、停止、杀死容器
docker start-i-a 容器ID #启动容器
docker restart 容器ID #重启容器
docker stop 容器ID    #停止容器
dcoker kill 容器ID    #杀死容器
常用其他命令
后台启动容器
# 命令 docker run -d 镜像名
[root@aliyun ~]# docker run -d centos
57b79167f347e3b014ae2a8e99a9b4b3fd6121eae6e3d1df2652160f7bf12540
[root@aliyun ~]# docker ps
CONTAINER ID   IMAGE     COMMAND   CREATED   STATUS    PORTS     NAMES
# 问题:docker ps 发现centos停止了
# 常见的坑,docker容器使用后台运行,就必须要有一个前台程序,docker发现没有应用,就自动停止了!
# nginx,容器启动后,发现自己没有提供服务,就会立刻停止
查看日志
docker logs -f-t--tail number 容器ID
#参数
-f #实时刷新
-t #显示日志时间戳
--tail number #要显示的日志数
#自己编写一段shell脚本
[root@aliyun ~]# docker run -d centos /bin/bash -c "while true;do echo yyds;sleep 1;done"
dde1e7194104ca74506cf7d10f26a58d542d9a52d410665508b203ce13076215
[root@aliyun ~]# docker ps
CONTAINER ID   IMAGE     COMMAND                  CREATED          STATUS          PORTS     NAMES
dde1e7194104   centos    "/bin/bash -c 'while…"   47 seconds ago   Up 47 seconds             optimistic_sutherland
[root@aliyun ~]# docker ps -q
dde1e7194104
[root@aliyun ~]# docker logs -tf --tail 10 dde1e7194104
2023-02-23T06:11:48.920627684Z yyds
2023-02-23T06:11:49.922806211Z yyds
2023-02-23T06:11:50.924788189Z yyds
2023-02-23T06:11:51.926841971Z yyds
2023-02-23T06:11:52.928994239Z yyds
2023-02-23T06:11:53.931238393Z yyds
查看容器中进程的信息ps
#命令 docker top 容器ID
[root@aliyun ~]# docker top dde1e7194104
UID PID PPID C STIME TTY TIME CMD
root 2052 2031 0 14:10 ? 00:00:00 /bin/bash -cwhiletrue;do echo yyds;sleep 1;done
root 2725 2052 0 14:16 ? 00:00:00 /usr/bin/coreutils --coreutils-prog-shebang=sleep /usr/bin/sleep 1查看镜像的元数据
#命令 docker inspect 镜像ID
[root@aliyun ~]# docker inspect dde1e7194104
[
{
"Id": "dde1e7194104ca74506cf7d10f26a58d542d9a52d410665508b203ce13076215",
"Created": "2023-02-23T06:10:13.382331814Z",
"Path": "/bin/bash",
"Args": [
"-c",
"while true;do echo yyds;sleep 1;done"
],
"State": {
"Status": "running",
"Running": true,
"Paused": false,
"Restarting": false,
"OOMKilled": false,
"Dead": false,
"Pid": 2052,
"ExitCode": 0,
"Error": "",
"StartedAt": "2023-02-23T06:10:13.686614357Z",
"FinishedAt": "0001-01-01T00:00:00Z"
},
......
}
}
}
}
]进入当前正在运行的容器中
#我们通常容器都是使用后台方式运行的,需要进入容器修改一些配置
#命令
docker exec -it 容器ID bashshell #进入容器后开启一个新的终端,可以在里面操作(常用)
#测试
[root@aliyun ~]# docker ps
CONTAINER ID   IMAGE     COMMAND                  CREATED          STATUS          PORTS     NAMES
dde1e7194104   centos    "/bin/bash -c 'while…"   26 minutes ago   Up 26 minutes             optimistic_sutherland
[root@aliyun ~]# docker exec -it dde1e7194104 /bin/bash
[root@dde1e7194104 /]#
#命令
docker attach 容器ID #进入容器当前正在执行的终端,不会启动新的终端
#测试
[root@aliyun ~]# docker ps
CONTAINER ID   IMAGE     COMMAND                  CREATED          STATUS          PORTS     NAMES
dde1e7194104   centos    "/bin/bash -c 'while…"   29 minutes ago   Up 29 minutes             optimistic_sutherland
[root@aliyun ~]# docker attach dde1e7194104
yyds
yyds
yyds
从容器内拷贝文件到主机上
docker cp 容器ID:容器内路径 目的的主机路径
#打开一个centos容器,创建一个文件
[root@aliyun ~]# docker run -it centos /bin/bash
[root@6fd328067329 /]# cd /home/
[root@6fd328067329 home]# touch test.java
[root@6fd328067329 home]# ls
test.java
[root@6fd328067329 home]# exit
exit
[root@aliyun ~]# docker ps
CONTAINER ID IMAGE COMMAND CREATED STATUS PORTS NAMES
[root@aliyun ~]# docker ps -a
CONTAINER ID IMAGE COMMAND CREATED STATUS PORTS NAMES
6fd328067329 centos "/bin/bash" 29 seconds ago Exited (0) 6 seconds ago serene_turing
#查看主机上的文件
[root@aliyun ~]# ls
1: demo.sh install.sh msfinstall yfs.java
#将这个文件拷贝出来到主机上
[root@aliyun ~]# docker cp 6fd328067329:/home/test.java /root
Preparing to copy...
Successfully copied 1.536kB to /root
[root@aliyun ~]# ls
1: demo.sh install.sh msfinstall test.java yfs.java
[root@aliyun ~]# 小结
attach     Attach to a running container                #当前shell下attach连接指定运行镜像
build    Build an image from a Dockerfile            #通过Dockerfile定制镜像
commit    Create a new image from a container changes    #提交当前容器为新的镜像
cp        Copy files/folders from the containers filesystem to the host path    #从容器中拷贝指定文件或者目录到宿主机中
create    Create a new container                        #创建一个新的容器,同run,但是不启动容器
diff    Inspect changes on a container's filesystem    #查看docker容器的变化
events    Get real time events from the server        #从docker服务获取容器实时事件
exec    Run a command in an existing container        #在已存在的容器上运行命令
export    Stream the contents of a container as a tar archive    #导出容器的内容流作为一个tar归档文件[对应 import]
history    Show the history of an image                #展示一个镜像形成历史
images    List images                                    #列出系统当前镜像
import    Create a new filesystem image from the contents of a tarball    #从tar包中的内容创建一个新的文件系统映像[对应 export]
info    Display system-wide information                #显示系统相关信息
inspect    Return low-leve information on a container    #查看容器详细信息
kill    Kill a running container                    #kill指定docker容器
load    Load an image from a tar archive            #从一个tar包中加载一个镜像[对应 save]
login    Register or Login to the docker registry server    #注册或者登录一个docker源服务器
logout    Log out from a Docker registry server        #从当前Docker registry退出
logs    Fetch the logs of a container                #输出当前容器日志信息
port    Lookup the public-facing port which is NAT-ed to PRIVATE_PORT    #查看映射对应端口对应的容器内部源端口
pause    Pause all processes within a container        #暂停容器
ps    List containers                                    #列出容器列表
pull    Pull an iamge or a repository from the docker registry server    #从docker镜像源服务器拉取指定镜像或库镜像
push    Push an iamge or a repository to the docker registry server    #推送指定镜像或库镜像至docker源服务器
restart    Restart a running container                    #重启运行的容器
rm    Remove one or containers                        #移除一个或者多个容器
rmi    Remove one or more images                        #移除一个或多个镜像[无容器使用该镜像才可删除,否则需删除相关容器才可继续或 -f 强制删除]
run    Run a command in a new container                #创建一个新的容器并运行一个命令
save    Save an image to a new container            #保存一个镜像为tar包[对应 load]
search    Search for an image on the Docker Hub        #在DockerHub上搜索镜像
start    Start a stopped container                    #启动容器
stop    Stop a running container                    #暂停容器
tag    Tag an image into a repository                    #给源中镜像打标签
top    Lookup the running processes of a container        #查看容器中的运行的进程信息
unpause    Unpause a paused container                    #取消暂停容器
version    Show the docker version information            #查看 docker版本号
wait Block until a container stops,then print its exit code #截取容器停止时的退出状态值笔记通过哔哩哔哩视频《狂神说javaDocker最新超详细版教程通俗易懂》学习摘抄


 1万+
1万+


 被折叠的 条评论
为什么被折叠?
被折叠的 条评论
为什么被折叠?
 到【灌水乐园】发言


