


链路聚合个人理解思维:
将几个接口虚拟为一个接口,这也注定每个接口都要一模一样。
链路聚合的模式:
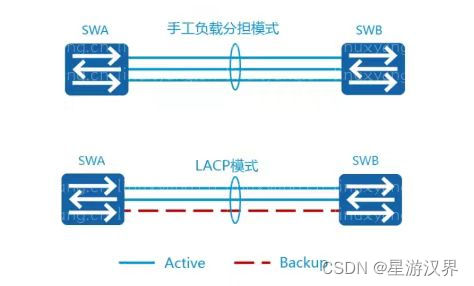
手工负载模式: 所有活活动接口都参与数据的转发,分担负载流量
LACP模式:如上图,有三条线路,其中有俩进行转发数据,其中一条是不进行转发数数据,作为备份,其他线路有问题后第三条进行转发数据, 如果你用了LACP模式,他会产生LACP报文类似BPDU报文,去维护端口的状态。
链路聚合(eth-trunk)
一组链路“捆绑”
作用:1.增加带宽 2.更多的冗余链路 3.提高链路的利用率,STP中被看做一个链路 4.支持负载分
担(把数据放到不同的物理链路)
条件:实施eth-trunk必须是混杂模式
每个接口配置要一模一样
(Eth-Trunk链路两端相连的物理接口的数量,速率,双工方式,流控制,端口的模式都要一样, 说白了就是如果你想做聚合链路,对应的端口配置都是相同的,比如链路类型,划分的Vlan等。)
所以应先清除接口配置(清除后为默认,接口为关闭状态)
清除后应开启接口
清除命令:
clear configuration int g0/0/1
两种视图下都应使用这个命令
方法一:
[Huawei-GigabitEthernet0/0/2]clear configuration int g0/0/1
Warning: All configurations of the interface will be cleared, and its state will
be shutdown. Continue? [Y/N] :y
Info: Total execute 1 command(s), 1 successful, 0 failed.
方法二: 用户视图
[Huawei]clear configuration int g0/0/1
Warning: All configurations of the interface will be cleared, and its state will
be shutdown. Continue? [Y/N] :y
Info: Total execute 1 command(s), 1 successful, 0 failed.
聚合实操: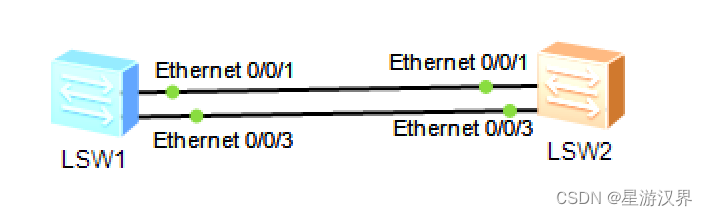
switch1:
[s1]clear configuration interface GigabitEthernet 0/0/1
[s1-GigabitEthernet0/0/1]undo shutdown
[s1]clear configuration interface GigabitEthernet 0/0/2
[s1-GigabitEthernet0/0/2]undo shutdown
[s1]interface Eth-Trunk 10 #创建一个聚合链路id为10 可将多个接口视为一个接口
[s1-Eth-Trunk10]trunkport GigabitEthernet 0/0/1 to 0/0/2 #将G0/0/1和G0/0/2加入这个聚合链路里[s1-Eth-Trunk10]]port link-type trunk #修改链路类型
[s1-Eth-Trunk10]port trunk pvid vlan 110 #这个vlan应先创建好。
[s1-Eth-Trunk10]port trunk allow-pass vlan all #允许所有vlan通过
switch2:
[s2]clear configuration interface GigabitEthernet 0/0/1
[s2-GigabitEthernet0/0/1]undo shutdown
[s2]clear configuration interface GigabitEthernet 0/0/2
[s2-GigabitEthernet0/0/2]undo shutdown
[s2]interface Eth-Trunk 10 #创建一个聚合链路id为10 交换机两端这个聚合链路id最好一致
[s2-Eth-Trunk10]trunkport GigabitEthernet 0/0/1 to 0/0/2 #将G0/0/1和G0/0/2加入这个聚合链路里[s2-Eth-Trunk10]]port link-type trunk #修改链路类型
[s2-Eth-Trunk10]port trunk pvid vlan 110 #这个vlan应先创建好。
[s2-Eth-Trunk10]port trunk allow-pass vlan all #允许所有vlan通过
查看配置:
[s1]dis eth-trunk 10
Eth-Trunk10's state information is:
WorkingMode: NORMAL Hash arithmetic: According to SIP-XOR-DIP
Least Active-linknumber: 1 Max Bandwidth-affected-linknumber: 8
Operate status: down Number Of Up Port In Trunk: 2
--------------------------------------------------------------------------------
PortName Status Weight
GigabitEthernet0/0/1 Down 1
GigabitEthernet0/0/2 Down 1
WorkingMode: NORMAL NORMAL 为手工负责模式
Least Active-linknumber: 1 最少活动接口 1个
Operate status: down 链路是否运行
Hash arithmetic: According to SIP-XOR-DIP 一种算法
Max Bandwidth-affected-linknumber: 8 8代表做大带宽数
Number Of Up Port In Trunk: 2 聚合链路eth-trunk中有两条链路工作
三层的链路聚合:
重要:[s1-Eth-Trunk10]undo portswitch #改为三层链路聚合 其他和二层一样
[s1]clear configuration interface GigabitEthernet 0/0/1
[s1-GigabitEthernet0/0/1]undo shutdown
[s1]clear configuration interface GigabitEthernet 0/0/2
[s1-GigabitEthernet0/0/2]undo shutdown
[s1]interface Eth-Trunk 10 #创建一个聚合链路id为10 可将多个接口视为一个接口
[s1-Eth-Trunk10]undo portswitch #改为三层链路聚合
[s1-Eth-Trunk10]trunkport GigabitEthernet 0/0/1 to 0/0/2 #将G0/0/1和G0/0/2加入这个聚合链路里[s1-Eth-Trunk10]]port link-type trunk #修改链路类型
[s1-Eth-Trunk10]port trunk pvid vlan 110 #这个vlan应先创建好。
[s1-Eth-Trunk10]port trunk allow-pass vlan all #允许所有vlan通过


 1万+
1万+


 被折叠的 条评论
为什么被折叠?
被折叠的 条评论
为什么被折叠?
 到【灌水乐园】发言


