


android:angle=
“integer” //渐变角度,必须为
45的倍数,
0为从左到右,
90为从上到下
android:centerX=
“float” //渐变中心
X的相当位置,范围为
0~
1
android:centerY=
“float” //渐变中心
Y的相当位置,范围为
0~
1
android:startColor=
“color” //渐变开始点的颜色
android:centerColor=
“color” //渐变中间点的颜色,在开始与结束点之间
android:endColor=
“color” //渐变结束点的颜色
android:gradientRadius=
“float” //渐变的半径,只有当渐变类型为
radial时才能使用
android:useLevel=
["
true" | "
false"] /> //使用LevelListDrawable时就要设置为true。设为false时才有渐变效果
首先有三种渐变类型,分别是:linear(线性渐变)、radial(放射性渐变)、sweep(扫描式渐变)
(1)先看看这几个属性的使用方法:
android:type=[“linear” | “radial” | “sweep”]
android:startColor=“color” //渐变开始点的颜色
android:centerColor=“color” //渐变中间点的颜色,在开始与结束点之间
android:endColor=“color” //渐变结束点的颜色
android:gradientRadius=“float” //渐变的半径,只有当渐变类型为radial时才能使用
下面我们使用三色渐变来看看这三种渐变方式都是怎么显示的:(如果不使用centerColor属性就是双色渐变,这个属性是可选的)
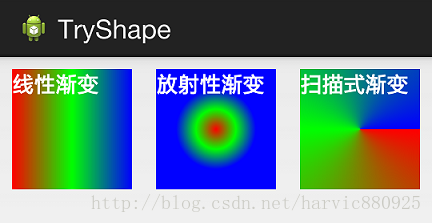
需要注意的一点是,在构造放射性渐变时,要加上android:gradientRadius属性(渐变半径),即必须指定渐变半径的大小才会起作用,下面列出这三个渐变方式的shape代码,供大家参考:
线性渐变:
<shape xmlns:android=“http://schemas.android.com/apk/res/android” >
<gradient
android:type=
“linear”
android:startColor=
“#ff0000”
android:centerColor=
“#00ff00”
android:endColor=
“#0000ff”/>
</shape>
放射性渐变:
<shape xmlns:android=“http://schemas.android.com/apk/res/android” >
<gradient
android:type=
“radial”
android:startColor=
“#ff0000”
android:centerColor=
“#00ff00”
android:endColor=
“#0000ff”
android:gradientRadius=
“100”/>
</shape>
扫描式渐变:
 最低0.47元/天 解锁文章


 868
868


 被折叠的 条评论
为什么被折叠?
被折叠的 条评论
为什么被折叠?
 到【灌水乐园】发言


