


1、前言
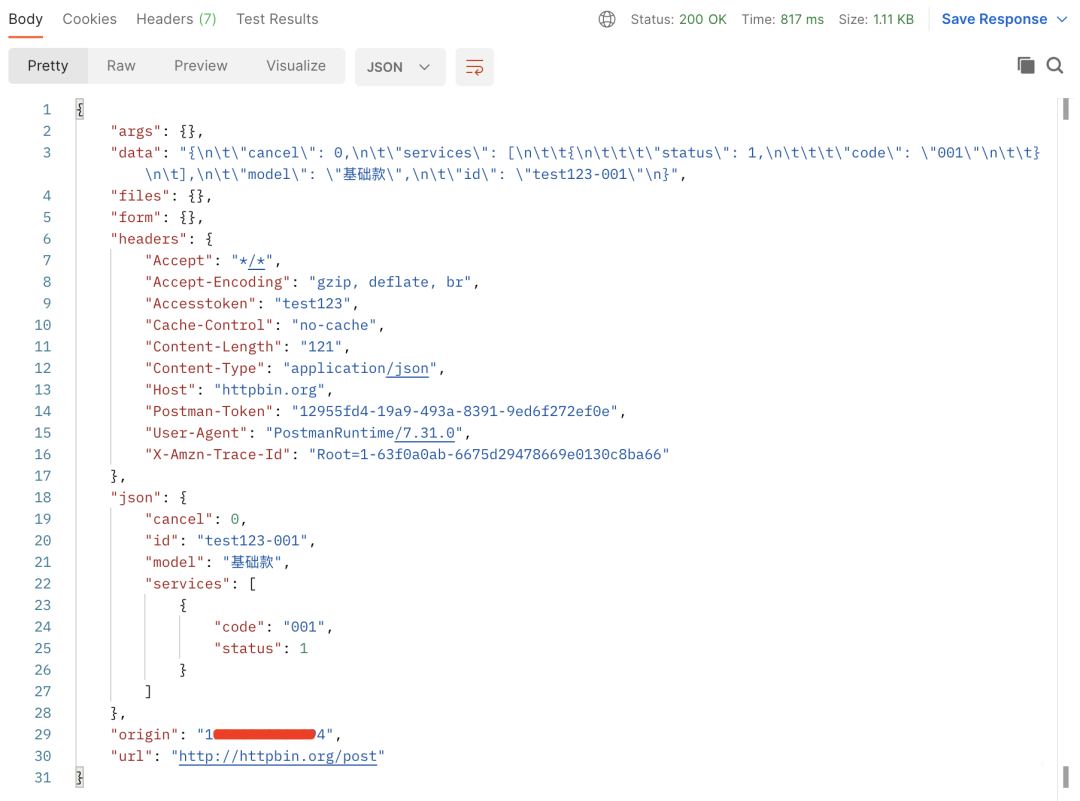
使用 Postman 进行接口测试,如下图。
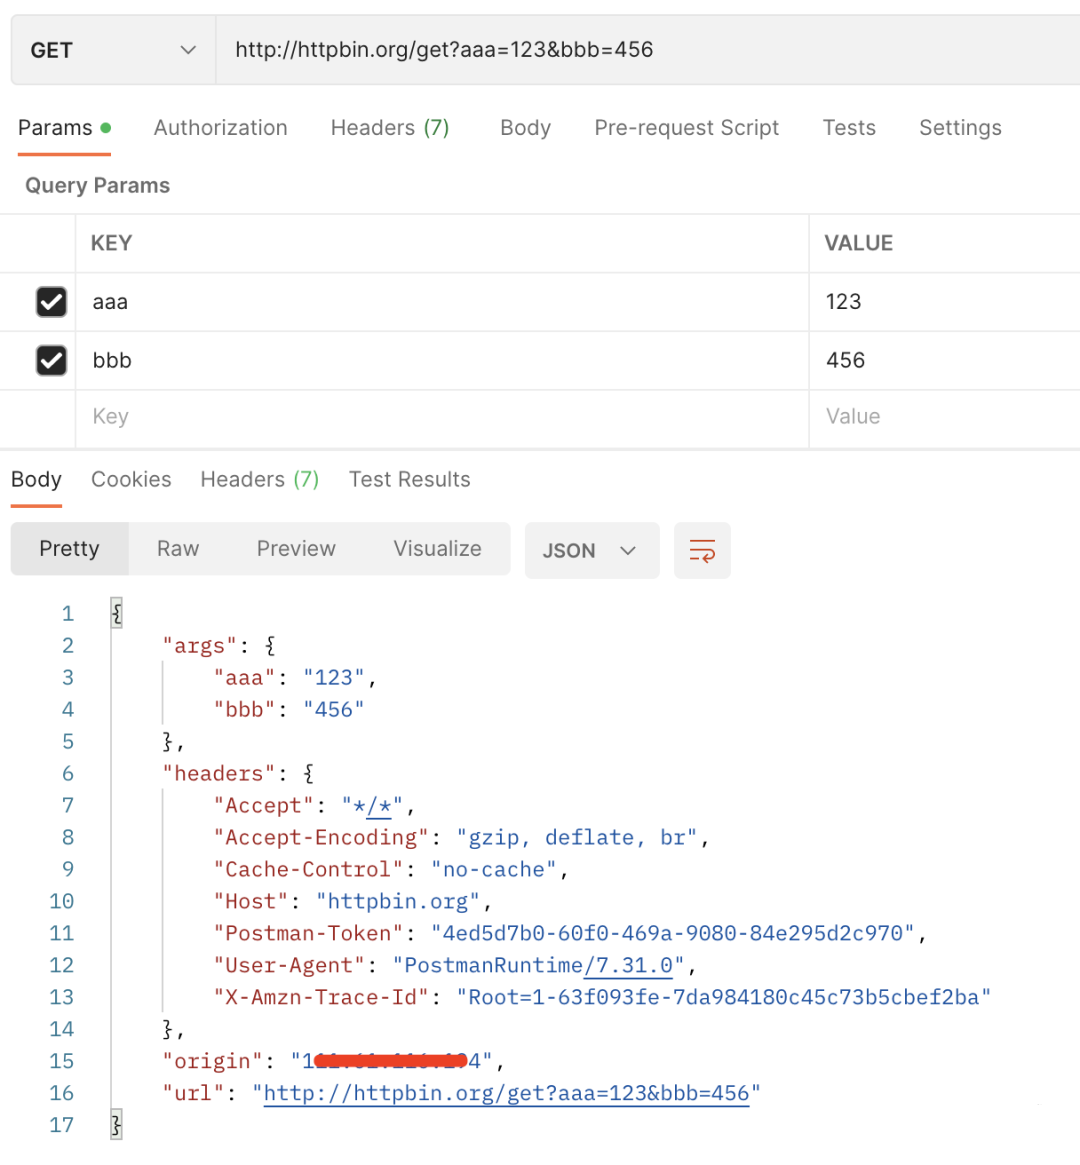
在 Postman 的代码段里,可以转换你需要的不同语言的代码,其中就可以转换 cURL 代码。
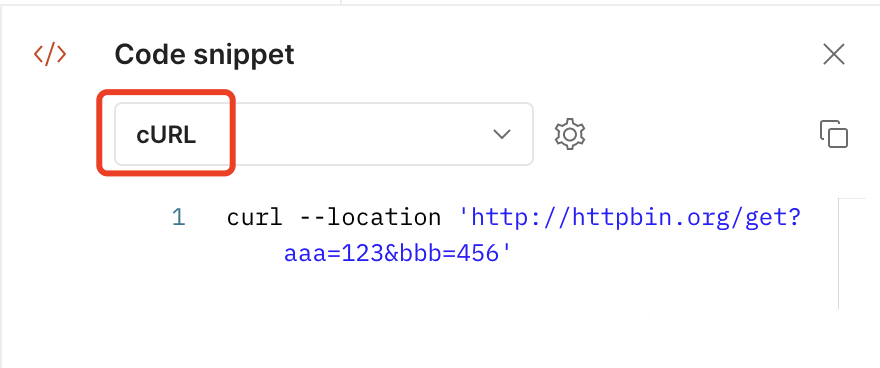
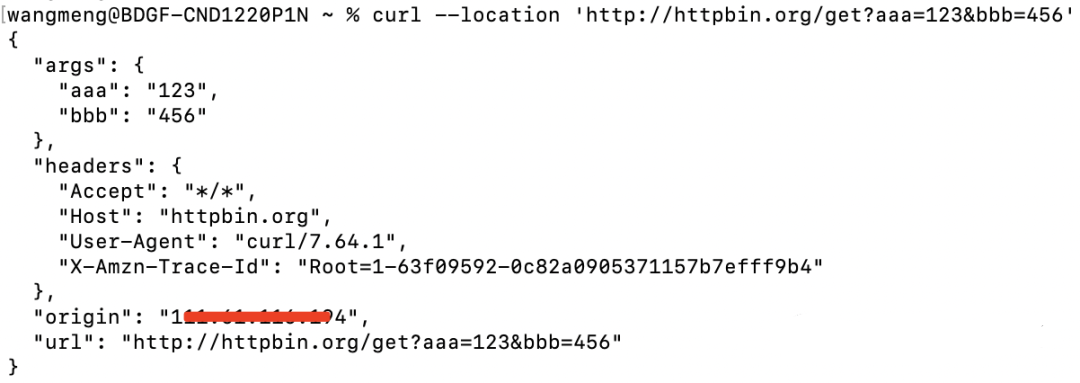
将此代码复制到命令行里执行,可以执行成功,请求结果和在 Postman 里执行的结果一样。
cURL 在命令行或脚本中用于传输数据。
2、简介
cURL 是一个利用 URL 语法在命令行下工作的文件传输工具,1997年首次发行。它支持文件上传和下载,所以是综合传输工具,但按传统习惯称 cURL 为下载工具。cURL 还包含了用于程序开发的 libcurl。
cURL 支持的通信协议有 FTP、FTPS、HTTP、HTTPS、TFTP、SFTP、Gopher、SCP、Telnet、DICT、FILE、LDAP、LDAPS、IMAP、POP3、SMTP 和 RTSP。
cURL 还用于汽车、电视机、路由器、打印机、音频设备、移动电话、平板电脑、机顶盒、媒体播放器,是超过100亿个安装中数千个软件应用程序的互联网传输引擎。
官方网址:
https://curl.se/
3、命令参数
基本操作命令:
curl -X <method> [-H “xxx:xxx”]… [-d “xxx=xxx”]… url

-X :请求方式 GET、POST。。。。。。
-H :请求头header
-d :POST/PUT/。。。请求所带的form表单或body,GET请求无视这个参数
url :请求地址
示例1:GET请求
curl -X GET "http://httpbin.org/get?aaa=123&bbb=456"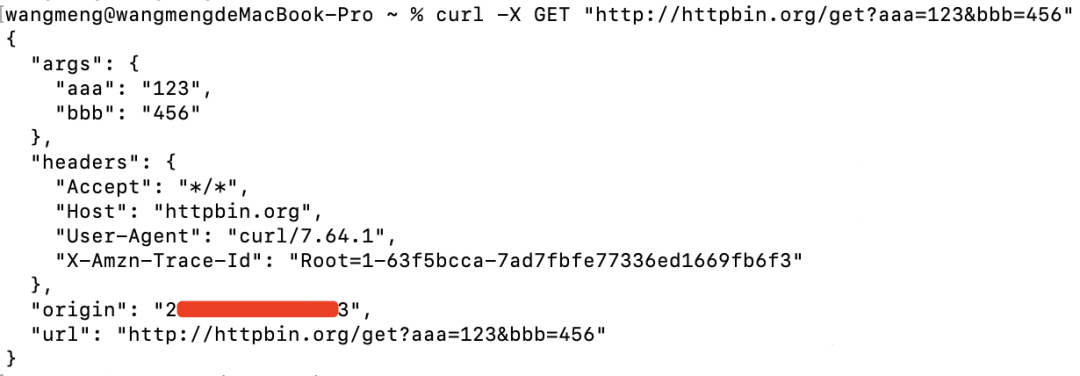
示例2:POST请求,参数为form表单
curl -X POST "http://httpbin.org/post" -d "aaa=123" -d "bbb=456"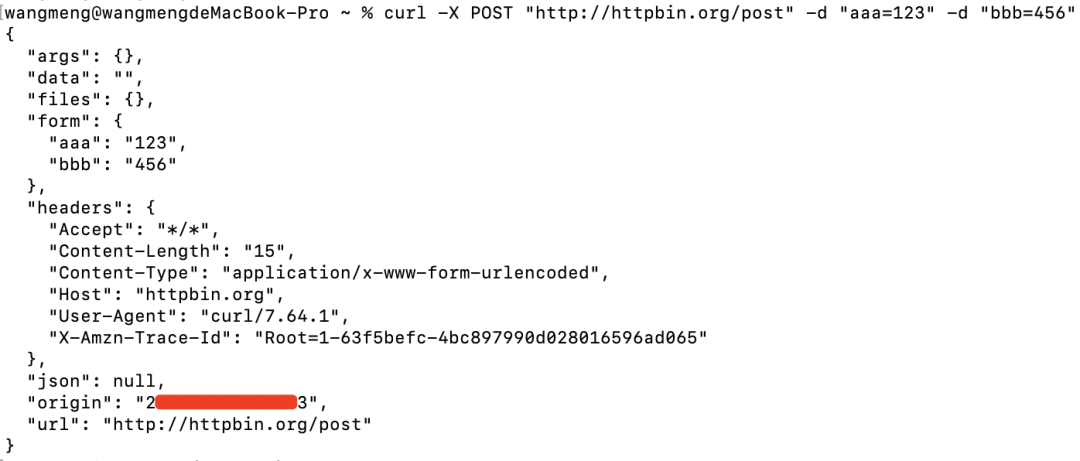
示例3:POST请求,参数为json,并且有请求头header参数
curl -X POST "http://httpbin.org/post" -H "accesstoken: test123" -H "Content-Type: application/json" -d '{"cancel": 0,"services": [{"status": 1,"code": "001"}],"model": "demo","id": "test123-001"}'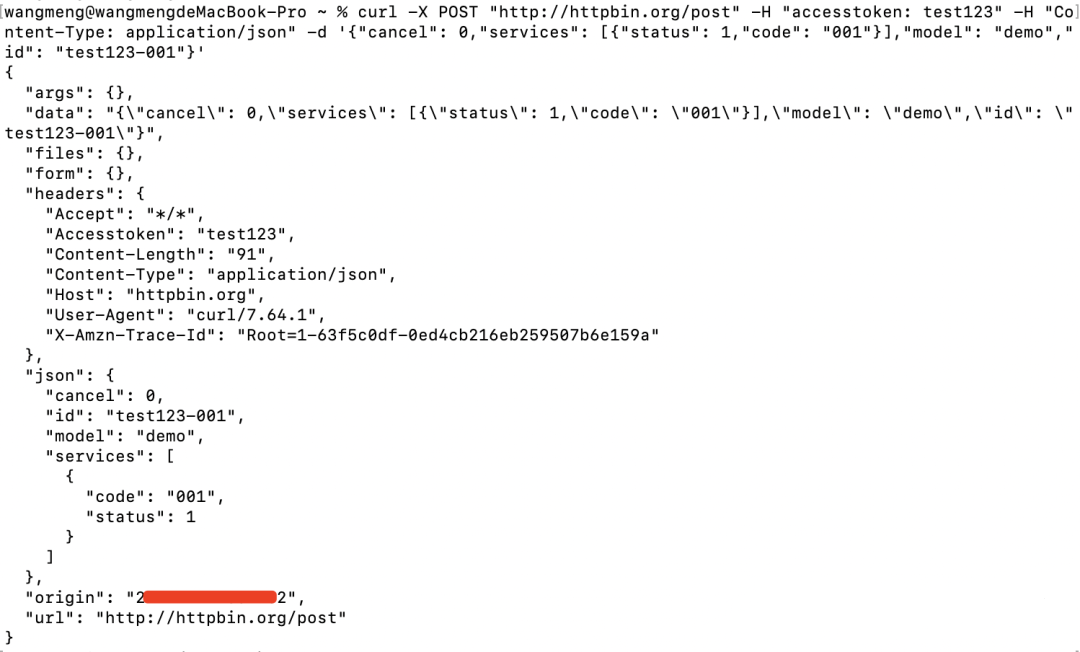
查找更多参数,输入命令 curl --help 即可。
wangmeng@wangmengdeMacBook-Pro ~ % curl --help
Usage: curl [options...] <url>
     --abstract-unix-socket <path> Connect via abstract Unix domain socket
     --alt-svc <file name> Enable alt-svc with this cache file
     --anyauth Pick any authentication method
 -a, --append Append to target file when uploading
     --basic Use HTTP Basic Authentication
     --cacert <file> CA certificate to verify peer against
     --capath <dir> CA directory to verify peer against
 -E, --cert <certificate[:password]> Client certificate file and password
     --cert-status Verify the status of the server certificate
     --cert-type <type> Certificate file type (DER/PEM/ENG)
     --ciphers <list of ciphers> SSL ciphers to use
     --compressed Request compressed response
     --compressed-ssh Enable SSH compression
 -K, --config <file> Read config from a file
     --connect-timeout <seconds> Maximum time allowed for connection
     --connect-to <HOST1:PORT1:HOST2:PORT2> Connect to host
 -C, --continue-at <offset> Resumed transfer offset
 -b, --cookie <data|filename> Send cookies from string/file
 -c, --cookie-jar <filename> Write cookies to <filename> after operation
     --create-dirs Create necessary local directory hierarchy
     --crlf Convert LF to CRLF in upload
     --crlfile <file> Get a CRL list in PEM format from the given file
 -d, --data <data>   HTTP POST data
     --data-ascii <data> HTTP POST ASCII data
     --data-binary <data> HTTP POST binary data
     --data-raw <data> HTTP POST data, '@' allowed
     --data-urlencode <data> HTTP POST data url encoded
     --delegation <LEVEL> GSS-API delegation permission
     --digest Use HTTP Digest Authentication
 -q, --disable Disable .curlrc
     --disable-eprt Inhibit using EPRT or LPRT
     --disable-epsv Inhibit using EPSV
     --disallow-username-in-url Disallow username in url
     --dns-interface <interface> Interface to use for DNS requests
     --dns-ipv4-addr <address> IPv4 address to use for DNS requests
     --dns-ipv6-addr <address> IPv6 address to use for DNS requests
     --dns-servers <addresses> DNS server addrs to use
     --doh-url <URL> Resolve host names over DOH
 -D, --dump-header <filename> Write the received headers to <filename>
     --egd-file <file> EGD socket path for random data
     --engine <name> Crypto engine to use
     --expect100-timeout <seconds> How long to wait for 100-continue
 -f, --fail Fail silently (no output at all) on HTTP errors
     --fail-early Fail on first transfer error, do not continue
     --false-start Enable TLS False Start
 -F, --form <name=content> Specify multipart MIME data
     --form-string <name=string> Specify multipart MIME data
     --ftp-account <data> Account data string
     --ftp-alternative-to-user <command> String to replace USER [name]
     --ftp-create-dirs Create the remote dirs if not present
     --ftp-method <method> Control CWD usage
     --ftp-pasv Use PASV/EPSV instead of PORT
 -P, --ftp-port <address> Use PORT instead of PASV
     --ftp-pret Send PRET before PASV
     --ftp-skip-pasv-ip Skip the IP address for PASV
     --ftp-ssl-ccc Send CCC after authenticating
     --ftp-ssl-ccc-mode <active/passive> Set CCC mode
     --ftp-ssl-control Require SSL/TLS for FTP login, clear for transfer
 -G, --get Put the post data in the URL and use GET
 -g, --globoff Disable URL sequences and ranges using {} and []
     --happy-eyeballs-timeout-ms <milliseconds> How long to wait in milliseconds for IPv6 before trying IPv4
     --haproxy-protocol Send HAProxy PROXY protocol v1 header
 -I, --head Show document info only
 -H, --header <header/@file> Pass custom header(s) to server
 -h, --help This help text
     --hostpubmd5 <md5> Acceptable MD5 hash of the host public key
     --http0.9 Allow HTTP 0.9 responses
 -0, --http1.0 Use HTTP 1.0
     --http1.1 Use HTTP 1.1
     --http2 Use HTTP 2
     --http2-prior-knowledge Use HTTP 2 without HTTP/1.1 Upgrade
     --ignore-content-length Ignore the size of the remote resource
 -i, --include Include protocol response headers in the output
 -k, --insecure Allow insecure server connections when using SSL
     --interface <name> Use network INTERFACE (or address)
 -4, --ipv4 Resolve names to IPv4 addresses
 -6, --ipv6 Resolve names to IPv6 addresses
 -j, --junk-session-cookies Ignore session cookies read from file
     --keepalive-time <seconds> Interval time for keepalive probes
     --key <key> Private key file name
     --key-type <type> Private key file type (DER/PEM/ENG)
     --krb <level> Enable Kerberos with security <level>
     --libcurl <file> Dump libcurl equivalent code of this command line
     --limit-rate <speed> Limit transfer speed to RATE
 -l, --list-only List only mode
     --local-port <num/range> Force use of RANGE for local port numbers
 -L, --location Follow redirects
     --location-trusted Like --location, and send auth to other hosts
     --login-options <options> Server login options
     --mail-auth <address> Originator address of the original email
     --mail-from <address> Mail from this address
     --mail-rcpt <address> Mail to this address
 -M, --manual Display the full manual
     --max-filesize <bytes> Maximum file size to download
     --max-redirs <num> Maximum number of redirects allowed
 -m, --max-time <seconds> Maximum time allowed for the transfer
     --metalink Process given URLs as metalink XML file
     --negotiate Use HTTP Negotiate (SPNEGO) authentication
 -n, --netrc Must read .netrc for user name and password
     --netrc-file <filename> Specify FILE for netrc
     --netrc-optional Use either .netrc or URL
 -:, --next Make next URL use its separate set of options
     --no-alpn Disable the ALPN TLS extension
 -N, --no-buffer Disable buffering of the output stream
     --no-keepalive Disable TCP keepalive on the connection
     --no-npn Disable the NPN TLS extension
     --no-sessionid Disable SSL session-ID reusing
     --noproxy <no-proxy-list> List of hosts which do not use proxy
     --ntlm Use HTTP NTLM authentication
     --ntlm-wb Use HTTP NTLM authentication with winbind
     --oauth2-bearer <token> OAuth 2 Bearer Token
 -o, --output <file> Write to file instead of stdout
     --pass <phrase> Pass phrase for the private key
     --path-as-is Do not squash .. sequences in URL path
     --pinnedpubkey <hashes> FILE/HASHES Public key to verify peer against
     --post301 Do not switch to GET after following a 301
     --post302 Do not switch to GET after following a 302
     --post303 Do not switch to GET after following a 303
     --preproxy [protocol://]host[:port] Use this proxy first
 -#, --progress-bar Display transfer progress as a bar
     --proto <protocols> Enable/disable PROTOCOLS
     --proto-default <protocol> Use PROTOCOL for any URL missing a scheme
     --proto-redir <protocols> Enable/disable PROTOCOLS on redirect
 -x, --proxy [protocol://]host[:port] Use this proxy
     --proxy-anyauth Pick any proxy authentication method
     --proxy-basic Use Basic authentication on the proxy
     --proxy-cacert <file> CA certificate to verify peer against for proxy
     --proxy-capath <dir> CA directory to verify peer against for proxy
     --proxy-cert <cert[:passwd]> Set client certificate for proxy
     --proxy-cert-type <type> Client certificate type for HTTPS proxy
     --proxy-ciphers <list> SSL ciphers to use for proxy
     --proxy-crlfile <file> Set a CRL list for proxy
     --proxy-digest Use Digest authentication on the proxy
     --proxy-header <header/@file> Pass custom header(s) to proxy
     --proxy-insecure Do HTTPS proxy connections without verifying the proxy
     --proxy-key <key> Private key for HTTPS proxy
     --proxy-key-type <type> Private key file type for proxy
     --proxy-negotiate Use HTTP Negotiate (SPNEGO) authentication on the proxy
     --proxy-ntlm Use NTLM authentication on the proxy
     --proxy-pass <phrase> Pass phrase for the private key for HTTPS proxy
     --proxy-pinnedpubkey <hashes> FILE/HASHES public key to verify proxy with
     --proxy-service-name <name> SPNEGO proxy service name
     --proxy-ssl-allow-beast Allow security flaw for interop for HTTPS proxy
     --proxy-tls13-ciphers <ciphersuite list> TLS 1.3 proxy cipher suites
     --proxy-tlsauthtype <type> TLS authentication type for HTTPS proxy
     --proxy-tlspassword <string> TLS password for HTTPS proxy
     --proxy-tlsuser <name> TLS username for HTTPS proxy
     --proxy-tlsv1 Use TLSv1 for HTTPS proxy
 -U, --proxy-user <user:password> Proxy user and password
     --proxy1.0 <host[:port]> Use HTTP/1.0 proxy on given port
 -p, --proxytunnel Operate through an HTTP proxy tunnel (using CONNECT)
     --pubkey <key> SSH Public key file name
 -Q, --quote Send command(s) to server before transfer
     --random-file <file> File for reading random data from
 -r, --range <range> Retrieve only the bytes within RANGE
     --raw Do HTTP "raw"; no transfer decoding
 -e, --referer <URL> Referrer URL
 -J, --remote-header-name Use the header-provided filename
 -O, --remote-name Write output to a file named as the remote file
     --remote-name-all Use the remote file name for all URLs
 -R, --remote-time Set the remote file's time on the local output
 -X, --request <command> Specify request command to use
     --request-target Specify the target for this request
     --resolve <host:port:address[,address]...> Resolve the host+port to this address
     --retry <num> Retry request if transient problems occur
     --retry-connrefused Retry on connection refused (use with --retry)
     --retry-delay <seconds> Wait time between retries
     --retry-max-time <seconds> Retry only within this period
     --sasl-ir Enable initial response in SASL authentication
     --service-name <name> SPNEGO service name
 -S, --show-error Show error even when -s is used
 -s, --silent Silent mode
     --socks4 <host[:port]> SOCKS4 proxy on given host + port
     --socks4a <host[:port]> SOCKS4a proxy on given host + port
     --socks5 <host[:port]> SOCKS5 proxy on given host + port
     --socks5-basic Enable username/password auth for SOCKS5 proxies
     --socks5-gssapi Enable GSS-API auth for SOCKS5 proxies
     --socks5-gssapi-nec Compatibility with NEC SOCKS5 server
     --socks5-gssapi-service <name> SOCKS5 proxy service name for GSS-API
     --socks5-hostname <host[:port]> SOCKS5 proxy, pass host name to proxy
 -Y, --speed-limit <speed> Stop transfers slower than this
 -y, --speed-time <seconds> Trigger 'speed-limit' abort after this time
     --ssl Try SSL/TLS
     --ssl-allow-beast Allow security flaw to improve interop
     --ssl-no-revoke Disable cert revocation checks (Schannel)
     --ssl-reqd Require SSL/TLS
 -2, --sslv2 Use SSLv2
 -3, --sslv3 Use SSLv3
     --stderr Where to redirect stderr
     --styled-output Enable styled output for HTTP headers
     --suppress-connect-headers Suppress proxy CONNECT response headers
     --tcp-fastopen Use TCP Fast Open
     --tcp-nodelay Use the TCP_NODELAY option
 -t, --telnet-option <opt=val> Set telnet option
     --tftp-blksize <value> Set TFTP BLKSIZE option
     --tftp-no-options Do not send any TFTP options
 -z, --time-cond <time> Transfer based on a time condition
     --tls-max <VERSION> Set maximum allowed TLS version
     --tls13-ciphers <list of TLS 1.3 ciphersuites> TLS 1.3 cipher suites to use
     --tlsauthtype <type> TLS authentication type
     --tlspassword TLS password
     --tlsuser <name> TLS user name
 -1, --tlsv1 Use TLSv1.0 or greater
     --tlsv1.0 Use TLSv1.0 or greater
     --tlsv1.1 Use TLSv1.1 or greater
     --tlsv1.2 Use TLSv1.2 or greater
     --tlsv1.3 Use TLSv1.3 or greater
     --tr-encoding Request compressed transfer encoding
     --trace <file> Write a debug trace to FILE
     --trace-ascii <file> Like --trace, but without hex output
     --trace-time Add time stamps to trace/verbose output
     --unix-socket <path> Connect through this Unix domain socket
 -T, --upload-file <file> Transfer local FILE to destination
     --url <url> URL to work with
 -B, --use-ascii Use ASCII/text transfer
 -u, --user <user:password> Server user and password
 -A, --user-agent <name> Send User-Agent <name> to server
 -v, --verbose Make the operation more talkative
 -V, --version Show version number and quit
 -w, --write-out <format> Use output FORMAT after completion
     --xattr Store metadata in extended file attributes
4、将cURL命令转换为其他语言
推荐一个网址:
https://curlconverter.com/
可以将 cURL 命令转换为 Python、JavaScript、PHP、R、Go、C#、Ruby、Rust、Elixir、Java、MATLAB、Dart、CFML、Ansible URI 或 JSON。
打开此页面。

示例:如下图是 Postman 一个接口的执行结果
将此接口的 cURL 代码拷贝进去,生成想要的代码,例如 Python。
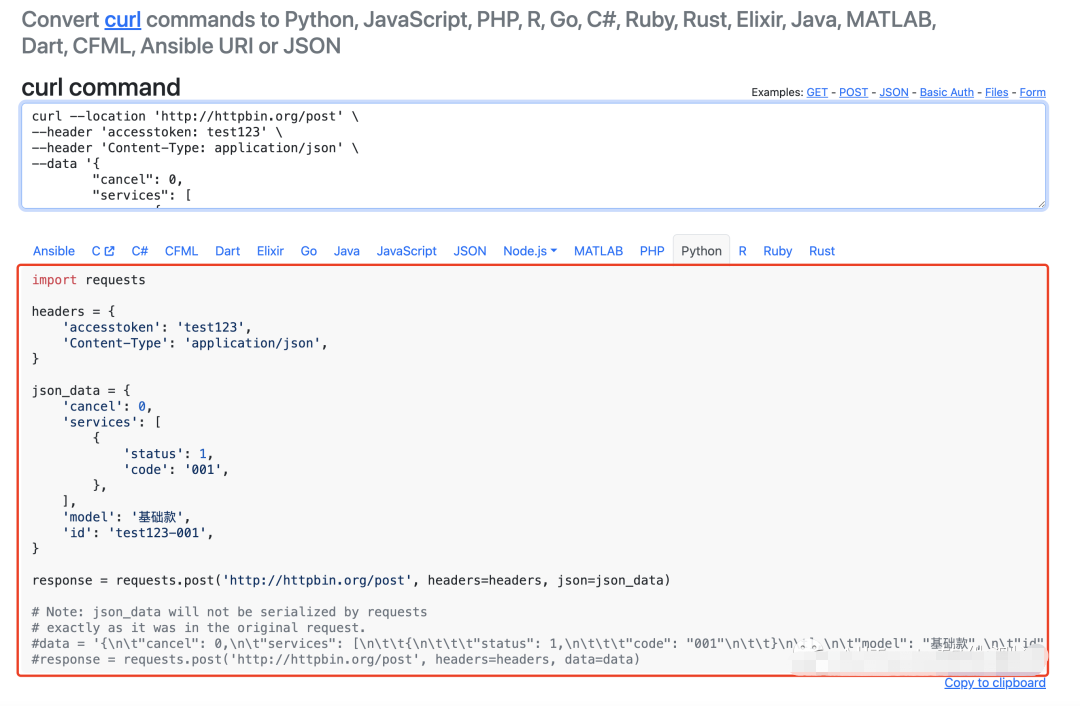
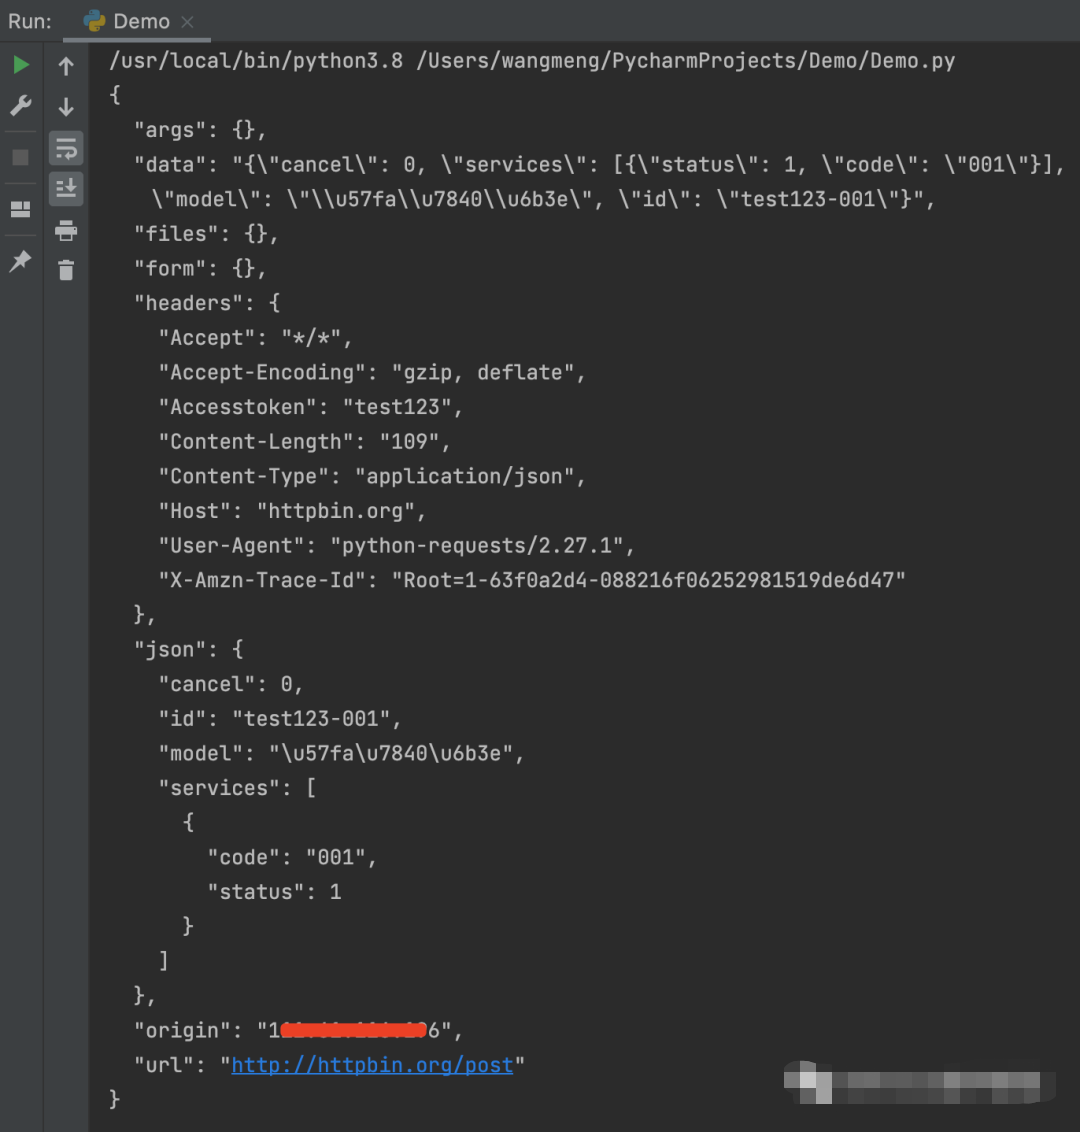
将生成的 Python 代码复制后,进行执行。
#!/usr/bin/env python
# -*- coding: utf-8 -*-
# 公众号:AllTests软件测试

import requests

headers = {
    'accesstoken': 'test123',
    'Content-Type': 'application/json',
}

json_data = {
    'cancel': 0,
    'services': [
        {
            'status': 1,
            'code': '001',
        },
    ],
    'model': '基础款',
    'id': 'test123-001',
}

response = requests.post('http://httpbin.org/post', headers=headers, json=json_data)
print(response.text)
执行结果和在 Postman 上执行的结果一致。
5、将cURL命令转换为Python请求的库
Uncurl 是一个库,允许你将 cURL 命令转换为使用 requests 的 Python 代码。由于 Chrome 网络检查器有一个漂亮的“复制为cURL”,因此该工具对于在 Python 中重新创建浏览器请求非常有用。
GitHub地址:
https://github.com/spulec/uncurl
安装
pip install uncurl
代码示例:
#!/usr/bin/env python
# -*- coding: utf-8 -*-
# 公众号:AllTests软件测试

import uncurl

context = "curl -X POST 'http://httpbin.org/post' -H 'accesstoken: test123' -H 'Content-Type: application/json' -d '{\"cancel\": 0,\"services\": [{\"status\": 1,\"code\": \"001\"}],\"model\": \"demo\",\"id\": \"test123-001\"}'"
print(uncurl.parse(context))
运行结果,已经将 cURL 命令转换为 Python 请求。
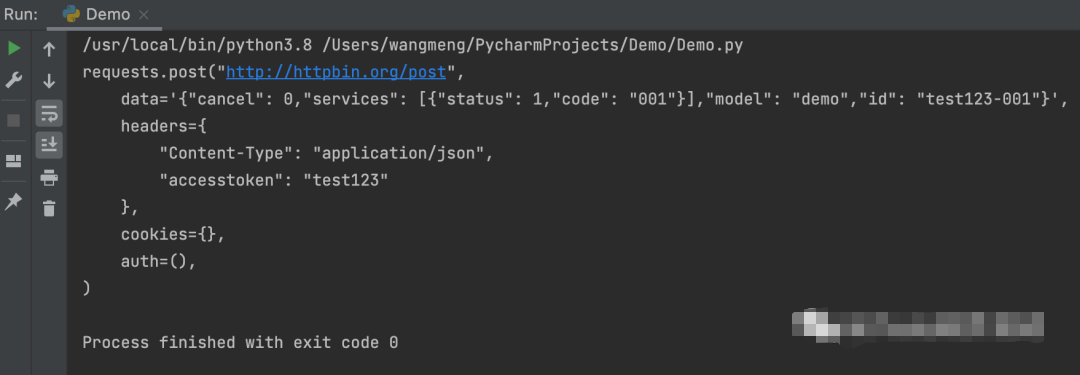
接下来将转换后的 Python 请求脚本执行一下。
#!/usr/bin/env python
# -*- coding: utf-8 -*-
# 公众号:AllTests软件测试
import requests
response = requests.post("http://httpbin.org/post",
data='{"cancel": 0,"services": [{"status": 1,"code": "001"}],"model": "demo","id": "test123-001"}',
headers={
"Content-Type": "application/json",
"accesstoken": "test123"
},
cookies={},
auth=(),
)
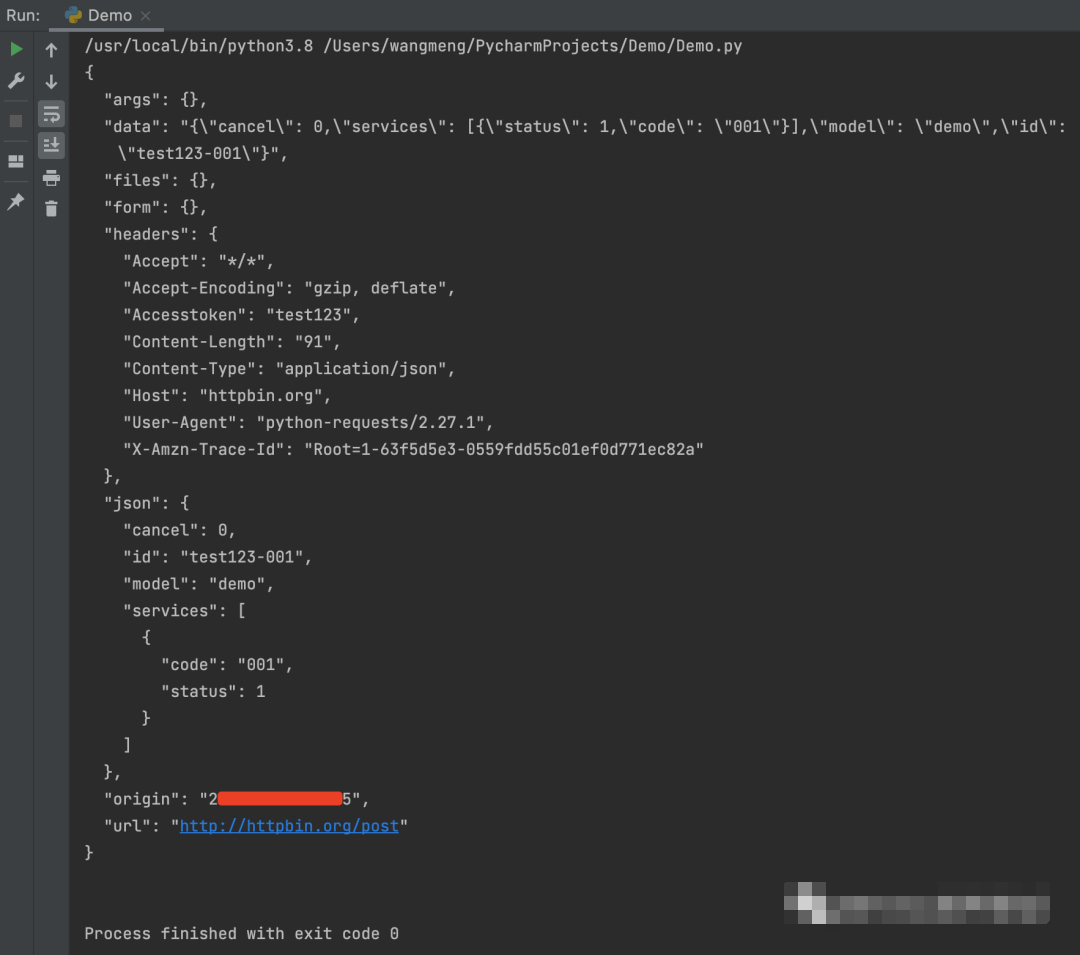
print(response.text)请求结果,执行成功。
6、将Python请求转换为cURL命令的库
Curlify 是一个库,允许你将 Python 请求转换为 cURL 命令。
GitHub地址:
https://github.com/ofw/curlify
安装:
pip install curlify
代码示例:
#!/usr/bin/env python
# -*- coding: utf-8 -*-
# 公众号:伤心的辣条
import curlify
import requests
response = requests.post("http://httpbin.org/post",
data='{"cancel": 0,"services": [{"status": 1,"code": "001"}],"model": "demo","id": "test123-001"}',
headers={
"Content-Type": "application/json",
"accesstoken": "test123"
},
cookies={},
auth=(),
)
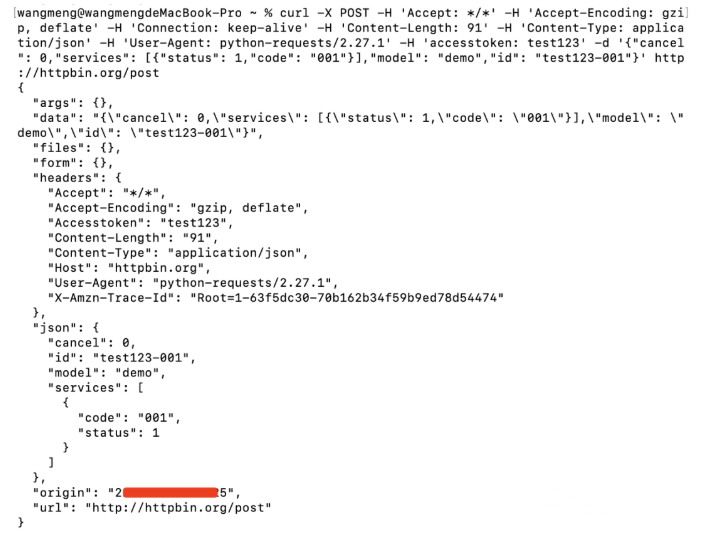
print(curlify.to_curl(response.request))运行结果,已经将 Python 请求转换为 cURL 命令。

在命令行上执行 cURL 命令,执行成功。
最后: 下方这份完整的软件测试视频学习教程已经整理上传完成,朋友们如果需要可以自行免费领取【保证100%免费】

这些资料,对于【软件测试】的朋友来说应该是最全面最完整的备战仓库,这个仓库也陪伴上万个测试工程师们走过最艰难的路程,希望也能帮助到你!


 800
800


 被折叠的 条评论
为什么被折叠?
被折叠的 条评论
为什么被折叠?
 到【灌水乐园】发言


