


写在前面:
该项目主要使用mybatis演示以下功能:
1、使用动态SQL实现批量插入,方法名为addBatch,添加时间和修改时间为SQL支持时的时刻。
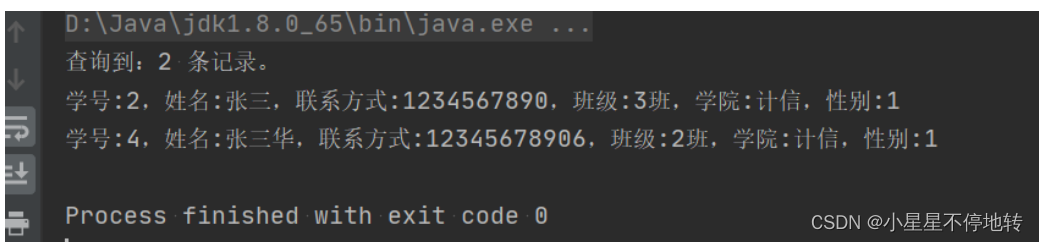
2、使用动态SQL实现分页查询,方法名为getPage,页面容量为10。查询条件:学号、姓名、班级、学院、性别、有效标识,其中前三个条件支持模糊匹配,有效标识值为1。查询结果列显示:学号、姓名、联系方式、班级、学院、性别。
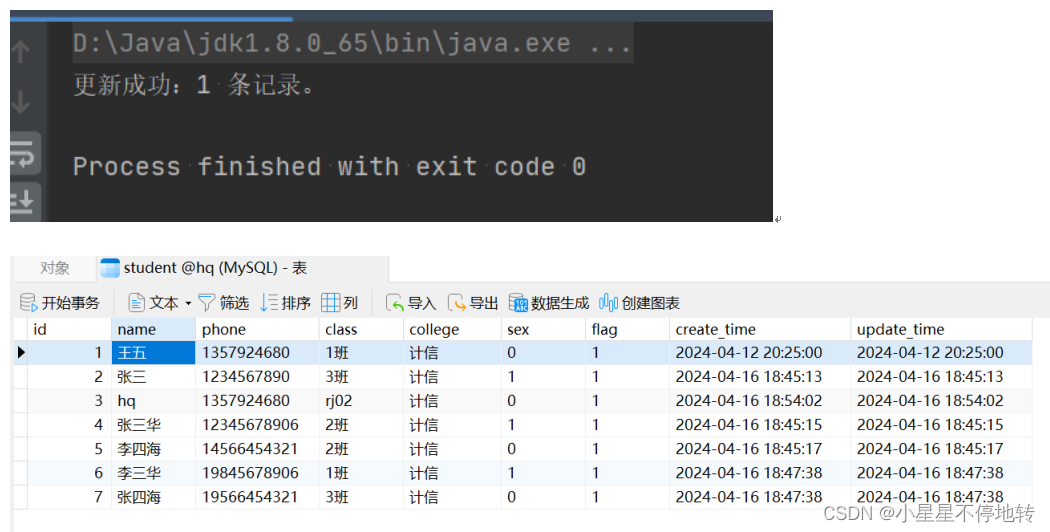
3、使用动态SQL实现更新,方法名为updateById,更新条件为学号,更新字段可为姓名、联系方式、班级、学院。更新字段不为空则更新,为空则不更新。
一、配置环境
在idea中新建一个maven项目,任选一个名字,选择一个位置存储项目,最好是一个自己能找得到得路径。
项目创建成功后,在pom.xml文件中增加如下依赖:
	<properties>
        <maven.compiler.source>8</maven.compiler.source>
        <maven.compiler.target>8</maven.compiler.target>
        <project.build.sourceEncoding>UTF-8</project.build.sourceEncoding>
    </properties>

    <dependencies>
        <dependency>
            <groupId>com.mysql</groupId>
            <artifactId>mysql-connector-j</artifactId>
            <!--这里使用8.0.33版本-->
            <version>8.0.33</version>
        </dependency>

        <!--mybatis-->
        <dependency>
            <groupId>org.mybatis</groupId>
            <artifactId>mybatis</artifactId>
            <version>3.5.11</version>
        </dependency>

        <!-- lombok -->
        <dependency>
            <groupId>org.projectlombok</groupId>
            <artifactId>lombok</artifactId>
            <version>1.18.26</version>
        </dependency>

        <dependency>
            <groupId>junit</groupId>
            <artifactId>junit</artifactId>
            <version>4.13.2</version>
        </dependency>

    </dependencies>

    <build>
        <finalName>Training01</finalName>
        <resources>
            <resource>
                <directory>src/main/resources</directory>
                <includes>
                    <include>**/*.properties</include>
                    <include>**/*.xml</include>
                </includes>
                <filtering>true</filtering>
            </resource>
            <resource>
                <directory>src/main/java</directory>
                <includes>
                    <include>**/*.properties</include>
                    <include>**/*.xml</include>
                </includes>
                <filtering>true</filtering>
            </resource>
        </resources>
    </build>
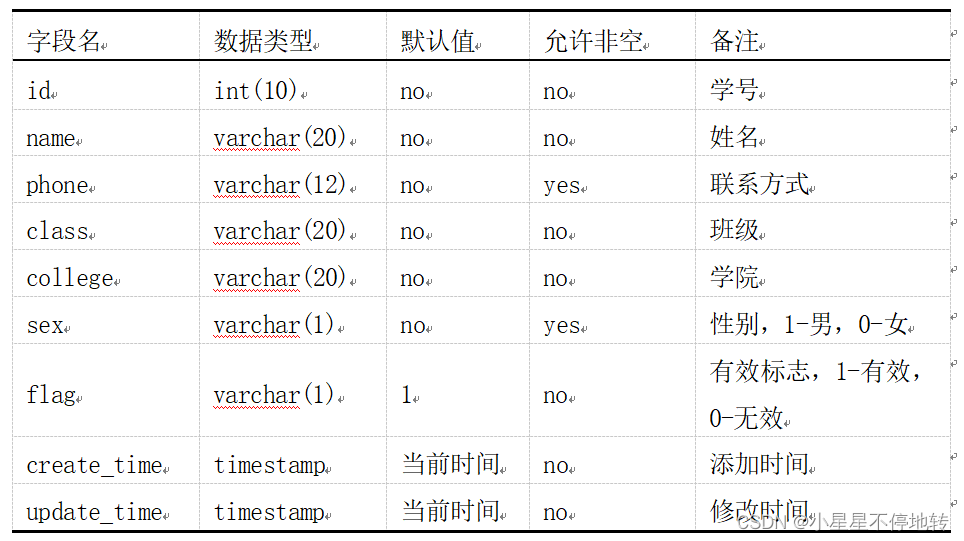
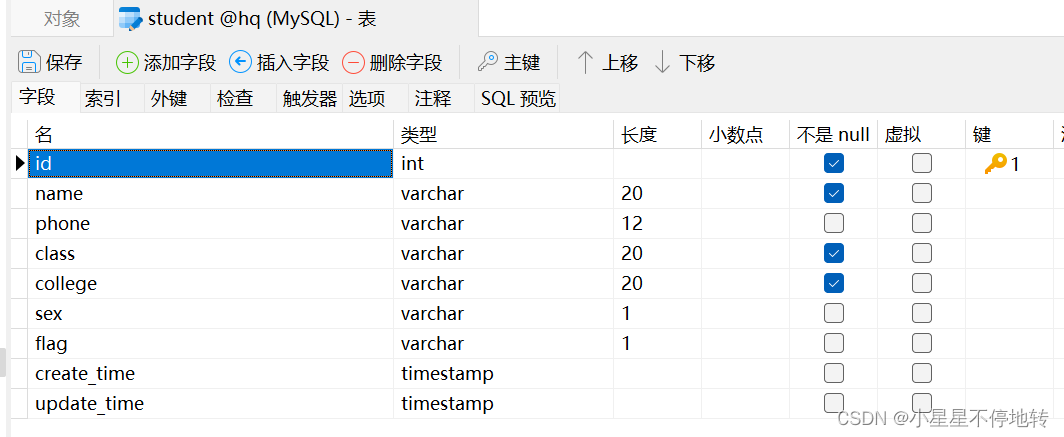
添加好依赖之后,在数据库中按如下字段及类型建表student:
用MySQL建表成功后:
二、编写代码
在配置好基本的依赖、准备好数据表后,我们开始来编写代码。
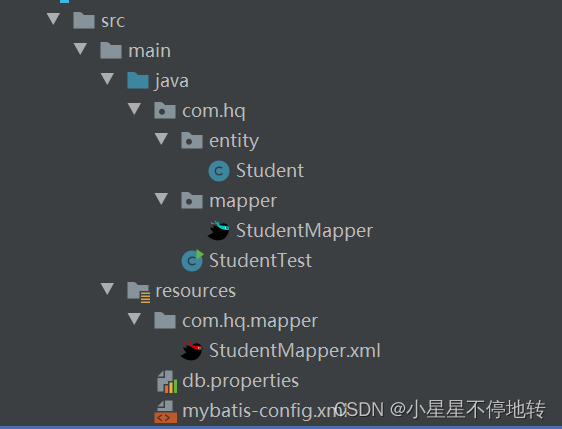
我的项目结构如下:
1、db.properties
#mysql
mysql.driver=com.mysql.cj.jdbc.Driver
mysql.url=jdbc:mysql://localhost:3306/hq #hq是数据库名
mysql.user=root
mysql.password=XXXX #XXXX输入自己的数据库密码
2、mybatis-config.xml
<?xml version="1.0" encoding="UTF-8" ?>
<!DOCTYPE configuration
        PUBLIC "-//mybatis.org//DTD Config 3.0//EN"
        "https://mybatis.org/dtd/mybatis-3-config.dtd">
<configuration>

    <properties resource="db.properties"></properties>

    <settings>
        <setting name="mapUnderscoreToCamelCase" value="true"/>
        <setting name="lazyLoadingEnabled" value="true"/>
        <setting name="aggressiveLazyLoading" value="false"/>
    </settings>

    <environments default="dev_mysql">
        <!--配置数据源-->
        <environment id="dev_mysql">
            <transactionManager type="JDBC"/>
            <dataSource type="POOLED">
                <property name="driver" value="${mysql.driver}"/>
                <property name="url" value="${mysql.url}"/>
                <property name="username" value="${mysql.user}"/>
                <property name="password" value="${mysql.password}"/>
            </dataSource>
        </environment>
    </environments>

    <!--数据库厂商的配置-->
    <databaseIdProvider type="DB_VENDOR">
        <property name="MySQL" value="mysql"/>
    </databaseIdProvider>

    <!--sql映射文件-->
    <mappers>
    	<!--写自己项目的xml文件全路径-->
        <mapper resource="com.hq.mapper/StudentMapper.xml"></mapper>
    </mappers>
</configuration>
3、Student实体类
@Data
@AllArgsConstructor
@NoArgsConstructor
public class Student implements Serializable {
    private Integer id;
    private String name;
    private String phone;
    private String className;
    private String college;
    private String sex;
    private String flag;
    private String createTime;
    private String updateTime;
}
4、StudentMapper
/**
 * 学生表操作映射接口
 * 面向接口编程,每一个方法在映射文件中均有一个对应的sql定义
 */
public interface StudentMapper {
    int addBatch(List<Student> students); // 批量增加学生
    List<Student> getPage(Map map); // 分页查找
    int updateById(Student student); // 动态SQL更新
}
5、编写StudentMapper.xml映射文件
<?xml version="1.0" encoding="UTF-8" ?>
<!DOCTYPE mapper
        PUBLIC "-//mybatis.org//DTD Mapper 3.0//EN"
        "https://mybatis.org/dtd/mybatis-3-mapper.dtd">
<!--命名空间:接口的路径-->
<mapper namespace="com.hq.mapper.StudentMapper">
	<!--Student的结果集映射-->
    <resultMap id="studentResultMap" type="com.hq.entity.Student">
    	<!--property是指Java实体类的属性,column是指数据库表中的列名-->
        <id property="id" column="id"></id>
        <result property="name" column="name"></result>
        <result property="className" column="class"></result>
        <result property="college" column="college"></result>
        <result property="createTime" column="create_time"></result>
        <result property="flag" column="flag"></result>
        <result property="phone" column="phone"></result>
        <result property="sex" column="sex"></result>
        <result property="updateTime" column="update_time"></result>
    </resultMap>

    <!-- name LIKE CONCAT('%', #{keyword}, '%') -->
    <!--id是接口中的方法名,parameterType是指接收的参数类型,resultMap是指返回的结果集对象-->
    <select id="getPage" parameterType="Map" resultMap="studentResultMap">
        select id, name, phone, class, college, sex
        from student
        where flag = '1'
        <if test="id != null and '' != id">and id like '%${id}%'</if>
        <if test="name != null and '' != name">and name like '%${name}%'</if>
        <if test="className != null and '' != className">and class like '%${class}%'</if>
        <if test="college != null and '' != college">and college = #{college}</if>
        <if test="sex != null and '' != sex">and sex = #{sex}</if>
        limit #{offset}, 10
    </select>

    <insert id="addBatch" parameterType="java.util.List">
        insert into student (id, name, phone, class, college, sex, flag, create_time, update_time) values
        <foreach collection="list" item="item" separator=",">
            (
            #{item.id},
            #{item.name},
            #{item.phone},
            #{item.className},
            #{item.college},
            #{item.sex},
            #{item.flag},
            now(),
            now()
            )
        </foreach>
    </insert>

    <update id="updateById" parameterType="com.hq.entity.Student">
        update student
        <set>
            <if test="name != null and '' != name">name = #{name},</if>
            <if test="phone != null and '' != phone ">phone = #{phone},</if>
            <if test="className != null and '' != className">class = #{className},</if>
            <if test="college != null and '' != college">college = #{college},</if>
            <if test="updateTime != null and '' != updateTime">update_time = now()</if>
        </set>
        where id = #{id}
    </update>
</mapper>
6、测试类
public class StudentTest {
public static void main(String[] args) throws IOException {
//1.创建工厂
SqlSessionFactory factory = getFactory("mybatis-config.xml");
//2.获取会话对象 手动提交 false/true 事务自动提交方式
SqlSession session = factory.openSession(true);
//3.获取接口代理对象
StudentMapper mapper = session.getMapper(StudentMapper.class);
Student student = new Student(3, "hq", "1357924680", "rj02", null, null, null, null, "");
// 执行更新
int result = mapper.updateById(student);
session.commit();
System.out.println("更新成功:" + result + " 条记录。");
/*
// 插入
List<Student> students = new ArrayList<>();
SimpleDateFormat dateFormat = new SimpleDateFormat("yyyy-MM-dd HH:mm:ss");
// 添加测试数据
students.add(new Student(null, "李三华", "19845678906", "1班", "计信", "1", "1",null,null));
students.add(new Student(null, "张四海", "19566454321", "3班", "计信", "0", "1",null, null));
// 执行插入
int result = mapper.addBatch(students);
session.commit();
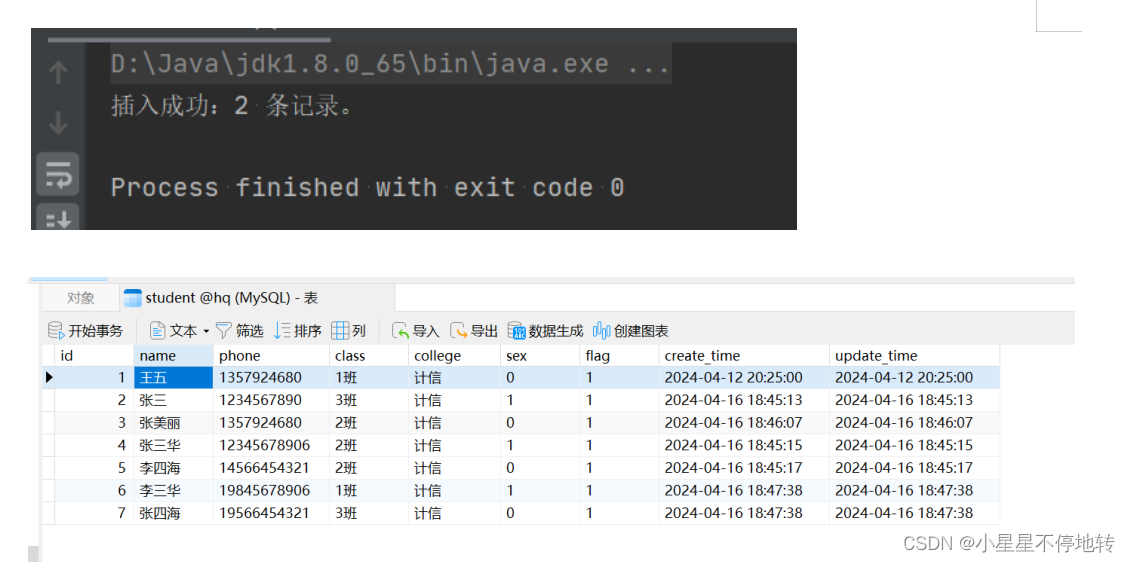
System.out.println("插入成功:" + result + " 条记录。");
// 查询
Map<String, Object> params = new HashMap<>();
params.put("name", "张");
params.put("className", "2班");
params.put("college", "计信");
params.put("sex", "1");
params.put("offset", 0); // 添加 offset 属性
List<Student> students = mapper.getPage(params);
if (!students.isEmpty()) {
System.out.println("查询到:" + students.size() + " 条记录。");
for (Student student : students) {
System.out.println("学号:" + student.getId() + ",姓名:" + student.getName() + ",联系方式:" + student.getPhone() + ",班级:" + student.getClassName() + ",学院:" + student.getCollege() + ",性别:" + student.getSex());
}
} else {
System.out.println("没有查询到任何记录。");
}
*/
}
public static SqlSessionFactory getFactory(String config) throws IOException {
SqlSessionFactory factory = null;
InputStream in = Resources.getResourceAsStream(config);
SqlSessionFactoryBuilder builder = new SqlSessionFactoryBuilder();
factory = builder.build(in);
return factory;
}
}
三、运行结果


 1805
1805


 被折叠的 条评论
为什么被折叠?
被折叠的 条评论
为什么被折叠?
 到【灌水乐园】发言


