


文章摘要
一、AOP关键词
| 注解 | 关键词 |
|---|---|
| AspectJ | 切面:就是一个标准的类,在切面类中定义切面方法 |
| joinPoint | 连接点:切面方法里的参数,可以获取到目标类、目标方法的信息 |
| Target Class / Method | 目标类、目标方法 |
| PointCut | 切入点:使用execution表达式,指定要切入哪个目标类、哪个目标方法上 |
| Advice | 通知:确定了切入点之后,通知用来确定什么时候执行,例如:before、after… |
二、Spring AOP 的xml基本用法
//schema的设置
<?xml version="1.0" encoding="UTF-8"?>
<beans xmlns:xsi="http://www.w3.org/2001/XMLSchema-instance"
       xmlns:context="http://www.springframework.org/schema/context"
       xmlns:aop="http://www.springframework.org/schema/aop"
       xmlns="http://www.springframework.org/schema/beans"
       xsi:schemaLocation="http://www.springframework.org/schema/beans
        http://www.springframework.org/schema/beans/spring-beans.xsd
        http://www.springframework.org/schema/context
        http://www.springframework.org/schema/context/spring-context.xsd
        http://www.springframework.org/schema/aop
        http://www.springframework.org/schema/aop/spring-aop.xsd">
</beans>
===========================================================================
//AOP配置
    <bean id="methodAspect" class="com.imooc.spring.aop.aspect.MethodAspect"></bean>
    <aop:config>
    	<!-- 规定切入点 -->
        <aop:pointcut id="pointcut" expression="execution(* com.imooc..*Service.*(..))"></aop:pointcut>
        <!-- 设置切面类 -->
        <aop:aspect ref="methodAspect">
        	<!-- 设置通知  设置切入点 -->
            <aop:before method="printExecutionTime" pointcut-ref="pointcut"/>
        </aop:aspect>
    </aop:config>
二、JoinPoin的核心方法
| 核心方法 | 说法 |
|---|---|
JoinPoint.getTarget() | 获取目标类 对象 |
| JoinPoint.getTarget().getClass().getName () | 获取目标 类名称 |
JoinPoint.getSignature() .getName() | 获取目标 方法名 |
JoinPoint.getArgs() | 获取目标 方法参数 |
三、PointCut 的 execution表达式
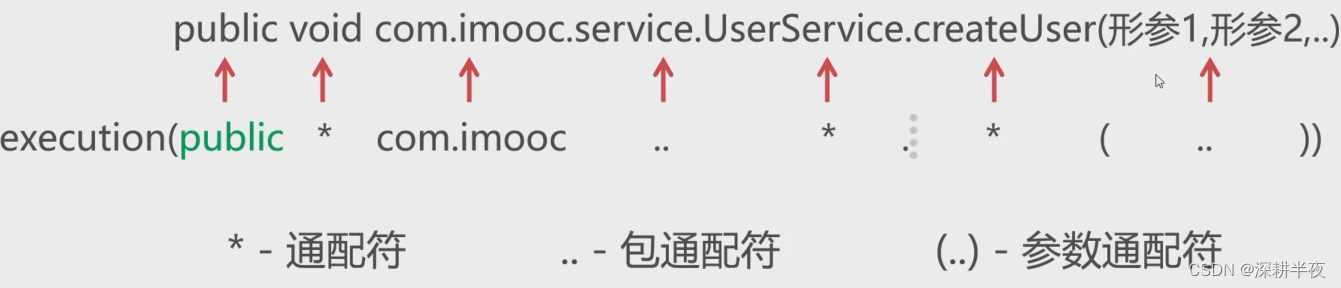
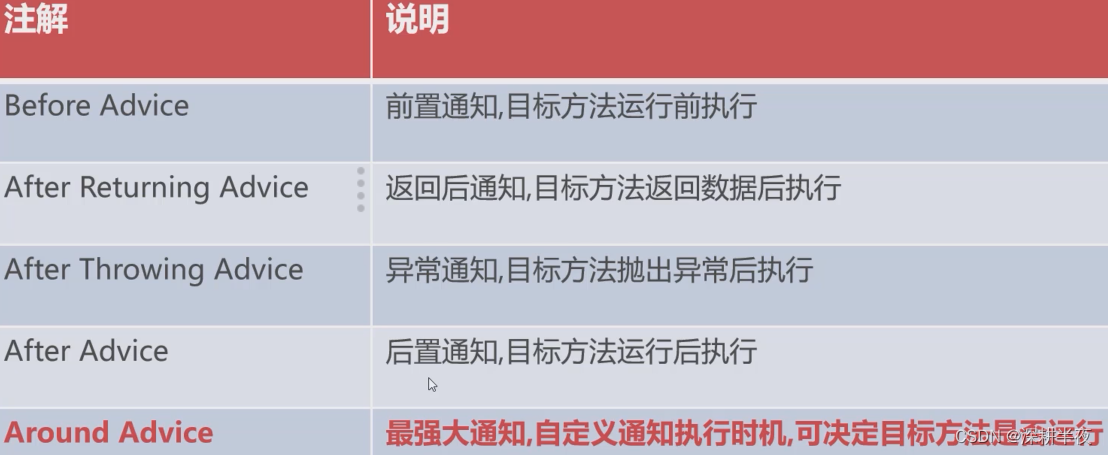
四、Advice 的五种通知类型
五、基于注解 开发Spring AOP
用注解 ===>>> 开启组件扫描:
										 	//注解配置Bean
<context:component-scan base-package="com.test.spring.ioc.entity"></context:component-scan>
//启用Spring AOP注解模式
<aop:aspectj-autoproxy/>
1、找到 切面类 添加
@Component+@Aspect
2、找到对应的切面方法 添加
@Advice("execution(* com.imooc..*Service.*(..))")
六、Spring AOP底层的实现原理
Spring基于代理模式实现功能动态扩展,其中包含两种形式:
1、目标类拥有接口,通过JDK动态代理实现功能扩展
2、目标类没有接口,通过CGLib组件实现功能扩展
七、代理模式
//接口
public interface UserService {
    public void createUser();
}
//接口实现类
public class UserServiceImpl implements UserService {
    @Override
    public void createUser() {
        System.out.println("执行创建用户的业务逻辑");
    }
}
//程序入口
public class Application {
    public static void main(String[] args) {
        UserService userService = new UserServiceImpl();
        userService.createUser();
    }
}
//运行输出: ====>>> 执行创建用户的业务逻辑
7.1、静态代理
==================添加功能:获取 createUser方法 执行的时间==================

//创建代理类:

    //代理类和委托类 都要实现相同的接口
public class UserServiceProxy implements UserService{
    //通过有参构造,在创建代理类时,就可以 ==> 持有委托类的对象
    private UserService userService;
    public UserServiceProxy(UserService userService) {
        this.userService = userService;
    }

    public void createUser() {
        System.out.println("======"+ new SimpleDateFormat("yyyy-MM-dd HH:mm:ss SSS").format(new Date())+"======");
        userService.createUser();
    }
}

//程序入口
public class Application {
    public static void main(String[] args) {
        UserService userServiceProxy = new UserServiceProxy(new UserServiceImpl());
            userServiceProxy.createUser();
    }
}
//运行输出: ====>>> 			======2020-07-13 20:51:34 247======
//	    							执行创建用户的业务逻辑
7.2、动态代理
==================添加功能:获取 createUser方法 执行的时间==================

public class ProxyInvocationHandler implements InvocationHandler {
    private Object target;//目标对象
    public ProxyInvocationHandler(Object target) {
        this.target = target;
    }
    /**
     * @param proxy 代理类对象
     * @param method    目标方法的对象
     * @param args  目标方法的参数
     * @return  目标方法运行后返回值
     * @throws Throwable
     * 该方法和反射有关。而且和Advice里的Around 非常相似。
     */
    @Override
    public Object invoke(Object proxy, Method method, Object[] args) throws Throwable {
        System.out.println("======要添加的业务======");
        //下面开启 执行目标方法
        Object ret = method.invoke(target, args);
        return ret;
    }
    public static void main(String[] args) {
        UserService userService = new UserServiceImpl();
        ProxyInvocationHandler proxyInvocationHandler = new ProxyInvocationHandler(userService);
        //动态创建代理类
        UserService userServiceProxy = (UserService) Proxy.newProxyInstance(userService.getClass().getClassLoader(),
                userService.getClass().getInterfaces(),proxyInvocationHandler);
        userServiceProxy.createUser();
    }

}


 7万+
7万+


 被折叠的 条评论
为什么被折叠?
被折叠的 条评论
为什么被折叠?
 到【灌水乐园】发言


