React实现添加购物车小车抛物线效果

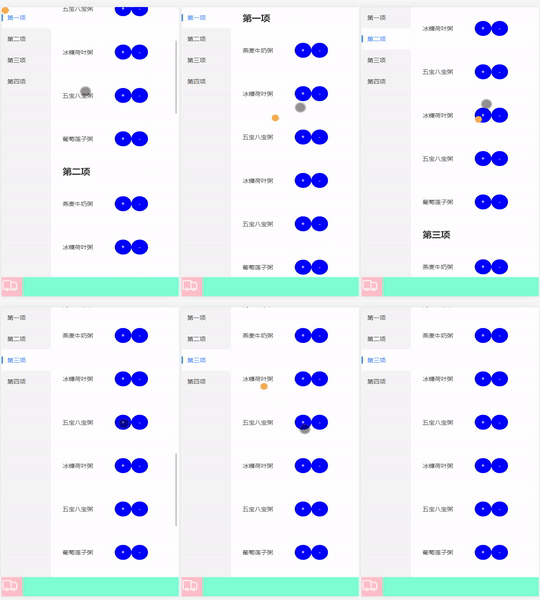
效果:


 实现思路:

                     创建一个小球Div ,

                     点击按钮,先将小球移到点击的地方

                     设置个定时器(可以重复点击)

                     向页面底部抛掷小球,css动画,   立方贝塞尔曲线

                     立方贝赛尔曲线: cubic-bezier.com (可以设置好曲线弧度,直接复制)

代码:

        页面创建小球

return (
    <>
       <div id="ball"></div>    
    </>
  )

       css:


#ball {
    width: 15px;
    height: 15px;
    background: #f4ad52;
    border-radius: 50%;
    position: fixed;
    transition: left 1s linear, top 1s ease-in;
    z-index: 1;
}

功能逻辑代码实现:


  // 点击按钮 抛掷小球
  function dianji(evt) {
    var $ball = document.getElementById('ball');  //获取小球的dom节点
    // 将小球进行归位,移到点击的位置,
    $ball.style.top = evt.pageY + 'px';   
    $ball.style.left = evt.pageX + 'px';
    $ball.style.transition = 'left 0s, top 0s';  //动画
    // 小球向下进行抛掷, 设置定时器可以重复点击
    setTimeout(() => {
      $ball.style.top = window.innerHeight + 'px'; 
      $ball.style.bottom = "20px"
      $ball.style.left = '10px';
      //css动画   加上cubic-bezier(.35,.8,1,1) 立方贝塞尔曲线  上面有官网链接
      $ball.style.transition = 'left 1s cubic-bezier(.35,.8,1,1), top 1s ease-in';  
    }, 20)
  }


  • 3
    点赞
  • 5
    收藏
    觉得还不错? 一键收藏
  • 0
    评论
实现购物车抛物线效果,可以使用 react-motion 这个动画库。 首先,需要引入 react-motion 库。 ```JavaScript import { Motion, spring } from 'react-motion'; ``` 然后,可以在购物车组件中添加一个“添加购物车”按钮。当用户点击该按钮时,可以触发一个动画,将商品从添加按钮处抛向购物车。 ```JavaScript class ShoppingCart extends React.Component { state = { items: [], // 购物车列表 showItem: false, // 是否显示添加的商品 itemX: 0, // 商品的 X 坐标 itemY: 0, // 商品的 Y 坐标 cartX: 0, // 购物车的 X 坐标 cartY: 0, // 购物车的 Y 坐标 }; // 添加商品到购物车 handleAddItem = (item) => { const { clientWidth, clientHeight } = document.documentElement; // 获取添加按钮的位置 const { x: itemX, y: itemY } = this.btnAdd.getBoundingClientRect(); // 获取购物车的位置 const { x: cartX, y: cartY } = this.cart.getBoundingClientRect(); // 更新状态,显示添加的商品,同时保存商品和购物车的位置 this.setState({ showItem: true, items: [...this.state.items, item], itemX, itemY, cartX, cartY, }); // 2 秒后隐藏添加的商品 setTimeout(() => { this.setState({ showItem: false }); }, 2000); }; render() { const { items, showItem, itemX, itemY, cartX, cartY } = this.state; return ( <div> <ul> {/* 渲染购物车列表 */} {items.map((item) => ( <li key={item.id}>{item.name}</li> ))} </ul> {/* 添加按钮 */} <button ref={(btn) => (this.btnAdd = btn)} onClick={() => this.handleAddItem({ id: 1, name: '商品1' })}> 添加购物车 </button> {/* 购物车 */} <div ref={(cart) => (this.cart = cart)} style={{ width: '50px', height: '50px', border: '1px solid #ccc', position: 'fixed', right: '50px', bottom: '50px', }} > {/* 购物车图标 */} <i className="fa fa-shopping-cart fa-2x"></i> {/* 商品动画 */} <Motion defaultStyle={{ x: itemX, y: itemY, }} style={{ x: showItem ? spring(cartX - itemX, { stiffness: 100, damping: 10 }) : itemX, y: showItem ? spring(cartY - itemY, { stiffness: 100, damping: 10 }) : itemY, }} > {(style) => showItem ? ( <div style={{ position: 'absolute', left: style.x, top: style.y, width: '20px', height: '20px', background: 'red', borderRadius: '50%', }} ></div> ) : null } </Motion> </div> </div> ); } } ``` 在上面的代码中,我们首先定义了一些状态,包括购物车列表、是否显示添加的商品、商品和购物车的坐标等。在 `handleAddItem` 方法中,我们获取了添加按钮和购物车的位置,并保存到状态中。然后,我们使用 `react-motion` 的 `Motion` 组件来实现动画。`Motion` 组件的 `defaultStyle` 属性定义了动画的起始状态,即商品的位置。`style` 属性定义了动画的结束状态,即商品飞到购物车的位置。在这里,我们使用了 `react-motion` 的 `spring` 函数来实现动画效果。`spring` 函数接受两个参数,第一个参数是动画的结束位置,第二个参数是动画的配置项,包括 `stiffness` 和 `damping` 两个属性,可以用来调整动画的弹性和阻力。最后,我们在 `Motion` 组件中渲染了一个红色的圆形,表示商品。 这样,就实现购物车抛物线效果。当用户点击添加按钮时,商品会从该位置飞向购物车,形成一个抛物线动画效果

“相关推荐”对你有帮助么?

  • 非常没帮助
  • 没帮助
  • 一般
  • 有帮助
  • 非常有帮助
提交
评论
添加红包

请填写红包祝福语或标题

红包个数最小为10个

红包金额最低5元

当前余额3.43前往充值 >
需支付:10.00
成就一亿技术人!
领取后你会自动成为博主和红包主的粉丝 规则
hope_wisdom
发出的红包
实付
使用余额支付
点击重新获取
扫码支付
钱包余额 0

抵扣说明:

1.余额是钱包充值的虚拟货币,按照1:1的比例进行支付金额的抵扣。
2.余额无法直接购买下载,可以购买VIP、付费专栏及课程。

余额充值