


一、创建WebContextmenu文件
1. html部分
<template>
  <transition :name="`el-zoom-in-${transitionType}`" :css="!hasMoveAnimation">
    <ul
      v-if="modelValue"
      class="web-contextmenu user-none"
      :style="styleCss"
      ref="targetRef"
      :class="{ 'is-transition': hasMoveAnimation }"
    >
      <li
        class="web-contextmenu-item"
        v-for="(item, index) in list"
        :key="item.name"
        :class="{ 'is-disabled': item.disabled }"
        @click="handleCommand(<boolean>item.disabled, index)"
      >
        <el-icon>
          <component :is="item.icon"></component>
        </el-icon>
        {{ item.name }}
      </li>
    </ul>
  </transition>
</template>
1.transition 使用的Elementplus内置过渡动画 具体可参考官网
2. js部分
<script setup lang="ts" name="web-contextmenu">
const targetRef = ref<HTMLElement | null>(null)
const { isOutside } = useMouseInElement(targetRef)
interface configListType {
  icon: string
  name: string
  disabled?: boolean
  show?: boolean
}
const props = withDefaults(
  defineProps<{
    transitionType?: 'top' | 'center' | 'bottom'
    configList: configListType[]
    modelValue: boolean
    x?: number
    y?: number
    hasMoveAnimation?: boolean
    zIndex?: number
  }>(),
  {
    transitionType: 'top',
    modelValue: false,
    x: 0,
    y: 0,
    hasMoveAnimation: false,
    zIndex: 10,
  },
)
const emit = defineEmits(['command', 'update:modelValue'])
//过滤item.show
const list = computed(() => {
  return props.configList.filter((item) => !item.show)
})
const handleCommand = (disabled: boolean, index: number) => {
  if (disabled) return
  //如果禁用的就不执行
  new Promise((resolve, reject) => {
    try {
      emit('command', index)
      resolve(true)
    } catch (e) {
      reject(e)
    }
  }).then(() => {
    emit('update:modelValue', false)
  })
}
watch(
  () => props.modelValue,
  (newValue) => {
    if (newValue) {
      document.addEventListener('click', closeMenu, true)
    } else {
      document.removeEventListener('click', closeMenu, true)
    }
  },
)
// 关闭
const closeMenu = () => {
  if (!isOutside.value) return
  emit('update:modelValue', false)
}
//css样式
const styleCss = computed(() => {
  let { x, y, zIndex } = props
  return { left: x + 'px', top: y + 'px', zIndex }
})
</script>
1. useMouseInElement 使用的@vueuse/core工具库 鼠标在元素中 具体可参考官网
3. style样式部分
<style lang="scss" scoped>
.web-contextmenu {
  position: fixed;
  padding: 5px 0;
  margin: 0;
  background-color: var(--el-bg-color-overlay);
  border-radius: var(--el-border-radius-base);
  list-style: none;
  box-shadow: 2px 2px 10px var(--el-color-info-light-7);
  display: flex;
  flex-direction: column;
  &.is-transition {
    transition: $base-transition;
  }
  &-item {
    display: flex;
    align-items: center;
    white-space: nowrap;
    list-style: none;
    line-height: 22px;
    padding: 5px 16px;
    margin: 0;
    font-size: var(--el-font-size-base);
    color: var(--el-text-color-regular);
    cursor: pointer;
    outline: none;
    > i {
      margin-right: 5px;
    }
    &:not(.is-disabled):hover {
      color: var(--el-color-primary);
      background: var(--el-color-primary-light-9);
    }
    &.is-disabled {
      cursor: not-allowed;
      color: var(--el-text-color-disabled);
    }
  }
}
</style>
1.css变量$base-transition: all 0.3s cubic-bezier(0.645, 0.045, 0.355, 1), border 0s,
color 0.1s, font-size 0s
二、使用WebContextmenu
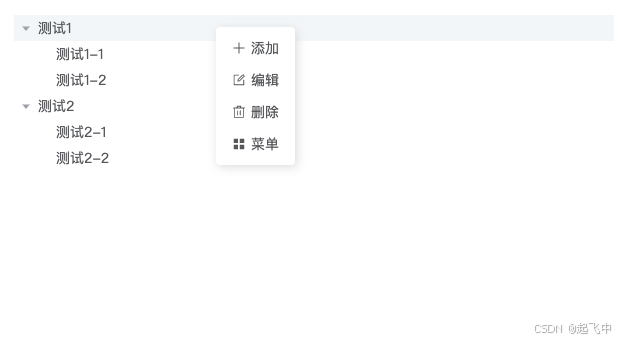
效果图展示
1.全显示
2. show隐藏

3. disabled禁用

1. html部分
<template>
   <el-tree
    style="max-width: 600px"
    :data="data"
    @node-contextmenu="handleNodeContextmenu"
    />
    <WebContextmenu
      transition-type="center"
      :configList="contextMenuList"
      :x="contextmenuParmas.x"
      :y="contextmenuParmas.y"
      v-model="contextmenuParmas.visible"
      @command="handleCommand"
    ></WebContextmenu>

</template>
2. js部分
<script lang="ts" setup >
import WebContextmenu from '@/components/WebContextmenu/index.vue'
interface Tree {
  label: string
  show: boolean
  disabled: boolean
  children?: Tree[]
}
const data: Tree[] = [
  {
    label: '测试1',
    show: false,
    disabled: false,
    children: [
      {
        label: '测试1-1',
        show: true,
        disabled: false,
      },
      {
        label: '测试1-2',
        show: false,
        disabled: true,
      },
    ],
  },
  {
    label: '测试2',
    show: false,
    disabled: false,
    children: [
      {
        label: '测试2-1',
        show: true,
        disabled: false,
      },
      {
        label: '测试2-2',
        show: false,
        disabled: true,
      },
    ],
  },
]

interface contextmenuParmasType<T = any> {
  x: number //x轴
  y: number //y轴
  visible: boolean //是否显示 true显示 false隐藏
  row?: T //存储数据
}
/**
 * contextmenu定义参数
 */
const contextmenuParmas = ref<contextmenuParmasType<Tree>>({
  x: 0,
  y: 0,
  visible: false, //true显示 false隐藏
})

/**
 * 鼠标右键功能 默认使用的tree的右键事件也可以是表格的
 * @param treeNode tree实例对象
 * @param row row数据
 */
const handleNodeContextmenu = (treeNode: MouseEvent, row: Tree) => {
  contextmenuParmas.value = {
    x: treeNode.x,
    y: treeNode.y,
    visible: true,
    row,
  }
}
/**
 * contextMenuList2 默认
 */
const contextMenuList2 = [
  {
    icon: 'plus',
    name: '添加',
  },
  {
    icon: 'edit',
    name: '编辑',
  },
  {
    icon: 'delete',
    name: '删除',
  },
]

/**
 * contextMenu  如果数据是动态的就用computed
 */
const contextMenuList = computed(() => {
  // show      ture是隐藏  false不隐藏   可选
  // disabled  ture是禁用  false不禁用   可选
  let { row } = contextmenuParmas.value
  return [
    {
      icon: 'plus',
      name: '添加',
    },
    {
      icon: 'edit',
      name: '编辑',
    },
    {
      icon: 'delete',
      name: '删除',
    },
    //show  disabled的使用
    {
      icon: 'menu',
      name: '菜单',
      show: row?.show ? true : false,
      disabled: row?.disabled ? true : false,
    },
  ]
})

/**
 * contextMenu点击事件
 * @param index 就是配置数组下标
 */
const handleCommand = (index: number) => {
  // 如果做逻辑操作可以使用currentRow
  let currentRow = contextmenuParmas.value.row
  switch (index) {
    case 0:
      // 下标0执行
      break
    case 1:
      // 下标1执行
      break
    case 2:
      // 下标2执行
      break
    case 3:
      // 下标3执行
      break
  }
}
</script>


 1649
1649

 被折叠的 条评论
为什么被折叠?
被折叠的 条评论
为什么被折叠?
 到【灌水乐园】发言


