


本章内容
	1. 整合MyBatis-Plus
	2. SpringBoot自动配置原理
	3. SpringBoot上传
	4. SpringBoot常用接口
	5. Swagger
	6. @Configuration和@Component
整合MyBatis-Plus
基本配置
官网:https://baomidou.com/
MyBatis-Plus (opens new window)(简称 MP)是一个 MyBatis (opens new window)的增强工具,在
MyBatis 的基础上只做增强不做改变,为简化开发、提高效率而生。
依赖 mybatis plus 部分依赖
代码生成器(旧)
依赖
<!-- mp -->
<dependency>
	<groupId>com.baomidou</groupId>
	<artifactId>mybatis-plus-boot-starter</artifactId>
	<version>3.4.1</version>
</dependency>
<!-- 代码生成工具 -->
<dependency>
	<groupId>com.baomidou</groupId>
	<artifactId>mybatis-plus-generator</artifactId>
	<version>3.4.1</version>
</dependency>
<!-- 代码生成模板 -->
<dependency>
	<groupId>org.apache.velocity</groupId>
	<artifactId>velocity-engine-core</artifactId>
	<version>2.2</version>
</dependency>
代码
public class CodeGenerator {

    //数据源
    private static final String JdbcUrl = "jdbc:mysql:///student?useUnicode=true&characterEncoding=UTF-8&serverTimezone=GMT%2B8";
    private static final String DriverName = "com.mysql.cj.jdbc.Driver";
    private static final String username = "root";
    private static final String password = "root";
    //忽略的表前缀
    private static final String tablePrefix = "tb_";
    //private static final String tablePrefix = "";
    //父包名
    private static final String parent = "com.lxy";


    private static String scanner(String tip) {
        Scanner scanner = new Scanner(System.in);
        System.out.println("请输入" + tip + ":");
        if (scanner.hasNext()) {
            String ipt = scanner.next();
            if (ipt!=null) {
                return ipt;
            }
        }
        throw new MybatisPlusException("请输入正确的" + tip + "!");
    }


    public static void main(String[] args) {
        // 创建代码生成器对象
        AutoGenerator mpg = new AutoGenerator();
        // 全局配置
        GlobalConfig gc = new GlobalConfig();
        gc.setOutputDir(scanner("你的项目路径(本项目的路径 如:D:\\Java_practice\\demo)") + "/src/main/java");
        gc.setAuthor("sunwz");
        //生成之后是否打开资源管理器
        gc.setOpen(false);
        //重新生成时是否覆盖文件
        gc.setFileOverride(false);
        //%s 为占位符
        //mp生成service层代码,默认接口名称第一个字母是有I
        gc.setServiceName("%sService");
        //gc.setServiceName("service");
        //设置主键生成策略 自动增长
        gc.setIdType(IdType.AUTO);
        //设置Date的类型 只使用 java.util.date 代替
        gc.setDateType(DateType.ONLY_DATE);
        //开启实体属性 Swagger2 注解
        //gc.setSwagger2(true);
        mpg.setGlobalConfig(gc);
        // 数据源配置
        DataSourceConfig dsc = new DataSourceConfig();
        dsc.setUrl(JdbcUrl);
        dsc.setDriverName(DriverName);
        dsc.setUsername(username);
        dsc.setPassword(password);
        //使用mysql数据库
        dsc.setDbType(DbType.MYSQL);
        mpg.setDataSource(dsc);
        // 包配置
        PackageConfig pc = new PackageConfig();
        //pc.setModuleName(scanner("请输入模块名(存放的包名称 如system)"));
        pc.setParent(parent);
        pc.setController("controller");
        pc.setService("service");
        pc.setServiceImpl("service.impl");
        pc.setMapper("mapper");
        pc.setEntity("pojo");
        pc.setXml("mapper");
        mpg.setPackageInfo(pc);
        // 策略配置
        StrategyConfig strategy = new StrategyConfig();
        //设置哪些表需要自动生成
        strategy.setInclude(scanner("表名,多个英文逗号分割").split(","));
        //实体类名称驼峰命名
        strategy.setNaming(NamingStrategy.underline_to_camel);
        //列名名称驼峰命名
        strategy.setColumnNaming(NamingStrategy.underline_to_camel);
        strategy.setEntityLombokModel(true);
        //设置controller的api风格 使用RestController
        strategy.setRestControllerStyle(true);
        //驼峰转连字符
        strategy.setControllerMappingHyphenStyle(true);
        //忽略表前缀
        strategy.setTablePrefix(tablePrefix);
        mpg.setStrategy(strategy);
        mpg.execute();
    }
}
代码生成器(新)
依赖
<!-- https://mvnrepository.com/artifact/com.baomidou/mybatis-plus-boot-starter -->
<dependency>
	<groupId>com.baomidou</groupId>
	<artifactId>mybatis-plus-boot-starter</artifactId>
	<version>3.5.3.1</version>
</dependency>
<dependency>
	<groupId>com.baomidou</groupId>
	<artifactId>mybatis-plus-generator</artifactId>
	<version>3.5.2</version>
</dependency>
<dependency>
	<groupId>org.apache.velocity</groupId>
	<artifactId>velocity-engine-core</artifactId>
	<version>2.2</version>
</dependency>
代码
public class CodeGeneration {
    public static void main(String[] args) {
        /**
         * 先配置数据源
         */
        MySqlQuery mySqlQuery = new MySqlQuery() {
            @Override
            public String[] fieldCustom() {
                return new String[]{"Default"};
            }
        };


        DataSourceConfig dsc = new DataSourceConfig.Builder("jdbc:mysql://localhost:3306/shiyan6?&useUnicode=true&characterEncoding=utf-8&serverTimezone=Asia/Shanghai","root","root")
                .dbQuery(mySqlQuery).build();
        //通过datasourceConfig创建AutoGenerator
        AutoGenerator generator = new AutoGenerator(dsc);


        Scanner scanner = new Scanner(System.in);
        System.out.println("代码生成的绝对路径(右键项目->copy path):");
        String projectPath = scanner.next();
        System.out.println("请输入表名,多个英文逗号分隔,所有输入 all");
        String s = scanner.next();

        /**
         * 全局配置
         */
        //String projectPath = System.getProperty("user.dir"); //获取项目路径

        String filePath = projectPath + "/src/main/java";  //java下的文件路径
        GlobalConfig global = new GlobalConfig.Builder()
                .outputDir(filePath)//生成的输出路径
                .author("吕鑫源")//生成的作者名字
                //.enableSwagger()开启swagger,需要添加swagger依赖并配置
                .dateType(DateType.TIME_PACK)//时间策略
                .commentDate("yyyy年MM月dd日")//格式化时间格式
                .disableOpenDir()//禁止打开输出目录,默认false
                .fileOverride()//覆盖生成文件
                .build();

        /**
         * 包配置
         */
        PackageConfig packages = new PackageConfig.Builder()
                .entity("pojo")//实体类包名
                .parent("edu.xja")//父包名。如果为空,将下面子包名必须写全部, 否则就只需写子包名
                .controller("controller")//控制层包名
                .mapper("mapper")//mapper层包名
                .xml("mapper.xml")//数据访问层xml包名
                .service("service")//service层包名
                .serviceImpl("service.impl")//service实现类包名
                //.other("output")//输出自定义文件时的包名
                .pathInfo(Collections.singletonMap(OutputFile.xml, projectPath + "/src/main/resources/mapper")) //路径配置信息,就是配置各个文件模板的路径信息,这里以mapper.xml为例
                .build();
        /**
         * 模板配置
         */

        // 如果模板引擎是 freemarker
//        String templatePath = "/templates/mapper.xml.ftl";
//         如果模板引擎是 velocity
        // String templatePath = "/templates/mapper.xml.vm";


        TemplateConfig template = new TemplateConfig.Builder()
//            .disable()//禁用所有模板
                //.disable(TemplateType.ENTITY)禁用指定模板
//                .service(filePath + "/service.java")//service模板路径
//                .serviceImpl(filePath + "/service/impl/serviceImpl.java")//实现类模板路径
//                .mapper(filePath + "/mapper.java")//mapper模板路径
//                .mapperXml("/templates/mapper.xml")//xml文件模板路路径
//                .controller(filePath + "/controller")//controller层模板路径
                .build();

        /**
         * 注入配置,自定义配置一个Map对象
         */
//    Map<String,Object> map = new HashMap<>();
//        map.put("name","young");
//        map.put("age","22");
//        map.put("sex","男");
//        map.put("description","深情不及黎治跃");
//
//    InjectionConfig injectionConfig = new InjectionConfig.Builder()
//            .customMap(map)
//            .build();


        /**
         * 策略配置开始
         */
        StrategyConfig strategyConfig = new StrategyConfig.Builder()
                .enableCapitalMode()//开启全局大写命名
                //.likeTable()模糊表匹配
                .addInclude(getTables(s))//添加表匹配,指定要生成的数据表名,不写默认选定数据库所有表
                .addTablePrefix("tb_", "sys_") //设置忽略表前缀
                //.disableSqlFilter()禁用sql过滤:默认(不使用该方法)true
                //.enableSchema()启用schema:默认false

                .entityBuilder() //实体策略配置
                //.disableSerialVersionUID()禁用生成SerialVersionUID:默认true
                .enableChainModel()//开启链式模型
                .enableLombok()//开启lombok
                .enableRemoveIsPrefix()//开启 Boolean 类型字段移除 is 前缀
                .enableTableFieldAnnotation()//开启生成实体时生成字段注解
                //.addTableFills()添加表字段填充
                .naming(NamingStrategy.underline_to_camel)//数据表映射实体命名策略:默认下划线转驼峰underline_to_camel
                .columnNaming(NamingStrategy.underline_to_camel)//表字段映射实体属性命名规则:默认null,不指定按照naming执行
                .idType(IdType.AUTO)//添加全局主键类型
                .formatFileName("%s")//格式化实体名称,%s取消首字母I
                .build()

                .mapperBuilder()//mapper文件策略
                .enableMapperAnnotation()//开启mapper注解
                .enableBaseResultMap()//启用xml文件中的BaseResultMap 生成
                .enableBaseColumnList()//启用xml文件中的BaseColumnList
                //.cache(缓存类.class)设置缓存实现类
                .formatMapperFileName("%sMapper")//格式化Dao类名称
                .formatXmlFileName("%sMapper")//格式化xml文件名称
                .build()

                .serviceBuilder()//service文件策略
                .formatServiceFileName("%sService")//格式化 service 接口文件名称
                .formatServiceImplFileName("%sServiceImpl")//格式化 service 接口文件名称
                .build()

                .controllerBuilder()//控制层策略
                //.enableHyphenStyle()开启驼峰转连字符,默认:false
                .enableRestStyle()//开启生成@RestController
                .formatFileName("%sController")//格式化文件名称
                .build();
        /*至此,策略配置才算基本完成!*/

        /**
         * 将所有配置项整合到AutoGenerator中进行执行
         */


        generator.global(global)
                .template(template)
//                .injection(injectionConfig)
                .packageInfo(packages)
                .strategy(strategyConfig)
                .execute();
    }

    // 处理 all 情况
    protected static List<String> getTables(String tables) {
        return "all".equals(tables) ? Collections.emptyList() : Arrays.asList(tables.split(","));
    }
}
配置文件
#添加mybatis-plus配置
mybatis-plus:
	configuration:
		log-impl: org.apache.ibatis.logging.stdout.StdOutImpl #打印SQL执行详情
	type-aliases-package: com.xja.entity
Rest测试MP应用
controller
@RestController
@RequestMapping("/user")
public class UserController {
    @Autowired
    private UserService userService;

    @GetMapping
    public List<User> list() {
        return userService.list();
    }

    @GetMapping("/{id}")
    public User buId(@PathVariable Long id) {
        return userService.getById(id);
    }

    @PostMapping
    public boolean save(@RequestBody User user) {
        return userService.save(user);
    }

    @PutMapping
    public boolean update(@RequestBody User user) {
        return userService.updateById(user);
    }

    @DeleteMapping("/{id}")
    public boolean delete(@PathVariable Long id) {
        return userService.removeById(id);
    }
}
关于时间处理
旧版生成日期 java.util.Date
@DateTimeFormat(pattern = "yyyy-MM-dd HH:mm:ss")
@JsonFormat(pattern = "yyyy-MM-dd HH:mm:ss")
private Date registerTime;
新版生成日期 import java.time.LocalDateTime;
Java 8有一个全新的日期和时间API。 此API中最有用的类之一是LocalDateTime
@TableField("create_time")
private LocalDateTime createTime;
但是新版会出现JSON转化时间问题,因此我们添加一个配置类整体解决这个问题
@Configuration
public class LocalDateTimeConfig {
    /*
     * 序列化内容
     *   LocalDateTime -> String
     * 服务端返回给客户端内容
     * */
    @Bean
    public LocalDateTimeSerializer localDateTimeSerializer() {
        return new LocalDateTimeSerializer(DateTimeFormatter.ofPattern("yyyy-MM-dd HH:mm:ss"));
    }
    /*
     * 反序列化内容
     *   String -> LocalDateTime
     * 客户端传入服务端数据
     * */
    @Bean
    public LocalDateTimeDeserializer localDateTimeDeserializer() {
        return new LocalDateTimeDeserializer(DateTimeFormatter.ofPattern("yyyy-MM-dd HH:mm:ss"));
    }
    // 配置
    @Bean
    public Jackson2ObjectMapperBuilderCustomizer jackson2ObjectMapperBuilderCustomizer() {
        return builder -> {
            builder.serializerByType(LocalDateTime.class, localDateTimeSerializer());
            builder.deserializerByType(LocalDateTime.class, localDateTimeDeserializer());
        };
    }
}
SpringBoot自动配置原理
SpringBoot 虽然干掉了 XML 但未做到 零配置,它体现出了一种 约定优于配置,也称作按约定编程,是一种软件设计范式,旨在减少软件开发人员需做决定的数量,获得简单的好处,而又不失灵活性。 一般情况下默认的配置足够满足日常开发所需,但在特殊的情况下,我们往往需要用到自定义属性配置、自定义文件配置、多环境配置、外部命令引导等一系列功能。不用担心,这些 SpringBoot 都替我们考虑好了,我们只需要遵循它的规则配置即可。
Spring Boot的配置文件
初识Spring Boot时我们就知道,Spring Boot有一个全局配置文件:application.properties或application.yml。
我们的各种属性都可以在这个文件中进行配置,最常配置的比如:server.port、logging.level.* 等等,然而我们实际用到的往往只是很少的一部分,那么这些属性是否有据可依呢?答案当然是肯定的,这些属性都可以在官方文档中查找到,但是开发这是比较喜欢记忆一些常用的配置,或者使用idea提供功能进行一些相关的配置。

那么问题来了:这些配置是如何在Spring Boot项目中生效的呢? 那么接下来,就需要聚焦本篇博客的主
题:自动配置工作原理或者叫实现方式。
工作原理剖析
Spring Boot关于自动配置的源码在spring-boot-autoconfigure-x.x.x.x.jar中:
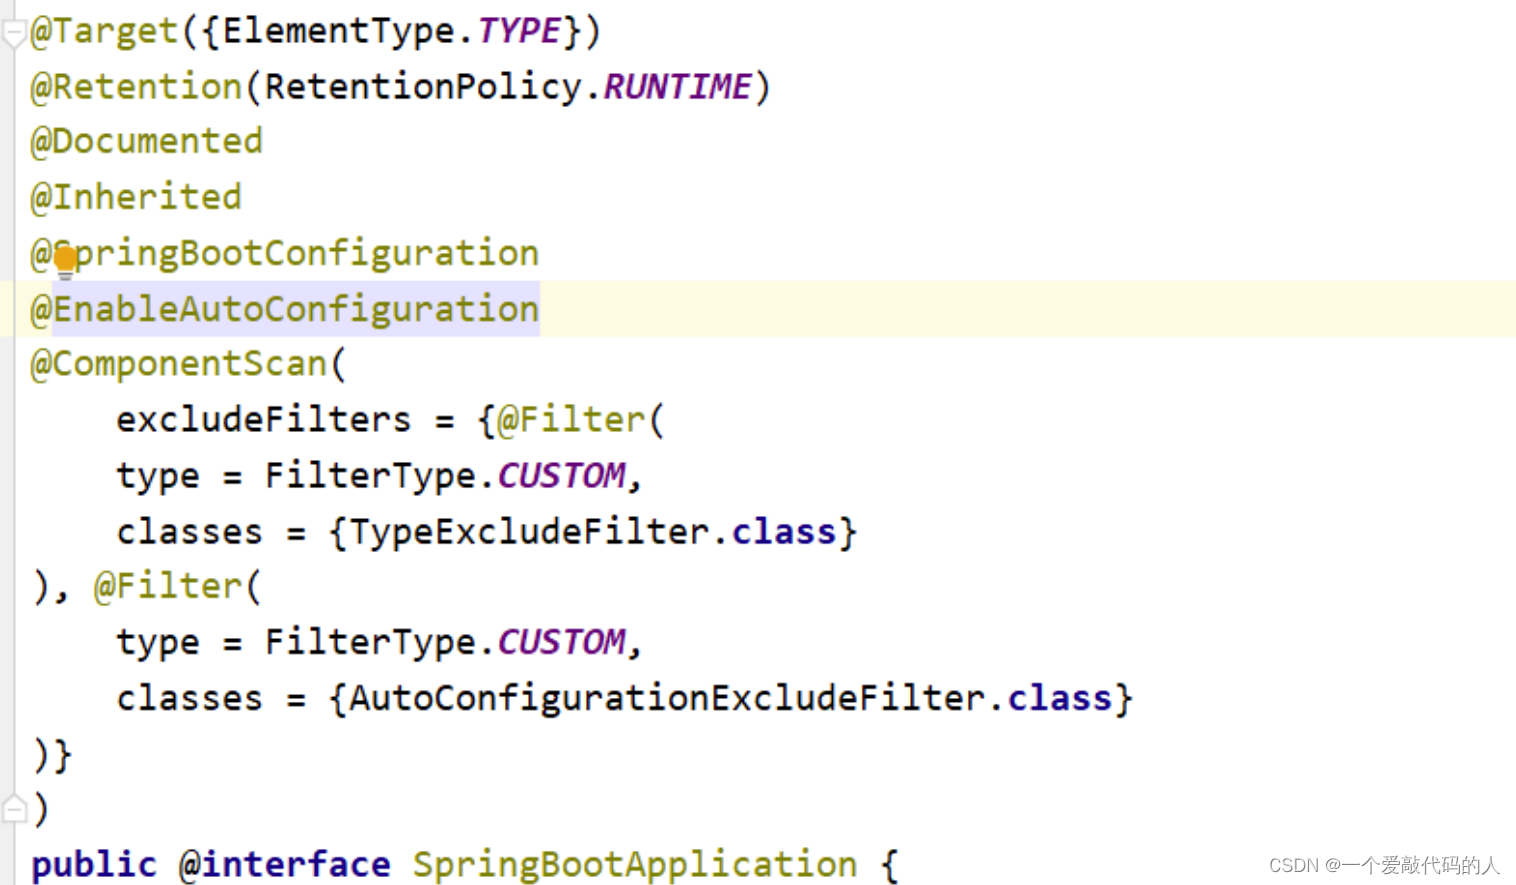
 自动配置原理的相关描述,官方文档没有提及。不过我们不难猜出,Spring Boot的启动类上有一个@SpringBootApplication注解,这个注解是Spring Boot项目必不可少的注解。那么自动配置原理一定和这个注解有着千丝万缕的联系!

@SpringBootApplication 是一个复合注解或派生注解,在 @SpringBootApplication 中有一个注解
@EnableAutoConfiguration ,翻译成人话就是开启自动配置,其定义如下:
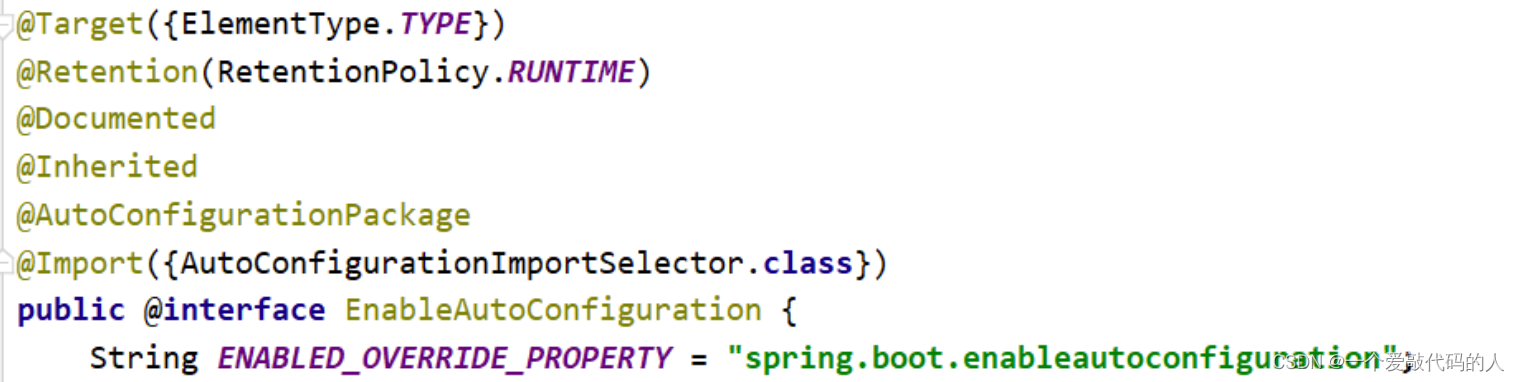
 而这个注解也是一个派生注解,其中的关键功能由@Import提供,其导入的
AutoConfigurationImportSelector的 selectImports() 方法通过
SpringFactoriesLoader.loadFactoryNames() 扫描所有具有META-INF/spring.factories 的jar包。
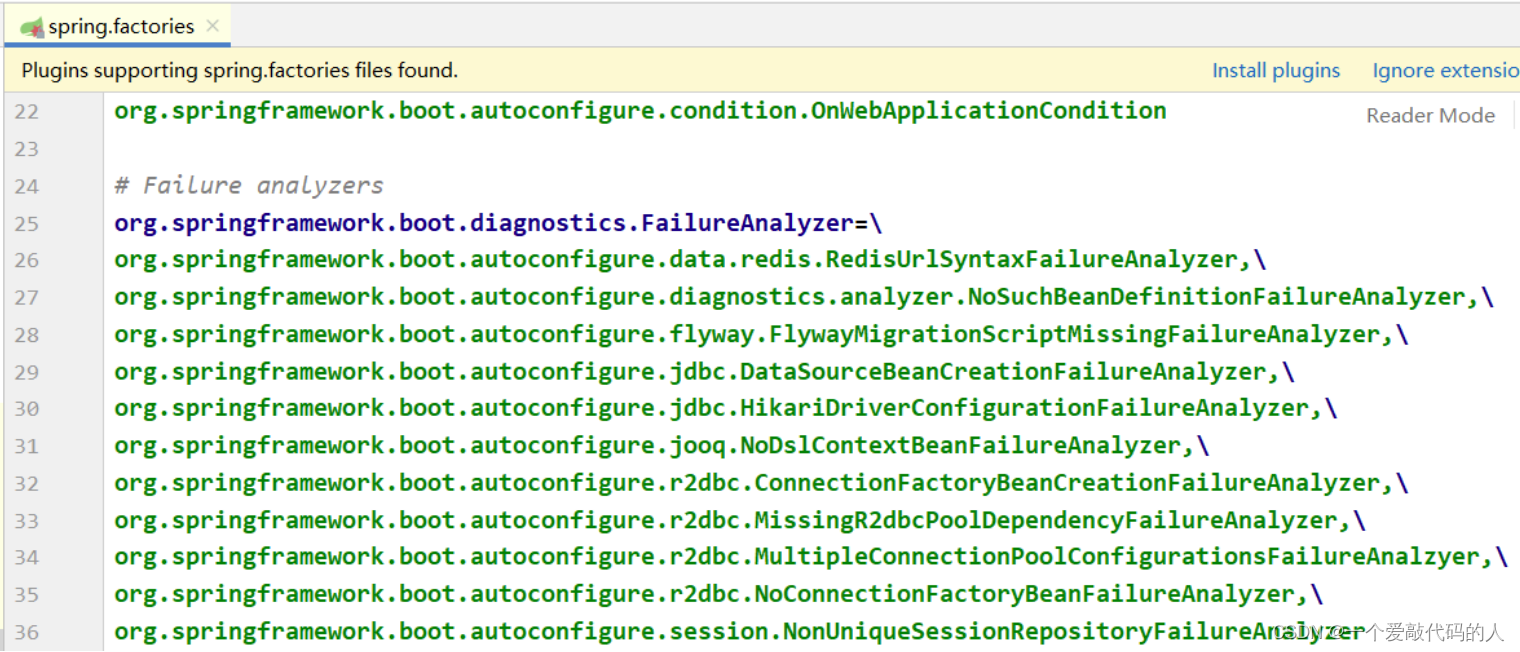
spring-boot-autoconfigure-x.x.x.x.jar 里就有一个这样的 spring.factories 文件。
这个 spring.factories 文件也是一组一组的key=value的形式,其中一个key是EnableAutoConfiguration 类的全类名,而它的value是一个 xxxxAutoConfiguration 的类名的列表,这些类名以逗号分隔,如下图所示:
这个 @EnableAutoConfiguration 注解通过@SpringBootApplication被间接的标记在了Spring Boot的启动类上。在SpringApplication.run(...) 的内部就会执行 selectImports() 方法,找到所有JavaConfig自动配置类的全限定名对应的class,然后将所有自动配置类加载到Spring容器中。
自动配置生效原理
每一个XxxxAutoConfiguration自动配置类都是在某些条件之下才会生效的,这些条件的限制在Spring Boot中以注解的形式体现,常见的条件注解有如下几项:
@ConditionalOnBean :当容器里有指定的bean的条件下。
@ConditionalOnMissingBean :当容器里不存在指定bean的条件下。
@ConditionalOnClass :当类路径下有指定类的条件下。
@ConditionalOnMissingClass :当类路径下不存在指定类的条件下。
@ConditionalOnProperty :指定的属性是否有指定的值,比如
@ConditionalOnProperties(prefix=”xxx.xxx”, value=”enable”, matchIfMissing=true) ,代表当xxx.xxx为enable时条件的布尔值为true,如果没有设置的情况下也为true.
以 ServletWebServerFactoryAutoConfiguration 配置类为例,解释一下全局配置文件中的属性如何生效,比如: server.port=8081 ,是如何生效的(当然不配置也会有默认值,这个默认值来自于org.apache.catalina.startup.Tomcat )。
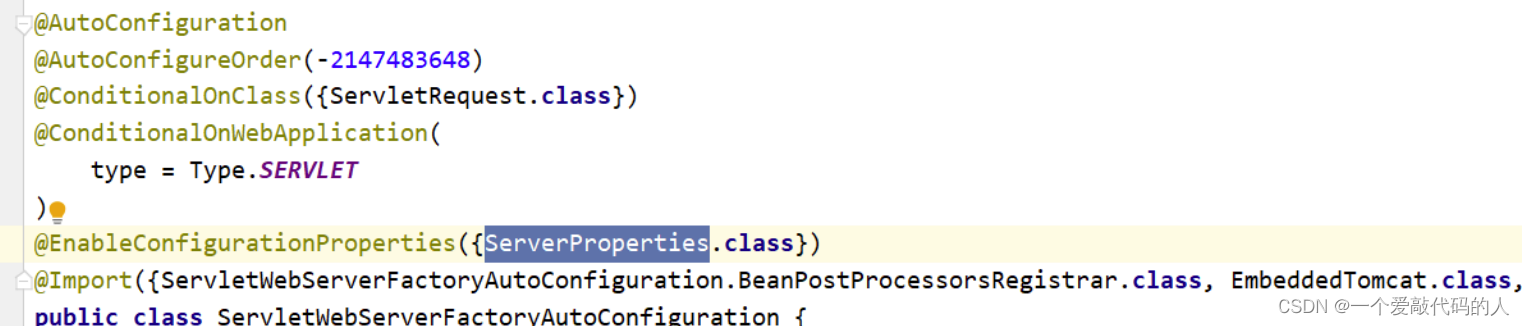
在 ServletWebServerFactoryAutoConfiguration 类上,有一个 @EnableConfigurationProperties 注
解:开启配置属性,而它后面的参数是一个ServerProperties类,这就是习惯优于配置(该做的帮你做好)
的最终落地点。
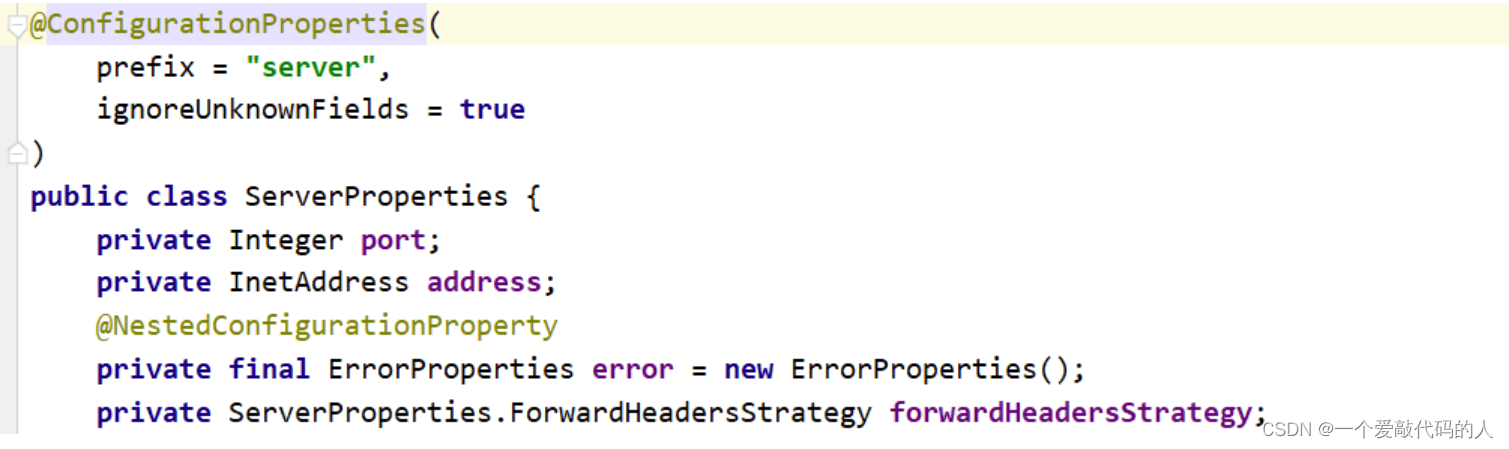 在这个类上,我们看到了一个非常熟悉的注解:
 @ConfigurationProperties ,它的作用就是从配置文件中绑定属性到对应的bean上,而 @EnableConfigurationProperties 负责导入这个已经绑定了属性的bean到spring容器中(见上面截图)。那么所有其他的和这个类相关的属性都可以在全局配置文件中定义,也就是说,真正“限制”我们可以在全局配置文件中配置哪些属性的类就是这些XxxxProperties类,它与配置文件中定义的prefix关键字开头的一组属性是唯一对应的。
至此,我们大致可以了解。在全局配置的属性如: server.port 等,通过 @ConfigurationProperties 注解,绑定到对应的XxxxProperties配置实体类上封装为一个bean,然后再通过@EnableConfigurationProperties 注解导入到Spring容器中。
而诸多的 XxxxAutoConfiguration 自动配置类,就是Spring容器的JavaConfig(俗称Java配置)形式,作用就是为Spring 容器导入bean,而所有导入的bean所需要的属性都通过 xxxxProperties 的bean来获得。
可能到目前为止还是有所疑惑,但面试的时候,其实远远不需要回答的这么具体,你只需要这样回答(背下来):
Spring Boot启动的时候类上有一个注解@SpringBootApplication,程序通过SpringApplication.run()将本类的字节码传递到这个类中,从通过反射机制加载这个注解。 @SpringBootApplication是一个派生注解,点击去发现 @EnableAutoConfiguration这就是开启自动配置的注解,通过这个注解找到@Improt 导入的注解找到 META-INF/spring.factories配置文件中的所有自动配置类,并对其进行加载,而这些自动配置类都是以AutoConfiguration结尾来命名的,它实际上就是一个JavaConfig形式的Spring容器配置类,它能通过以Properties结尾命名的类中取得在全局配置文件中配置的属性如:server.port,而XxxxProperties类是通过@ConfigurationProperties注解与全局配置文件中对应的属性进行绑定的,这样就完成了一个自动配置功能。
SpringBoot上传
文件上传和下载是JAVA WEB中常见的一种操作,文件上传主要是将文件通过IO流传输到服务器的某一个特定的文件夹下;刚开始工作那会一个上传文件常常花费小半天的时间,繁琐的代码量以及XML配置让我是痛不欲生;值得庆幸的是有了Spring Boot短短的几句代码就能实现文件上传与本地写入操作….
导入依赖
在 pom.xml 中添加上 spring-boot-starter-web 和 spring-boot-starter-thy
<dependencies>
	<dependency>
		<groupId>org.springframework.boot</groupId>
		<artifactId>spring-boot-starter-web</artifactId>
	</dependency>
	<dependency>
		<groupId>org.springframework.boot</groupId>
		<artifactId>spring-boot-starter-thymeleaf</artifactId>
	</dependency>
	<dependency>
		<groupId>org.springframework.boot</groupId>
		<artifactId>spring-boot-starter-test</artifactId>
		<scope>test</scope>
	</dependency>
</dependencies>
配置文件
默认情况下 Spring Boot 无需做任何配置也能实现文件上传的功能,但有可能因默认配置不符而导致文件上传失败问题,所以了解相关配置信息更有助于我们对问题的定位和修复;
# 禁用 thymeleaf 缓存
spring.thymeleaf.cache=false
# 是否支持批量上传 (默认值 true)
spring.servlet.multipart.enabled=true
# 上传文件的临时目录 (一般情况下不用特意修改)
spring.servlet.multipart.location=
# 上传文件最大为 1M (默认值 1M 根据自身业务自行控制即可)
spring.servlet.multipart.max-file-size=1048576
# 上传请求最大为 10M(默认值10M 根据自身业务自行控制即可)
spring.servlet.multipart.max-request-size=10485760
# 文件大小阈值,当大于这个阈值时将写入到磁盘,否则存在内存中,(默认值0 一般情况下不用特意修改)
spring.servlet.multipart.file-size-threshold=0
# 判断是否要延迟解析文件(相当于懒加载,一般情况下不用特意修改)
spring.servlet.multipart.resolve-lazily=false
控制层
创建一个 FileUploadController ,其中 @GetMapping 的方法用来跳转 index.html 页面,而@PostMapping 相关方法则是对应的 单文件上传、多文件上传处理方式。@RequestParam(“file”)** 此处的"file"对应的就是html 中 name=“file” 的 input 标签,而将文件真正写入的还是借助的commons-io中的FileUtils.copyInputStreamToFile(inputStream,file)**
@Controller
@RequestMapping("/uploads")
public class FileUploadController {
	private static final Logger log = LoggerFactory.getLogger(FileUploadController.class);
	@GetMapping
	public String index() {
		return "index";
	}
	@PostMapping("/upload1")
	@ResponseBody
	public Map<String, String> upload1(@RequestParam("file") MultipartFile file)
		throws IOException {
				log.info("[文件类型] - [{}]", file.getContentType());
				log.info("[文件名称] - [{}]", file.getOriginalFilename());
				log.info("[文件大小] - [{}]", file.getSize());
				// TODO 将文件写入到指定目录(具体开发中有可能是将文件写入到云存储/或者指定目录通过 Nginx
				进行 gzip 压缩和反向代理,此处只是为了演示故将地址写成本地电脑指定目录)
				file.transferTo(new File("F:\\app\\chapter16\\" +
				file.getOriginalFilename()));
				Map<String, String> result = new HashMap<>(16);
				result.put("contentType", file.getContentType());
				result.put("fileName", file.getOriginalFilename());
				result.put("fileSize", file.getSize() + "");
				return result;
			}
			@PostMapping("/upload2")
			@ResponseBody
	public List<Map<String, String>> upload2(@RequestParam("file") MultipartFile[] files) throws IOException {
		if (files == null || files.length == 0) {
			return null;
		}
		List<Map<String, String>> results = new ArrayList<>();
		for (MultipartFile file : files) {
			// TODO Spring Mvc 提供的写入方式
			file.transferTo(new File("F:\\app\\chapter16\\" +
			file.getOriginalFilename()));
			Map<String, String> map = new HashMap<>(16);
			map.put("contentType", file.getContentType());
			map.put("fileName", file.getOriginalFilename());
			map.put("fileSize", file.getSize() + "");
			results.add(map);
		}
		return results;
	}
}
配置tomcat虚拟目录
package com.xja.config;
import org.springframework.context.annotation.Configuration;
import org.springframework.stereotype.Component;
import org.springframework.web.context.WebApplicationContext;
import org.springframework.web.servlet.config.annotation.ResourceHandlerRegistry;
import org.springframework.web.servlet.config.annotation.WebMvcConfigurer;
/**
* 配置tomcat下的虚拟目录:核心思想就将本地的文件夹当成项目资源用tomcat的形式提供访问
*/
@Configuration
//@Component
public class TomcatDocResource implements WebMvcConfigurer {
	@Override
	public void addResourceHandlers(ResourceHandlerRegistry registry) {
		//addResourceHandler 配置访问路径
		//addResourceLocations 配置资源的具体地址
		//虽然能使用但是影响项目原有的请求
		//registry.addResourceHandler("/**").addResourceLocations("file:D:\\comment_image\\
		");
		registry.addResourceHandler("/ims/**").addResourceLocations("file:D:\\comment_image\\");
	}
}
SpringBoot常用接口
ApplicationListener
ApplicationListener可以监听某个事件event,通过实现这个接口,传入一个泛型事件,在run方法中就可以监听这个事件,从而做出一定的逻辑,比如在等所有bean加载完之后执行某些操作. Spring典型的观察者设计模式。
同时这个事件还可以直接读取到IOC容器中所有被实例化的对象.
@Component
public class SystemListener implements ApplicationListener<ContextRefreshedEvent> {
	@Override
	public void onApplicationEvent(ContextRefreshedEvent event) {
		if (event.getApplicationContext().getParent() == null) {
			System.out.println("do something");
			// 打印容器中出事Bean的数量
			System.out.println("监听器获得容器中初始化Bean数量:" +
			event.getApplicationContext().getBeanDefinitionCount());
		}
	}
}
Spring内置事件
1、ContextRefreshedEvent
ApplicationContext 被初始化或刷新时,该事件被发布。这也可以在 ConfigurableApplicationContext接口中使用 refresh() 方法来发生。此处的初始化是指:所有的Bean被成功装载,后处理Bean被检测并激活,所有Singleton Bean 被预实例化,ApplicationContext容器已就绪可用
2、ContextStartedEvent
当使用 ConfigurableApplicationContext (ApplicationContext子接口)接口中的 start() 方法启动ApplicationContext 时,该事件被发布。你可以调查你的数据库,或者你可以在接受到这个事件后重启任何停止的应用程序
3、ContextStoppedEvent
当使用 ConfigurableApplicationContext 接口中的 stop() 停止 ApplicationContext 时,发布这个事件。你可以在接受到这个事件后做必要的清理的工作
4、ContextClosedEvent
当使用 ConfigurableApplicationContext 接口中的 close() 方法关闭 ApplicationContext 时,该事件被发布。一个已关闭的上下文到达生命周期末端;它不能被刷新或重启
5、RequestHandledEvent
这是一个 web-specific 事件,告诉所有 bean HTTP 请求已经被服务。只能应用于使用DispatcherServlet的Web应用。在使用Spring作为前端的MVC控制器时,当Spring处理用户请求结束后,系统会自动触发该事件
比较实用的场景:比如有一个超大全球性的电商平台,当我购买完产品之后需要通知用户我们准备发货了。正常思想是当支完成之后直接在支付的业务后面调用短信和邮箱的接口实现通知的业务,但是作为一个大的平台面向全球,那么通知的方式未来也可能有很多种方式,我们也不能在支付的业务后面调用太多的通知的接口,为了能够实现业务解耦合,我们可以定义一个支付成功的事件,时间发布成功之后可以通过监听获取,然后再进行多种形式的通知,这样既不影响原有的支付业务,而且代码的拓展能力也变强了。 这种发布订阅(的模式)和后续学习的mq的机制同理,当然这种业务也完全可以通过mq来实现。
ApplicationContextAware
接口可以获取Spring容器对象,可以获取容器中的Bean
@Component
public class PayService2 implements ApplicationContextAware {
	@Override
	public void setApplicationContext(ApplicationContext applicationContext) throws BeansException {
		// 初始化applicationContext对象
		this.applicationContext = applicationContext;
	}
}
InitializingBean
此接口的类拥有初始化Bean的功能
HandlerInterceptor
我们实现接口所创建的拦截器并不会自动生效
需要将自定义拦截器放入实现了 WebMvcConfigurer 接口的配置类中
WebMvcConfigurer
WebMvcConfigurer配置类其实是Spring内部的一种配置方式,采用JavaBean的形式来代替传统的xml配置文件形式进行针对框架个性化定制,可以自定义一些Handler,Interceptor,ViewResolver,MessageConverter。基于java-based方式的spring mvc配置,需要创建一个配置类并实现WebMvcConfigurer 接口;
在Spring Boot 1.5版本都是靠重写WebMvcConfigurerAdapter的方法来添加自定义拦截器,消息转换器等。SpringBoot 2.0 后,该类被标记为@Deprecated(弃用)。官方推荐直接实现WebMvcConfigurer或者直接继WebMvcConfigurationSupport。
其中必须掌握常用方法包括:
/* 拦截器配置 */
void addInterceptors(InterceptorRegistry var1);`在这里插入代码片`
/* 视图跳转控制器 */
void addViewControllers(ViewControllerRegistry registry);
/** *静态资源处理**/
void addResourceHandlers(ResourceHandlerRegistry registry);
/* 默认静态资源处理器 */
void configureDefaultServletHandling(DefaultServletHandlerConfigurer configurer);
/* 这里配置视图解析器 */
void configureViewResolvers(ViewResolverRegistry registry);
/* 配置内容裁决的一些选项*/
void configureContentNegotiation(ContentNegotiationConfigurer configurer);
/** 解决跨域问题 **/
void addCorsMappings(CorsRegistry registry) ;
addInterceptors
拦截器
- addInterceptor:需要一个实现HandlerInterceptor接口的拦截器实例
- addPathPatterns:用于设置拦截器的过滤路径规则; addPathPatterns(“/**”) 对所有请求都拦截
- excludePathPatterns:用于设置不需要拦截的过滤规则
- 拦截器主要用途:进行用户登录状态的拦截,日志的拦截等。
@Override
public void addInterceptors(InterceptorRegistry registry) {
	super.addInterceptors(registry);
	registry.addInterceptor(new
	TestInterceptor()).addPathPatterns("/**").excludePathPatterns("/emp/toLogin","/emp/login","/js/**","/css/**","/images/**");
}
addViewControllers
页面跳转
以前写SpringMVC的时候,如果需要访问一个页面,必须要写Controller类,然后再写一个方法跳转到页面,感觉好麻烦,其实重写WebMvcConfigurer中的addViewControllers方法即可达到效果了
@Override
public void addViewControllers(ViewControllerRegistry registry) {
	registry.addViewController("/toLogin").setViewName("login");
}
值的指出的是,在这里重写addViewControllers方法,并不会覆盖WebMvcAutoConfiguration(Springboot自动配置)中的addViewControllers(在此方法中,Spring Boot将“/”映射至index.html),这也就意味着自己的配置和Spring Boot的自动配置同时有效,这也是我们推荐添加自己的MVC配置的方式。
configureViewResolvers
视图解析器
这个方法是用来配置视图解析器的,该方法的参数ViewResolverRegistry 是一个注册器,用来注册你想自定义的视图解析器等。
/**
* 配置请求视图映射
* @return
*/
@Bean
public InternalResourceViewResolver resourceViewResolver(){
	InternalResourceViewResolver internalResourceViewResolver = new
	InternalResourceViewResolver();
	//请求视图文件的前缀地址
	internalResourceViewResolver.setPrefix("/WEB-INF/jsp/");
	//请求视图文件的后缀
	internalResourceViewResolver.setSuffix(".jsp");
	return internalResourceViewResolver;
}
/**
* 视图配置
* @param registry
*/
@Override
public void configureViewResolvers(ViewResolverRegistry registry) {
	super.configureViewResolvers(registry);
	registry.viewResolver(resourceViewResolver());
}
Swagger
接口文档对于前后端开发人员都十分重要。尤其近几年流行前后端分离后,接口文档又变成重中之重。接口文档固然重要,但是由于项目周期等原因,后端人员经常出现无法及时更新,导致前端人员抱怨接口文档和实际情况不一致。
很多人员会抱怨别人写的接口文档不规范,不及时更新。但是,当自己写的时候,确实最烦去写接口文档。这种痛苦只有亲身经历才会牢记于心。如果接口文档可以实时动态生成就不会出现上面问题。
Swagger可以完美的解决上面的问题。
优点
自动生成文档,只需要在接口中使用注解进行标注,就能生成对应的接口文档。
自动更新文档,由于是动态生成的,所以如果你修改了接口,文档也会自动对应修改(如果你也更新了注解的话)。这样就不会出现我修改了接口,却忘记更新接口文档的情况。支持在线调试,swagger提供了在线调用接口的功能。
缺点
不能创建测试用例,所以他暂时不能帮你处理完所有的事情。他只能提供一个简单的在线调试,如果你想存储你的测试用例,可以使用Postman或者YAPI这样支持创建测试用户的功能。
要遵循一些规范,它不是任意规范的。比如说,你可能会返回一个json数据,而这个数据可能是一个Map格式的,那么我们此时不能标注这个Map格式的返回数据的每个字段的说明,而如果它是一个实体类的话,我们可以通过标注类的属性来给返回字段加说明。也比如说,对于swagger,不推荐在使用GET方式提交数据的时候还使用Body,仅推荐使用query参数、header参数或者路径参数,当然了这个限制只适用于在线调试。没有接口文档更新管理,虽然一个接口更新之后,可能不会关心旧版的接口信息,但你“可能”想看看旧版的接口信息,例如有些灰度更新发布的时候可能还会关心旧版的接口。那么此时只能由后端去看看有没有注释留下了,所以可以考虑接口文档大更新的时候注释旧版的,然后写下新版的。
整合swagger
依赖
<!--swagger依赖-->
	<dependency>
		<groupId>io.springfox</groupId>
		<artifactId>springfox-swagger2</artifactId>
		<version>2.9.2</version>
	</dependency>
	<dependency>
		<groupId>io.springfox</groupId>
		<artifactId>springfox-swagger-ui</artifactId>
		<version>2.9.2</version>
	</dependency>
要使用swagger,我们必须对swagger进行配置,我们需要创建一个swagger的配置类,比如可以命名为SwaggerConfig.java
package com.its.swagger.config;
import org.springframework.context.annotation.Bean;
import org.springframework.context.annotation.Configuration;
import springfox.documentation.builders.ApiInfoBuilder;
import springfox.documentation.builders.PathSelectors;
import springfox.documentation.builders.RequestHandlerSelectors;
import springfox.documentation.service.ApiInfo;
import springfox.documentation.service.Contact;
import springfox.documentation.spi.DocumentationType;
import springfox.documentation.spring.web.plugins.Docket;
import springfox.documentation.swagger2.annotations.EnableSwagger2;
/*
* 用于配置SwaggerApi
* */
//开启Swagger使用(项目注释文档)
@EnableSwagger2
//标明是配置类
@Configuration
public class SwaggerConfig {
	@Bean
	public Docket createRestApi() {
	return new Docket(DocumentationType.SWAGGER_2)
		//用于生成API信息
		.apiInfo(apiInfo())
		//select()函数返回一个ApiSelectorBuilder实例,用来控制接口被swagger做成文档
		.select()
		//用于指定扫描哪个包下的接口
		.apis(RequestHandlerSelectors.basePackage("com.its.controller"))
		//选择所有的API,如果你想只为部分API生成文档,可以配置这里
		.paths(PathSelectors.any())
		.build();
	}
	/*
	*用于定义API主界面的信息,比如可以声明所有的API的总标题、描述、版本
	*/
	private ApiInfo apiInfo() {
	return new ApiInfoBuilder()
		//用来自定义API的标题
		.title("SpringBoot项目SwaggerAPI")
		//用来描述整体的API
		.description("SpringBoot项目SwaggerAPI描述测试")
		//创建人信息
		.contact(new Contact("sunwz","http://localhost:8080/swaggerui.html","xxxxxxxx@163.com"))
		//用于定义服务的域名
		//.termsOfServiceUrl("")
		.version("1.0") //可以用来定义版本
		.build();
	}
}
配置文件添加(SpringBoot2.5以上都需要添加)
spring:
	mvc:
		pathmatch:
			matching-strategy: ant_path_matcher
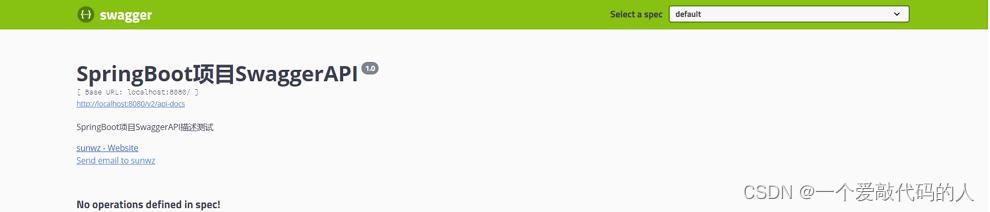
运行我们的Spring Boot项目,(我默认是8080端口,如果你不一样,请注意修改后续的url),
访问http://localhost:8080/swagger-ui.html然后你就可以看到一个如下的界面,由于我们暂时没有配置接口数据,所以下面显示No operations definedin spec!
定义接口组
使用了 @Api 来标注一个Controller之后,如果下面有接口,那么就会默认生成文档,但没有我们自定义的说明:
package com.its.swagger.controller;
import io.swagger.annotations.Api;
import org.springframework.web.bind.annotation.GetMapping;
import org.springframework.web.bind.annotation.RestController;
@Api(tags = "用户管理")
@RestController
public class UserController {
	// 注意,对于swagger,不要使用@RequestMapping,
	// 因为@RequestMapping支持任意请求方式,swagger会为这个接口生成7种请求方式的接口文档
	@GetMapping("/info")
	public String info(String id){
		return "aaa";
	}
}
package com.its.swagger.controller;
import io.swagger.annotations.Api;
import org.springframework.web.bind.annotation.PostMapping;
import org.springframework.web.bind.annotation.RestController;
@Api(tags = "角色管理") // tags:你可以当作是这个组的名字。
@RestController
public class RoleController {
	@PostMapping("/ww")
	public boolean ww(){
		return false;
	}
}
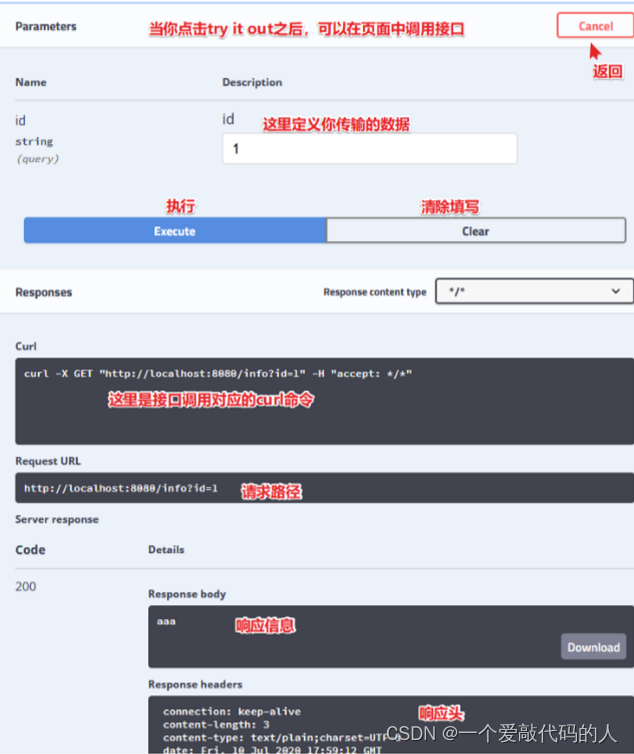
重启查看UI视图
 视图解析
视图解析
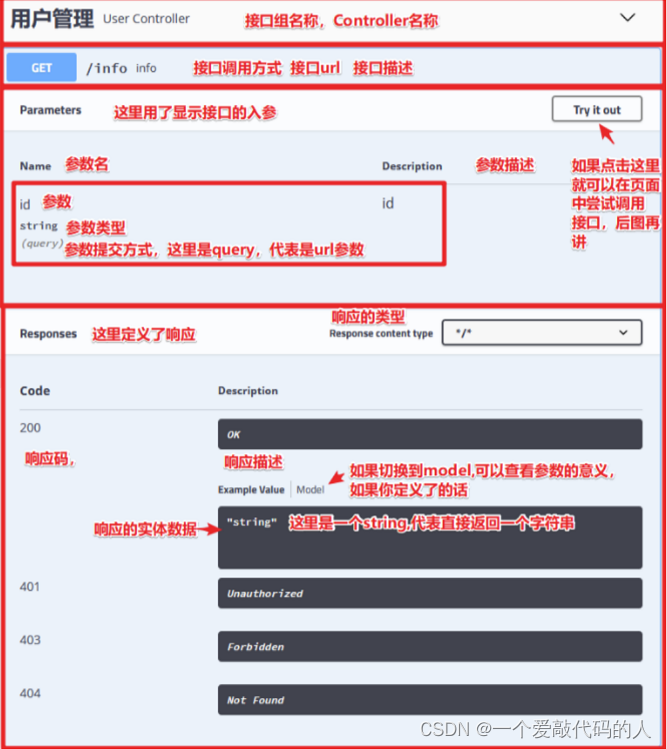
我们可以使用 @ApiOperation 来描述接口,比如:
@ApiOperation(value = "用户测试",notes = "用户测试notes")
@GetMapping("/test")
public String test(String id){
	return "test";
}
定义接口请求参数
上面使用了@ApiOperation来了描述接口,但其实还缺少接口请求参数的说明,下面我们分场景来讲。注意一下,对于GET方式,swagger不推荐使用body方式来传递数据,也就是不希望在GET方式时使用json、form-data等方式来传递,这时候最好使用路径参数或者url参数。(虽然POSTMAN等是支持的),所以如果接口传递的数据是json或者form-data方式的,还是使用POST方式好。
请求参数是实体类
此时我们需要使用 @ApiModel 来标注实体类,然后在接口中定义入参为实体类即可:
@ApiModel:用来标类
常用配置项:
1. value:实体类简称
2. description:实体类说明
@ApiModelProperty:用来描述类的字段的意义。
常用配置项:
1. value:字段说明
2. example:设置请求示例(Example Value)的默认值,如果不配置,当字段为string的时候,此时请求示例中默认值为"".
3. name:用新的字段名来替代旧的字段名。
4. allowableValues:限制值得范围,例如{1,2,3}代表只能取这三个值;[1,5]代表取1到5的值;(1,5)代表1到5的值,不包括1和5;还可以使用infinity或-infinity来无限值,比如[1, infinity]代表最小值为1,最大值无穷大。
public class Filter {
	@ApiModelProperty(allowableValues = "range[1,5]")
	Integer order
	@ApiModelProperty(allowableValues = "111, 222")
	String code;
}
- required:标记字段是否必填,默认是false,
- hidden:用来隐藏字段,默认是false,如果要隐藏需要使用true,因为字段默认都会显示,就算没有@ApiModelProperty。
package com.its.swagger.pojo;
import io.swagger.annotations.ApiModel;
import io.swagger.annotations.ApiModelProperty;
import lombok.Data;
// 先使用@ApiModel来标注类
@ApiModel(value="用户登录表单对象",description="用户登录表单对象")
@Data //getter,setter,swagger也需要这个
public class LoginForm {
	// 使用ApiModelProperty来标注字段属性。
	@ApiModelProperty(value = "用户名",required = true,example = "root")
	private String username;
	@ApiModelProperty(value = "密码",required = true,example = "123456")
	private String password;
}
定义成入参:
@ApiOperation(value = "登录接口",notes = "登录接口的说明")
@PostMapping("/login")
public LoginForm login(@RequestBody LoginForm loginForm){
	return loginForm;
}

请求参数是非实体类
声明入参是URL参数
再说一次:对于GET方式,swagger不推荐使用body方式来传递数据,所以虽然Spring MVC可以自动封装参数,但对于GET请求还是不要使用form-data,json等方式传递参数,除非你使用Postman来测试接口,swagger在线测试是不支持这个操作的。
对于非实体类参数,可以使用@ApiImplicitParams和@ApiImplicitParam来声明请求参数。
@ApiImplicitParams用在方法头上,@ApiImplicitParam定义在@ApiImplicitParams里面,一个
@ApiImplicitParam对应一个参数。
@ApiImplicitParam常用配置项:
- name:用来定义参数的名字,也就是字段的名字,可以与接口的入参名对应。如果不对应,也会生成,所以可以用来定义额外参数!
- value:用来描述参数
- required:用来标注参数是否必填
- paramType有path,query,body,form,header等方式,但对于对于非实体类参数的时候,常用的只有
path,query,header;body和form是不常用的。body不适用于多个零散参数的情况,只适用于json对象等情况。【如果你的接口是form-data,x-www-form-urlencoded的时候可能不能使用swagger页面API调试,但可以在后面讲到基于BootstrapUI的swagger增强中调试,基于BootstrapUI的swagger支持指定form-data或x-www-form-urlencoded】
// 使用URL query参数
@ApiOperation(value = "登录接口2",notes = "登录接口的说明2")
@ApiImplicitParams({
	@ApiImplicitParam(
		name = "username",//参数名字
		value = "用户名",//参数的描述
		required = true,//是否必须传入
		//paramType定义参数传递类型:有path,query,body,form,header
		paramType = "query"
	),
	@ApiImplicitParam(
		name = "password",//参数名字
		value = "密码",//参数的描述
		required = true,//是否必须传入
		paramType = "query"
	)
})
@PostMapping(value = "/login2")
public LoginForm login2(String username,String password){
	System.out.println(username+":"+password);
	LoginForm loginForm = new LoginForm();
	loginForm.setUsername(username);
	loginForm.setPassword(password);
	return loginForm;
}
声明入参是URL路径参数
// 使用路径参数
@PostMapping("/login3/{id1}/{id2}")
@ApiOperation(value = "登录接口3",notes = "登录接口的说明3")
@ApiImplicitParams({
	@ApiImplicitParam(
		name = "id1",//参数名字
		value = "用户名",//参数的描述
		required = true,//是否必须传入
		//paramType定义参数传递类型:有path,query,body,form,header
		paramType = "path"
	),
	@ApiImplicitParam(
		name = "id2",//参数名字
		value = "密码",//参数的描述
		required = true,//是否必须传入
		paramType = "path"
	)
})
public String login3(@PathVariable Integer id1,@PathVariable Integer id2){
	return id1+":"+id2;
}
声明入参是header参数
// 用header传递参数
@PostMapping("/login4")
@ApiOperation(value = "登录接口4",notes = "登录接口的说明4")
@ApiImplicitParams({
	@ApiImplicitParam(
		name = "username",//参数名字
		value = "用户名",//参数的描述
		required = true,//是否必须传入
		//paramType定义参数传递类型:有path,query,body,form,header
		paramType = "header"
	),
	@ApiImplicitParam(
		name = "password",//参数名字
		value = "密码",//参数的描述
		required = true,//是否必须传入
		paramType = "header"
	)
})
public String login4(
					@RequestHeader String username,
					@RequestHeader String password){
	return username+":"+password;
}
声明文件上传参数
// 有文件上传时要用@ApiParam,用法基本与@ApiImplicitParam一样,不过@ApiParam用在参数上
// 或者你也可以不注解,swagger会自动生成说明
@ApiOperation(value = "上传文件",notes = "上传文件")
@PostMapping(value = "/upload")
public String upload(@ApiParam(value = "图片文件", required = true)MultipartFileuploadFile){
	String originalFilename = uploadFile.getOriginalFilename();
	return originalFilename;
}
// 多个文件上传时,**swagger只能测试单文件上传**
@ApiOperation(value = "上传多个文件",notes = "上传多个文件")
@PostMapping(value = "/upload2",consumes = "multipart/*", headers = "contenttype=multipart/form-data")
public String upload2(@ApiParam(value = "图片文件", required = true,allowMultipletrue)MultipartFile[] uploadFile){
	StringBuffer sb = new StringBuffer();
	for (int i = 0; i < uploadFile.length; i++) {
		System.out.println(uploadFile[i].getOriginalFilename());
		sb.append(uploadFile[i].getOriginalFilename());
		sb.append(",");
	}
	return sb.toString();
}
// 既有文件,又有参数
@ApiOperation(value = "既有文件,又有参数",notes = "既有文件,又有参数")
@PostMapping(value = "/upload3")
@ApiImplicitParams({
	@ApiImplicitParam(
		name = "name",
		value = "图片新名字",
		required = true
	)
})
public String upload3(@ApiParam(value = "图片文件", required = true)MultipartFileuploadFile,String name){
	String originalFilename = uploadFile.getOriginalFilename();
	return originalFilename+":"+name;
}
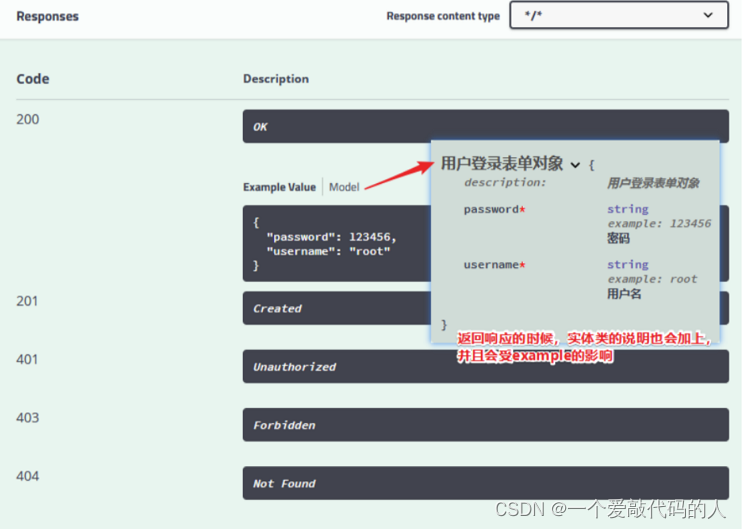
定义接口响应
定义接口响应,是方便查看接口文档的人能够知道接口返回的数据的意义。
响应是实体类
前面在定义接口请求参数的时候有提到使用 @ApiModel 来标注类,如果接口返回了这个类,那么这个类上的说明也会作为响应的说明:
// 返回被@ApiModel标注的类对象
@ApiOperation(value = "实体类响应",notes = "返回数据为实体类的接口")
@PostMapping("/role1")
public LoginForm role1(@RequestBody LoginForm loginForm){
	return loginForm;
}
响应是非实体类
swagger无法对非实体类的响应进行详细说明,只能标注响应码等信息。是通过 @ApiResponses 和@ApiResponse 来实现的。@ApiResponses 和 @ApiResponse 可以与 @ApiModel 一起使用。
// 其他类型的,此时不能增加字段注释,所以其实swagger推荐使用实体类
@ApiOperation(value = "非实体类",notes = "非实体类")
@ApiResponses({
@ApiResponse(code=200,message = "调用成功"),
@ApiResponse(code=401,message = "无权限" )
})
@PostMapping("/role2")
public String role2(){
	return " {\n" +
			" name:\"广东\",\n" +
			" citys:{\n" +
					" city:[\"广州\",\"深圳\",\"珠海\"]\n" +
			" }\n" +
			" }";
	}

Swagger UI增强
你可能会觉得现在这个UI不是很好看,现在有一些第三方提供了一些Swagger UI增强,比较流行的是swagger-bootstrap-ui
<!-- 引入swagger-bootstrap-ui依赖包-->
<dependency>
	<groupId>com.github.xiaoymin</groupId>
	<artifactId>swagger-bootstrap-ui</artifactId>
	<version>1.9.6</version>
</dependency>
在swagger配置类中增加注解 @EnableSwaggerBootstrapUI
@Configuration // 标明是配置类
@EnableSwagger2 //开启swagger功能
@EnableSwaggerBootstrapUI // 开启SwaggerBootstrapUI
public class SwaggerConfig {
// 省略配置内容
}
访问API: http://localhost:8080/doc.html ,即可预览到基于bootstarp的Swagger UI界面。
@Configuration和@Component
句话概括就是 @Configuration 中所有带 @Bean 注解的方法都会被动态代理,因此调用该方法返回的都是同一个实例。
理解:调用@Configuration类中的@Bean注解的方法,返回的是同一个示例;而调用@Component类中的@Bean注解的方法,返回的是一个新的实例。


 6827
6827


 被折叠的 条评论
为什么被折叠?
被折叠的 条评论
为什么被折叠?
 到【灌水乐园】发言


