一. 背景
Pytest目前已经成为Python系自动化测试必学必备的一个框架,网上也有很多的文章讲述相关的知识。最近自己也抽时间梳理了一份pytest接口自动化测试框架,因此准备写文章记录一下,做到尽量简单通俗易懂,当然前提是基本的python基础已经掌握了。如果能够对新学习这个框架的同学起到一些帮助,那就更好了~
二. 基础环境
语言:python 3.8
编译器:pycharm
基础:具备python编程基础
框架:pytest+requests+allure
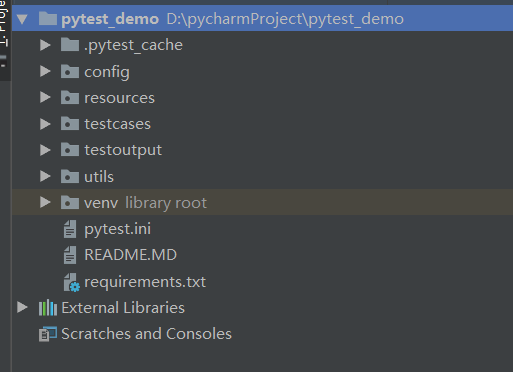
三. 项目结构
项目结构图如下:
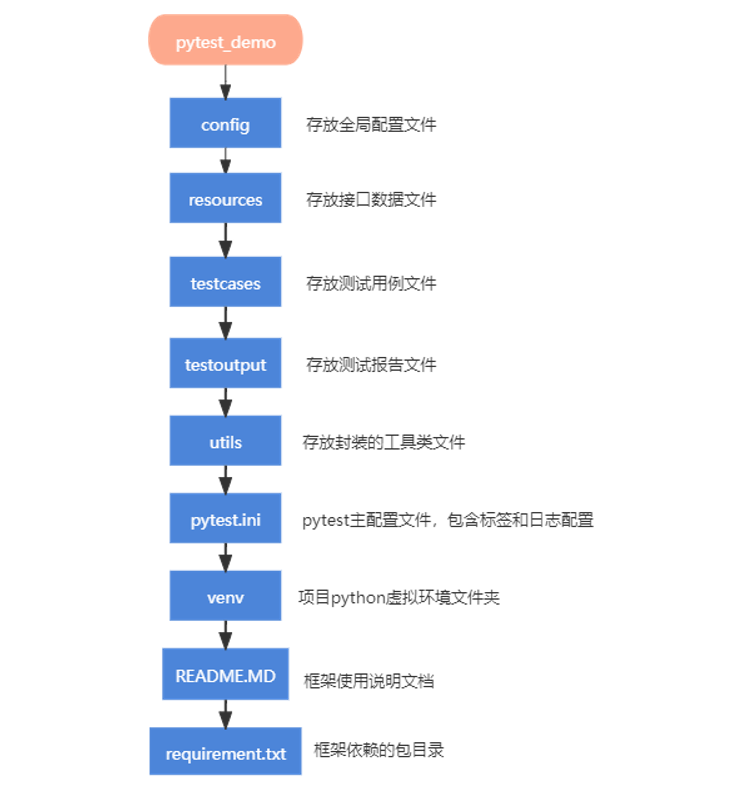
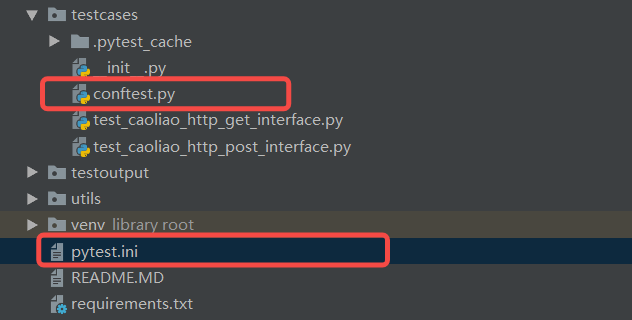
每一层具体的含义如下图:
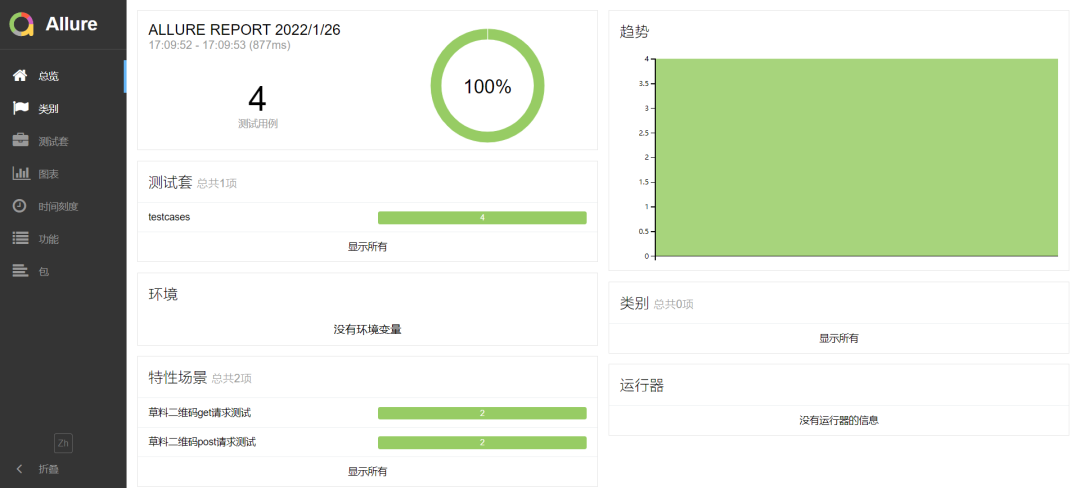
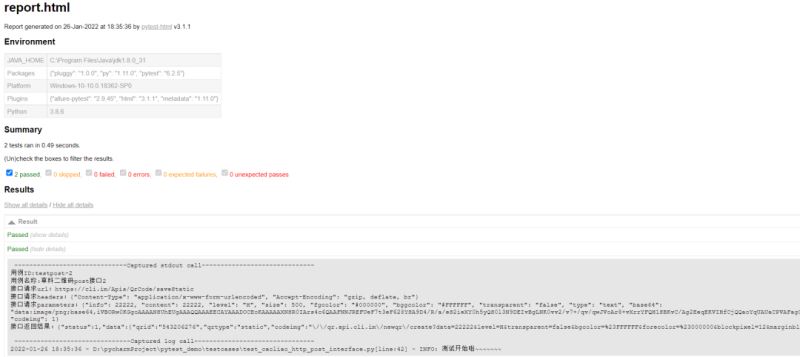
测试报告如下图:
四、框架解析
4.1 接口数据文件处理

框架中使用草料二维码的get和post接口用于demo测试,比如:
get接口:https://cli.im/qrcode/getDefaultComponentMsg
返回值:{“code”:1,“msg”:"",“data”:{xxxxx}}
数据文件这里选择使用Json格式,文件内容格式如下,test_http_get_data.json:
| 1 2 3 4 5 6 7 8 9 10 11 12 13 14 15 16 17 18 19 20 21 22 23 24 25 26 27 28 | {
"dataItem": [
{
"id": "testget-1",
"name": "草料二维码get接口1",
"headers":{
"Accept-Encoding":"gzip, deflate, br"
},
"url":"/qrcode/getDefaultComponentMsg",
"method":"get",
"expectdata": {
"code": "1"
}
},
{
"id": "testget-2",
"name": "草料二维码get接口2",
"headers":{},
"url":"/qrcode/getDefaultComponentMsg",
"method":"get",
"expectdata": {
"code": "1"
}
}
]
}
|
表示dataitem下有两条case,每条case里面声明了id, name, header, url, method, expectdata。如果是post请求的话,case中会多一个parameters表示入参,如下:
| 1 2 3 4 5 6 7 8 9 10 11 12 13 14 15 16 17 18 19 20 21 22 23 24 | {
"id":"testpost-1",
"name":"草料二维码post接口1",
"url":"/Apis/QrCode/saveStatic",
"headers":{
"Content-Type":"application/x-www-form-urlencoded",
"Accept-Encoding":"gzip, deflate, br"
},
"parameters":{
"info":11111,
"content":11111,
"level":"H",
"size":500,
"fgcolor":"#000000",
"bggcolor":"#FFFFFF",
"transparent":"false",
"type":"text",
"codeimg":1
},
"expectdata":{
"status":"1",
"qrtype":"static"
}
}
|
为了方便一套脚本用于不同的环境运行,不用换了环境后挨个儿去改数据文件,比如
测试环境URL为:https://testcli.im/qrcode/getDefaultComponentMsg
生产环境URL为:https://cli.im/qrcode/getDefaultComponentMsg
因此数据文件中url只填写后半段,不填域名。然后config》global_config.py下设置全局变量来定义域名:
| 1 2 3 | # 配置HTTP接口的域名,方便一套脚本用于多套环境运行时,只需要改这里的全局配置就OK
CAOLIAO_HTTP_POST_HOST = "https://cli.im"
CAOLIAO_HTTP_GET_HOST = "https://nc.cli.im"
|
utils文件夹下,创建工具类文件:read_jsonfile_utils.py, 用于读取json文件内容:
| 1 2 3 4 5 6 7 8 9 10 11 12 13 14 15 16 17 18 19 20 21 22 23 24 25 26 27 28 | import json
import os
class ReadJsonFileUtils:
def __init__(self, file_name):
self.file_name = file_name
self.data = self.get_data()
def get_data(self):
fp = open(self.file_name,encoding='utf-8')
data = json.load(fp)
fp.close()
return data
def get_value(self, id):
return self.data[id]
@staticmethod
def get_data_path(folder, fileName):
BASE_PATH = os.path.dirname(os.path.dirname(os.path.realpath(__file__)))
data_file_path = os.path.join(BASE_PATH, folder, fileName)
return data_file_path
if __name__ == '__main__':
opers = ReadJsonFileUtils("..\\resources\\test_http_post_data.json")
#读取文件中的dataItem,是一个list列表,list列表中包含多个字典
dataitem=opers.get_value('dataItem')
print(dataitem)
|
运行结果如下:

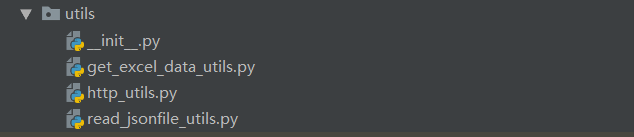
4.2 封装测试工具类
utils文件夹下,除了上面提到的读取Json文件工具类:read_jsonfile_utils.py,还有封装request 请求的工具类:http_utils.py
从Excel文件中读取数据的工具类:get_excel_data_utils.py(虽然本次框架中暂时未采用存放接口数据到Excel中,但也写了个工具类,需要的时候可以用)
http_utils.py内容:
| 1 2 3 4 5 6 7 8 9 10 11 12 13 14 15 16 17 18 19 20 21 22 23 24 25 26 27 | import requests
import json
class HttpUtils:
@staticmethod
def http_post(headers, url, parameters):
print("接口请求url:" + url)
print("接口请求headers:" + json.dumps(headers))
print("接口请求parameters:" + json.dumps(parameters))
res = requests.post(url, data=parameters, headers=headers)
print("接口返回结果:"+res.text)
if res.status_code != 200:
raise Exception(u"请求异常")
result = json.loads(res.text)
return result
@staticmethod
def http_get(headers, url):
req_headers = json.dumps(headers)
print("接口请求url:" + url)
print("接口请求headers:" + req_headers)
res = requests.get(url, headers=headers)
print("接口返回结果:" + res.text)
if res.status_code != 200:
raise Exception(u"请求异常")
result = json.loads(res.text)
return result
|
get_excel_data_utils.py内容:
| 1 2 3 4 5 6 7 8 9 10 11 12 13 14 15 16 17 18 19 20 21 22 23 24 25 26 27 28 29 30 31 32 33 34 35 36 37 38 39 40 41 42 43 44 45 46 47 48 49 50 51 52 53 54 55 56 57 58 59 60 61 62 63 64 | import xlrd
from xlrd import xldate_as_tuple
import datetime
class ExcelData(object):
'''
xlrd中单元格的数据类型
数字一律按浮点型输出,日期输出成一串小数,布尔型输出0或1,所以我们必须在程序中做判断处理转换
成我们想要的数据类型
0 empty,1 string, 2 number, 3 date, 4 boolean, 5 error
'''
def __init__(self, data_path, sheetname="Sheet1"):
#定义一个属性接收文件路径
self.data_path = data_path
# 定义一个属性接收工作表名称
self.sheetname = sheetname
# 使用xlrd模块打开excel表读取数据
self.data = xlrd.open_workbook(self.data_path)
# 根据工作表的名称获取工作表中的内容
self.table = self.data.sheet_by_name(self.sheetname)
# 根据工作表的索引获取工作表的内容
# self.table = self.data.sheet_by_name(0)
# 获取第一行所有内容,如果括号中1就是第二行,这点跟列表索引类似
self.keys = self.table.row_values(0)
# 获取工作表的有效行数
self.rowNum = self.table.nrows
# 获取工作表的有效列数
self.colNum = self.table.ncols
# 定义一个读取excel表的方法
def readExcel(self):
# 定义一个空列表
datas = []
for i in range(1, self.rowNum):
# 定义一个空字典
sheet_data = {}
for j in range(self.colNum):
# 获取单元格数据类型
c_type = self.table.cell(i,j).ctype
# 获取单元格数据
c_cell = self.table.cell_value(i, j)
if c_type == 2 and c_cell % 1 == 0: # 如果是整形
c_cell = int(c_cell)
elif c_type == 3:
# 转成datetime对象
date = datetime.datetime(*xldate_as_tuple(c_cell, 0))
c_cell = date.strftime('%Y/%d/%m %H:%M:%S')
elif c_type == 4:
c_cell = True if c_cell == 1 else False
sheet_data[self.keys[j]] = c_cell
# 循环每一个有效的单元格,将字段与值对应存储到字典中
# 字典的key就是excel表中每列第一行的字段
# sheet_data[self.keys[j]] = self.table.row_values(i)[j]
# 再将字典追加到列表中
datas.append(sheet_data)
# 返回从excel中获取到的数据:以列表存字典的形式返回
return datas
if __name__ == "__main__":
data_path = "..\\resources\\test_http_data.xls"
sheetname = "Sheet1"
get_data = ExcelData(data_path, sheetname)
datas = get_data.readExcel()
print(datas)
|
4.3 测试用例代码编写
testcases文件夹下编写测试用例:
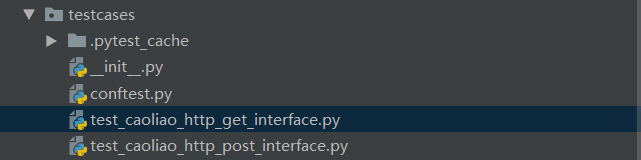
test_caoliao_http_get_interface.py内容:
| 1 2 3 4 5 6 7 8 9 10 11 12 13 14 15 16 17 18 19 20 21 22 23 24 25 26 27 28 29 30 31 32 33 | import logging
import allure
import pytest
from utils.http_utils import HttpUtils
from utils.read_jsonfile_utils import ReadJsonFileUtils
from config.global_config import CAOLIAO_HTTP_GET_HOST
@pytest.mark.httptest
@allure.feature("草料二维码get请求测试")
class TestHttpInterface:
# 获取文件相对路径
data_file_path = ReadJsonFileUtils.get_data_path("resources", "test_http_get_data.json")
# 读取测试数据文件
param_data = ReadJsonFileUtils(data_file_path)
data_item = param_data.get_value('dataItem') # 是一个list列表,list列表中包含多个字典
"""
@pytest.mark.parametrize是数据驱动;
data_item列表中有几个字典,就运行几次case
ids是用于自定义用例的名称
"""
@pytest.mark.parametrize("args", data_item, ids=['测试草料二维码get接口1', '测试草料二维码get接口2'])
def test_caoliao_get_demo(self, args, login_test):
# 打印用例ID和名称到报告中显示
print("用例ID:{}".format(args['id']))
print("用例名称:{}".format(args['name']))
print("测试conftest传值:{}".format(login_test))
logging.info("测试开始啦~~~~~~~")
res = HttpUtils.http_get(args['headers'], CAOLIAO_HTTP_GET_HOST+args['url'])
# assert断言,判断接口是否返回期望的结果数据
assert str(res.get('code')) == str(args['expectdata']['code']), "接口返回status值不等于预期"
|
test_caoliao_http_post_interface.py内容:
| 1 2 3 4 5 6 7 8 9 10 11 12 13 14 15 16 17 18 19 20 21 22 23 24 25 26 27 28 29 30 31 32 33 | import pytest
import logging
import allure
from utils.http_utils import HttpUtils
from utils.read_jsonfile_utils import ReadJsonFileUtils
from config.global_config import CAOLIAO_HTTP_POST_HOST
# pytest.ini文件中要添加markers = httptest,不然会有warning,说这个Mark有问题
@pytest.mark.httptest
@allure.feature("草料二维码post请求测试")
class TestHttpInterface:
# 获取文件相对路径
data_file_path = ReadJsonFileUtils.get_data_path("resources", "test_http_post_data.json")
# 读取测试数据文件
param_data = ReadJsonFileUtils(data_file_path)
data_item = param_data.get_value('dataItem') #是一个list列表,list列表中包含多个字典
"""
@pytest.mark.parametrize是数据驱动;
data_item列表中有几个字典,就运行几次case
ids是用于自定义用例的名称
"""
@pytest.mark.parametrize("args", data_item, ids=['测试草料二维码post接口1','测试草料二维码post接口2'])
def test_caoliao_post_demo(self, args):
# 打印用例ID和名称到报告中显示
print("用例ID:{}".format(args['id']))
print("用例名称:{}".format(args['name']))
logging.info("测试开始啦~~~~~~~")
res = HttpUtils.http_post(args['headers'], CAOLIAO_HTTP_POST_HOST+args['url'], args['parameters'])
# assert断言,判断接口是否返回期望的结果数据
assert str(res.get('status')) == str(args['expectdata']['status']), "接口返回status值不等于预期"
assert str(res.get('data').get('qrtype')) == str(args['expectdata']['qrtype']), "接口返回qrtype值不等于预期"
|
企业中的系统接口,通常都有认证,需要先登录获取token,后续接口调用时都需要认证token。因此框架需要能处理在运行用例前置和后置做一些动作,所以这里用到了conftest.py文件,内容如下:
| 1 2 3 4 5 6 7 8 9 10 11 12 13 14 15 16 17 18 19 20 21 22 23 24 25 26 27 28 29 30 31 32 33 34 35 36 37 38 39 40 41 42 43 44 45 46 47 | import logging
import traceback
import pytest
import requests
"""
如果用例执行前需要先登录获取token值,就要用到conftest.py文件了
作用:conftest.py 配置里可以实现数据共享,不需要import导入 conftest.py,pytest用例会自动查找
scope参数为session,那么所有的测试文件执行前执行一次
scope参数为module,那么每一个测试文件执行前都会执行一次conftest文件中的fixture
scope参数为class,那么每一个测试文件中的测试类执行前都会执行一次conftest文件中的fixture
scope参数为function,那么所有文件的测试用例执行前都会执行一次conftest文件中的fixture
"""
# 获取到登录请求返回的ticket值,@pytest.fixture装饰后,testcase文件中直接使用函数名"login_ticket"即可得到ticket值
@pytest.fixture(scope="session")
def login_ticket():
header = {
'Content-Type': 'application/x-www-form-urlencoded; charset=UTF-8'
}
params = {
"loginId": "username",
"pwd": "password",
}
url = 'http://testxxxxx.xx.com/doLogin'
logging.info('开始调用登录接口:{}'.format(url))
res = requests.post(url, data=params, headers=header, verify=False) # verify:忽略https的认证
try:
ticket = res.headers['Set-Cookie']
except Exception as ex:
logging.error('登录失败!接口返回:{}'.format(res.text))
traceback.print_tb(ex)
logging.info('登录成功,ticket值为:{}'.format(ticket))
return ticket
#测试一下conftest.py文件和fixture的作用
@pytest.fixture(scope="session")
def login_test():
print("运行用例前先登录!")
# 使用yield关键字实现后置操作,如果上面的前置操作要返回值,在yield后面加上要返回的值
# 也就是yield既可以实现后置,又可以起到return返回值的作用
yield "runBeforeTestCase"
print("运行用例后退出登录!")
|
由于用例中用到了@pytest.mark.httptest给用例打标,因此需要创建pytest.ini文件,并在里面添加markers = httptest,不然会有warning,说这个Mark有问题。并且用例中用到的日志打印logging模板也需要在pytest.ini文件中增加日志配置。pytest.ini文件内容如下:
| 1 2 3 4 5 6 7 8 9 10 11 | [pytest]
markers =
httptest: run http interface test
dubbotest: run dubbo interface test
log_cli = true
log_cli_level = INFO
log_cli_format = %(asctime)s - %(pathname)s[line:%(lineno)d] - %(levelname)s: %(message)s
log_cli_date_format=%Y-%m-%d %H:%M:%S
log_format = %(asctime)s - %(pathname)s[line:%(lineno)d] - %(levelname)4s: %(message)s
log_date_format=%Y-%m-%d %H:%M:%S
|
4.4 测试用例运行生成报告
运行方式:
Terminal窗口,进入到testcases目录下,执行命令:
运行某一条case:pytest test_caoliao_http_post_interface.py
运行所有case: pytest
运行指定标签的case:pytest -m httptest
运行并打印过程中的详细信息:pytest -s test_caoliao_http_post_interface.py
运行并生成pytest-html报告:pytest test_caoliao_http_post_interface.py --html=../testoutput/report.html
运行并生成allure测试报告:
1. 先清除掉testoutput/result文件夹下的所有文件
2. 运行case,生成allure文件:pytest --alluredir ../testoutput/result
3. 根据文件生成allure报告:allure generate ../testoutput/result/ -o ../testoutput/report/ --clean
4. 如果不是在pycharm中打开,而是直接到report目录下打开index.html文件打开的报告无法展示数据,需要双击generateAllureReport.bat生成allure报告;
pytest-html报告:
generateAllureReport.bat文件位置:
文件内容:
Allure报告:

框架中用到的一些细节知识点和问题,如:
conftest.py和@pytest.fixture()结合使用
pytest中使用logging打印日志
python中获取文件相对路径的方式
python虚拟环境
pytest框架下Allure的使用
我会在后续写文章再介绍。另外框架同样适用于dubbo接口的自动化测试,只需要添加python调用dubbo的工具类即可,后续也会写文章专门介绍。
现在我也找了很多测试的朋友,做了一个分享技术的交流群,共享了很多我们收集的技术文档和视频教程。
如果你不想再体验自学时找不到资源,没人解答问题,坚持几天便放弃的感受
可以加入我们一起交流。而且还有很多在自动化,性能,安全,测试开发等等方面有一定建树的技术大牛
分享他们的经验,还会分享很多直播讲座和技术沙龙
可以免费学习!划重点!开源的!!!
qq群号:485187702【暗号:csdn11】
最后感谢每一个认真阅读我文章的人,看着粉丝一路的上涨和关注,礼尚往来总是要有的,虽然不是什么很值钱的东西,如果你用得到的话可以直接拿走! 希望能帮助到你!【100%无套路免费领取】


 220
220

 被折叠的 条评论
为什么被折叠?
被折叠的 条评论
为什么被折叠?
 到【灌水乐园】发言


