


一多设置典型页面
介绍
本示例展示了设置应用的典型页面,其在小窗口和大窗口有不同的显示效果,体现一次开发、多端部署的能力。
- 本示例使用[一次开发多端部署]中介绍的自适应布局能力和响应式布局能力进行多设备(或多窗口尺寸)适配,保证应用在不同设备或不同窗口尺寸下可以正常显示。
- 本示例使用[Navigation组件],实现小窗口单栏显示、大窗口双栏显示的效果。
- 开发前请熟悉鸿蒙开发指导文档:
gitee.com/li-shizhen-skin/harmony-os/blob/master/README.md点击或者复制转到。
效果预览
本示例在不同窗口尺寸下的显示效果。

本示例在开发板上的运行效果。
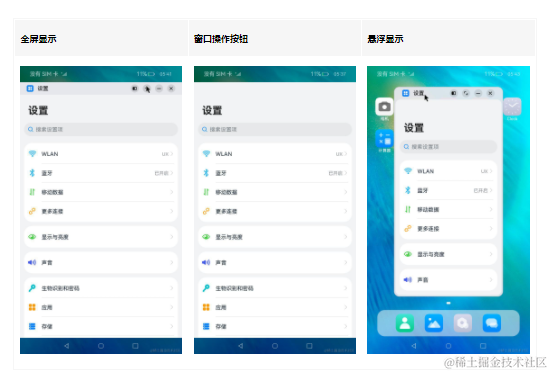
使用说明:
- 启动应用,查看应用在全屏状态下的显示效果。
- 依次点击
WLAN->更多WLAN设置,查看应用的显示效果。 - 依次点击
更多连接->NFC,查看应用的显示效果。 - 在应用顶部,下滑出现窗口操作按钮。(建议通过外接鼠标操作,接入鼠标只需要将鼠标移动至顶部即可出现窗口)
- 点击悬浮图标,将应用悬浮在桌面上显示。
- 拖动应用悬浮窗口改变窗口尺寸,触发应用显示刷新。改变窗口尺寸的过程中,窗口尺寸可能超出屏幕尺寸,此时在屏幕中只能看到应用部分区域的显示。可以通过移动窗口位置,查看应用其它区域的显示。
- 重复步骤2和3,查看应用在不同窗口尺寸下的显示效果。
工程目录
features/settingitems/src/main/ets/
|---settingList
|   |---settingList.ets                    // 设置页面
|---moreconnections
|   |---MoreConnectionsItem.ets            // 更多连接模块
|   |---Nfc.ets                            // nfc对象操作类
|---wlan
|   |---WlanMoreSetting.ets                // 更多网络设置模块
|   |---WlanSettingItem.ets                // 网络设置模块
|---components
|   |---ItemDescription.ets                // 每个单元组模块前的标题描述模块
|   |---ItemGroup.ets                      // 单元组模块
|   |---MainItem.ets                       // 主体框架模块
|   |---SearchBox.ets                      // 搜索框模块
|   |---SubItemArrow.ets                   // 下一步模块(箭头跳转组件)
|   |---SubItemToggle.ets                  // 状态按钮组件
|   |---SubItemWifi.ets                    // 子网络列表模块
|---products/default/src/main/ets/pages/
|   |---Index.ets                          // 首页
`HarmonyOS与OpenHarmony鸿蒙文档籽料:mau123789是v直接拿`
具体实现
本示例介绍如何实现不同断点下存在单栏和双栏设计的场景,主要有以下三方面:
实现单/双栏的显示效果
通过Navigation组件实现单/双栏展示,由Navbar(设置主页面)和Content(跳转子页面)两部分区域组成,Navigation组件支持Stack、Split以及Auto三种模式。
1、stack模式:导航栏与内容区独立显示,相当于多个页面。展示效果:从Navbar(设置主页面)跳转到Content1(WLAN页面)跳转到Content2(更多WLAN模式)。
2、Split模式:导航栏与内容区分两栏显示。展示效果:Navbar+Content1。
3、auto模式:Navigation组件可以根据应用窗口尺寸,自动选择合适的模式:窗口宽度小于520vp时,采用Stack模式显示;窗口宽度大于等于520vp时,采用Split模式显示。当窗口尺寸发生改变时,Navigation组件也会自动在Stack模式和Split模式之间切换。[源码参考]
/*

 * Copyright (c) 2022 Huawei Device Co., Ltd.

 * Licensed under the Apache License, Version 2.0 (the "License");

 * you may not use this file except in compliance with the License.

 * You may obtain a copy of the License at

 *

 *     http://www.apache.org/licenses/LICENSE-2.0

 *

 * Unless required by applicable law or agreed to in writing, software

 * distributed under the License is distributed on an "AS IS" BASIS,

 * WITHOUT WARRANTIES OR CONDITIONS OF ANY KIND, either express or implied.

 * See the License for the specific language governing permissions and

 * limitations under the License.

 */


import { SettingList } from '@ohos/settingItems'


let storage = LocalStorage.GetShared()


@Entry(storage)

@Component

struct Index {

  @LocalStorageProp('currentBreakpoint') curBp: string = 'sm'

  @LocalStorageProp('windowWidth') windowWidth: number = 300

  @LocalStorageProp('isSplitMode') isSplitMode: boolean = false

  @State itemTitle: string = ''


  aboutToAppear() {

    this.itemTitle = getContext().resourceManager.getStringSync($r('app.string.settings').id)

  }


  build() {

    Navigation() {

      SettingList()

    }

    .title(this.itemTitle)

    .mode(this.isSplitMode ? NavigationMode.Split : NavigationMode.Stack)

    .navBarWidth(0.4 * this.windowWidth)

    .hideToolBar(true)

    .width('100%')

    .height('100%')

    .backgroundColor($r("sys.color.ohos_id_color_sub_background"))

  }

}
实现点击跳转或刷新
Navigation组件通常搭配NavRouter组件以及NavDestination组件一起使用:
- NavRouter组件用于控制Navigation组件Content区域的显示和刷新逻辑:其必须包含两个孩子节点。
1、容器类组件-直接控制NavRouter的显示效果。
2、NavDestination组件:刷新Navigation组件Content区域的显示。
3、NavRouter组件通过onStateChange回调事件,用于通知开发者NavRouter的状态:用户点击NavRouter,激活NavRouter并加载对应的NavDestination子组件时,回调onStateChange(true);
4、NavRouter对应的NavDestination子组件不再显示时,回调onStateChange(false)。 - NavDestination组件用于实际刷新Navigation组件Content区域的显示。
- 例如:在本示例中wlan功能项为NavRouter的第一个孩子节点,跳转的子页面WLAN为NavRouter的第二个孩子节点,[源码参考]。
/**

 * Copyright (c) 2021-2023 Huawei Device Co., Ltd.

 * Licensed under the Apache License, Version 2.0 (the "License");

 * you may not use this file except in compliance with the License.

 * You may obtain a copy of the License at

 *

 *     http://www.apache.org/licenses/LICENSE-2.0

 *

 * Unless required by applicable law or agreed to in writing, software

 * distributed under the License is distributed on an "AS IS" BASIS,

 * WITHOUT WARRANTIES OR CONDITIONS OF ANY KIND, either express or implied.

 * See the License for the specific language governing permissions and

 * limitations under the License.

 */


import { MainItem } from '../components/MainItem'

import { WlanMoreSettingItem } from './WlanMoreSetting'

import { SubItemToggle } from '../components/SubItemToggle'

import { SubItemWifi } from '../components/SubItemWifi'

import { ItemGroup } from '../components/ItemGroup'

import { ItemDescription } from '../components/ItemDescription'


@Component

export struct WlanSettingItem {

  @State itemTitle: string = ''

  @LocalStorageLink('selectedLabel') selectedLabel: string  = ''


  aboutToAppear() {

    this.itemTitle = getContext().resourceManager.getStringSync($r('app.string.wifiTab').id)

  }


  build() {

    Column() {

      NavRouter() {

        MainItem({

          title: $r('app.string.wifiTab'),

          tag: 'UX',

          icon: $r('app.media.wlan'),

          label: 'WLAN'

        })


        NavDestination() {

          WlanSetting()

        }

        .title(this.itemTitle)

        .backgroundColor($r('sys.color.ohos_id_color_sub_background'))

      }.onStateChange((isActivated: boolean) => {

        if (isActivated) {

          this.selectedLabel = 'WLAN'

        }

      })

    }

  }

}


@Component

struct WlanSetting {

  @Builder CustomDivider() {

    Divider()

      .strokeWidth('1px')

      .color($r('sys.color.ohos_id_color_list_separator'))

      .margin({left: 12, right: 8})

  }


  build() {

    Column() {

      Column() {

        ItemGroup() {

          SubItemToggle({title: $r('app.string.wifiTab'), isOn: true})

        }


        Row().height(16)


        ItemGroup() {

          WlanMoreSettingItem()

        }

      }

      .margin({bottom: 19.5})

      .flexShrink(0)


      Scroll() {

        Column() {

          ItemDescription({description: $r('app.string.wifiTipConnectedWLAN')})

            .padding({

              left: 12,

              right: 12,

              bottom: 9.5

            })


          ItemGroup() {

            SubItemWifi({

              title: 'UX',

              subTitle: $r('app.string.wifiSummaryConnected'),

              isConnected: true,

              icon: $r('app.media.ic_wifi_signal_4_dark')

            })

          }


          Column() {

            ItemDescription({description: $r('app.string.wifiTipValidWLAN')})

              .margin({

                left: 12,

                right: 12,

                top: 19.5,

                bottom: 9.5

              })


            ItemGroup() {

              SubItemWifi({

                title: 'Huwe-yee',

                subTitle: $r('app.string.wifiSummaryEncrypted'),

                isConnected: false,

                icon: $r('app.media.ic_wifi_lock_signal_4_dark')

              })


              this.CustomDivider()


              SubItemWifi({

                title: 'UX-5G',

                subTitle: $r('app.string.wifiSummaryOpen'),

                isConnected: false,

                icon: $r('app.media.ic_wifi_signal_4_dark')

              })


              this.CustomDivider()


              SubItemWifi({

                title: 'E1-AP',

                subTitle: $r('app.string.wifiSummarySaveOpen'),

                isConnected: false,

                icon: $r('app.media.ic_wifi_signal_4_dark')

              })

            }

          }

        }

      }

      .scrollable(ScrollDirection.Vertical)

      .scrollBar(BarState.Off)

      .width('100%')

      .flexShrink(1)

    }

    .width('100%')

    .height('100%')

    .padding({left: 12, right: 12})

  }

}
实现多级跳转
Navigation组件支持自动切换单栏和双栏的显示效果,同时可以根据当前状态自动添加返回键及响应系统的返回键事件。[源码参考]。
/**

 * Copyright (c) 2021-2023 Huawei Device Co., Ltd.

 * Licensed under the Apache License, Version 2.0 (the "License");

 * you may not use this file except in compliance with the License.

 * You may obtain a copy of the License at

 *

 *     http://www.apache.org/licenses/LICENSE-2.0

 *

 * Unless required by applicable law or agreed to in writing, software

 * distributed under the License is distributed on an "AS IS" BASIS,

 * WITHOUT WARRANTIES OR CONDITIONS OF ANY KIND, either express or implied.

 * See the License for the specific language governing permissions and

 * limitations under the License.

 */


import { SubItemArrow } from '../components/SubItemArrow'

import { SubItemToggle } from '../components/SubItemToggle'

import { ItemGroup } from '../components/ItemGroup'

import { ItemDescription } from '../components/ItemDescription'


@Component

export struct WlanMoreSettingItem {

  @State itemTitle: string = ''

  @LocalStorageLink('selectedLabel') selectedLabel: string = ''


  aboutToAppear() {

    this.itemTitle = getContext().resourceManager.getStringSync($r('app.string.moreWlanSettings').id)

  }


  build() {

    NavRouter() {

      SubItemArrow({ title: $r('app.string.moreWlanSettings') })


      NavDestination() {

        WlanMoreSetting()

      }

      .title(this.itemTitle)

      .backgroundColor($r('sys.color.ohos_id_color_sub_background'))

    }

    .onStateChange((isActivated: boolean) => {

      if (isActivated) {

        this.selectedLabel = 'WLAN'

      }

    })

  }

}


@Component

export struct WlanMoreSetting {

  build() {

    Scroll() {

      Column() {

        ItemGroup() {

          SubItemArrow({

            title: $r('app.string.wlanPlus'),

            tag: $r('app.string.enabled')

          })

        }


        ItemDescription({description: $r('app.string.wlanPlusTip')})

          .margin({

            top: 8,

            bottom: 24,

            left: 12,

            right: 12

          })


        ItemGroup() {

          SubItemArrow({ title: $r('app.string.wlanDirect') })

        }


        Blank().height(12)


        ItemGroup() {

          SubItemToggle({title: $r('app.string.wlanSecurityCheck')})

        }


        ItemDescription({description: $r('app.string.wlanSecurityCheckTip')})

          .margin({

            top: 8,

            bottom: 24,

            left: 12,

            right: 12

          })


        ItemGroup() {

          SubItemArrow({title: $r('app.string.savedWlan')})

          Divider()

            .strokeWidth('1px')

            .color($r('sys.color.ohos_id_color_list_separator'))

            .margin({left: 12, right: 8})

          SubItemArrow({title: $r('app.string.installCertificates')})

        }

      }

      .backgroundColor($r('sys.color.ohos_id_color_sub_background'))

      .padding({left: 12, right: 12})

    }

    .scrollBar(BarState.Off)

    .width('100%')

  }

}
1、通过激活SettingList中的WLANSettingItem,可以加载及显示WlanSetting。
2、激活WlanSetting中的WlanMoreSettingItem,可以加载及显示WlanMoreSetting。


 1251
1251


 被折叠的 条评论
为什么被折叠?
被折叠的 条评论
为什么被折叠?
 到【灌水乐园】发言


