


概述
在应用的开发过程中,经常需要设计复杂界面,此时涉及到多个相同或不同组件之间的嵌套。如果布局组件嵌套深度过深,或者嵌套组件数过多,会带来额外的开销。如果在布局的方式上进行优化,就可以有效的提升性能,减少时间开销。请参考优化布局时间了解RelativeContainer相对于List,在布局时间上的性能提升。
RelativeContainer为采用相对布局的容器,支持容器内部的子元素设置相对位置关系,适用于界面复杂场景的情况,对多个子组件进行对齐和排列。子元素支持指定兄弟元素作为锚点,也支持指定父容器作为锚点,基于锚点做相对位置布局。下图是一个RelativeContainer的概念图,图中的虚线表示位置的依赖关系。
图1 相对布局示意图
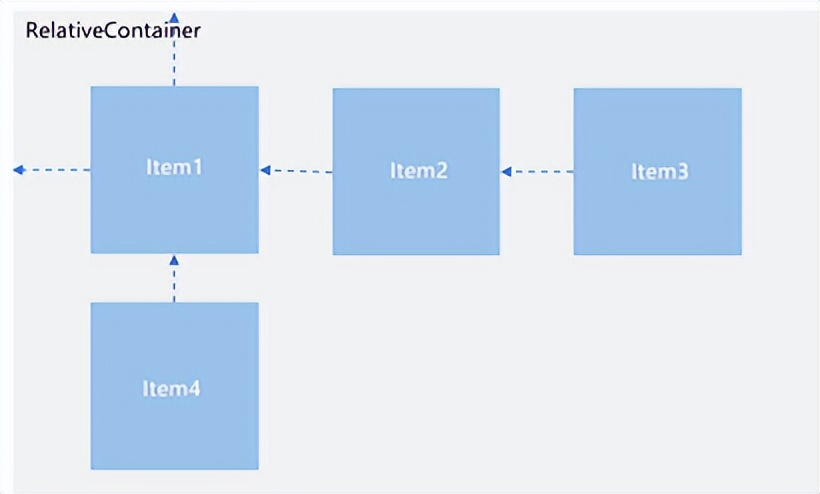
子元素并不完全是上图中的依赖关系。比如,Item4可以以Item2为依赖锚点,也可以以RelativeContainer父容器为依赖锚点。
基本概念
- 锚点:通过锚点设置当前元素基于哪个元素确定位置。
- 对齐方式:通过对齐方式,设置当前元素是基于锚点的上中下对齐,还是基于锚点的左中右对齐。
设置依赖关系
锚点设置
锚点设置是指设置子元素相对于父元素或兄弟元素的位置依赖关系。在水平方向上,可以设置left、middle、right的锚点。在竖直方向上,可以设置top、center、bottom的锚点。 为了明确定义锚点,必须为RelativeContainer及其子元素设置ID,用于指定锚点信息。ID默认为“container”,其余子元素的ID通过id属性设置。未设置ID的子元素在RelativeContainer中不会显示。互相依赖,环形依赖时容器内子组件全部不绘制。同方向上两个以上位置设置锚点,但锚点位置逆序时此子组件大小为0,即不绘制。
说明:
在使用锚点时要注意子元素的相对位置关系,避免出现错位或遮挡的情况。
- RelativeContainer父组件为锚点,__container__代表父容器的ID。
let AlignRus:Record<string,Record<string,string|VerticalAlign|HorizontalAlign>> = {
  'top': { 'anchor': '__container__', 'align': VerticalAlign.Top },
  'left': { 'anchor': '__container__', 'align': HorizontalAlign.Start }
}
let AlignRue:Record<string,Record<string,string|VerticalAlign|HorizontalAlign>> = {
  'top': { 'anchor': '__container__', 'align': VerticalAlign.Top },
  'right': { 'anchor': '__container__', 'align': HorizontalAlign.End }
}
let Mleft:Record<string,number> = { 'left': 20 }
let BWC:Record<string,number|string> = { 'width': 2, 'color': '#6699FF' }
RelativeContainer() {
  Row().width(100).height(100)
    .backgroundColor("#FF3333")
    .alignRules(AlignRus)
    .id("row1")

  Row().width(100).height(100)
    .backgroundColor("#FFCC00")
    .alignRules(AlignRue)
    .id("row2")
}.width(300).height(300)
.margin(Mleft)
.border(BWC)
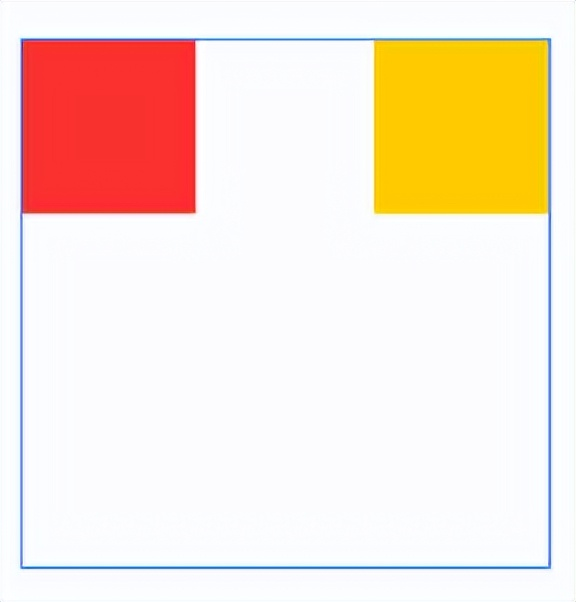
- 以兄弟元素为锚点。
let AlignRus:Record<string,Record<string,string|VerticalAlign|HorizontalAlign>> = {
  'top': { 'anchor': '__container__', 'align': VerticalAlign.Top },
  'left': { 'anchor': '__container__', 'align': HorizontalAlign.Start }
}
let RelConB:Record<string,Record<string,string|VerticalAlign|HorizontalAlign>> = {
  'top': { 'anchor': 'row1', 'align': VerticalAlign.Bottom },
  'left' : { 'anchor': 'row1', 'align': HorizontalAlign.Start }
}
let Mleft:Record<string,number> = { 'left': 20 }
let BWC:Record<string,number|string> = { 'width': 2, 'color': '#6699FF' }
RelativeContainer() {
  Row().width(100).height(100)
    .backgroundColor("#FF3333")
    .alignRules(AlignRus)
    .id("row1")

  Row().width(100).height(100)
    .backgroundColor("#FFCC00")
    .alignRules(RelConB)
    .id("row2")
}.width(300).height(300)
.margin(Mleft)
.border(BWC)

- 子组件锚点可以任意选择,但需注意不要相互依赖。
@Entry
@Component
struct Index {
  build() {
    Row() {

      RelativeContainer() {
        Row().width(100).height(100)
          .backgroundColor('#ff3339ff')
          .alignRules({
            top: {anchor: "__container__", align: VerticalAlign.Top},
            left: {anchor: "__container__", align: HorizontalAlign.Start}
          })
          .id("row1")

        Row().width(100)
          .backgroundColor('#ff298e1e')
          .alignRules({
            top: {anchor: "__container__", align: VerticalAlign.Top},
            right: {anchor: "__container__", align: HorizontalAlign.End},
            bottom: {anchor: "row1", align: VerticalAlign.Center},
          })
          .id("row2")

        Row().height(100)
          .backgroundColor('#ffff6a33')
          .alignRules({
            top: {anchor: "row1", align: VerticalAlign.Bottom},
            left: {anchor: "row1", align: HorizontalAlign.Start},
            right: {anchor: "row2", align: HorizontalAlign.Start}
          })
          .id("row3")

        Row()
          .backgroundColor('#ffff33fd')
          .alignRules({
            top: {anchor: "row3", align: VerticalAlign.Bottom},
            left: {anchor: "row1", align: HorizontalAlign.Center},
            right: {anchor: "row2", align: HorizontalAlign.End},
            bottom: {anchor: "__container__", align: VerticalAlign.Bottom}
          })
          .id("row4")

      }
      .width(300).height(300)
      .margin({left: 50})
      .border({width:2, color: "#6699FF"})
    }
    .height('100%')
  }
}
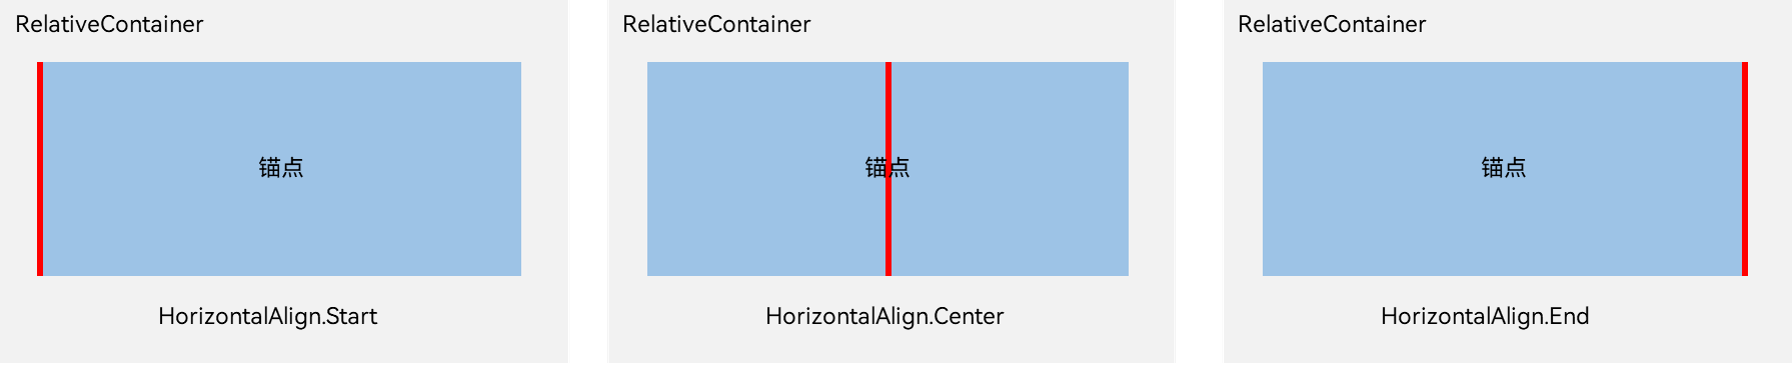
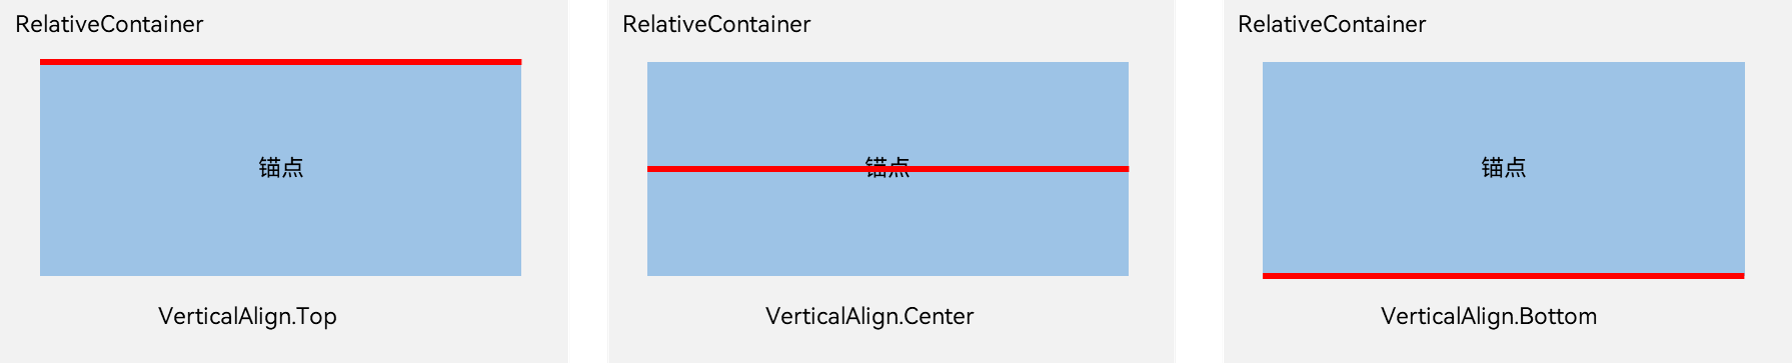
设置相对于锚点的对齐位置
设置了锚点之后,可以通过align设置相对于锚点的对齐位置。
在水平方向上,对齐位置可以设置为HorizontalAlign.Start、HorizontalAlign.Center、HorizontalAlign.End。
在竖直方向上,对齐位置可以设置为VerticalAlign.Top、VerticalAlign.Center、VerticalAlign.Bottom。
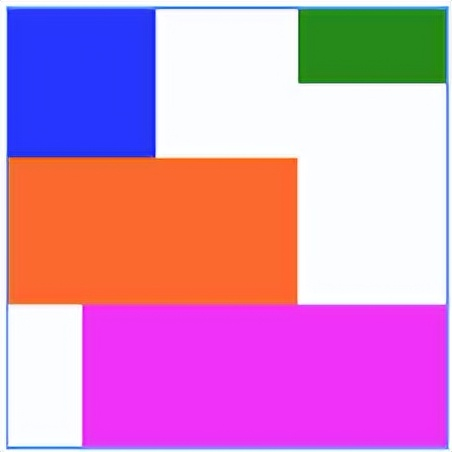
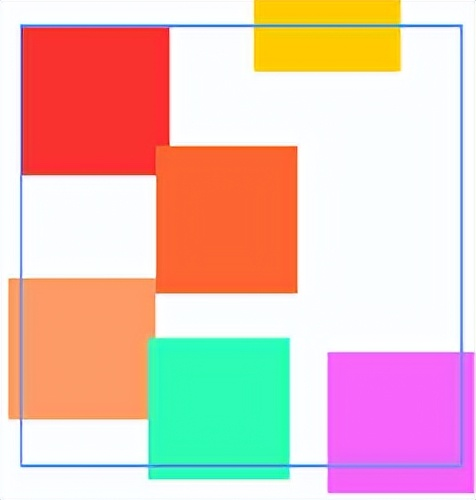
子组件位置偏移
子组件经过相对位置对齐后,位置可能还不是目标位置,开发者可根据需要进行额外偏移设置offset。
@Entry
@Component
struct Index {
  build() {
    Row() {

      RelativeContainer() {
        Row().width(100).height(100)
          .backgroundColor("#FF3333")
          .alignRules({
            top: {anchor: "__container__", align: VerticalAlign.Top},
            left: {anchor: "__container__", align: HorizontalAlign.Start}
          })
          .id("row1")

        Row().width(100)
          .backgroundColor("#FFCC00")
          .alignRules({
            top: {anchor: "__container__", align: VerticalAlign.Top},
            right: {anchor: "__container__", align: HorizontalAlign.End},
            bottom: {anchor: "row1", align: VerticalAlign.Center},
          })
          .offset({
            x:-40,
            y:-20
          })
          .id("row2")

        Row().height(100)
          .backgroundColor("#FF6633")
          .alignRules({
            top: {anchor: "row1", align: VerticalAlign.Bottom},
            left: {anchor: "row1", align: HorizontalAlign.End},
            right: {anchor: "row2", align: HorizontalAlign.Start}
          })
          .offset({
            x:-10,
            y:-20
          })
          .id("row3")

        Row()
          .backgroundColor("#FF9966")
          .alignRules({
            top: {anchor: "row3", align: VerticalAlign.Bottom},
            bottom: {anchor: "__container__", align: VerticalAlign.Bottom},
            left: {anchor: "__container__", align: HorizontalAlign.Start},
            right: {anchor: "row1", align: HorizontalAlign.End}
          })
          .offset({
            x:-10,
            y:-30
          })
          .id("row4")

        Row()
          .backgroundColor("#FF66FF")
          .alignRules({
            top: {anchor: "row3", align: VerticalAlign.Bottom},
            bottom: {anchor: "__container__", align: VerticalAlign.Bottom},
            left: {anchor: "row2", align: HorizontalAlign.Start},
            right: {anchor: "row2", align: HorizontalAlign.End}
          })
          .offset({
            x:10,
            y:20
          })
          .id("row5")

        Row()
          .backgroundColor('#ff33ffb5')
          .alignRules({
            top: {anchor: "row3", align: VerticalAlign.Bottom},
            bottom: {anchor: "row4", align: VerticalAlign.Bottom},
            left: {anchor: "row3", align: HorizontalAlign.Start},
            right: {anchor: "row3", align: HorizontalAlign.End}
          })
          .offset({
            x:-15,
            y:10
          })
          .backgroundImagePosition(Alignment.Bottom)
          .backgroundImageSize(ImageSize.Cover)
          .id("row6")
      }
      .width(300).height(300)
      .margin({left: 50})
      .border({width:2, color: "#6699FF"})
    }
    .height('100%')
  }
}
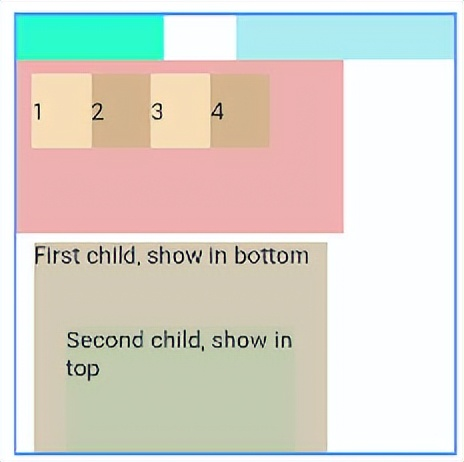
多种组件的对齐布局
Row、Column、Flex、Stack等多种布局组件,可按照RelativeContainer组件规则进行对其排布。
@Entry
@Component
struct Index {
  @State value: number = 0
  build() {
    Row() {

      RelativeContainer() {
        Row().width(100).height(100)
          .backgroundColor('#ff33ffcc')
          .alignRules({
            top: {anchor: "__container__", align: VerticalAlign.Top},
            left: {anchor: "__container__", align: HorizontalAlign.Start}
          })
          .id("row1")

        Column().width('50%').height(30).backgroundColor(0xAFEEEE)
          .alignRules({
            top: {anchor: "__container__", align: VerticalAlign.Top},
            left: {anchor: "__container__", align: HorizontalAlign.Center}
          }).id("row2")

        Flex({ direction: FlexDirection.Row }) {
          Text('1').width('20%').height(50).backgroundColor(0xF5DEB3)
          Text('2').width('20%').height(50).backgroundColor(0xD2B48C)
          Text('3').width('20%').height(50).backgroundColor(0xF5DEB3)
          Text('4').width('20%').height(50).backgroundColor(0xD2B48C)
        }
        .padding(10)
        .backgroundColor('#ffedafaf')
        .alignRules({
          top: {anchor: "row2", align: VerticalAlign.Bottom},
          left: {anchor: "__container__", align: HorizontalAlign.Start},
          bottom: {anchor: "__container__", align: VerticalAlign.Center},
          right: {anchor: "row2", align: HorizontalAlign.Center}
        })
        .id("row3")

        Stack({ alignContent: Alignment.Bottom }) {
          Text('First child, show in bottom').width('90%').height('100%').backgroundColor(0xd2cab3).align(Alignment.Top)
          Text('Second child, show in top').width('70%').height('60%').backgroundColor(0xc1cbac).align(Alignment.Top)
        }
        .margin({ top: 5 })
        .alignRules({
          top: {anchor: "row3", align: VerticalAlign.Bottom},
          left: {anchor: "__container__", align: HorizontalAlign.Start},
          bottom: {anchor: "__container__", align: VerticalAlign.Bottom},
          right: {anchor: "row3", align: HorizontalAlign.End}
        })
        .id("row4")

      }
      .width(300).height(300)
      .margin({left: 50})
      .border({width:2, color: "#6699FF"})
    }
    .height('100%')
  }
}
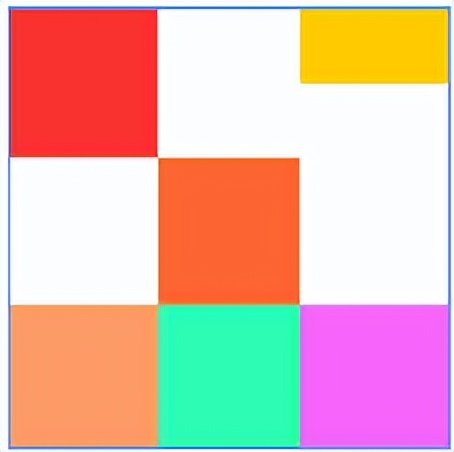
组件尺寸
子组件尺寸大小不会受到相对布局规则的影响。若子组件某个方向上设置两个或以上alignRules时最好不设置此方向尺寸大小,否则对齐规则确定的组件尺寸与开发者设置的尺寸可能产生冲突。
@Entry
@Component
struct Index {
  build() {
    Row() {

      RelativeContainer() {
        Row().width(100).height(100)
          .backgroundColor("#FF3333")
          .alignRules({
            top: {anchor: "__container__", align: VerticalAlign.Top},
            left: {anchor: "__container__", align: HorizontalAlign.Start}
          })
          .id("row1")

        Row().width(100)
          .backgroundColor("#FFCC00")
          .alignRules({
            top: {anchor: "__container__", align: VerticalAlign.Top},
            right: {anchor: "__container__", align: HorizontalAlign.End},
            bottom: {anchor: "row1", align: VerticalAlign.Center},
          })
          .id("row2")

        Row().height(100)
          .backgroundColor("#FF6633")
          .alignRules({
            top: {anchor: "row1", align: VerticalAlign.Bottom},
            left: {anchor: "row1", align: HorizontalAlign.End},
            right: {anchor: "row2", align: HorizontalAlign.Start}
          })
          .id("row3")

        Row()
          .backgroundColor("#FF9966")
          .alignRules({
            top: {anchor: "row3", align: VerticalAlign.Bottom},
            bottom: {anchor: "__container__", align: VerticalAlign.Bottom},
            left: {anchor: "__container__", align: HorizontalAlign.Start},
            right: {anchor: "row1", align: HorizontalAlign.End}
          })
          .id("row4")

        Row()
          .backgroundColor("#FF66FF")
          .alignRules({
            top: {anchor: "row3", align: VerticalAlign.Bottom},
            bottom: {anchor: "__container__", align: VerticalAlign.Bottom},
            left: {anchor: "row2", align: HorizontalAlign.Start},
            right: {anchor: "row2", align: HorizontalAlign.End}
          })
          .id("row5")

        Row()
          .backgroundColor('#ff33ffb5')
          .alignRules({
            top: {anchor: "row3", align: VerticalAlign.Bottom},
            bottom: {anchor: "row4", align: VerticalAlign.Bottom},
            left: {anchor: "row3", align: HorizontalAlign.Start},
            right: {anchor: "row3", align: HorizontalAlign.End}
          })
          .id("row6")
          .backgroundImagePosition(Alignment.Bottom)
          .backgroundImageSize(ImageSize.Cover)
      }
      .width(300).height(300)
      .margin({left: 50})
      .border({width:2, color: "#6699FF"})
    }
    .height('100%')
  }
}
如果大家还没有掌握鸿蒙,现在想要在最短的时间里吃透它,我这边特意整理了《鸿蒙语法ArkTS、TypeScript、ArkUI等…视频教程》以及《鸿蒙开发学习手册》(共计890页),希望对大家有所帮助:https://docs.qq.com/doc/DZVVBYlhuRkZQZlB3
鸿蒙语法ArkTS、TypeScript、ArkUI等…视频教程:https://docs.qq.com/doc/DZVVBYlhuRkZQZlB3
OpenHarmony APP开发教程步骤:https://docs.qq.com/doc/DZVVBYlhuRkZQZlB3
《鸿蒙开发学习手册》:
如何快速入门:https://docs.qq.com/doc/DZVVBYlhuRkZQZlB3
1.基本概念
2.构建第一个ArkTS应用
3.……

开发基础知识:https://docs.qq.com/doc/DZVVBYlhuRkZQZlB3
1.应用基础知识
2.配置文件
3.应用数据管理
4.应用安全管理
5.应用隐私保护
6.三方应用调用管控机制
7.资源分类与访问
8.学习ArkTS语言
9.……

基于ArkTS 开发:https://docs.qq.com/doc/DZVVBYlhuRkZQZlB3
1.Ability开发
2.UI开发
3.公共事件与通知
4.窗口管理
5.媒体
6.安全
7.网络与链接
8.电话服务
9.数据管理
10.后台任务(Background Task)管理
11.设备管理
12.设备使用信息统计
13.DFX
14.国际化开发
15.折叠屏系列
16.……

鸿蒙生态应用开发白皮书V2.0PDF:https://docs.qq.com/doc/DZVVBYlhuRkZQZlB3


 1790
1790

 被折叠的 条评论
为什么被折叠?
被折叠的 条评论
为什么被折叠?
 到【灌水乐园】发言


