


目录
目录
1.在LB负载均衡器上修改ngin配置文件,调用最小连接数算法,启用HTTPS:
2.在web服务器上编辑日志格式,添加X-Real-IP字段,获取用户IP:
1.在LB1负载均衡器上修改配置文件/etc/keepalived/keepalived.conf:
2.在LB2负载均衡器上修改配置文件/etc/keepalived/keepalived.conf:
5.修改配置文件,告诉named为zyk.love提供域名解析
6. 在DNS域名解析的数据目录/var/named下创建zyk.love的数据文件:
3.在prometheus server里添加exporter程序
前言
项目名称
基于nginx+keepalived的负载均衡、高可用web集群
项目架构图
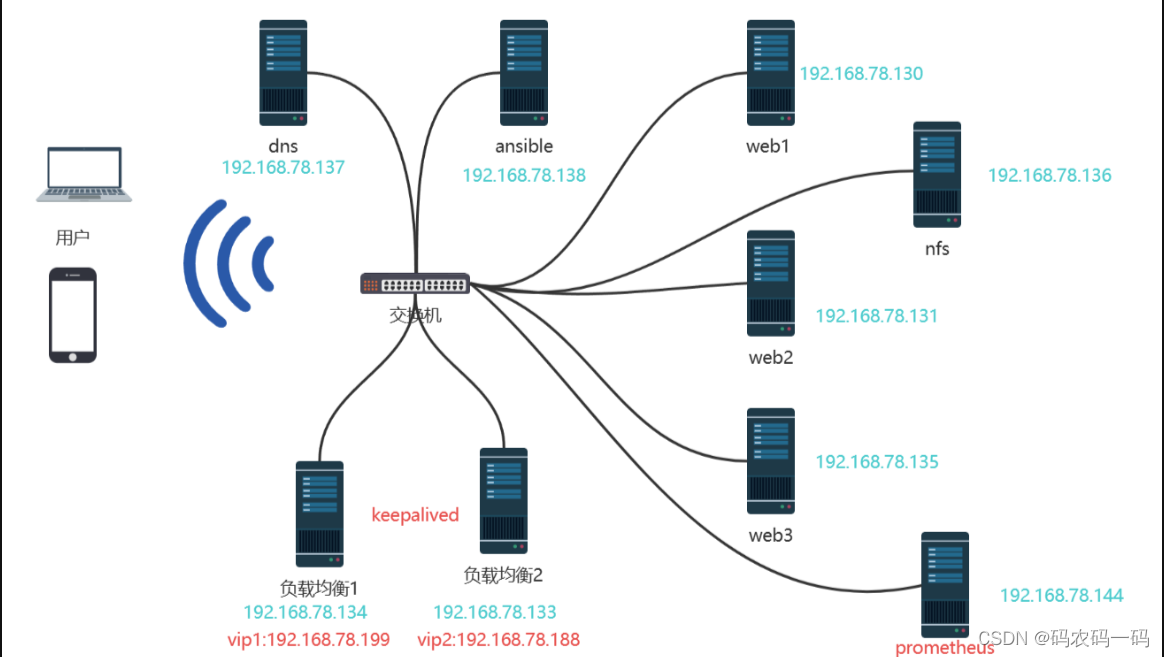
项目环境
软件环境
- CentOS:CentOS Linux release 7.9.2009 (Core)
- Nginx:nginx/1.23.3
- DNS:BIND 9.11.4-P2-RedHat-9.11.4-26.P2.el7_9.13
- Ansible:ansible 2.9.27
- Keepalived: Keepalived v1.3.5 (03/19,2017)
- Prometheus: prometheus, version 2.43.0
- Grafana: grafana 9.4.7
- NFS: nfs v4
- ab:ApacheBench, Version 2.3
硬件环境
- CentOS 7.9(10台1核512MB)
项目描述
该项目旨在模拟企业环境中的web集群,能处理大并发的web业务。通过ansible自动化部署,Nginx实现7负载均衡和搭建web框架,Keepalived搭建双vip架构实现高可用,DNS服务器实现VIP轮询,NFS保持数据一致性,及使用Prometheus+grafana实现数据可视化监控
项目步骤
一、建立免密通道,部署ansible
1.安装ansible
[root@ansible ~]# yum install epel-release -y
[root@ansible ~]# yum install ansible -y
#查看版本
[root@ansible ~]# ansible --version
ansible 2.9.27
2.在所有服务器上建立与ansible服务器的免密通道
在所有需要ansible的机器上建立免密通道:web服务器,负载均衡器,nfs服务器
[root@ansible ~]# ssh-keygen
[root@ansible ~]# cd /root/.ssh/
[root@ansible .ssh]# ls
id_rsa  id_rsa.pub
[root@ansible .ssh]# ssh-copy-id -i id_rsa.pub root@192.168.203.*
3.建立主机清单
[root@ansible /]# cd /etc/ansible/
[root@ansible ansible]# ls
ansible.cfg  hosts  roles
[root@ansible ansible]# vim hosts
[LBservers]
192.168.78.134          #负载均衡1
192.168.78.133          #负载均衡2

[webservers]
192.168.78.130          #web1
192.168.78.131          #web2
192.168.78.135          #web3

[nfsservers]
192.168.78.136          #nfs

[dnsservers]
192.168.78.137          #dns
4.编写playbook批量安装软件
[root@ansible playbooks]# vim install.yaml
---
- hosts: LBservers      #在负载均衡器上安装nginx,keepalived
  remote_user: root
  tasks:
  - name: install nginx
    script: /etc/ansible/playbooks/one_key_install_nginx.sh     #执行一键安装脚本
  - name: install keepalived
    yum: name=keepalived state=latest

- hosts: webservers     #在web服务器上安装nginx,nfs-utils
  remote_user: root
  tasks:
  - name: install nginx
    script: /etc/ansible/playbooks/one_key_install_nginx.sh
  - name: install nfs
    yum: name=nfs-utils state=latest

- hosts: webservers LBservers    #在web服务器,负载均衡器上安装node_exporter,以便于Prometheus服务器采集数据
  remote_user: root
  tasks:
  - name: install node_exporter
    script: /etc/ansible/playbooks/one_key_install_node_exporter.sh
一键安装nginx脚本如下one_key_install_nginx.sh:
#!/bin/bash

mkdir -p /my_nginx
cd /my_nginx

# 下载nginx压缩包
curl -O http://nginx.org/download/nginx-1.23.3.tar.gz

# 解压
tar xf nginx-1.23.3.tar.gz
# 进入文件夹
cd nginx-1.23.3

# 新建用户,用于启动nginx进程
useradd -s /sbin/nologin ly

# 安装依赖包,ssh相关、gcc为编译需要、pcre正则相关、make编译相关
yum install -y openssl openssl-devel gcc pcre pcre-devel automake make net-tools vim

# configure是一个配置的脚本文件,会根据指定的配置生成一个Makefile文件,这个文件会影响后面make命令的编译,相当于图纸
# configure可配置参数可以参考官方文档:http://nginx.org/en/docs/configure.html
# 常用选项:
# --with-*:开启某个功能,默认不安装    --without-*:禁用某个功能,默认安装
# --prefix=path:指定路径                       --conf-path=path:指定配置文件路径,不指定会放到prefix路径下
# --user=name:指定启动nginx worker进程的用户
# --with-http_ssl_moudle 开启https的功能,下载ssl来进行公钥和私钥的认证
# --without-http——memcached_moudle 禁用http_memcached
# --with-http_realip_module 启用realip功能,让后端知道通过代理访问的用户的ip
# --with-http_v2_module:对http2.0版本的支持
# --with-threads:开启线程池功能                --with-http_stub_status_moudle:开启nginx状态统计功能,可以知道多少访问
# --with-stream 支持tcp/udp反向代理,即4层负载均衡
./configure --prefix=/usr/local/nginx --user=ly --with-http_ssl_module --with-http_realip_module --with-http_v2_module --with-threads --with-http_stub_status_module --with-stream

# 编译
# make是按照Makefile的配置去编译程序为二进制文件,二进制文件就是执行可以运行的程序
# -j:指定编译进程数,多点速度快些,可以使用top后按1查看虚拟机配有几个核心
make -j2
# 将编译好的二进制文件复制到指定安装路径目录下
make install

# 启动nginx
/usr/local/nginx/sbin/nginx

# 修改PATH变量
PATH=$PATH:/usr/local/nginx/sbin
echo "PATH=$PATH" >>/root/.bashrc

# 设置nginx的开机启动,rc.local是指向rc.d/rc.local的链接,后者需要拥有执行权限才能开机自启
echo "/usr/local/nginx/sbin/nginx" >>/etc/rc.local
chmod +x /etc/rc.d/rc.local

# selinux和firewalld防火墙都关闭
# selinux临时和永久关闭
setenforce 0
sed -i '/^SELINUX=/ s/enforcing/disabled/' /etc/selinux/config

# 防火墙临时和永久关闭
service firewalld stop
systemctl disable firewalld
5.运行playbook,快速部署环境:
[root@ansible playbooks]# ansible-playbook install.yaml
PLAY [LBservers] ****************************************************************************************************************************************************

TASK [Gathering Facts] **********************************************************************************************************************************************
ok: [192.168.78.133]
ok: [192.168.78.134]

TASK [install nginx] ************************************************************************************************************************************************
changed: [192.168.78.133]
changed: [192.168.78.134]

TASK [install keepalived] *******************************************************************************************************************************************
changed: [192.168.78.134]
changed: [192.168.78.133]

PLAY [webservers] ***************************************************************************************************************************************************

TASK [Gathering Facts] **********************************************************************************************************************************************
ok: [192.168.78.135]
ok: [192.168.78.131]
ok: [192.168.78.130]

TASK [install nginx] ************************************************************************************************************************************************
changed: [192.168.78.130]
changed: [192.168.78.131]
changed: [192.168.78.135]

TASK [install nfs] **************************************************************************************************************************************************
changed: [192.168.78.131]
changed: [192.168.78.130]
changed: [192.168.78.135]
[WARNING]: Could not match supplied host pattern, ignoring: LBserver

PLAY [webservers LBserver] ******************************************************************************************************************************************

TASK [Gathering Facts] **********************************************************************************************************************************************
ok: [192.168.78.131]
ok: [192.168.78.130]
ok: [192.168.78.135]

TASK [install node_exporter] ****************************************************************************************************************************************
changed: [192.168.78.130]
changed: [192.168.78.131]
changed: [192.168.78.135]

PLAY RECAP **********************************************************************************************************************************************************
192.168.78.130             : ok=5    changed=3    unreachable=0    failed=0    skipped=0    rescued=0    ignored=0
192.168.78.131             : ok=5    changed=3    unreachable=0    failed=0    skipped=0    rescued=0    ignored=0
192.168.78.133             : ok=3    changed=2    unreachable=0    failed=0    skipped=0    rescued=0    ignored=0
192.168.78.134             : ok=3    changed=2    unreachable=0    failed=0    skipped=0    rescued=0    ignored=0
192.168.78.135             : ok=5    changed=3    unreachable=0    failed=0    skipped=0    rescued=0    ignored=0
发现一个报错:[WARNING]: Could not match supplied host pattern, ignoring: LBserver,这是因为没有在/etc/ansible/hosts文件中添加 LBserver主机清单才有的报错,经过检查发现是playbook中编写错误。
二、配置web服务器
让三台web服务器之间通过网络进行文件共享,保持网页数据一致性
1.安装开启
[root@nfs ~]# yum install nfs-utils -y
[root@nfs ~]# service nfs-server restart
Redirecting to /bin/systemctl restart nfs-server.service
2.编辑共享文件/etc/export
[root@nfs ~]# vim /etc/exports
[root@nfs ~]# cat /etc/exports
/web 192.168.78.0/24(ro,all_squash,sync) 	#共享目录/web,78网段全部可以访问,只读权限,实时共享
[root@nfs ~]# mkdir /web
[root@nfs ~]# cd /web/
[root@nfs web]# mkdir sc
[root@nfs web]# vim index.html
[root@nfs web]# ls
index.html  sc
[root@nfs web]# exportfs -rv		#刷新nfs服务
exporting 192.168.78.0/24:/web
[root@nfs web]# service firewalld stop		#关闭防火墙
Redirecting to /bin/systemctl stop firewalld.service
3.在其他的web服务器上挂载使用共享文件夹
[root@localhost web1]# mount 192.168.78.136:/web /usr/local/nginx/html
4.开机自动挂载nfs文件系统
[root@web1 html]# vim /etc/rc.local
service nfs-server start
mount  192.168.0.139:/web   /usr/local/nginx/html
[root@web1 html]# chmod +x /etc/rc.d/rc.local
这样就可以保证所有web服务器是同一个页面
四、负载均衡
1.在LB负载均衡器上修改ngin配置文件,调用最小连接数算法,启用HTTPS:
worker_processes  1;

events {
    worker_connections  1024;
}


http {
    include       mime.types;
    default_type  application/octet-stream;

	server_tokens off;          #隐藏nginx版本
    sendfile        on;
    keepalive_timeout  65;
    upstream  LB{
        least_conn;                     #调用最小连接数
        server  192.168.78.130;         #web1
        server  192.168.78.131;         #web2
        server  192.168.78.135;         #web3
        }
    server {
        listen       80;
        #把http的域名请求转成https
        return 301 https://www.zyk.love;
    }

    # HTTPS server
    server {
        listen       443 ssl;
        server_name  www.zyk.com;	#申请的域名

        ssl_certificate      9993605_yilong.love.pem;	#ssl证书
        ssl_certificate_key  9993605_yilong.love.key;

        ssl_session_cache    shared:SSL:1m;
        ssl_session_timeout  5m;

        ssl_ciphers  HIGH:!aNULL:!MD5;
        ssl_prefer_server_ciphers  on;

        location / {
            proxy_pass http://LB;       #代理转发到LB组
            proxy_set_header   X-Real-IP     $remote_addr;      #添加日志字段,让后端服务器知道客户机的IP

        }
    }
2.在web服务器上编辑日志格式,添加X-Real-IP字段,获取用户IP:
	log_format  main  '$remote_addr -  $HTTP_X_REAL_IP - $remote_user [$time_local] "$request" '
                      '$status $body_bytes_sent "$http_referer" '
                      '"$http_user_agent" "$http_x_forwarded_for"';

    access_log  logs/access.log  main;
五、部署keepalived双VIP负载均衡服务器
1.在LB1负载均衡器上修改配置文件/etc/keepalived/keepalived.conf:
! Configuration File for keepalived

global_defs {
   notification_email {
     acassen@firewall.loc
     failover@firewall.loc
     sysadmin@firewall.loc
   }
   notification_email_from Alexandre.Cassen@firewall.loc
   smtp_server 192.168.200.1
   smtp_connect_timeout 30
   router_id LVS_DEVEL
   vrrp_skip_check_adv_addr
   #vrrp_strict
   vrrp_garp_interval 0
   vrrp_gna_interval 0
}

vrrp_instance VI_1 {
    state MASTER	#做master角色
    interface ens33
    virtual_router_id 220
    priority 120	#优先级
    advert_int 1
    authentication {
        auth_type PASS
        auth_pass 1111
    }
    virtual_ipaddress {		#vip1
        192.168.78.199
    }
}

vrrp_instance VI_2 {
    state BACKUP
    interface ens33
    virtual_router_id 221
    priority 100
    advert_int 1
    authentication {
        auth_type PASS
        auth_pass 1111
    }
    virtual_ipaddress {		#vip2
        192.168.78.188
    }
}
2.在LB2负载均衡器上修改配置文件/etc/keepalived/keepalived.conf:
! Configuration File for keepalived

global_defs {
   notification_email {
     acassen@firewall.loc
     failover@firewall.loc
     sysadmin@firewall.loc
   }
   notification_email_from Alexandre.Cassen@firewall.loc
   smtp_server 192.168.200.1
   smtp_connect_timeout 30
   router_id LVS_DEVEL
   vrrp_skip_check_adv_addr
   #vrrp_strict
   vrrp_garp_interval 0
   vrrp_gna_interval 0
}

vrrp_instance VI_1 {
    state BACKUP
    interface ens33
    virtual_router_id 220
    priority 100
    advert_int 1
    authentication {
        auth_type PASS
        auth_pass 1111
    }
    virtual_ipaddress {
        192.168.78.199
    }
}

vrrp_instance VI_2 {
    state MASTER
    interface ens33
    virtual_router_id 221
    priority 120
    advert_int 1
    authentication {
        auth_type PASS
        auth_pass 1111
    }
    virtual_ipaddress {
        192.168.78.188
    }
}
启动2个vrrp实例,每台机器上都启用2个vrrp实例,一个做master,一个做backup,启用2个vip,每台机器上都会有一个vip,这2个vip都对外提供服务,这样就可以避免单vip的情况下,一个很忙一个很闲。 可以提升设备的使用率,LB1和LB2上配置文件互为主备。
3.健康检测
keepalived的价值是建立在nginx能正常工作的情况下,如果nginx异常,这台机器就不是负载均衡器了,需要停止它的master身份,将优先级降低,让位给其他的机器。 背后需要有健康检测功能。
1.在两台负载均衡器上编写监控nginx是否运行的脚本,并且赋予可执行权限:
[root@lb-1 nginx]# cat check_nginx.sh
#!/bin/bash
#检测nginx是否正常运行
if  /usr/sbin/pidof  nginx  ;then
	exit 0
else
	exit 1
fi
[root@lb-1 nginx]# chmod +x check_nginx.sh
2.在keepalived里定义监控脚本并且调用:
调用需定义在master角色中。
修改LB1的/etc/keepalived/keepalived.conf:
#定义监控脚本chk_nginx
vrrp_script chk_nginx {
#当脚本/nginx/check_nginx.sh脚本执行返回值为0的时候,不执行下面的weight  -30的操作,只有脚本执行失败,返回值非0的时候,就执行执行权重值减30的操作
script "/my_nginx/check_nginx.sh"
interval 1      #健康检查周期
weight -30
}

vrrp_instance VI_1 {
    state MASTER
    interface ens33
    virtual_router_id 220
    priority 120
    advert_int 1
    authentication {
        auth_type PASS
        auth_pass 1111
    }
    virtual_ipaddress {
        192.168.78.199
    }
    #调用监控脚本
    track_script {
        chk_nginx
    }
}
修改LB2的/etc/keepalived/keepalived.conf:
#定义监控脚本chk_nginx
vrrp_script chk_nginx {
#当脚本/my_nginx/check_nginx.sh脚本执行返回值为0的时候,不执行下面的weight  -30的操作,只有脚本执行失败,返回值非0的时候,就执行执行权重值减30的操作
script "/my_nginx/check_nginx.sh"
interval 1
weight -30
}
vrrp_instance VI_2 {
    state MASTER
    interface ens33
    virtual_router_id 221
    priority 120
    advert_int 1
    authentication {
        auth_type PASS
        auth_pass 1111
    }
    virtual_ipaddress {
        192.168.78.188
    }
    #调用监控脚本
    track_script {
        chk_nginx
    }
}
六、搭建DNS服务器
1.关闭防火墙和SELINUX,安装bind*:
[root@dns ~]# systemctl stop firewalld
[root@dns ~]# vim /etc/selinux/config
SELINUX=disabled
[root@dns ~]# yum install bind* -y
2.设置named服务开机启动,并且立马启动DNS服务:
[root@dns ~]# systemctl enable named
Created symlink from /etc/systemd/system/multi-user.target.wants/named.service to /usr/lib/systemd/system/named.service.
[root@dns ~]# systemctl start named		#立马启动named进程
[root@dns ~]# netstat -anplut|grep named
tcp        0      0 127.0.0.1:953           0.0.0.0:*               LISTEN      4987/named
tcp        0      0 127.0.0.1:53            0.0.0.0:*               LISTEN      4987/named
tcp6       0      0 ::1:953                 :::*                    LISTEN      4987/named
tcp6       0      0 ::1:53                  :::*                    LISTEN      4987/named
udp        0      0 127.0.0.1:53            0.0.0.0:*                           4987/named
udp6       0      0 ::1:53                  :::*                                4987/named
3.修改dns服务到本机接口:
[root@dns ~]# cat /etc/resolv.conf
# Generated by NetworkManager
nameserver 127.0.0.1	#127.0.0.1代表本地回环接口地址,任何机器都有,只能本机使用
4.修改配置文件,允许其他机器能过来查询dns域名:
[root@dns ~]# vim /etc/named.conf
options {
        listen-on port 53 { any; };     #127.0.0.1修改为any,任意
        listen-on-v6 port 53 { any; };  #修改
        directory       "/var/named";
        dump-file       "/var/named/data/cache_dump.db";
        statistics-file "/var/named/data/named_stats.txt";
        memstatistics-file "/var/named/data/named_mem_stats.txt";
        recursing-file  "/var/named/data/named.recursing";
        secroots-file   "/var/named/data/named.secroots";
        allow-query     { any; };       #修改
[root@dns ~]# service named restart
Redirecting to /bin/systemctl restart named.service
5.修改配置文件,告诉named为zyk.love提供域名解析
[root@dns ~]# vim /etc/named.rfc1912.zones
#添加内容
zone "yilong.love" IN {
        type master;
        file "zyk.love.zone";
        allow-updateyilong.love { none; };
};
6. 在DNS域名解析的数据目录/var/named下创建zyk.love的数据文件:
[root@dns named]# pwd
/var/named
[root@dns named]# ls
chroot  chroot_sdb  data  dynamic  dyndb-ldap  named.ca  named.empty  named.localhost  named.loopback  slaves  yilong.love.zone
[root@dns named]# cp -a  named.localhost yilong.love.zone  #-a相同属性,复制产生一个zyk.love的数据文件
[root@dns named]# vim zyk.love.zone
$TTL 1D
@       IN SOA  @ rname.invalid. (
                                        0       ; serial
                                        1D      ; refresh
                                        1H      ; retry
                                        1W      ; expire
                                        3H )    ; minimum
        NS      @
        A       192.168.78.137
www IN A 192.168.78.199		#vip1
www IN A 192.168.78.188		#vip2
通过添加2条A记录相同的名字对应2个vip地址,实现dns域名的负载均衡,把流量分散到不同的服务器上。
测试dns解析:
[root@long ~]# ping www.yilong.love
PING www.yilong.love (192.168.78.188) 56(84) bytes of data.
64 bytes from 192.168.78.188 (192.168.78.188): icmp_seq=1 ttl=64 time=0.234 ms
64 bytes from 192.168.78.188 (192.168.78.188): icmp_seq=2 ttl=64 time=0.551 ms
^Z
[3]+  已停止               ping www.zyk.com
[root@long ~]# ping www.baidu.com
PING www.a.shifen.com (14.119.104.189) 56(84) bytes of data.
64 bytes from 14.119.104.189 (14.119.104.189): icmp_seq=1 ttl=128 time=23.5 ms
64 bytes from 14.119.104.189 (14.119.104.189): icmp_seq=2 ttl=128 time=23.7 ms
64 bytes from 14.119.104.189 (14.119.104.189): icmp_seq=3 ttl=128 time=23.5 ms
^Z
[4]+  已停止               ping www.baidu.com
七、搭建Prometheus+grafana监控
1.安装prometheus server
#上传下载的源码包到linux服务器
[root@prometheus ~]# mkdir /prom
[root@prometheus ~]# cd /prom
[root@prometheus prom]# ls
prometheus-2.34.0.linux-amd64.tar.gz
#解压源码包
[root@prometheus prom]# tar xf prometheus-2.34.0.linux-amd64.tar.gz
[root@prometheus prom]# ls
prometheus-2.34.0.linux-amd64  prometheus-2.34.0.linux-amd64.tar.gz
[root@prometheus prom]# mv prometheus-2.34.0.linux-amd64 prometheus
[root@prometheus prom]# ls
prometheus  prometheus-2.34.0.linux-amd64.tar.gz
#临时和永久修改PATH变量,添加prometheus的路径
[root@prometheus prometheus]# PATH=/prom/prometheus:$PATH		#临时
[root@prometheus prometheus]# cat /root/.bashrc				#永久
# .bashrc

# User specific aliases and functions

alias rm='rm -i'
alias cp='cp -i'
alias mv='mv -i'

# Source global definitions
if [ -f /etc/bashrc ]; then
	. /etc/bashrc
fi
PATH=/prom/prometheus:$PATH   #添加
#执行prometheus程序
[root@prometheus prometheus]# nohup prometheus  --config.file=/prom/prometheus/prometheus.yml &
[1] 8431
[root@prometheus prometheus]# nohup: 忽略输入并把输出追加到"nohup.out"
2.把prometheus做成一个服务来进行管理
[root@prometheus prometheus]# vim /usr/lib/systemd/system/prometheus.service
[Unit]
Description=prometheus
[Service]
ExecStart=/prom/prometheus/prometheus --config.file=/prom/prometheus/prometheus.yml
ExecReload=/bin/kill -HUP $MAINPID
KillMode=process
Restart=on-failure
[Install]:
WantedBy=multi-user.target
#重新加载systemd相关的服务
[root@prometheus prometheus]# systemctl daemon-reload
[root@prometheus prometheus]#  service prometheus start
[root@prometheus system]# ps aux|grep prometheu
root       7193  2.0  4.4 782084 44752 ?        Ssl  13:16   0:00 /prom/prometheus/prometheus --config.file=/prom/prometheus/prometheus.yml
root       7201  0.0  0.0 112824   972 pts/1    S+   13:16   0:00 grep --color=auto prometheu
3.在prometheus server里添加exporter程序
在prometheus服务器上添加抓取数据的配置,添加node节点服务器,将抓取的数据存储到时序数据库里,这样就可以知道去哪里pull数据
[root@prometheus prometheus]# vim prometheus.yml
scrape_configs:
  # The job name is added as a label `job=<job_name>` to any timeseries scraped from this config.
  - job_name: "prometheus"

    # metrics_path defaults to '/metrics'
    # scheme defaults to 'http'.

    static_configs:
      - targets: ["localhost:9090"]
  #添加以下要监控的节点
  - job_name: "LB1"
    static_configs:
      - targets: ["192.168.78.134:8090"]
  - job_name: "LB2"
    static_configs:
      - targets: ["192.168.78.133:8090"]
  - job_name: "web1"
    static_configs:
      - targets: ["192.168.78.130:8090"]
  - job_name: "web2"
    static_configs:
      - targets: ["192.168.78.131:8090"]
  - job_name: "web3"
    static_configs:
      - targets: ["192.168.78.135:8090"]
[root@prometheus prometheus]# service prometheus restart
Redirecting to /bin/systemctl restart prometheus.service
登录prometheus查看是否添加targets成功

4.部署grafana
Grafana是一个开源的数据可视化和分析平台,支持多种数据源的查询和展示。
[root@prometheus grafana]# wget https://dl.grafana.com/enterprise/release/grafana-enterprise-9.1.2-1.x86_64.rpm
[root@prometheus grafana]# yum install grafana-enterprise-9.1.2-1.x86_64.rpm -y
[root@prometheus grafana]# service grafana-server start
Starting grafana-server (via systemctl):                   [  确定  ]
#设置开机启动
[root@prometheus grafana]# systemctl enable grafana-server
Created symlink from /etc/systemd/system/multi-user.target.wants/grafana-server.service to /usr/lib/systemd/system/grafana-server.service.
#查看端口号
[root@prometheus grafana]# netstat -anplut|grep grafana
tcp6       0      0 :::3000                 :::*                    LISTEN      2187/grafana-server
登录查看:
默认的用户名和密码是
用户名admin
密码admin
 配置prometheus的数据源(点击设置>Add data source>Prometheus),填入URL,然后保存:

导入grafana的模板(点击Dashboards下的import),填入模板编号:

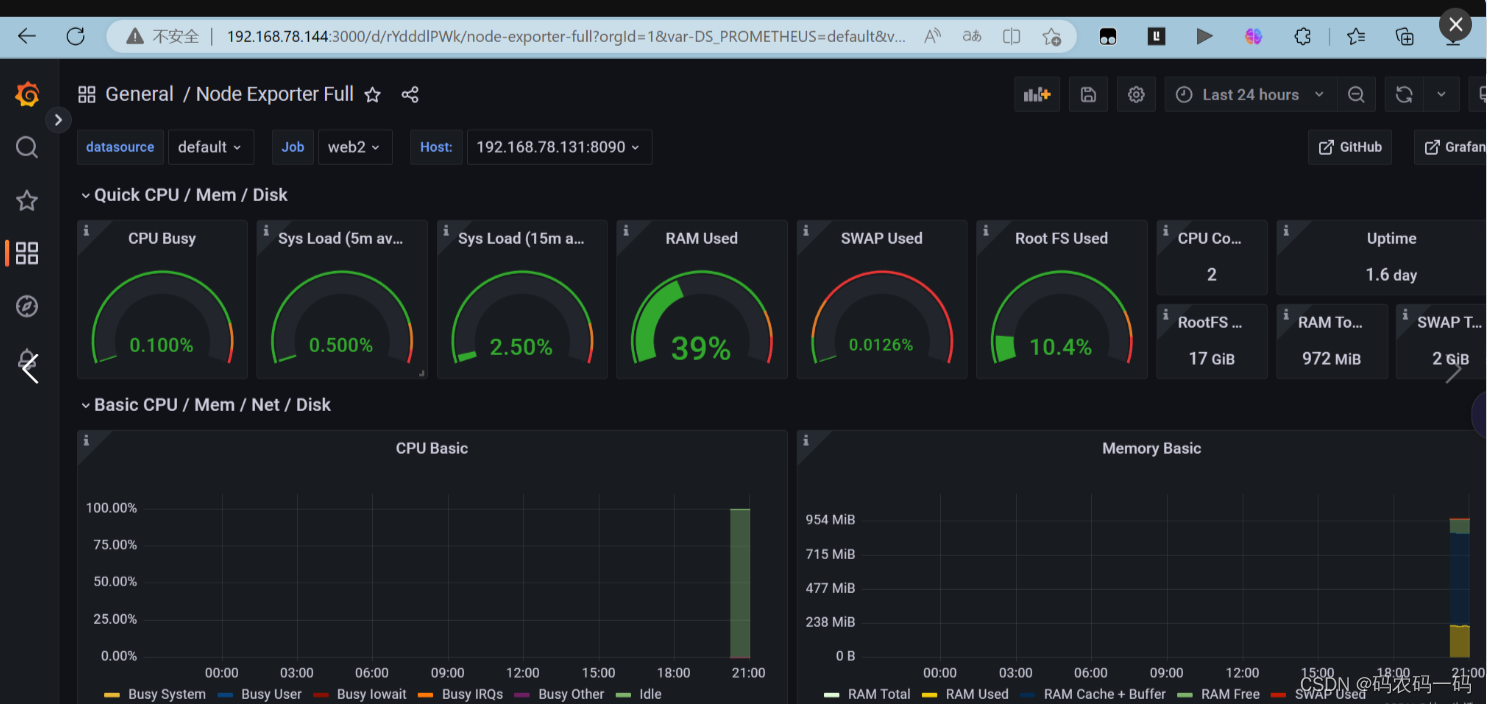
得到以下监控效果:
5.压力测试:
[root@ab ~]# ab -c 1500 -n 20000 http://www.zyk.com/结果为
Requests per second:Time per request:
Time per request:
Transfer rate:
2618.15[#/sec](mean)852.403「ms](mean)
0.852 [ms](mean, across all concurrent requests)400.98 [Kbytes/seclreceived
得到最大处理并发数2000左右。
6.系统性能资源进行调优
内核参数调优
[root@lb1 ~]# ulimit -n 65535
[root@lb1 ~]# ulimit -a
core file size          (blocks, -c) 0
data seg size           (kbytes, -d) unlimited
scheduling priority             (-e) 0
file size               (blocks, -f) unlimited
pending signals                 (-i) 7190
max locked memory       (kbytes, -l) 64
max memory size         (kbytes, -m) unlimited
open files                      (-n) 65535
pipe size            (512 bytes, -p) 8
POSIX message queues     (bytes, -q) 819200
real-time priority              (-r) 0
stack size              (kbytes, -s) 8192
cpu time               (seconds, -t) unlimited
max user processes              (-u) 7190
virtual memory          (kbytes, -v) unlimited
file locks                      (-x) unlimited
交换分区调优
当内存使用率为0时在使用交换分区资源,提高内存的利用率。
[root@lb1 ~]# cat /proc/sys/vm/swappiness
30
[root@lb1 ~]# echo 0 > /proc/sys/vm/swappiness
[root@lb1 ~]# cat /proc/sys/vm/swappiness
0
nginx参数调优
#user  nobody;
worker_processes  2; #增加worker进程数量

#error_log  logs/error.log;
#error_log  logs/error.log  notice;
#error_log  logs/error.log  info;

#pid        logs/nginx.pid;


events {
    worker_connections  2048; #增加每个worker进程的最大并发连接数
}
在进行多次压力测试
[root@ab ~]# ab -c 3000 -n 30000 http://www.zyk.com/
结果为
Requests per second:    3014.15 [#/sec] (mean)
Time per request:       852.403 [ms] (mean)
Time per request:       0.852 [ms] (mean, across all concurrent requests)
Transfer rate:          400.98 [Kbytes/sec] received
发现每秒请求数增大为了3014,所以进行内核参数调优和nginx参数调优,效果还是有的。只不过不是很显著。
项目遇到的问题
- 静态配置ip的时候,有几台虚拟机未设置桥接,导致无法上网
- dns服务器上忘记关闭firewalld和NetworkManager导致windows客户机域名解析不出来。
- 搭建双vip高可用架构的时候出现了脑裂现象,发现是因为虚拟路由器id设置错误了。
- 未完全理解ansible中script模块的使用,以为是要将脚本上传到远程主机才可以执行脚本,其实完全可以在在中控机上编写好脚本,远程机上执行。
- realip获取真实客户机的ip地址时,代码放错了位置,导致没有出现效果。
- nginx前期编译时没加入realip模块,可以考虑热升级。
- 一键安装nginx脚本中修改PATH变量时,修改的是子进程中的环境变量,即使export PATH变量也只是让子进程可以使用,无法影响到父进程的环境变量,导致安装完nginx后无法在PATH变量中找到nginx命令,简单的解决办法有二个:一是重启,二是在ansibleplaybook中不使用script模块,而是先cp脚本过去后通过shell模块用
项目心得
1.提前规划好整个集群的架构,可以提高项目开展时效率。
2.对基于Nginx的web集群和高可用、高性能有了深入的理解,同时对脑裂和vip漂移现象也有了更加深刻的体会和分析。
3.加强了对7层负载均衡和dns负载均衡的认识
4.认识到了系统性能资源的重要性,对压力测试下整个集群的瓶颈有了一个整体概念。
5.对监控也有了的更进一步的认识,监控可以提前看到问题,做好预警
6.对很多软件之间的配合有了一定的理解,如Grafana、prometheus、ansible、nginx、nfs等
7.troubleshooting的能力得到了提升


 1329
1329


 被折叠的 条评论
为什么被折叠?
被折叠的 条评论
为什么被折叠?
 到【灌水乐园】发言


