


一、Spring 简介
1.简介
1.简介
-
Spring framework 是 Spring 基础框架
-
学习Spring 家族产品
-
Spring framework
-
SpringBoot
-
SpringCloud
-
-
Spring 能用来做什么
-
开发 WEB 项目
-
微服务
-
分布式系统
-
-
Spring framework 是 Spring 最基础的框架,是其它框架技术的基础
-
SpringBoot 是用来做简化开发的,单一项目
-
SpringCloud 做分布式微服务相关的,拆分大单体项目为小模块项目
2.Spring 概述
2.1 Spring framework 介绍
-
概述:spring 提供了基础框架,你不必关心框架细节,只需要专注于代码业务逻辑
-
优点:
-
组件化模块化的:通过很多模块与组件组合成 spring 应用,以后可以通过 Xml 或者注解的方式去操作
-
控制反转( Inversion of Control (IoC) ):传统创建对象都是通过认为的new 对象的方式,把控制创建对象的权利转交给Spring
-
依赖注入(Dependency Injection):自动化的注入属性
-
3.模块
3.1 Spring 系统架构图

3.2模块介绍
-
Core Container:核心容器,是Spring 最核心的模块,以后用到的都依赖该模块实现
-
Aop:面向切面编程,目的是不改变原有代码的前提下对功能进行增强
-
Aspects:是Aop 具体实现
-
-
Data Access/Integration:数据层
-
Data Access:数据访问的
-
Data Integration:数据集成
-
Transactios:支持事务操作,通过 AOP 来实现,释放我们的双手
-
-
Web:WEB 层,SpringMVC 框架的
-
Servlet
-
Web
-
-
Test:做集成测试
-
整合 Junit 做单元测试
-
二、IOC
1.概述
1.1 IOC:Inversion of Control 控制反转
- 把对象的创建权利交出去,交由第三方容器负责。
- 把对象和对象之间关系的维护权利交出去,交给第三方容器负责。
1.2 控制反转是一种思想
- 为了降低程序耦合度,提高程序扩展力,达到OCP原则,达到DIP原则。
1.3 如何实现控制反转
- DI:依赖注入
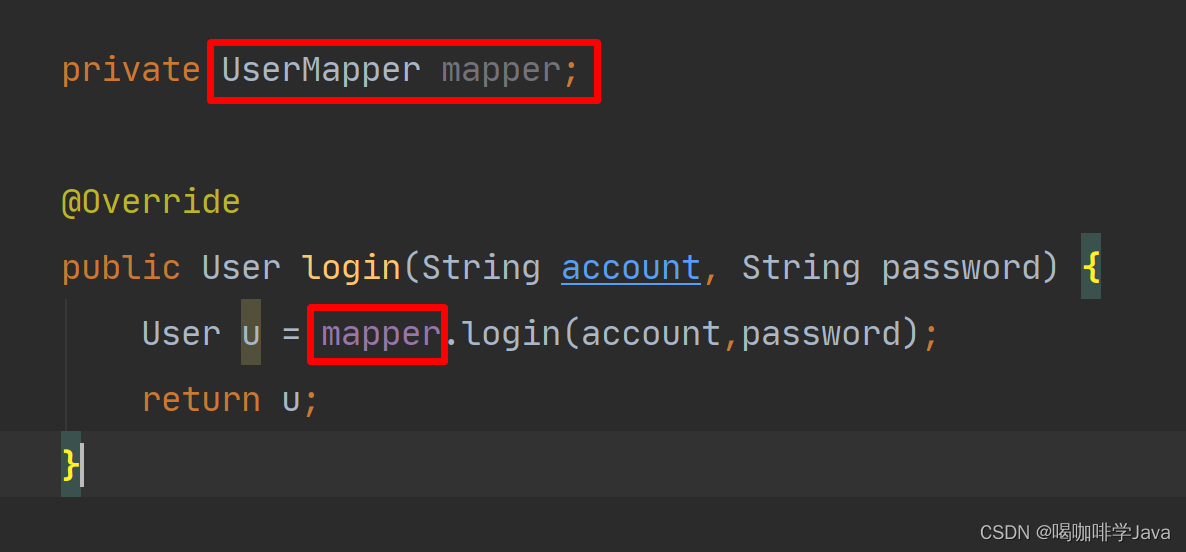
2.回顾问题
2.1问题:写了太多与业务无关的代码
-
耦合度非常高,写了很多和业务无关的代码
-
不利于项目的升级迭代
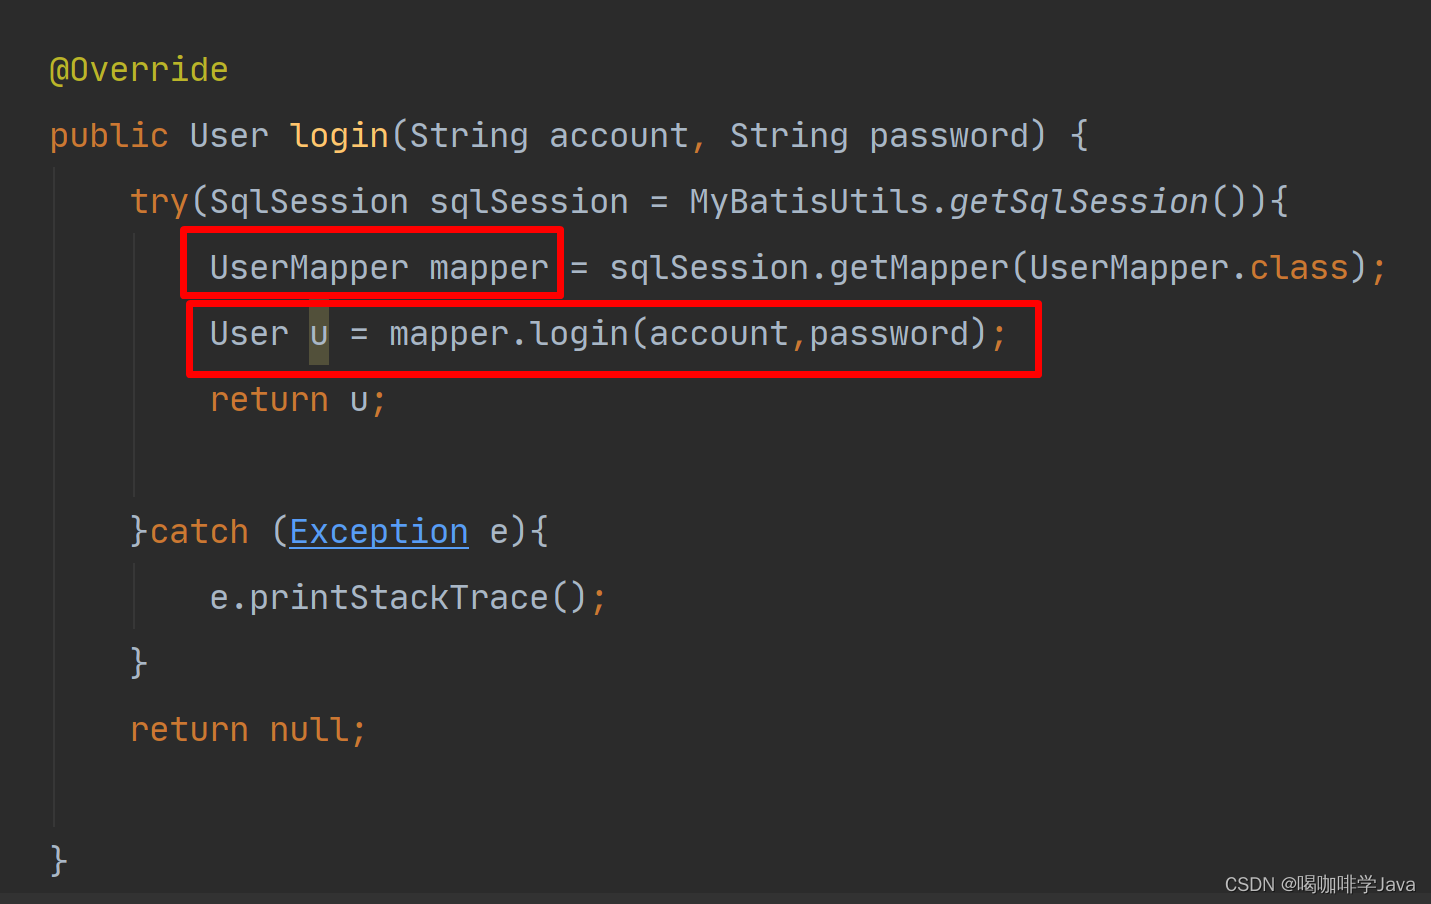
- 思考的解决方案
-
能够直接获取 mapper 接口,而不必去关心底层的获取方式
-
3.bean 配置
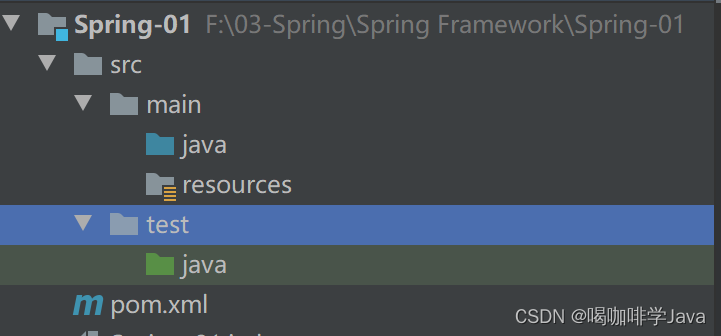
3.1.创建 spring01 项目
项目结构
添加 Spring 依赖
<dependencies>
<!--        添加 spring 依赖-->
        <dependency>
            <groupId>org.springframework</groupId>
            <artifactId>spring-context</artifactId>
            <version>5.2.17.RELEASE</version>
        </dependency>
<!--        添加 junit 依赖-->
        <dependency>
            <groupId>junit</groupId>
            <artifactId>junit</artifactId>
            <version>4.12</version>
<!--            <scope>test</scope>-->
        </dependency>
    </dependencies>
3.2添加 Student 类
- 创建空学生类
3.3添加 Spring 配置文件
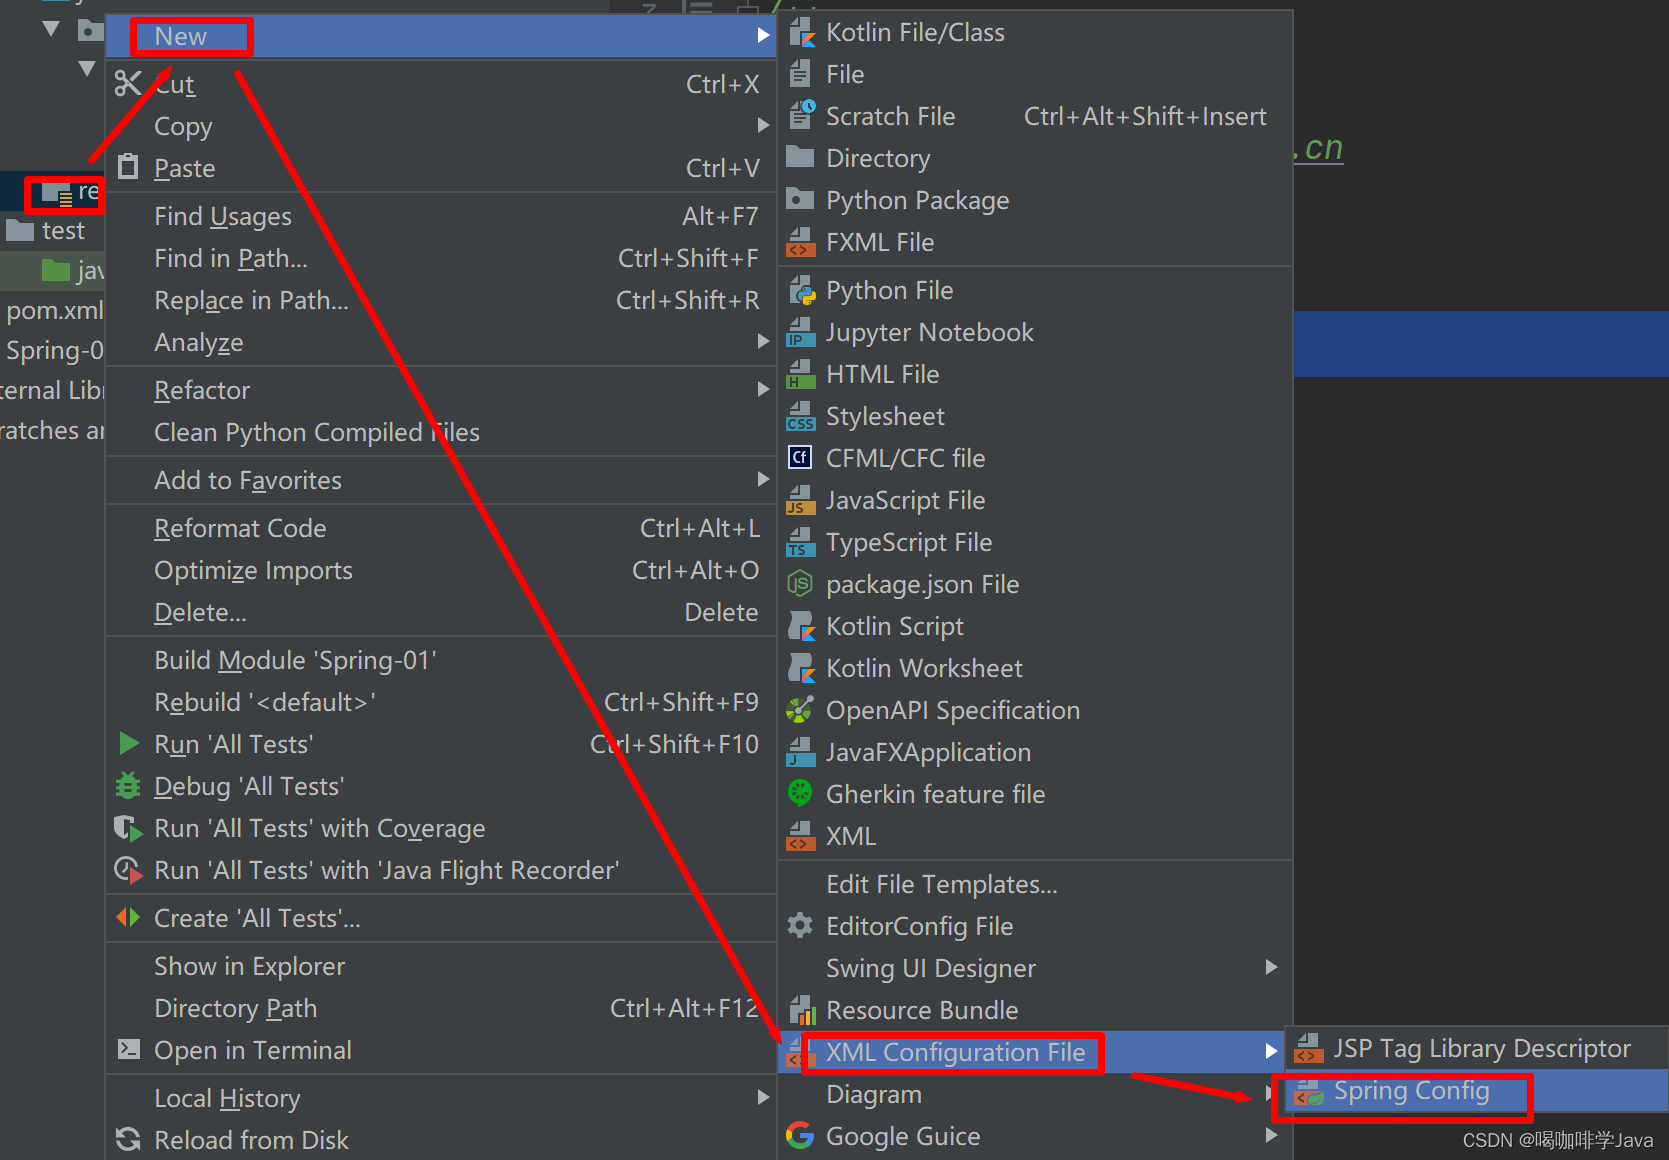
开始配置 javabean
<?xml version="1.0" encoding="UTF-8"?>
<beans xmlns="http://www.springframework.org/schema/beans"
       xmlns:xsi="http://www.w3.org/2001/XMLSchema-instance"
       xsi:schemaLocation="http://www.springframework.org/schema/beans http://www.springframework.org/schema/beans/spring-beans.xsd">
<!--    配置 Student 学生类-->
    <bean id="student" name="stu" class="cn.wjcoder.domian.Student"></bean>
</beans>
3.4属性介绍
| 属性名称 | 说明 |
|---|---|
| id | 给 bean 起名字(定义id 不能重复) |
| name | 给 bean 起别名 |
| class | 类全限定类名 |
4.容器创建
4.1ClassPathXmlApplicationContext
ApplicationContext context = new ClassPathXmlApplicationContext("beans.xml");
System.out.println(context);
4.2.FileSystemXmlApplicationContext
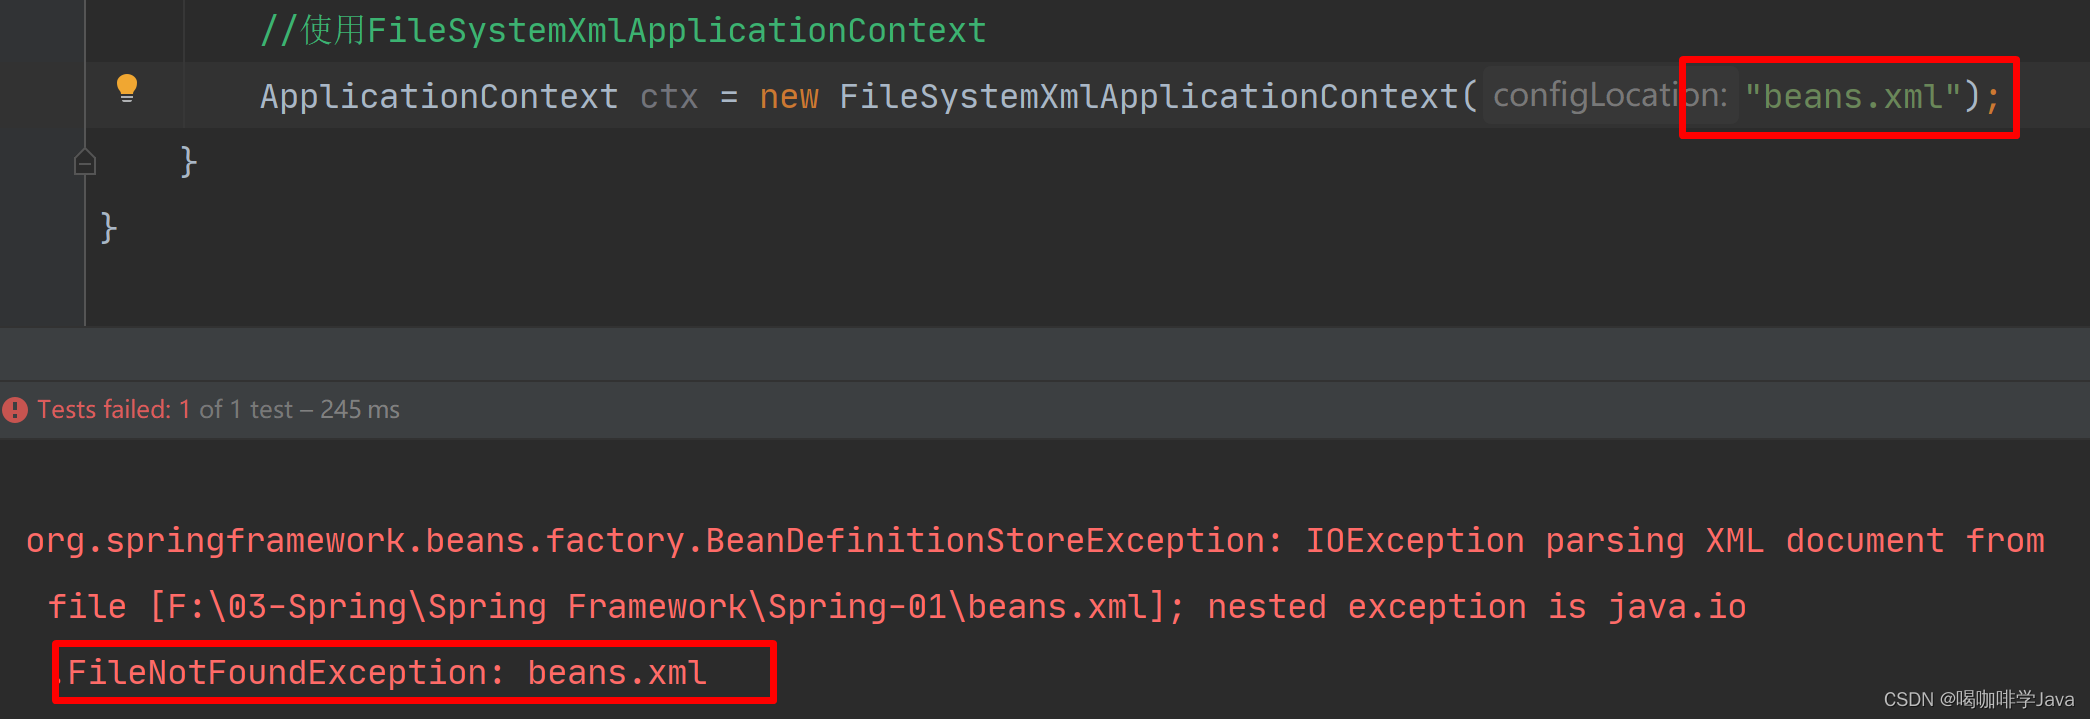
ApplicationContext ctx = new FileSystemXmlApplicationContext("绝对路径地址");使用 ClassPathXmlApplicationContext 获取方式会出现如下问题
5.从容器中获取 bean
5.1根据id 获取
ApplicationContext context = new ClassPathXmlApplicationContext("beans.xml");
//从容器中根据 id 获取 bean 对象
Student stu = (Student)context.getBean("student");
//通过别名获取 bean 对象
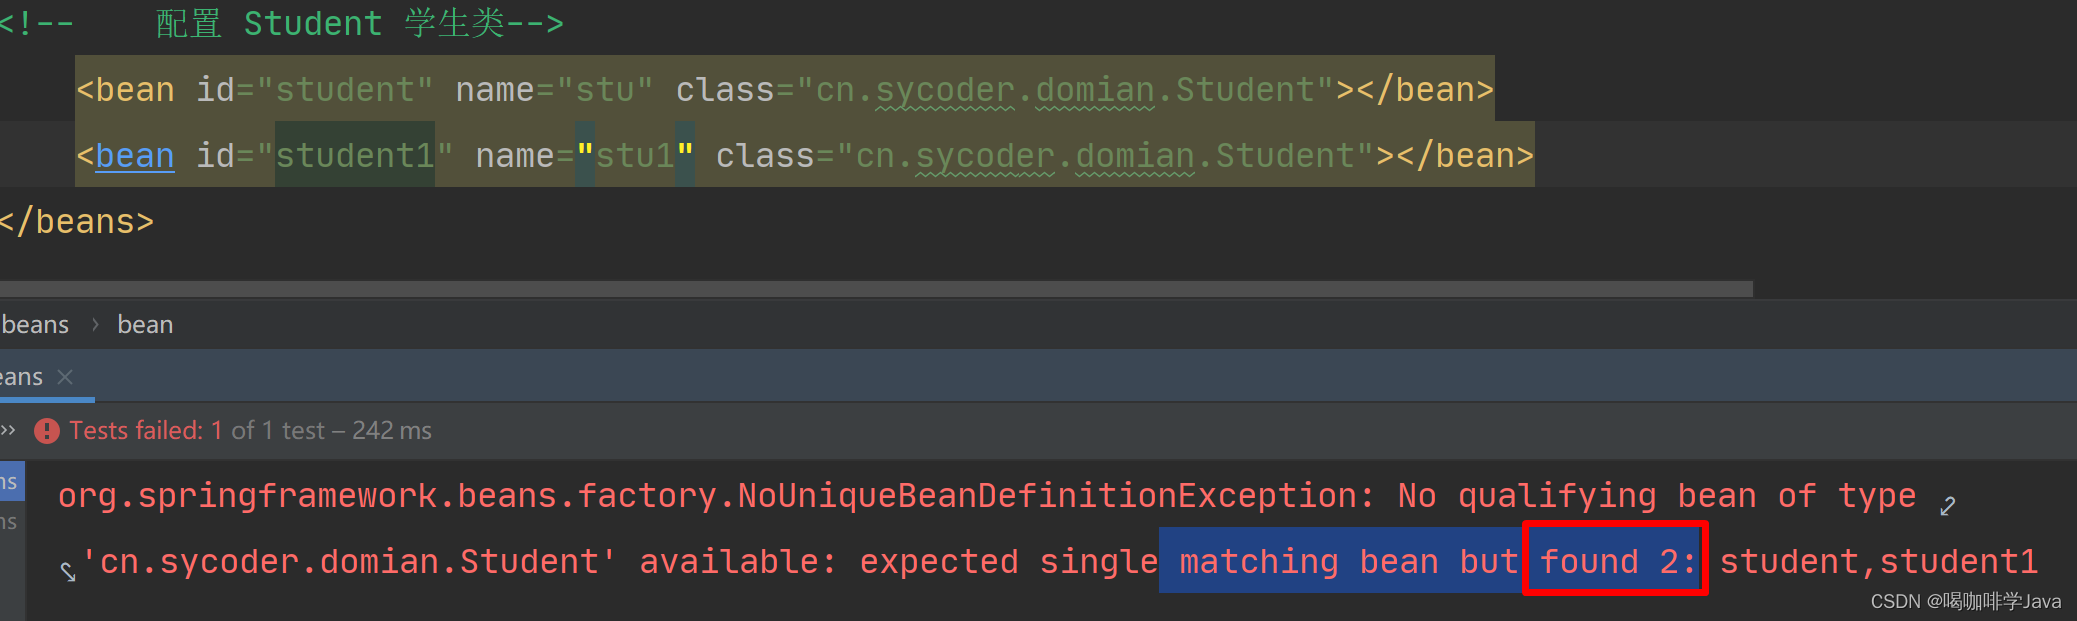
Student stuByName = (Student)context.getBean("stu");注意:如果id重复会有如下问题
5.2根据id和类型
ApplicationContext context = new ClassPathXmlApplicationContext("beans.xml");
final Student bean = context.getBean(Student.class);
注意:使用类型获取的时候,一定要保证容器中只有一个 javabean 对象
4.注意点
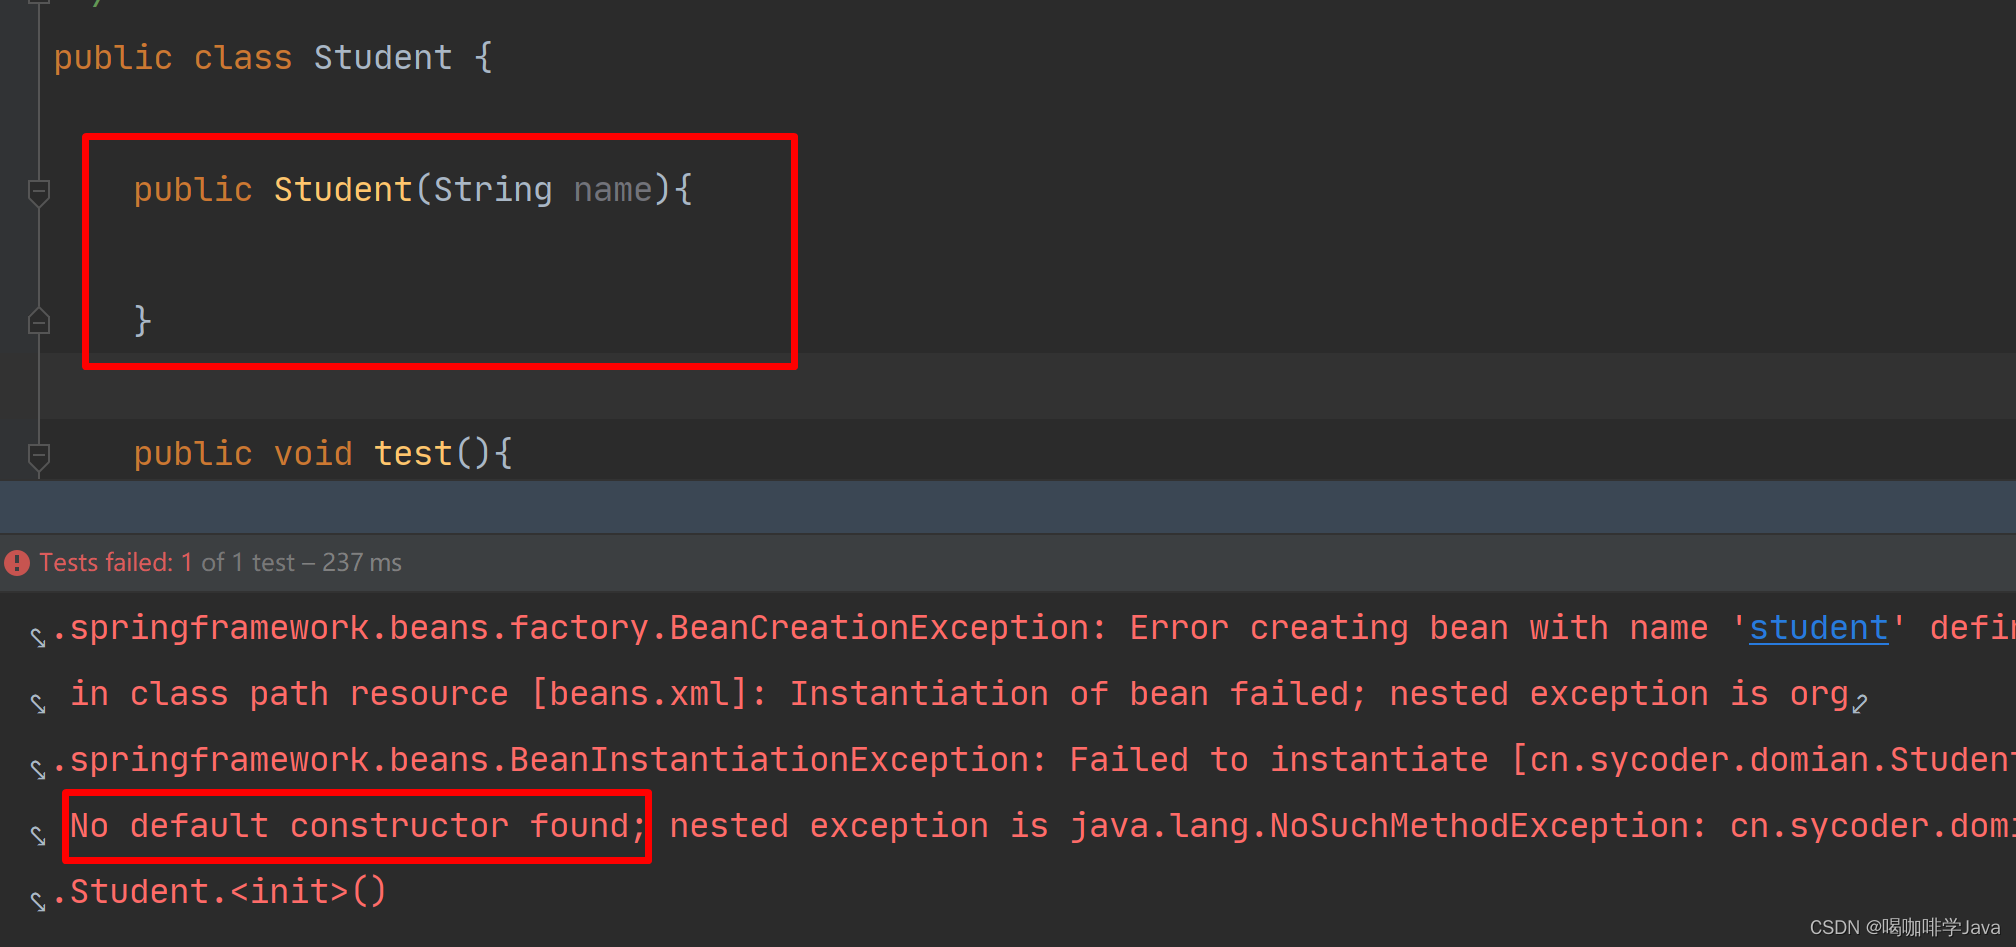
- bean 的配置spring 是使用反射调用对象的无参构造器实现的。所以必须提供无参构造器,否则会出现如下错误
6.设计模式
6.1单例模式
-
概述:属于创建型模式,提供了创建对象的最佳方式。单例模式只能有一个单一的类
-
懒汉式单例模式:需要用的时候,再去把对象创建出来
public class SingleObject {
    //线程不安全的懒汉式单例模式
    private static SingleObject instance;

    public static SingleObject getInstance(){
        if(instance == null){
            instance =new SingleObject();
        }
        return instance;
    }

}- 饿汉式单例模式:不管你有没有,我先创建出来
public class SingleObjectE {
    //线程不安全的饿汉式单例模式
    private static SingleObjectE instance = new SingleObjectE();

    public static SingleObjectE getInstance(){
        return instance;
    }
}
6.2工厂模式
-
概述:也是属于创建型模式,目的也是提供创建对象的最佳方式
-
静态工厂
public class BeanFactory {

    public static Student getBean() {
        return new Student();
    }

    public static Object getBean(String name) {
        if ("Student".equals(name))
            return new Student();
        else if("SingleObject".equals(name)) {
            return new SingleObject();
        }else{
            return new Object();
        }
    }

}- 实例工厂
public class BeanFactory {

    public Object getBean(){
        return new Student();
    }
}
7.bean 实例化
-
bean 交给 spring 创建,底层究竟是怎么创建的?
-
实例化 bean 三种方式:
-
构造器(常用)
-
静态工厂方法
-
实例工厂方法
-
实现 FactoryBean(最常用)
-
7.1无参构造器实例化
新建 person 类,底层是通过 clz.getDeclaredClasses() 获取构造器
public class Person {

    public Person(){

    }

}
配置 Person bean
<bean id="person" class="cn.wjcoder.domian.Person"></bean>从容器中获取 bean
@Test
public void testConstructorInit(){
     final ClassPathXmlApplicationContext context = new ClassPathXmlApplicationContext("beans.xml");
     Person p = (Person) context.getBean("person");

}
注意:修改构造器,添加参数测试,提示找不到无参构造器


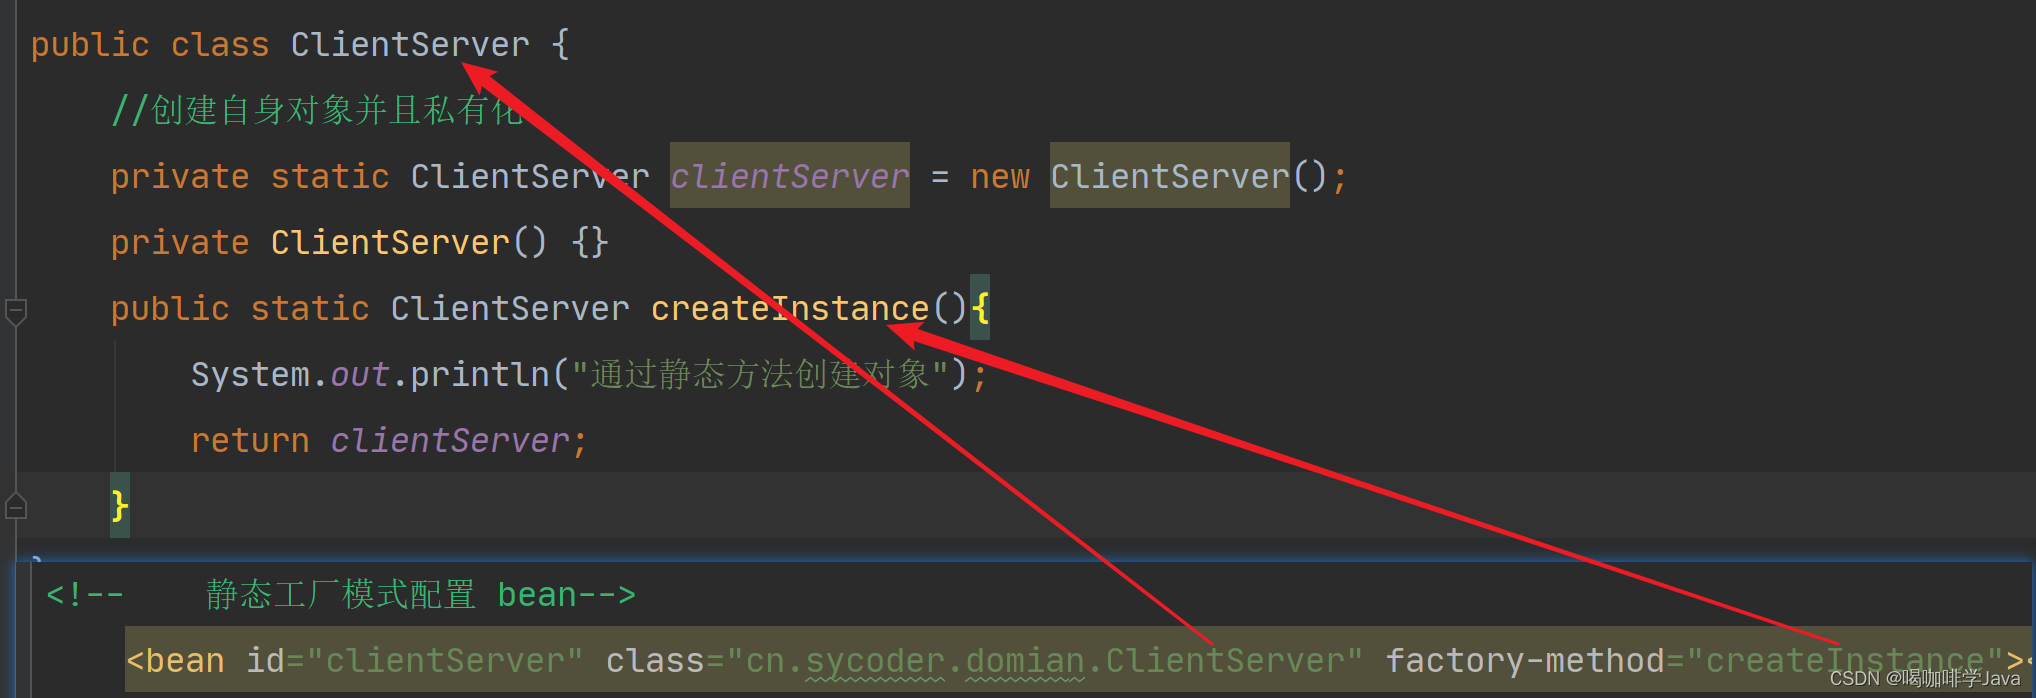
7.2静态工厂方法实例化
创建 clintServer 类,提供静态工厂方法
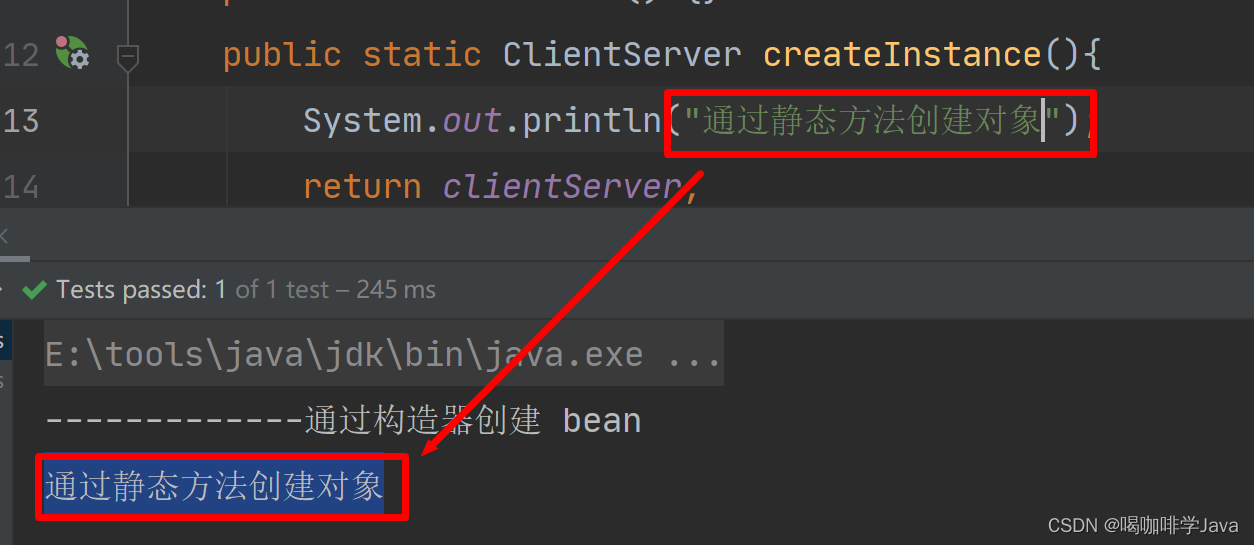
public class ClientServer {
    //创建自身对象并且私有化
    private static ClientServer clientServer = new ClientServer();
    private ClientServer() {}
    public static ClientServer createInstance(){
        return clientServer;
    }
}
配置bean 的 xml
<bean id="clientServer" class="cn.wjcoder.domian.ClientServer" factory-method="createInstance"></bean>获取 bean
@Test
    public void testFactoryStaticMethodInit(){
        final ClassPathXmlApplicationContext context = new ClassPathXmlApplicationContext("beans.xml");
        final ClientServer bean = context.getBean(ClientServer.class);
    }
配置关系
7.3实例工厂方法实例化
创建实例工厂类
public class ClientServiceFactory {
    private static ClientService instance = new ClientService();
    private ClientServiceFactory(){}
    public ClientService getInstance(){
        return instance;
    }
}
public class ClientService {
}配置 bean
<!--    配置工厂-->
    <bean id="clientFactory" class="cn.wjcoder.domian.ClientServiceFactory"></bean>
<!--    配置 clientService-->
    <bean id="clientService" factory-bean="clientFactory" factory-method="getInstance"></bean>
获取bean
@Test
    public void testFactoryInstanceMethodInit(){
        final ClassPathXmlApplicationContext context = new ClassPathXmlApplicationContext("beans.xml");
        final ClientService bean = context.getBean(ClientService.class);
    }
配置关系

7.4实现 FactoryBean实例化
创建员工类
public class Employee {
    public void check(){
        System.out.println("检查是否能够拿到员工类对象");
    }
}
创建员工 factory 类实现 FactoryBean
public class EmployeeFactory implements FactoryBean<Employee> {
    public Employee getObject() throws Exception {
        System.out.println("获取 emp 对象");
        return new Employee();
    }

    public Class<?> getObjectType() {
        return Employee.class;
    }

    public boolean isSingleton() {
        return false;
    }
}配置工厂类(并没有直接配置 emp 类)
<bean id="employee" class="cn.wjcoder.domian.EmployeeFactory"></bean>@Test
public void testFactoryBeanInit(){
final ClassPathXmlApplicationContext context = new ClassPathXmlApplicationContext("beans.xml");
final Employee emp = (Employee)context.getBean("employee");
emp.check();
}实现方法说明
-
isSingleton:如果是 true 返回单例的对象
public boolean isSingleton() {
        return true;
}- getObject:进行对象创建的
public Employee getObject() throws Exception {
    System.out.println("获取 emp 对象");
    return new Employee();
}
三、DI
1.概述
-
概述:Dependency Injection 依赖注入,给对象设置属性,曾经我们需要自己去创建 mapper 对象,才能调用,现在交给 spring 创建,并且使用 DI 注入,直接拿来用,程序员就可以更加关注业务代码而不是创建对象
-
给对象设置属性方式:
-
构造器
-
set 方法
-
-
spring 也是通过构造器以及set方法来实现属性设置
2.回顾问题
-
如果只给了 mapper 对象,那么调用的时候会出现空指针
解决方式:使用 DI 注入,解决方案如下

3.构造器依赖注入
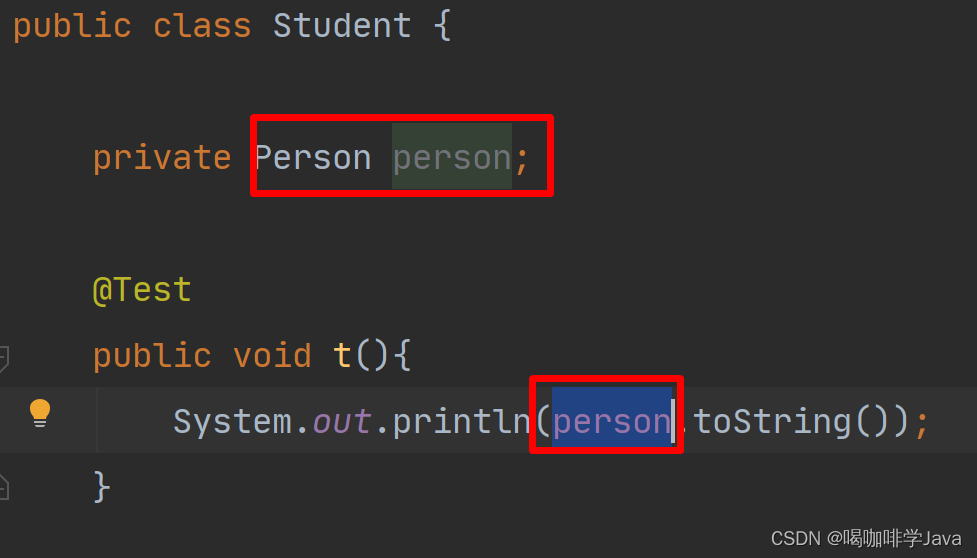
3.1创建学生类
public class Student {
}
3.2创建Mapper 接口以及实现类
-
创建 Mapper 接口
public interface StudentMapper { void insert(Student stu); int delete(Long id); } -
创建 Mapper 实现类
public class StudentMapperImpl implements StudentMapper{ public void insert(Student stu) { System.out.println("保存学生信息"); } public int delete(Long id) { System.out.println("删除id="+id+"的学生信息"); return 1; } } -
将 Mapper 交给容器管理
<bean id="studentMapper" class="cn.wjcoder.di.mapper.StudentMapperImpl"></bean>
3.3创建 service 接口以及实现类
-
创建 service 接口
public interface IStudentService { void insert(Student stu); int delete(Long id); } -
创建 service 实现类
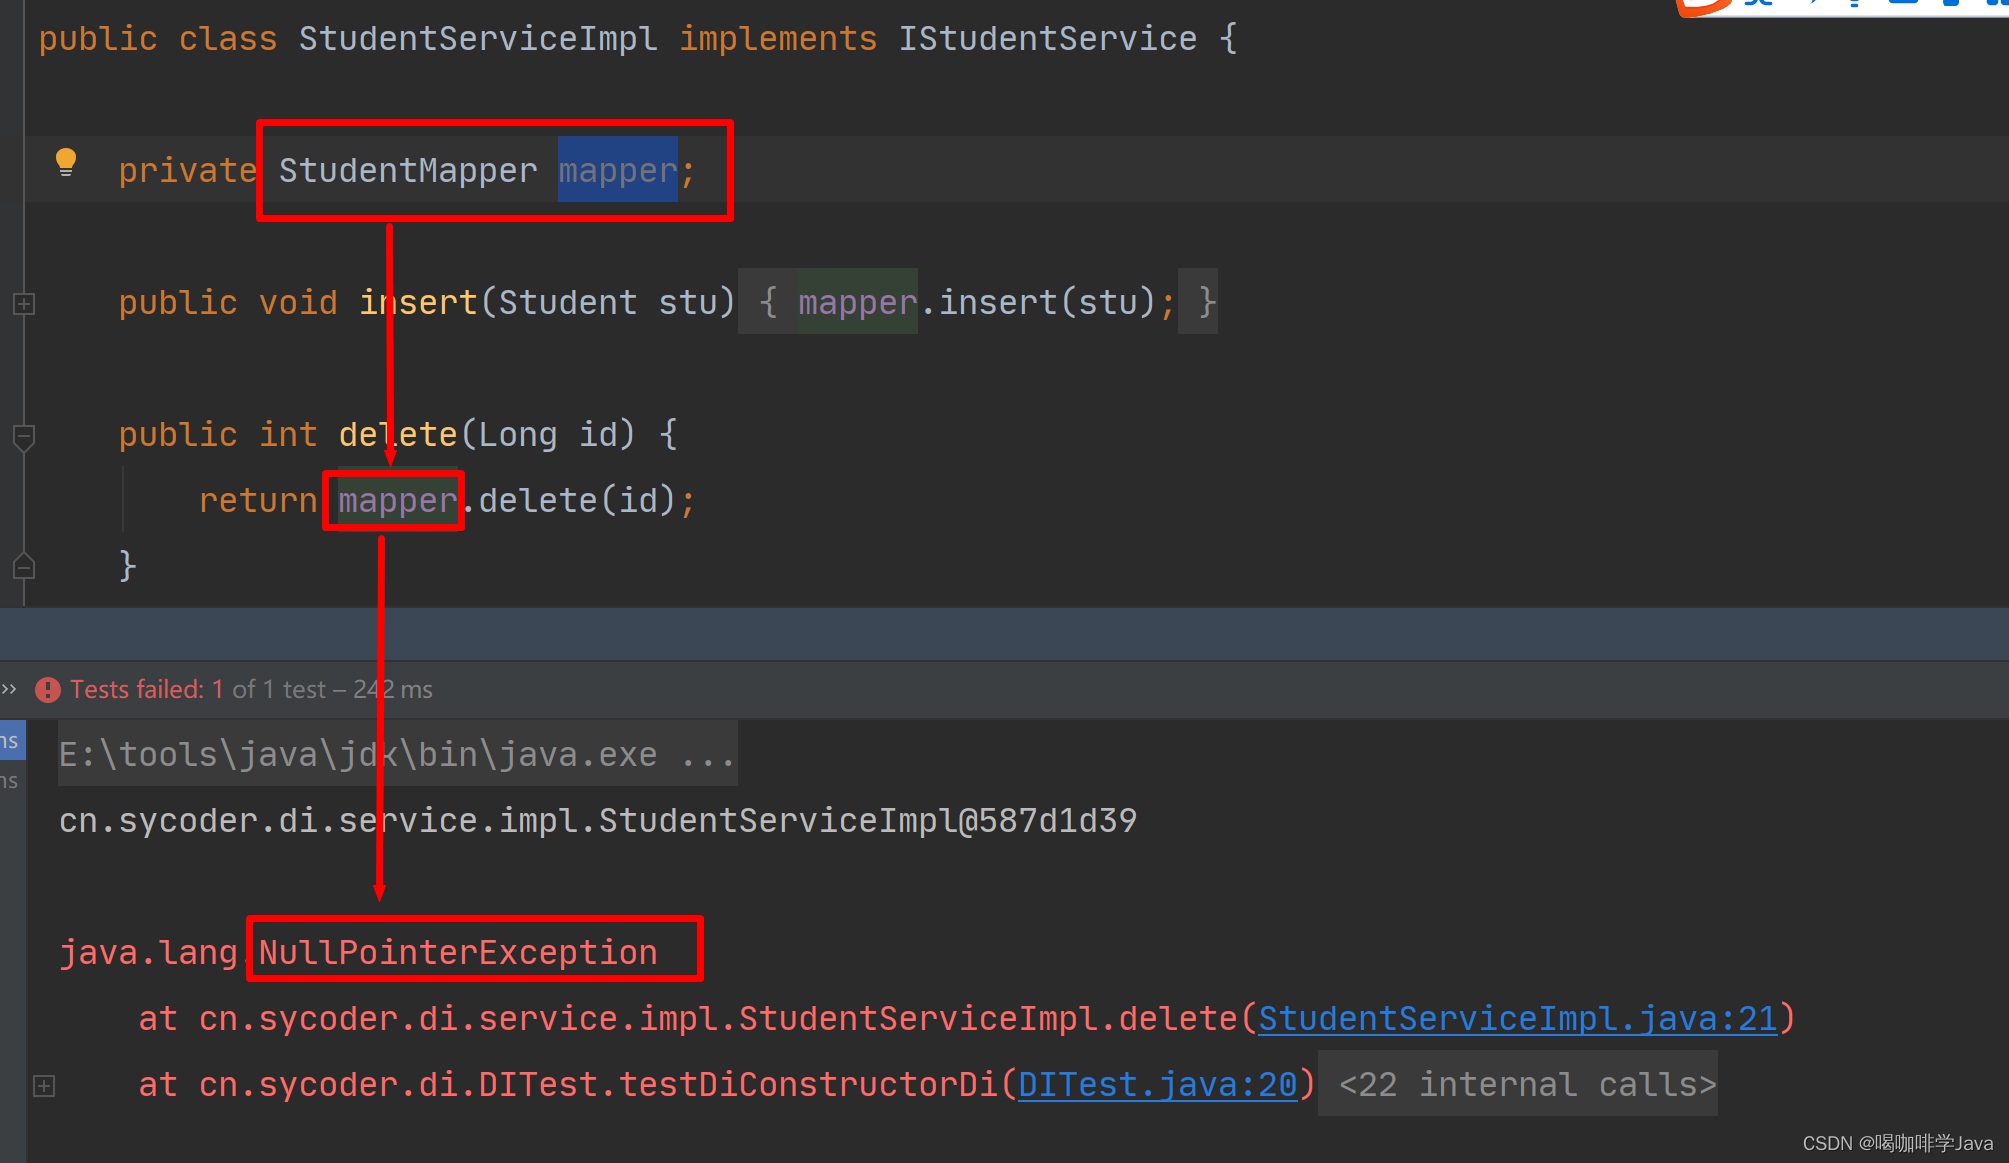
public class StudentServiceImpl implements IStudentService { private StudentMapper mapper; public void insert(Student stu) { mapper.insert(stu); } public int delete(Long id) { return mapper.delete(id); } } -
将 service 交给容器管理
<bean id="iStudentService" class="cn.wjcoder.di.service.impl.StudentServiceImpl"></bean>
3.4如果没有使用DI注入直接调用
-
会产生如下问题
4.5配置构造器注入属性
配置 service 构造器
public class StudentServiceImpl implements IStudentService {

    private StudentMapper mapper;

    public StudentServiceImpl(StudentMapper mapper){
        this.mapper = mapper;
    }

    public void insert(Student stu) {
        mapper.insert(stu);
    }

    public int delete(Long id) {
        return mapper.delete(id);
    }
}
配置 xml
<!--    配置 service-->
    <bean id="iStudentService" class="cn.wjcoder.di.service.impl.StudentServiceImpl">
        <constructor-arg name="mapper" ref="studentMapper"></constructor-arg>
    </bean>
<!--    配置 mapper-->
    <bean id="studentMapper" class="cn.wjcoder.di.mapper.StudentMapperImpl"></bean>
注意:
-
name:构造器的参数名称
-
ref:配置文件中其它 bean 的名称
-
图示如下

3.6构造器配置多个引用类型参数
配置service
public class StudentServiceImpl implements IStudentService {

    private StudentMapper mapper;

    private UserMapper userMapper;

    public StudentServiceImpl(StudentMapper mapper,UserMapper userMapper){
        this.mapper = mapper;
        this.userMapper = userMapper;
    }

    public void insert(Student stu) {
        mapper.insert(stu);
    }

    public int delete(Long id) {
        userMapper.delete(id);
        return mapper.delete(id);
    }
}
创建mapper
public interface UserMapper {
    int delete(Long id);
}
创建mapper实现类
public class UserMapperImpl implements UserMapper{

    public int delete(Long id) {
        System.out.println("删除id="+id+"的用户信息");
        return 1;
    }
}
配置bean
<beans xmlns="http://www.springframework.org/schema/beans"
       xmlns:xsi="http://www.w3.org/2001/XMLSchema-instance"
       xsi:schemaLocation="http://www.springframework.org/schema/beans http://www.springframework.org/schema/beans/spring-beans.xsd">
<!--    配置 service-->
<bean id="iStudentService" class="cn.wjcoder.di.service.impl.StudentServiceImpl">
     <constructor-arg name="mapper" ref="studentMapper"></constructor-arg>
     <constructor-arg name="userMapper" ref="userMapper"></constructor-arg>
</bean>
<!--    配置学生mapper-->
<bean id="studentMapper" class="cn.wjcoder.di.mapper.StudentMapperImpl"></bean>
<!--    配置用户mapper-->
<bean id="userMapper" class="cn.wjcoder.di.mapper.UserMapperImpl"></bean>
</beans>
3.7构造器配置多个基本数据类型参数
配置service
public class StudentServiceImpl implements IStudentService {

    private String name;

    private int age;

    private StudentMapper mapper;

    private UserMapper userMapper;

    public StudentServiceImpl(String name,int age,StudentMapper mapper,UserMapper userMapper){
        this.name = name;
        this.age = age;
        this.mapper = mapper;
        this.userMapper = userMapper;
    }

    public void insert(Student stu) {
        mapper.insert(stu);
    }

    public int delete(Long id) {
        System.out.println( name+":"+age);
        userMapper.delete(id);
        return mapper.delete(id);
    }
}
配置bean
<?xml version="1.0" encoding="UTF-8"?>
<beans xmlns="http://www.springframework.org/schema/beans"
       xmlns:xsi="http://www.w3.org/2001/XMLSchema-instance"
       xsi:schemaLocation="http://www.springframework.org/schema/beans http://www.springframework.org/schema/beans/spring-beans.xsd">
<!--    配置 service-->
    <bean id="iStudentService" class="cn.sycoder.di.service.impl.StudentServiceImpl">
        <constructor-arg name="userMapper" ref="userMapper"></constructor-arg>
        <constructor-arg name="mapper" ref="studentMapper"></constructor-arg>
        <constructor-arg type="int" value="18"></constructor-arg>
        <constructor-arg type="java.lang.String" value="sy"></constructor-arg>
    </bean>
<!--    配置学生mapper-->
    <bean id="studentMapper" class="cn.sycoder.di.mapper.StudentMapperImpl"></bean>
<!--    配置用户mapper-->
    <bean id="userMapper" class="cn.sycoder.di.mapper.UserMapperImpl"></bean>
</beans>
这种方式会存在参数覆盖的问题,解决方式,删除 type 添加 index 属性
<?xml version="1.0" encoding="UTF-8"?>
<beans xmlns="http://www.springframework.org/schema/beans"
       xmlns:xsi="http://www.w3.org/2001/XMLSchema-instance"
       xsi:schemaLocation="http://www.springframework.org/schema/beans http://www.springframework.org/schema/beans/spring-beans.xsd">
<!--    配置 service-->
    <bean id="iStudentService" class="cn.sycoder.di.service.impl.StudentServiceImpl">
        <constructor-arg name="userMapper" ref="userMapper"></constructor-arg>
        <constructor-arg name="mapper" ref="studentMapper"></constructor-arg>
        <constructor-arg index="2" value="18"></constructor-arg>
        <constructor-arg index="1" value="1"></constructor-arg>
        <constructor-arg type="java.lang.String" value="sy"></constructor-arg>

    </bean>
<!--    配置学生mapper-->
    <bean id="studentMapper" class="cn.sycoder.di.mapper.StudentMapperImpl"></bean>
<!--    配置用户mapper-->
    <bean id="userMapper" class="cn.sycoder.di.mapper.UserMapperImpl"></bean>
</beans>
4.setter依赖注入
-
使用 set 方法实现属性的注入
-
使用 property 属性
-
name:属性名称
-
value:直接给值
-
ref:其它bean的引用
-
4.1创建员工类
public class Employee {
}
4.2创建 mapper 接口以及实现类
-
mapper 接口
public interface EmployeeMapper { int delete(Long id); } -
mapper 实现类
public class EmployeeMapperImpl implements EmployeeMapper {
    public int delete(Long id) {
        System.out.println("删除当前员工id:"+id);
        return 1;
    }
}
4.3创建 servie 接口以及实现类
-
创建 service 接口
public interface IEmployeeService { int delete(Long id); } -
创建 service 接口实现类
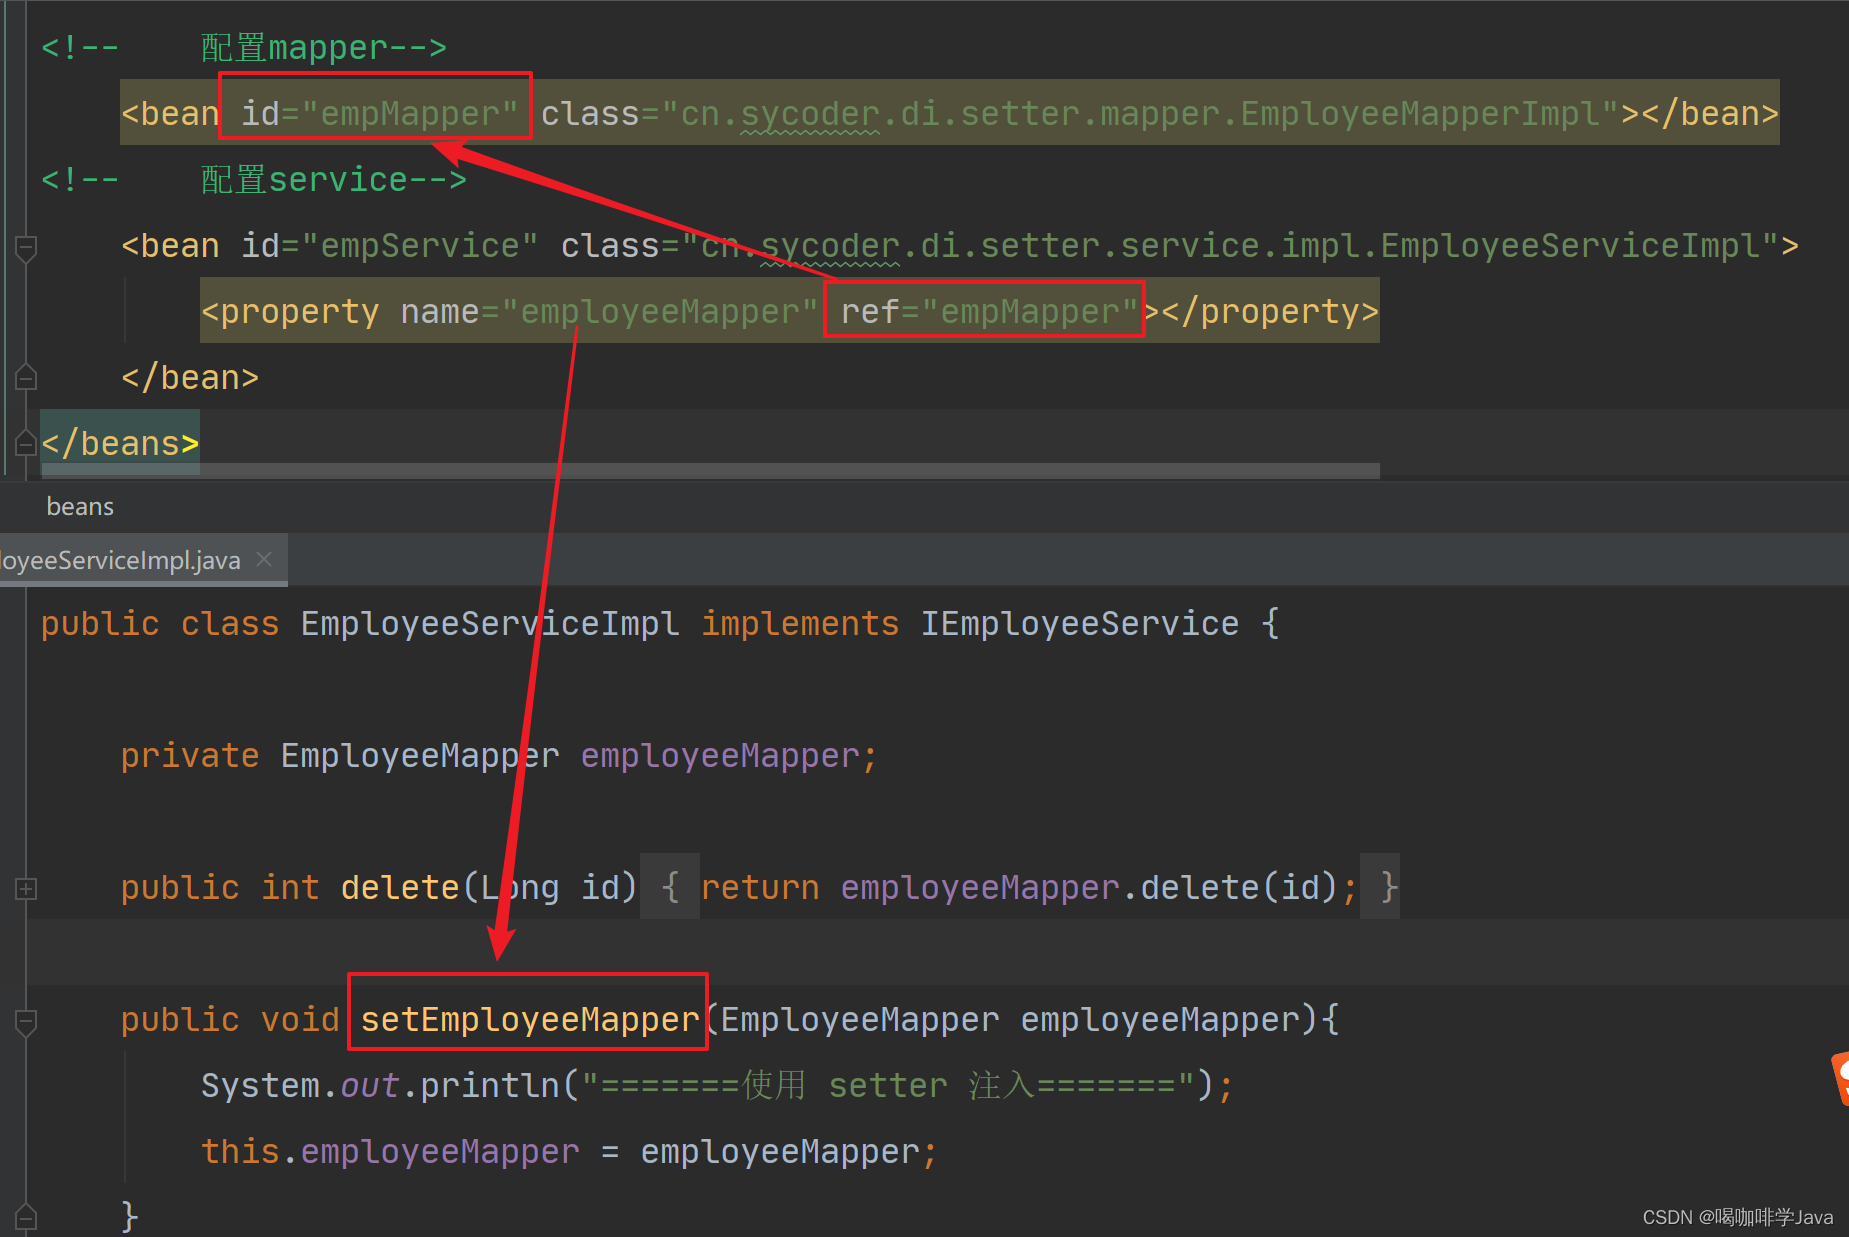
public class EmployeeServiceImpl implements IEmployeeService { private EmployeeMapper mapper; public int delete(Long id) { return mapper.delete(id); } }
4.4配置 setter 注入
-
配置bean
<?xml version="1.0" encoding="UTF-8"?>
<beans xmlns="http://www.springframework.org/schema/beans"
       xmlns:xsi="http://www.w3.org/2001/XMLSchema-instance"
       xsi:schemaLocation="http://www.springframework.org/schema/beans http://www.springframework.org/schema/beans/spring-beans.xsd"><!--    配置mapper实现类-->
<!--    配置mapper-->
    <bean id="empMapper" class="cn.sycoder.di.setter.mapper.EmployeeMapperImpl"></bean>
<!--    配置service-->
    <bean id="empService" class="cn.sycoder.di.setter.service.impl.EmployeeServiceImpl"></bean>
</beans>-
service 实现中提供 mapper 的setter 方法
public class EmployeeServiceImpl implements IEmployeeService { private EmployeeMapper employeeMapper; public int delete(Long id) { return employeeMapper.delete(id); } public void setEmployeeMapper(EmployeeMapper employeeMapper){ this.employeeMapper = employeeMapper; } } -
修改 beans.xml 通过 setter 注入
<?xml version="1.0" encoding="UTF-8"?> <beans xmlns="http://www.springframework.org/schema/beans" xmlns:xsi="http://www.w3.org/2001/XMLSchema-instance" xsi:schemaLocation="http://www.springframework.org/schema/beans http://www.springframework.org/schema/beans/spring-beans.xsd"><!-- 配置mapper实现类--> <!-- 配置mapper--> <bean id="empMapper" class="cn.sycoder.di.setter.mapper.EmployeeMapperImpl"></bean> <!-- 配置service--> <bean id="empService" class="cn.sycoder.di.setter.service.impl.EmployeeServiceImpl"> <property name="employeeMapper" ref="empMapper"></property> </bean> </beans> -
获取 service 执行 delete 方法
@Test public void testSetDi(){ final ClassPathXmlApplicationContext context = new ClassPathXmlApplicationContext("DiSetterBeans.xml"); final IEmployeeService empService = (IEmployeeService) context.getBean("empService"); empService.delete(2L); } -
setter 注入过程分析
4.5配置多个 setter 方法注入多个属性
-
给service 添加新的属性以及新的setter方法
public class EmployeeServiceImpl implements IEmployeeService { private EmployeeMapper employeeMapper; private UserMapper userMapper; public int delete(Long id) { return employeeMapper.delete(id); } public void setEmployeeMapper(EmployeeMapper employeeMapper){ System.out.println("=======使用 setter 注入======="); this.employeeMapper = employeeMapper; } public void setUserMapper(UserMapper mapper){ this.userMapper = mapper; } } -
配置 userMapper bean
<?xml version="1.0" encoding="UTF-8"?> <beans xmlns="http://www.springframework.org/schema/beans" xmlns:xsi="http://www.w3.org/2001/XMLSchema-instance" xsi:schemaLocation="http://www.springframework.org/schema/beans http://www.springframework.org/schema/beans/spring-beans.xsd"><!-- 配置mapper实现类--> <!-- 配置mapper--> <bean id="empMapper" class="cn.sycoder.di.setter.mapper.EmployeeMapperImpl"></bean> <!-- 配置service--> <bean id="empService" class="cn.sycoder.di.setter.service.impl.EmployeeServiceImpl"> <property name="employeeMapper" ref="empMapper"></property> </bean> <!-- 配置 userMapper--> <bean id="userMapper" class="cn.sycoder.di.constructor.mapper.StudentMapperImpl"></bean> </beans> -
通过 setter 注入
<?xml version="1.0" encoding="UTF-8"?> <beans xmlns="http://www.springframework.org/schema/beans" xmlns:xsi="http://www.w3.org/2001/XMLSchema-instance" xsi:schemaLocation="http://www.springframework.org/schema/beans http://www.springframework.org/schema/beans/spring-beans.xsd"><!-- 配置mapper实现类--> <!-- 配置mapper--> <bean id="empMapper" class="cn.sycoder.di.setter.mapper.EmployeeMapperImpl"></bean> <!-- 配置service--> <bean id="empService" class="cn.sycoder.di.setter.service.impl.EmployeeServiceImpl"> <property name="employeeMapper" ref="empMapper"></property> <property name="userMapper" ref="userMapper"></property> </bean> <!-- 配置 userMapper--> <bean id="userMapper" class="cn.sycoder.di.constructor.mapper.UserMapperImpl"></bean> </beans> -
获取 service 操作delete 方法
@Test
    public void testSetterSDi(){
        final ClassPathXmlApplicationContext context = new ClassPathXmlApplicationContext("DiSetterBeans.xml");
        final IEmployeeService empService = (IEmployeeService) context.getBean("empService");
        empService.delete(2L);
    }
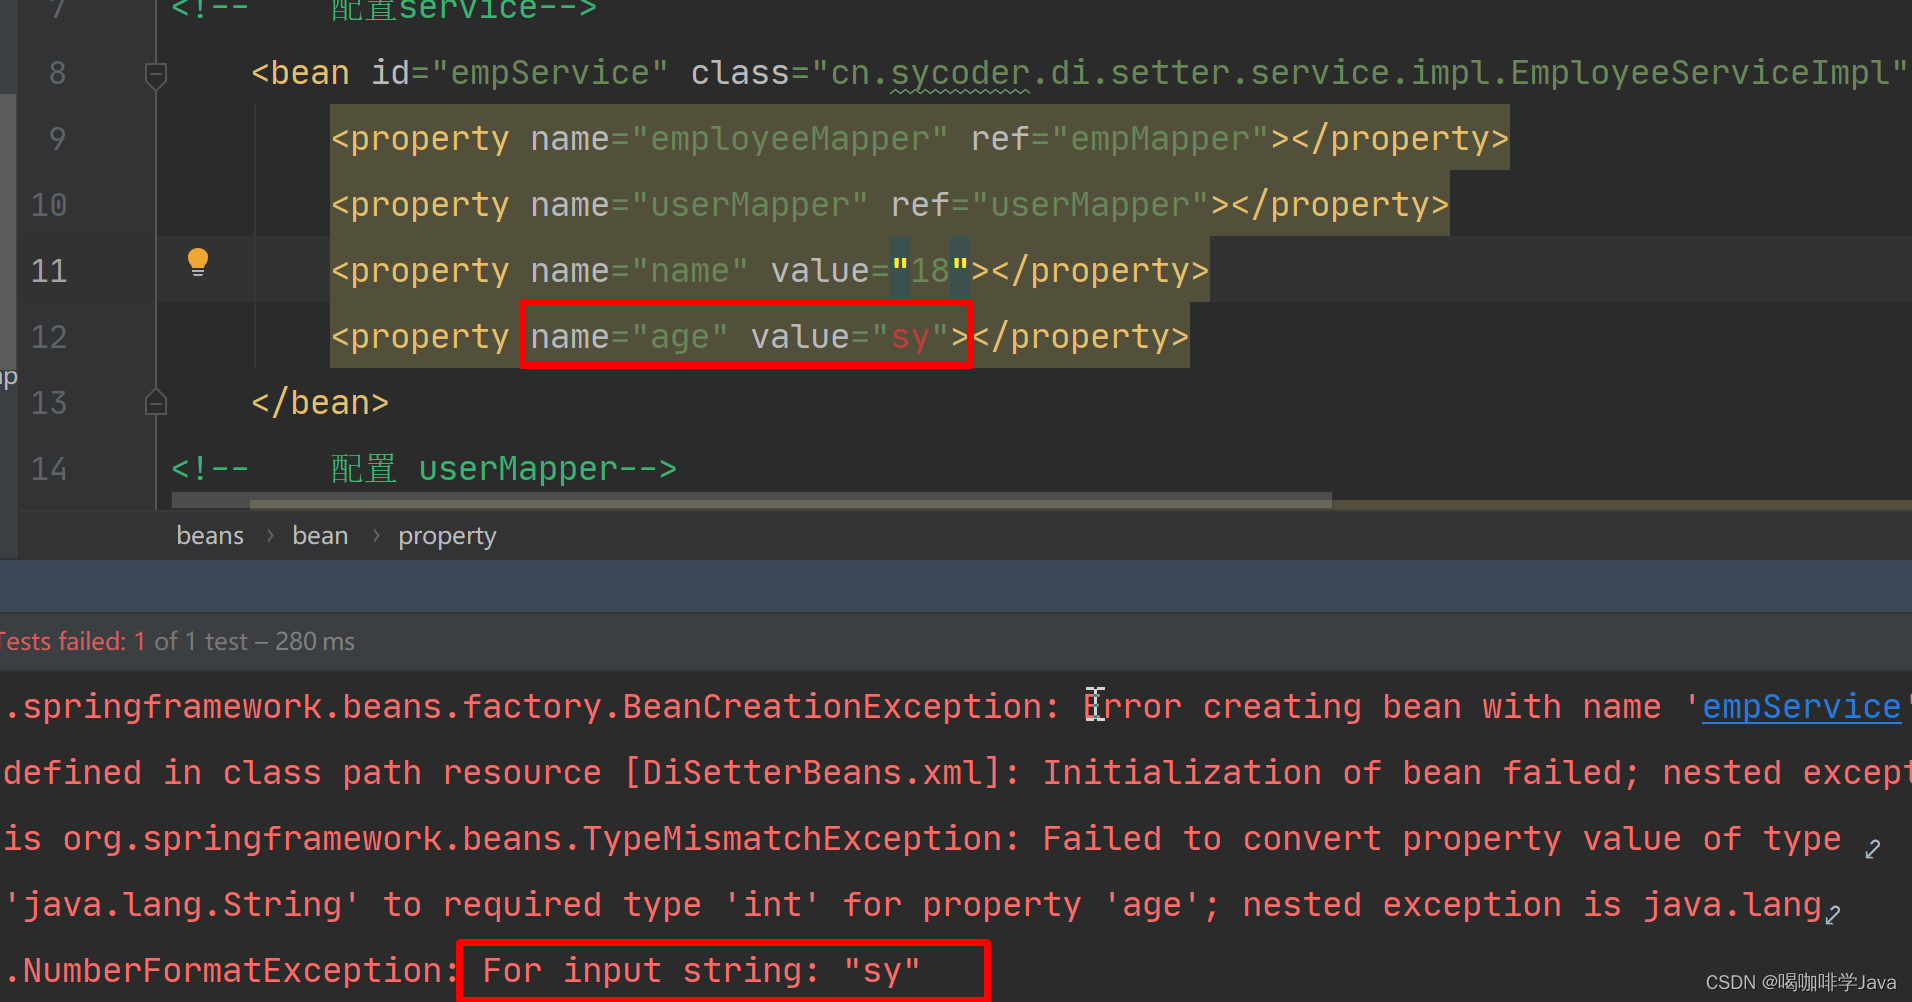
4.6使用 setter 注入简单类型
-
修改 service 类,提供两个属性 int age = 18,String name = "sy"
public class EmployeeServiceImpl implements IEmployeeService { private EmployeeMapper employeeMapper; private UserMapper userMapper; private String name; private int age; public void setName(String name){ this.name = name; } public void setAge(int age){ this.age = age; } public int delete(Long id) { System.out.println(name + ":" + age); userMapper.delete(id); return employeeMapper.delete(id); } public void setEmployeeMapper(EmployeeMapper employeeMapper){ System.out.println("=======EmployeeMapper使用 setter 注入======="); this.employeeMapper = employeeMapper; } public void setUserMapper(UserMapper mapper){ System.out.println("=======UserMapper使用 setter 注入======="); this.userMapper = mapper; } } -
配置 xml 设置值
<?xml version="1.0" encoding="UTF-8"?> <beans xmlns="http://www.springframework.org/schema/beans" xmlns:xsi="http://www.w3.org/2001/XMLSchema-instance" xsi:schemaLocation="http://www.springframework.org/schema/beans http://www.springframework.org/schema/beans/spring-beans.xsd"><!-- 配置mapper实现类--> <!-- 配置mapper--> <bean id="empMapper" class="cn.sycoder.di.setter.mapper.EmployeeMapperImpl"></bean> <!-- 配置service--> <bean id="empService" class="cn.sycoder.di.setter.service.impl.EmployeeServiceImpl"> <property name="employeeMapper" ref="empMapper"></property> <property name="userMapper" ref="userMapper"></property> <property name="name" value="sy"></property> <property name="age" value="18"></property> </bean> <!-- 配置 userMapper--> <bean id="userMapper" class="cn.sycoder.di.constructor.mapper.UserMapperImpl"></bean> </beans> -
可能出现的问题
4.7setter 注入总结
- 对于引用数据类型来说使用
<property name="" ref=""></property>- 对于简单数据类型
*<property name="" value=""></property>5.集合注入
List,Set,Map,Array,Properties
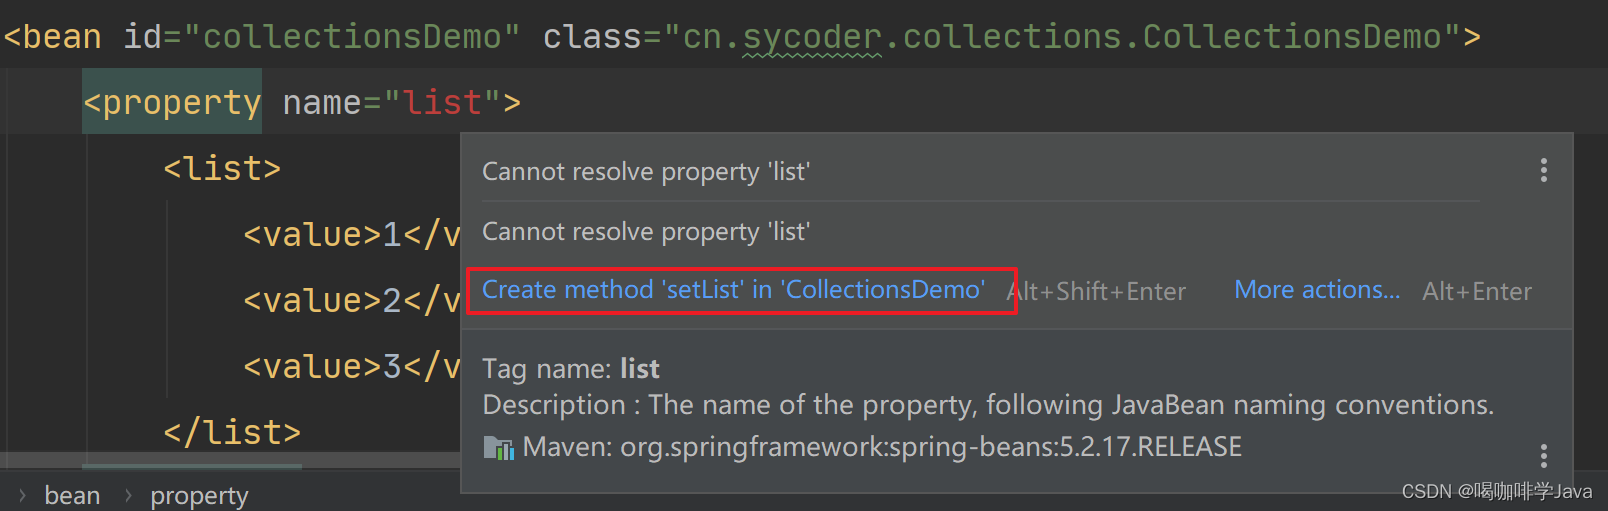
5.1添加CollectiosDemo类
1.添加CollectiosDemo类1.添加CollectiosDemo类public class CollectionsDemo {
    private List<Integer> list;
    private Map<String,String> map;
    private Set<String> set;
    private Properties properties;
    private int[] arr;

    public void print(){
        System.out.println("list:"+list);
        System.out.println("map:"+map);
        System.out.println("set:"+set);
        System.out.println("properties:"+properties);
        System.out.println("arr:"+ Arrays.toString(arr));
    }

    public void setList(List<Integer> list) {
        this.list = list;
    }

    public void setMap(Map<String, String> map) {
        this.map = map;
    }

    public void setSet(Set<String> set) {
        this.set = set;
    }

    public void setProperties(Properties properties) {
        this.properties = properties;
    }

    public void setArr(int[] arr) {
        this.arr = arr;
    }
}
5.2配置 bean
<?xml version="1.0" encoding="UTF-8"?>
<beans xmlns="http://www.springframework.org/schema/beans"
       xmlns:xsi="http://www.w3.org/2001/XMLSchema-instance"
       xsi:schemaLocation="http://www.springframework.org/schema/beans http://www.springframework.org/schema/beans/spring-beans.xsd">
    <bean id="collectionsDemo" class="cn.sycoder.collections.CollectionsDemo">
<!--        注入 list-->
        <property name="list">
            <list>
                <value>1</value>
                <value>2</value>
                <value>3</value>
            </list>
        </property>
        <property name="map">
            <map>
                <entry key="name" value="sy"/>
                <entry key ="age" value="18"/>
            </map>
        </property>
        <property name="set">
            <set>
                <value>just some string</value>
                <value>just string</value>
            </set>
        </property>
        <property name="properties">
            <props>
                <prop key="url">@example.org</prop>
                <prop key="user">root</prop>
                <prop key="password">123456</prop>
            </props>
        </property>
        <property name="arr">
            <array>
                <value>2</value>
                <value>2</value>
                <value>2</value>
            </array>
        </property>
    </bean>
</beans>
如果不提供setter 方法会出现如下错误
6.自动装配
6.1概述
-
概述:IOC容器根据bean所依赖的属性,自动查找并进行自动装配。
6.2分类
-
不启用自动装配
-
byName 通过名称
-
byType 通过类型
-
constructor 通过构造器
6.3实操
-
准备工作
public class EmployeeService { private EmployeeMapperImpl employeeMapper; public int delete(Long id) { return employeeMapper.delete(id); } public void setEmployeeMapper(EmployeeMapperImpl employeeMapper){ System.out.println("=======EmployeeMapper使用 setter 注入======="); this.employeeMapper = employeeMapper; } } public class EmployeeMapperImpl{ public int delete(Long id) { System.out.println("删除当前员工id:"+id); return 1; } } -
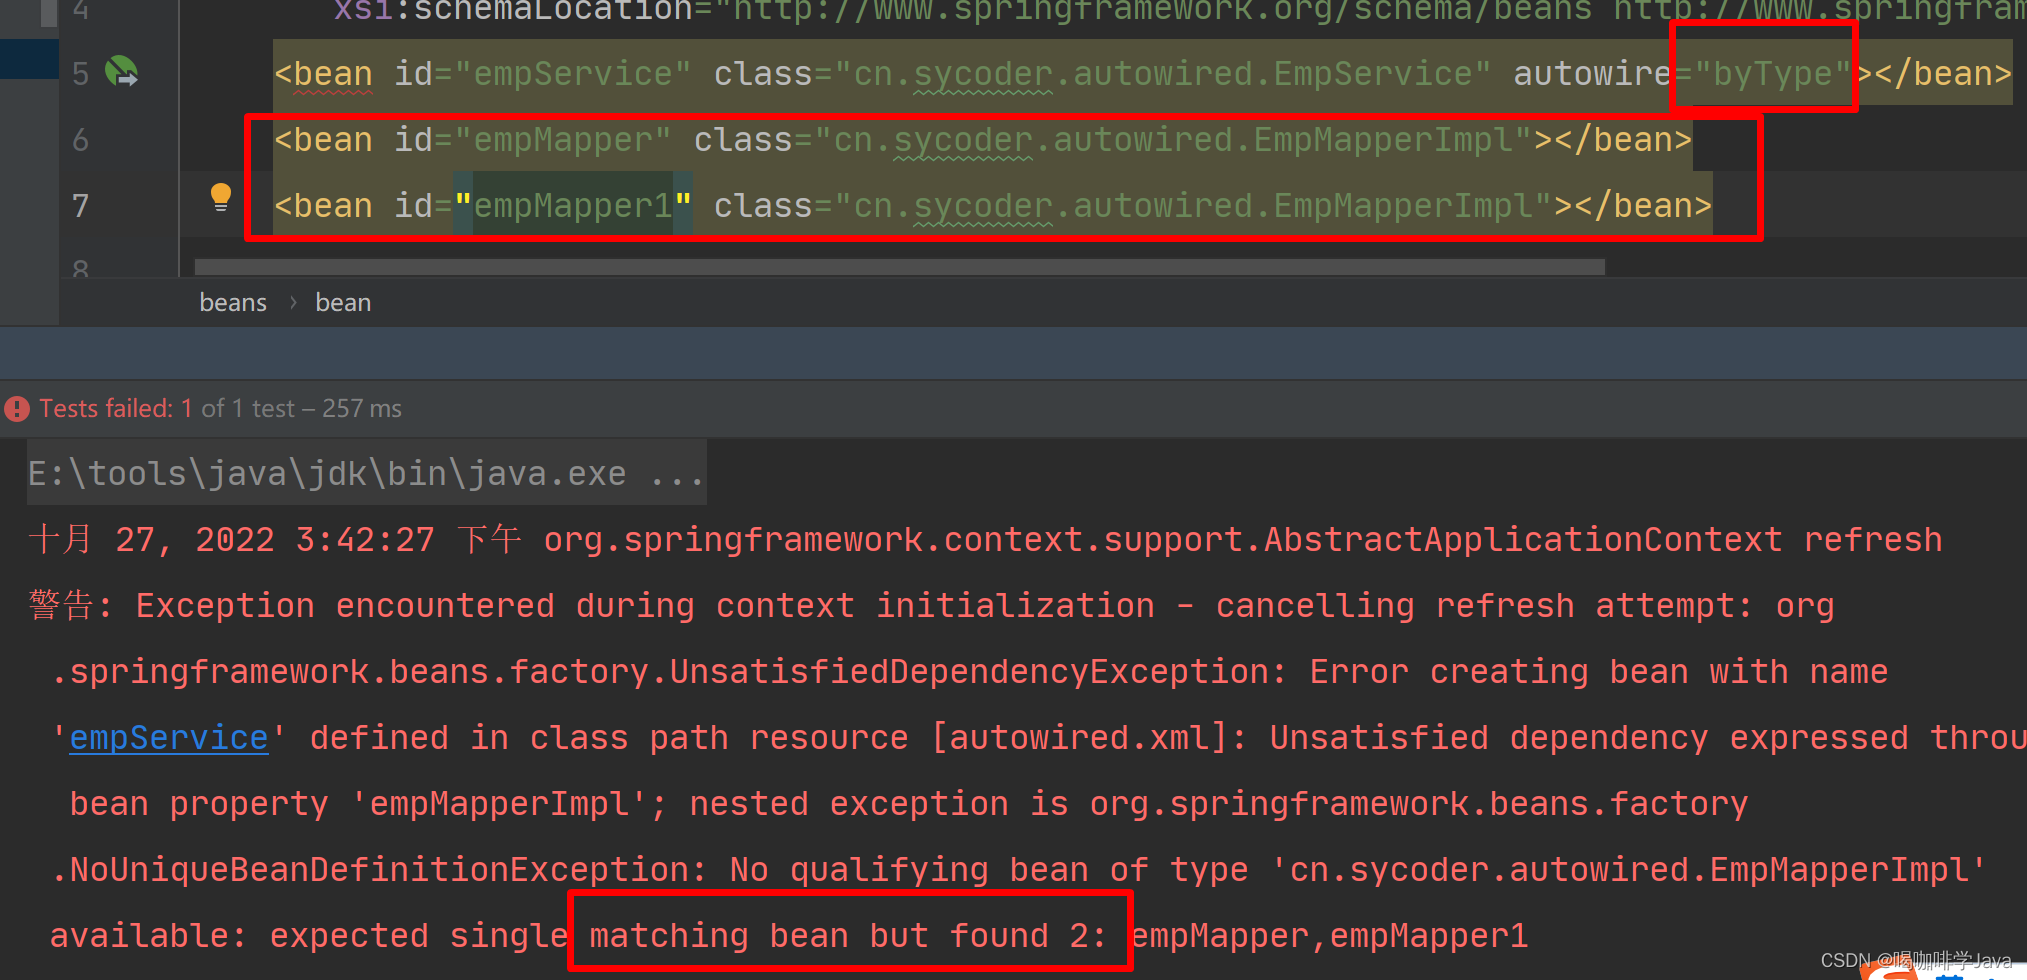
配置 bean 并且通过 bype 自动装配
<?xml version="1.0" encoding="UTF-8"?> <beans xmlns="http://www.springframework.org/schema/beans" xmlns:xsi="http://www.w3.org/2001/XMLSchema-instance" xsi:schemaLocation="http://www.springframework.org/schema/beans http://www.springframework.org/schema/beans/spring-beans.xsd"> <bean id="empService" class="cn.sycoder.autowired.EmpService" autowire="byType"></bean> <bean id="empMapperImpl" class="cn.sycoder.autowired.EmpMapperImpl"></bean> </beans> -
配置 bean 并且通过 byName 自动装配
<?xml version="1.0" encoding="UTF-8"?> <beans xmlns="http://www.springframework.org/schema/beans" xmlns:xsi="http://www.w3.org/2001/XMLSchema-instance" xsi:schemaLocation="http://www.springframework.org/schema/beans http://www.springframework.org/schema/beans/spring-beans.xsd"> <bean id="empService" class="cn.sycoder.autowired.EmpService" autowire="byName"></bean> <bean id="empMapperImpl" class="cn.sycoder.autowired.EmpMapperImpl"></bean> </beans> -
通过名称和类型的自动装配
-
byName
-
使用 id 或者是 name 别名
-
如果自动注入时,有多个相同对象,只能使用 byName
-
-
byType
-
根据类型注入
-
通过 byType 注入要保证容器中只有一个 bean 对象,否则会出现如下错误
-
-
- 注意:
-
自动注入的优先级是低于 setter 和 构造器注入的
-
自动注入只能用于引用类型,不能用于基本数据类型
-
推荐使用 byType 方式实现自动注入
-
注入流程
-
byType 根据 getClass 去注入
-
byName 根据属性名称去注入
-
-
7.bean scopes
- 常见的作用域
| 作用域 | 说明 |
|---|---|
| singleton | 单例的 |
| prototype | 多例 |
| request | 请求 |
| session | 会话 |
- 单例 singleton
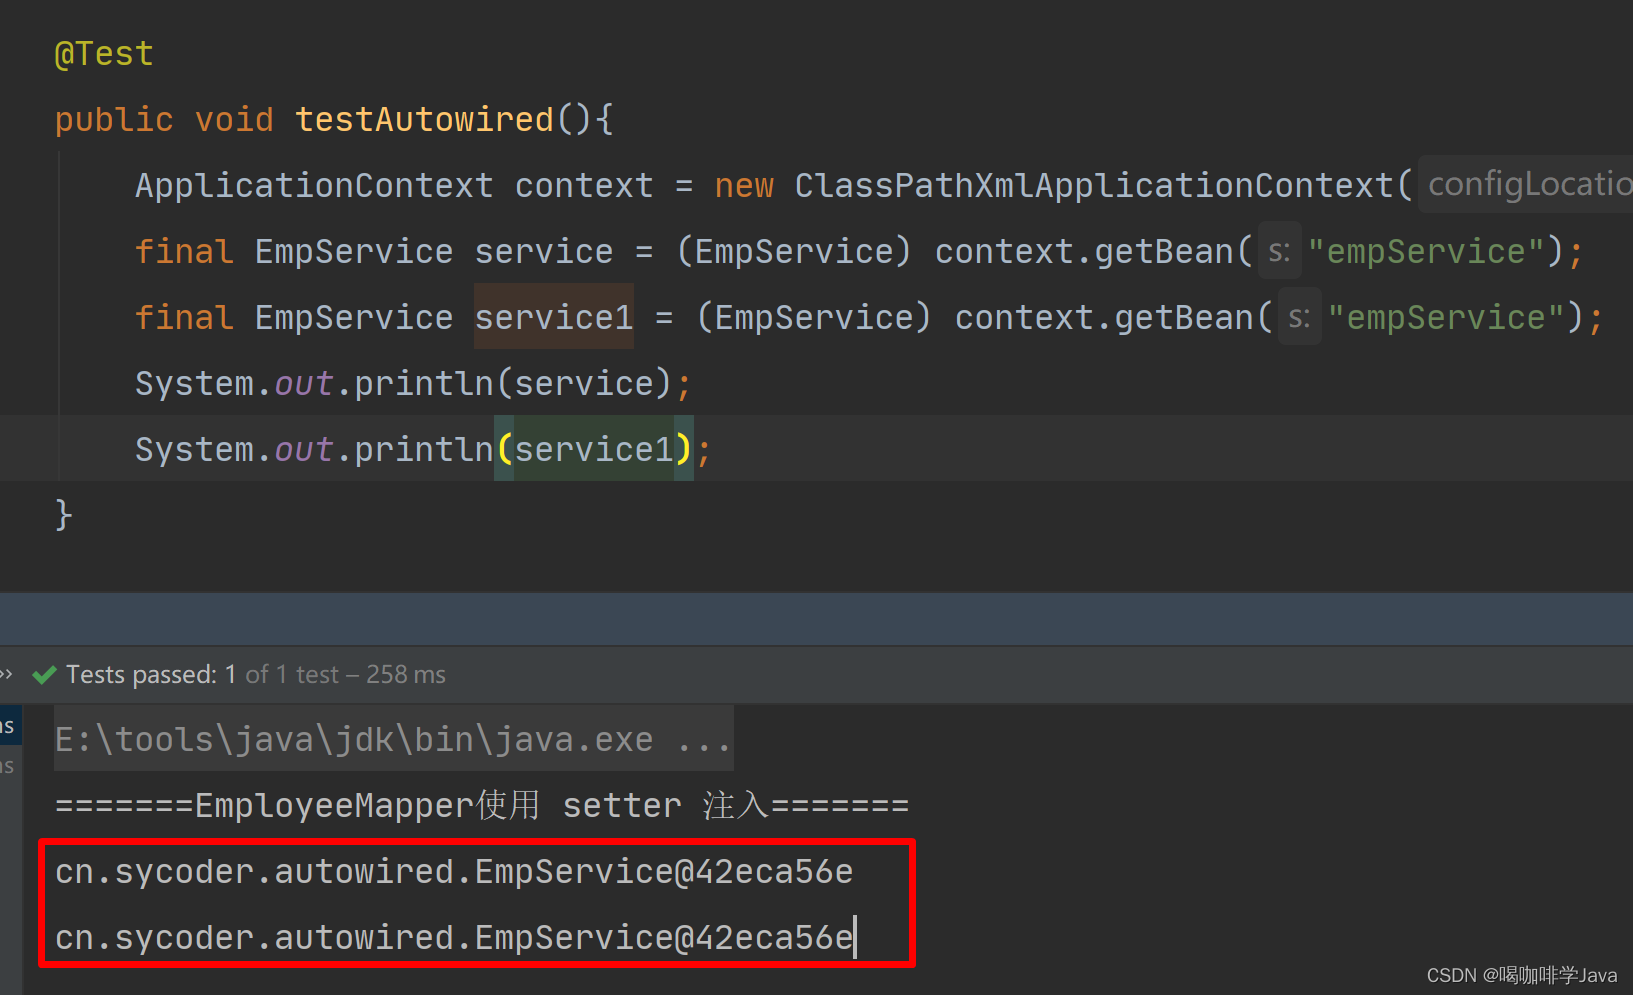
- 修改对象变成多个实例的
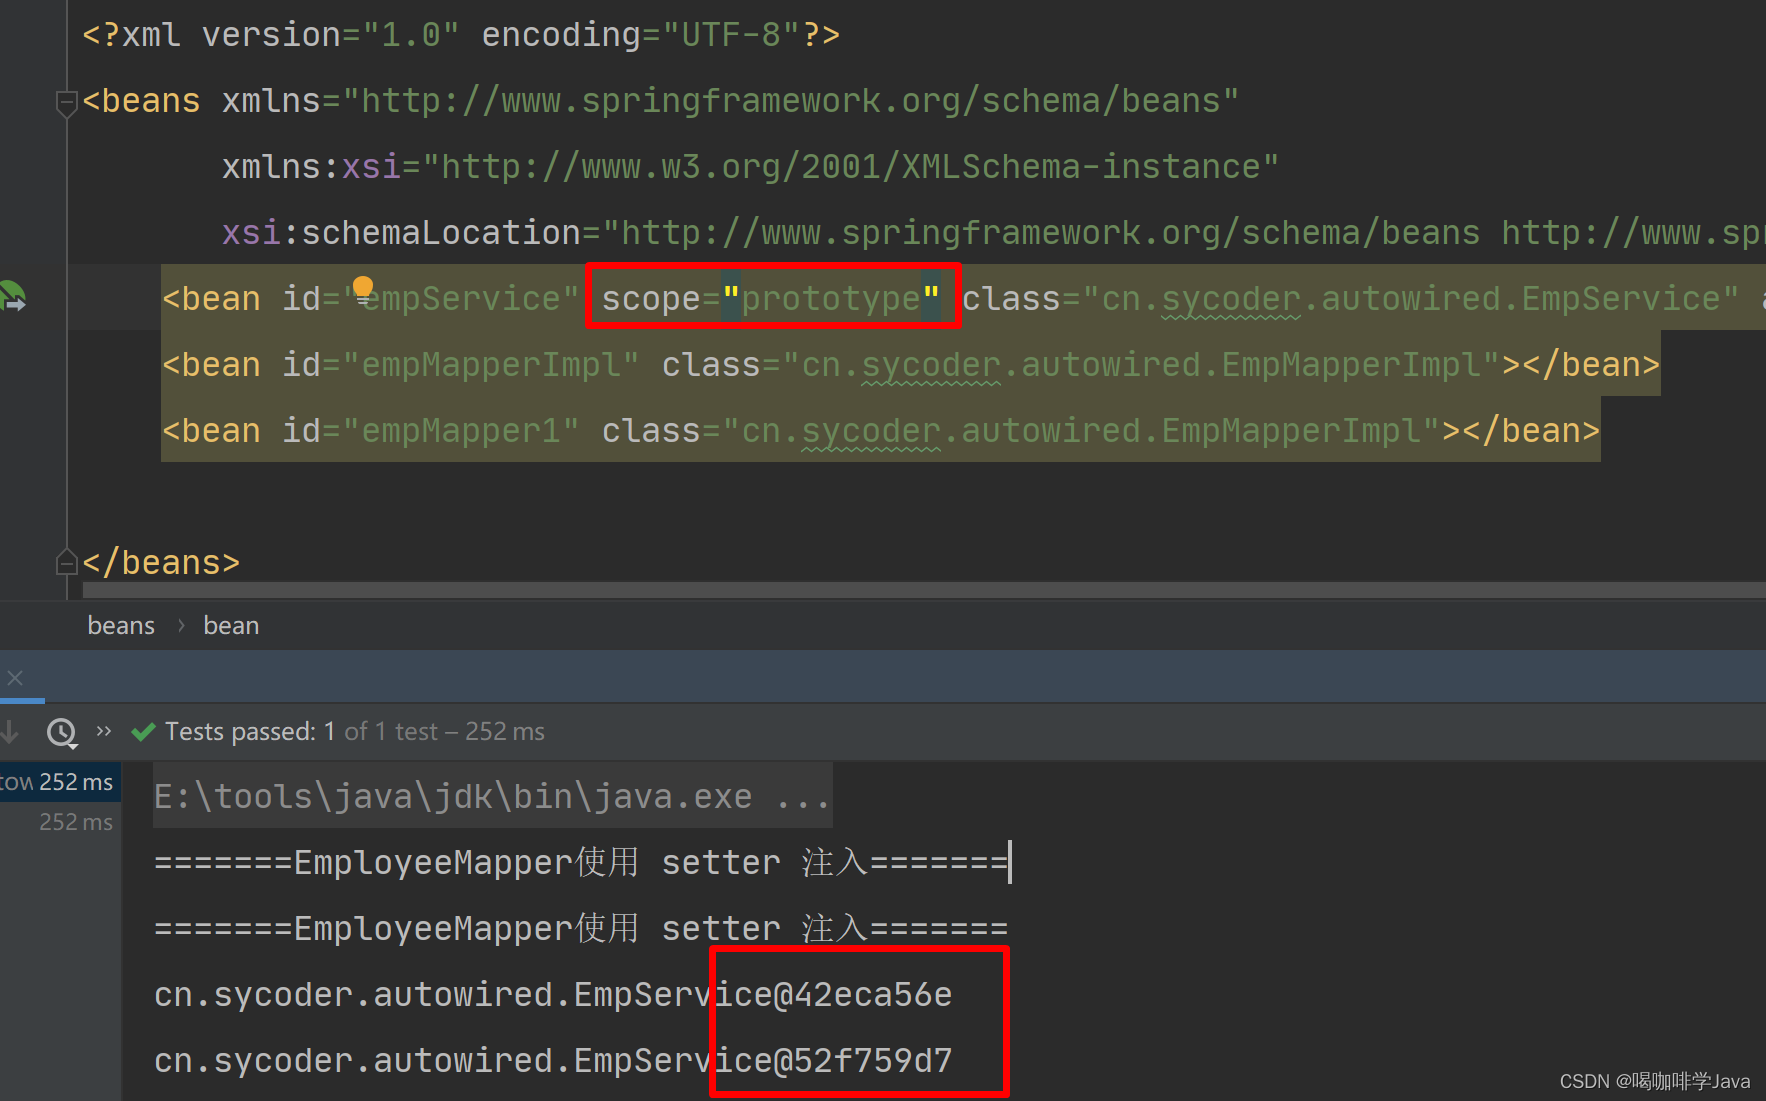
-
注意:容器模式就是以单例的方式创建对象的,如果需要修改成非单例,使用 scope 属性修改即可
-
以后开发中适合将那些bean对象交给 spring 管理
-
持久层 mapper
-
业务层 service
-
控制层 controller
-
-
单例bean会出现线程安全吗
-
判断bean 对象是否存储数据,如果用来存储数据了,会导致线程安全问题
-
使用局部变量做存储,方法调用结束就销毁了,所以不存在线程安全问题
-
8.bean 生命周期
8.1概述
-
概述:生命周期就是一个对象从出生到死亡的过程
8.2使用用户类观察生命周期
-
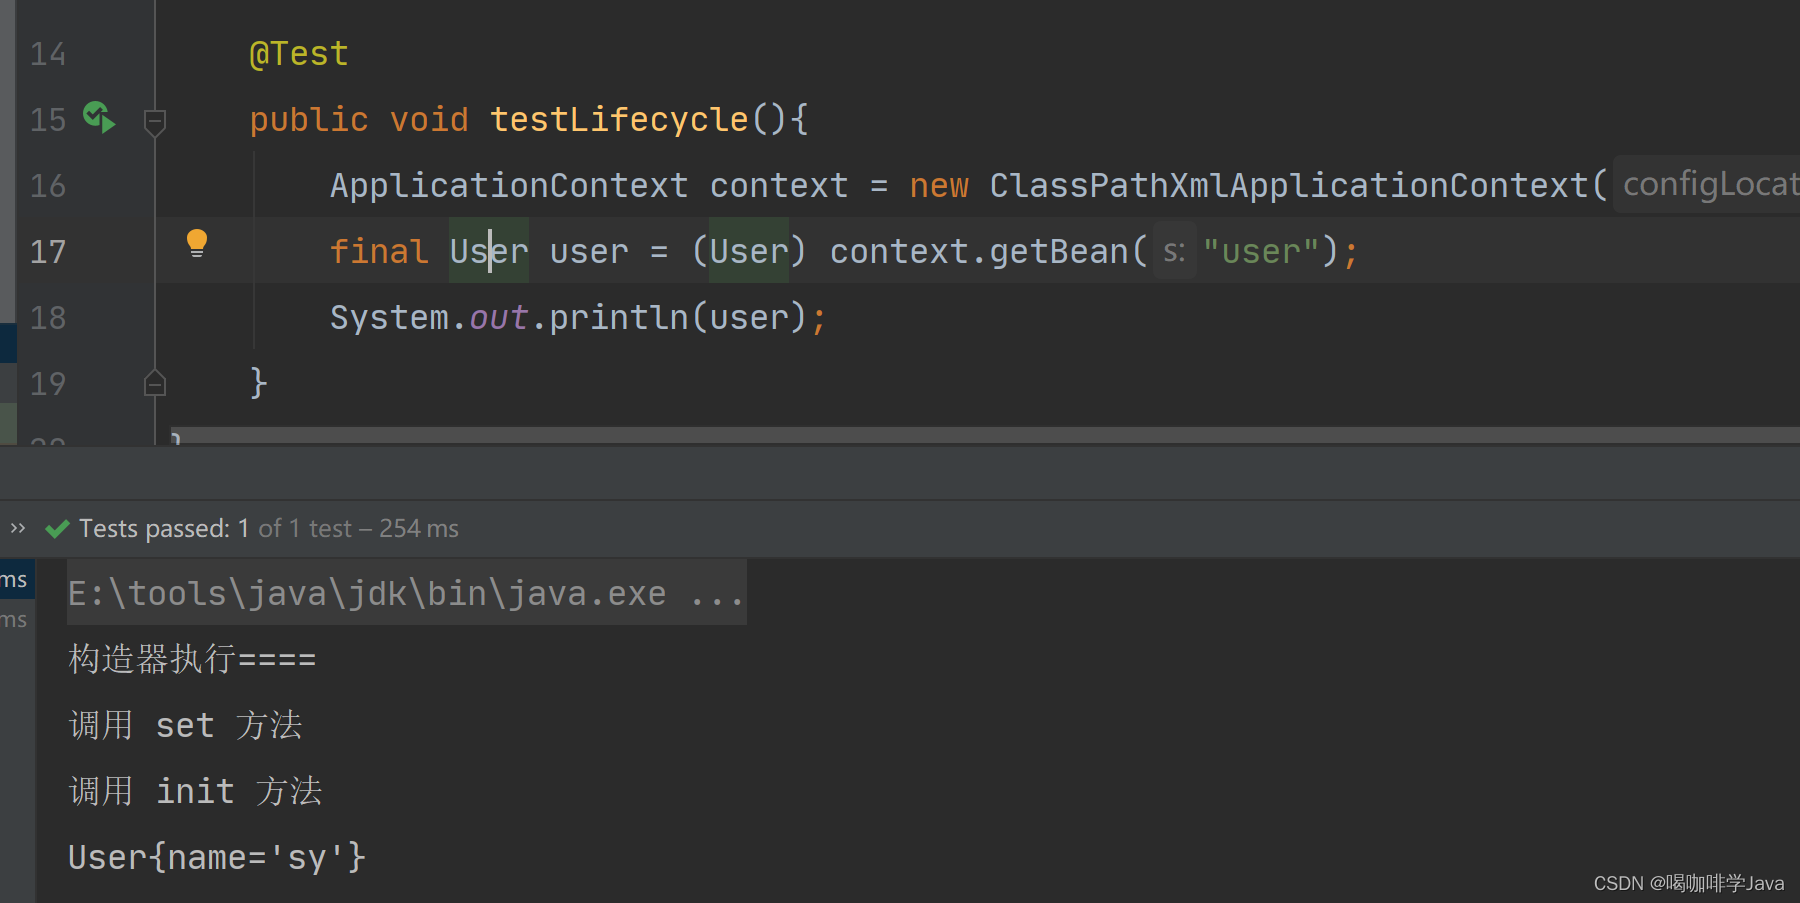
创建用户类
public class User { private String name; public User(){ System.out.println("构造器执行===="); } public void setName(String name) { System.out.println("调用 set 方法"); this.name = name; } public void init(){ System.out.println("调用 init 方法"); } public void destroy(){ System.out.println("调用销毁方法"); } } -
配置 bean
<?xml version="1.0" encoding="UTF-8"?> <beans xmlns="http://www.springframework.org/schema/beans" xmlns:xsi="http://www.w3.org/2001/XMLSchema-instance" xsi:schemaLocation="http://www.springframework.org/schema/beans http://www.springframework.org/schema/beans/spring-beans.xsd"> <bean id="user" class="cn.sycoder.lifecycle.User" init-method="init" destroy-method="destroy"> <property name="name" value="sy"></property> </bean> </beans> -
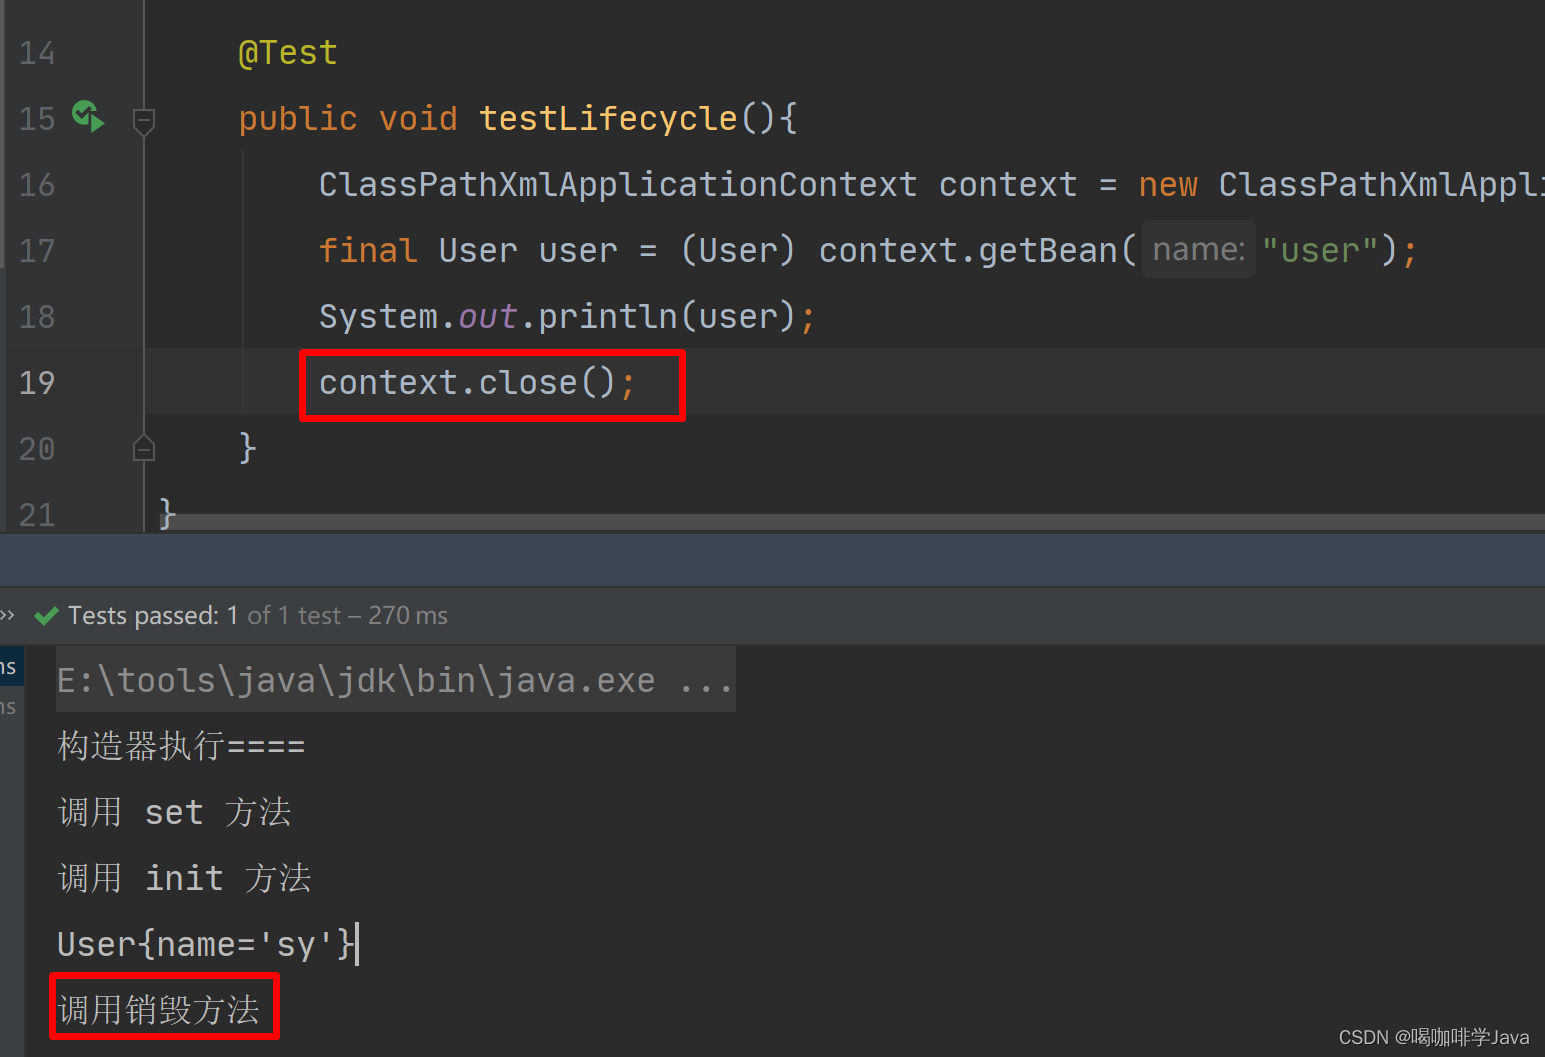
获取 bean 出现如下问题,没有打印销毁方法
-
原因:
-
spring ioc 容器是运行在 jvm 虚拟机中的
-
执行 test 方法后 jvm 虚拟机开启,spring 加载配置文件创建 bean 对象,调用构造器以及 init 方法
-
test 方法执行完毕的时候, jvm 退出,spring ioc 容器来不及关闭销毁 bean,所以没有去调用 destroy 方法
-
-
- 解决办法,手动关闭容器
5.3BeanPostProcessor
- 自定义自己 bean 处理器
public class MyBeanPostProcessor  implements BeanPostProcessor{
    public Object postProcessBeforeInitialization(Object bean, String beanName) throws BeansException {
        //bean 前置处理器
        System.out.println("bean 的前置处理器");
        return bean;
    }

    public Object postProcessAfterInitialization(Object bean, String beanName) throws BeansException {
        System.out.println("bean 的后置处理器");
        //bean 后置处理器
        return bean;
    }
}- 配置 bean
<?xml version="1.0" encoding="UTF-8"?>
<beans xmlns="http://www.springframework.org/schema/beans"
       xmlns:xsi="http://www.w3.org/2001/XMLSchema-instance"
       xsi:schemaLocation="http://www.springframework.org/schema/beans http://www.springframework.org/schema/beans/spring-beans.xsd">
    <bean id="user" class="cn.sycoder.lifecycle.User" init-method="init" destroy-method="destroy">
        <property name="name" value="sy"></property>
    </bean>

    <bean class="cn.sycoder.lifecycle.MyBeanPostProcessor"></bean>
</beans>
5.4生命周期总结
-
bean 对象创建(调用无参构造器)
-
设置属性通过 setter 方法
-
init 方法前调用 bean 的前置处理器
-
bean 的 init 方法
-
bean 的后置处理器
-
对象可以正常使用
-
destroy 销毁方法
-
ioc 容器关闭
-
jvm 虚拟机的退出
四、容器执行点(第三方注入)
1.整合 druid 连接池
添加依赖
<dependency>
    <groupId>com.alibaba</groupId>
    <artifactId>druid</artifactId>
    <version>1.2.8</version>
</dependency>
1.1硬编码方式整合
新建德鲁伊配置
<?xml version="1.0" encoding="UTF-8"?>
<beans xmlns="http://www.springframework.org/schema/beans"
       xmlns:xsi="http://www.w3.org/2001/XMLSchema-instance"
       xsi:schemaLocation="http://www.springframework.org/schema/beans http://www.springframework.org/schema/beans/spring-beans.xsd">
    <bean id="dataSource" class="com.alibaba.druid.pool.DruidDataSource">
        <property name="username" value="root"></property>
        <property name="password" value="123456"></property>
        <property name="driverClassName" value="com.mysql.cj.jdbc.Driver"></property>
        <property name="url" value="jdbc:mysql://localhost:3306/mybatis"></property>
    </bean>
</beans>
注意:属性是通过 set 方法注入进来的
1.2使用占位符获取连接数据
- 建立 db.properties 配置文件
username=root
password=123456
driverClassName=com.mysql.cj.jdbc.Driver
url=jdbc:mysql://localhost:3306/mybatis- 配置引用db.properties
 <bean id="dataSource1" class="com.alibaba.druid.pool.DruidDataSource">
        <property name="username" value="${username}"></property>
        <property name="password" value="${password}"></property>
        <property name="driverClassName" value="${driverClassName}"></property>
        <property name="url" value="${url}"></property>
    </bean>
<!--    获取db.properties 配置文件-->
    <bean class="org.springframework.beans.factory.config.PropertyPlaceholderConfigurer">
        <property name="location" value="db.properties"></property>
</bean>- 引入 db.properties 缩写
<context:property-placeholder location="db.properties"/>1.3注意事项
-
<context:property-placeholder location="db.properties"/> 使用这个标签加载配置会加载到电脑系统配置
- 解决方式
- 给配置文件加上前缀变量
jdbc.username=root
jdbc.password=123456
jdbc.driverClassName=com.mysql.cj.jdbc.Driver
jdbc.url=jdbc:mysql://localhost:3306/mybatis
username=123- 添加属性
<context:property-placeholder system-properties-mode="NEVER" location="db.properties"/>- 加载多个配置文件可以用 * 代替
<context:property-placeholder system-properties-mode="NEVER" location="*.properties"/>2.容器总结
2.1容器层级结构
- 按两次 shift 搜索 BeanFactory
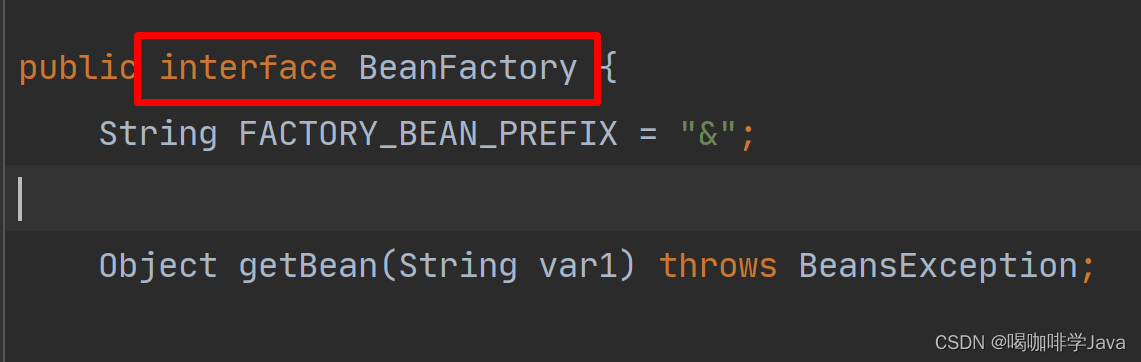
- 按 ctrl + h 查看继承结构
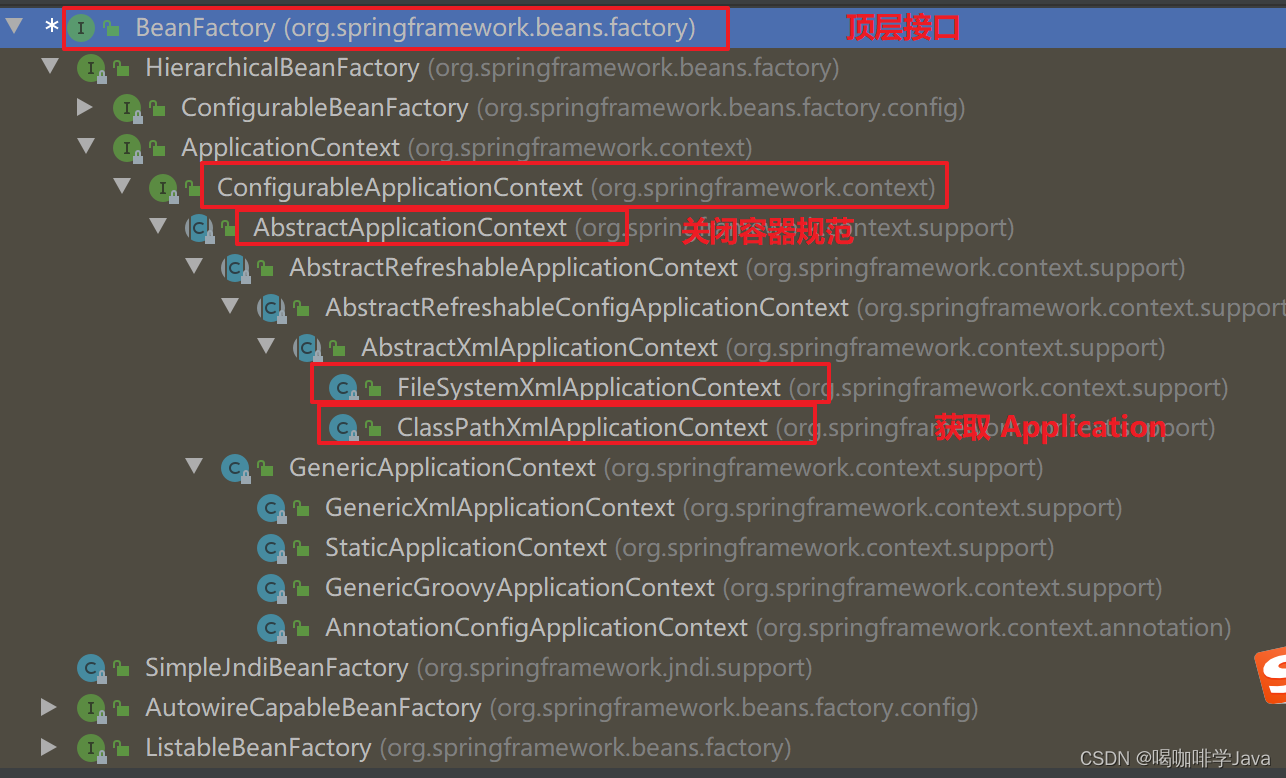
2.2创建容器
-
BeanFactory 是容器顶层接口
-
ApplicationContext 核心接口
-
AbstractApplicationContext 抽象类,提供了获取 bean 以及加载资源的功能
-
ClassPathXmlApplicationContext 装载bean的,做初始化的
2.3bean 配置
<bean id="user" class="cn.sycoder.lifecycle.User" init-method="init" destroy-method="destroy" scope="默认单例" autowire="byName" lazy-init="false">
    <property name="name" value="sy"></property>
</bean>-
lazy-init:如果开启懒加载,默认是调用时才创建bean
-
init-method:初始化方法
-
destroy-method:销毁方法
-
scope:作用域,单例,原型
-
autowire:自动注入
-
id:代表名称,必须唯一
-
class:全限定类名
2.4di 注入
- constructor-arg:构造器注入
- property : setter 注入
- 集合注入


 536
536


 被折叠的 条评论
为什么被折叠?
被折叠的 条评论
为什么被折叠?
 到【灌水乐园】发言


