目录
收货地址
收货地址页面
src\pages\User.vue
将原来的div改为router-link,并设置目标地址。
<router-link :to="{ name: 'address' }" class="mui-navigate-right">
<img class="mui-media-object mui-pull-left" src="../assets/images/avatar_default.png">
<div class="mui-media-body">收货地址</div>
</router-link>
src\router.js
import Address from './pages/user/Address.vue'
import AddressEdit from './pages/user/AddressEdit.vue'
routes: [
……(原有代码)
{ path: '/user/address', component: Address, name: 'address', meta: { title: '收货地址' } },
{ path: '/user/address/add', component: AddressEdit, name: 'address_add', meta: { title: '新增收货地址' } },
],
src\pages\user\Address.vue
<template>
<div class="address-container">
<div>收货地址列表</div>
<div class="mod_btns fixed">
<router-link :to="{ name: 'address_add' }" class="mod_btn">新增收货地址</router-link>
</div>
</div>
</template>
样式:
<style lang="scss" scoped>
.address-container {
background: #eee;
overflow: hidden;
.mod_btn {
font-size: 16px;
line-height: 46px;
height: 46px;
text-align: center;
background: #3884ff;
flex: 1;
display: block;
color: #fff;
}
.mod_btns .fixed {
display: flex;
overflow: hidden;
}
}
</style>
src\pages\user\AddressEdit.vue
<template>
<div>新增收货地址</div>
</template>
访问测试。
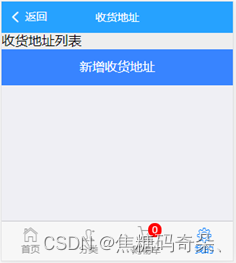
新增收货地址
src\pages\user\AddressEdit.vue
<template>
<form class="mui-input-group">
<div class="mui-input-row">
<label class="tit">收件人</label>
<input v-model="form.name" type="text" class="mui-input-clear" placeholder="请输入收件人姓名">
</div>
<div class="mui-input-row">
<label class="tit">联系方式</label>
<input v-model="form.tel" type="text" class="mui-input-clear" placeholder="请输入手机号">
</div>
<div class="mui-input-row">
<label class="tit">所在地区</label>
<input v-model="form.area" type="text" class="mui-input-clear" placeholder="所在地区">
</div>
<div class="mui-input-row">
<label class="tit">详细地址</label>
<input v-model="form.detail" type="text" class="mui-input-clear" placeholder="请输入详细地址">
</div>
<div class="mui-button-row">
<button @click="save" type="button" class="mui-btn mui-btn-primary mui-btn-block">确认</button>
</div>
</form>
</template>
逻辑:
<script>
export default {
data () {
return {
form: {
name: '',
tel: '',
area: '',
detail: ''
}
}
},
methods: {
save () {
window.console.log('确认')
}
}
}
</script>
样式:
<style lang="scss" scoped>
.mui-input-group .mui-button-row {
height: auto;
}
.mui-input-clear {
font-size: 14px;
}
.mui-input-group:before {
list-style: none;
}
.mui-button-row {
margin-top: 20px;
button {
margin: 20px 0;
padding: 10px 0;
}
}
.tit {
color: #999;
}
input::-webkit-input-placeholder {
color: #999;
}
input::-moz-placeholder { /* Mozilla Firefox 19+ */
color: #999;
}
input:-moz-placeholder { /* Mozilla Firefox 4 to 18 */
color: #999;
}
input:-ms-input-placeholder { /* Internet Explorer 10-11 */
color: #999;
}
</style>
页面效果:
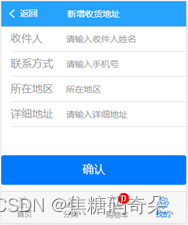
v-distpicker地区选择器
安装v-distpicker插件。
npm install v-distpicker@1.2 --save
src\pages\user\AddressEdit.vue
import VDistpicker from 'v-distpicker'
export default {
……(原有代码)
components: {
'v-distpicker': VDistpicker
}
}
<label class="tit">所在地区</label>
<input v-model="form.area" type="text" class="mui-input-clear" placeholder="所在地区" @click="choose">
<div class="divwrap">
<div class="mask" @click="choose" v-show="show"></div>
<v-distpicker
v-show="show"
type="mobile"
@province="onChangeProvince"
@city="onChangeCity"
@area="onChangeArea"
:province="newInfo.province"
:city="newInfo.city"
:area="newInfo.district"
>
</v-distpicker>
</div>
数据
data () {
return {
……(原有代码)
show: false, // 是否显示遮罩层
newInfo: {
province: '', // 省
city: '', // 市
area: '', // 区
}
}
}
方法:
methods: {
……(原有代码)
choose () {
this.show = !this.show
},
onChangeProvince (data) {
this.newInfo.province = data.value
},
onChangeCity (data) {
this.newInfo.city = data.value
},
onChangeArea (data) {
this.newInfo.area = data.value
this.form.area = this.newInfo.province + '-' + this.newInfo.city + '-' + this.newInfo.area
this.show = false
}
},
样式:
.divwrap > .mask {
background: #000;
opacity: 0.3;
position: fixed;
top: 0;
bottom: 0;
left: 0;
right: 0;
}
.divwrap > .distpicker-address-wrapper {
color: #999;
background: #fff;
border-top: 1px solid #ccc;
z-index: 1;
height: 300px;
overflow-y: auto;
position: fixed;
left: 0;
bottom: 0;
width: 100%;
}
.divwrap >>> .address-header {
position: fixed;
bottom: 300px;
width: 100%;
background: #000;
color: #fff;
}
.divwrap >>> .address-header ul li {
flex-grow: 1;
text-align: center;
}
.divwrap >>> .address-header .active {
color: #fff;
border-bottom: #666 solid 8px;
}
.divwrap >>> .address-container .active {
color: #000;
}
页面效果:
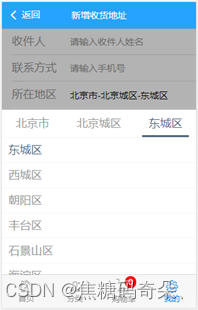
保存收货地址
src\pages\user\AddressEdit.vue
save () {
this.$indicator.open({
text: '提交中'
})
this.$http.post('address/save', this.form).then(res => {
this.$indicator.close()
if (res.data.code === 0) {
this.$toast(res.data.msg)
} else if (res.data.code === 1) {
this.$toast(res.data.msg)
this.$router.go(-1)
} else if (res.data.code === 2) {
this.$router.push({ name: 'login' })
}
})
},
测试程序。

显示收货地址列表
src\pages\user\Address.vue
<script>
export default {
created () {
this.getAddressList()
},
methods: {
getAddressList () {
this.$indicator.open({
text: '加载中'
})
this.$http.get('address').then(res => {
this.$indicator.close()
if (res.data.code === 1) {
this.addressList = res.data.data
} else if (res.data.code === 2) {
this.$router.push({ name: 'login' })
}
})
}
}
}
</script>
data () {
return {
addressList: []
}
},
在页面中显示出来
<div class="address-container">
<div>
<div class="mui-card" v-for="item in addressList" :key="item.id">
<ul class="selected">
<li class="title">
<strong>{{ item.name }}</strong>
<strong>{{ item.tel }}</strong>
</li>
<li>{{ item.area }} {{ item.detail }}</li>
<li>
<a class="edit">编辑</a>
</li>
</ul>
</div>
</div>
……(原有代码)
</div>
删掉:
<div>收货地址列表</div>
样式:
.address-container {
background: #eee;
overflow: hidden;
……(原有代码)
.mui-card {
padding: 7px 40px;
position: relative;
overflow: hidden;
padding: 15px;
color: #666;
.selected {
margin: 0;
padding: 0;
list-style: none;
padding-right: 50px;
.title {
font-size: 16px;
}
.edit {
color: #e93b3d;
width: 50px;
position: absolute;
top: 50%;
right: 0;
transform: translateY(-50%);
}
}
}
}
页面效果:
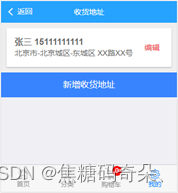
细节优化:
由于新增按钮显示在收货地址列表的下面,
在收货地址列表加载前后,新增按钮会发生上下跳动,
影响用户体验。
为了解决这个问题,可以在加载完成前,把按钮隐藏起来,
直到加载完成后,再显示新增按钮。
src\pages\user\Address.vue
this.$http.get('address').then(res => {
this.$indicator.close()
this.showAdd = true
……(原有代码)
})
data () {
return {
addressList: [],
showAdd: false
}
},
<div v-show="showAdd" class="mod_btns fixed">
<router-link :to="{ name: 'address_add' }" class="mod_btn">新增收货地址</router-link>
</div>
修改收货地址
“编辑”按钮
src\pages\user\Address.vue
把
<a class="edit">编辑</a>
改成:
<router-link class="edit" :to="{name: 'address_edit', params: {id: item.id}}">编辑</router-link>
商品收货地址的“修改”和“新增”其实是复用了同一个组件。
src\router.js
routes: [
……(原有代码)
{ path: '/user/address/edit/:id', component: AddressEdit, props: true, name: 'address_edit', meta: { title: '编辑收货地址' } },
],
在组件里通过是否传入参数id来区分当前是修改还是新增。
id是一个数字,表示待修改的记录的唯一标识。
接收一下路由传过来的id。
src\pages\user\AddressEdit.vue
props: ['id'],
created () {
this.getAddress()
},
methods: {
getAddress () {
if (!this.id) {
return
}
this.$indicator.open({
text: '加载中'
})
var params = { id: this.id }
this.$http.get('address/edit', { params: params }).then(res => {
this.$indicator.close()
window.console.log(res.data)
})
},
……(原有代码)
},
显示到页面中:
src\pages\user\AddressEdit.vue
this.$http.get('address/edit', { params: params }).then(res => {
this.$indicator.close()
if (res.data.code === 0) {
this.$toast(res.data.msg)
} else if (res.data.code === 1) {
this.form = res.data.data
} else if (res.data.code === 2) {
this.$router.push({ name: 'login' })
}
})
页面一打开后,就会把原有的数据显示出来。
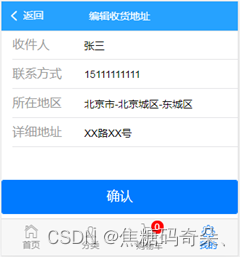
然后修改save()方法,将id放入表单中。
save () {
this.$indicator.open({
text: '提交中'
})
this.form.id = this.id
……(原有代码)
}
测试程序,观察修改是否会生效。
删除收货地址
src\pages\user\AddressEdit.vue
<template>
<form class="mui-input-group">
……(原有代码)
<div class="mui-button-row">
……(原有代码)
<button v-show="id" @click="del" type="button" class="mui-btn mui-btn-danger mui-btn-block">删除</button>
</div>
</form>
</template>
v-show的作用:只有传入了id参数的时候,显示“删除”按钮。
methods: {
……(原有代码)
del () {
this.$indicator.open({
text: '删除中'
})
this.form.id = this.id
this.$http.post('address/del', this.form).then(res => {
this.$indicator.close()
window.console.log(res.data)
})
}
},
处理服务器返回的结果。
src\pages\user\AddressEdit.vue
this.$http.post('address/del', this.form).then(res => {
this.$indicator.close()
if (res.data.code === 0) {
this.$toast(res.data.msg)
} else if (res.data.code === 1) {
this.$toast(res.data.msg)
this.$router.go(-1)
} else if (res.data.code === 2) {
this.$router.push({ name: 'login' })
}
})
订单
从购物车下订单
从购物车选中要购买的商品,点击“去结算”,就会进入到下订单的页面。
src\pages\Shopcart.vue
<mt-button type="primary" @click="createOrder">去结算</mt-button>
src\pages\Shopcart.vue
methods: {
……(原有代码)
createOrder () {
if (this.goodslist.length === 0) {
this.$toast('您的购物车为空')
return
}
this.$store.commit('shopcart/setBuy')
}
}
setBuy:用来将购物车中用户选中的商品设为要购买的商品。
将要购买的商品保存起来,方便在下订单的页面中进行读取展示。
src\store\modules\shopcart.js
const state = {
car: getItem('car'),
// 当前要购买的商品:buy: [{ id: '', count: '' }]
// 当在购物车里点“去结算”时,就把购物车车中已经选中的商品放进去
buy: getItem('buy')
}
const mutations = {
……(原有代码)
setBuy (state) {
state.buy = []
state.car.some(item => {
if (item.selected) {
state.buy.push(item)
}
})
setItem('buy', state.buy)
}
}
跳转到创建订单的页面。
src\pages\Shopcart.vue
createOrder () {
……(原有代码)
this.$router.push({ name: 'order_create' })
}
src\router.js
import OrderCreate from './pages/order/OrderCreate.vue'
routes: [
……(原有代码)
{ path: '/order/create', component: OrderCreate, name: 'order_create', meta: { title: '下订单' } },
],
创建文件:src\pages\order\OrderCreate.vue
<template>
<div>创建订单</div>
</template>
创建订单页面
获取要购买的商品
src\pages\order\OrderCreate.vue
<script>
import { mapState } from 'vuex'
export default {
computed: {
...mapState('shopcart', ['buy'])
},
created () {
this.getGoodsList()
},
methods: {
getGoodsList () {
window.console.log(this.buy)
}
}
}
</script>
从购物车选中要购买的商品,点击“去结算”,到浏览器控制台查看运行结果:


可以看到当前要购买的商品数据。
为了显示到页面中,需要到服务器查询商品信息。
getGoodsList () {
var idArr = []
this.buy.forEach(item => idArr.push(item.id))
if (idArr.length <= 0) {
return
}
this.$indicator.open({
text: '加载中'
})
var params = { ids: idArr }
this.$http.get('shopcart', { params: params }).then(res => {
this.$indicator.close()
window.console.log(res.data)
})
}
查看获取结果:
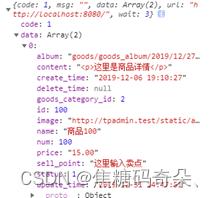
保存起来
this.$http.get('shopcart', { params: params }).then(res => {
this.$indicator.close()
if (res.data.code === 1) {
this.goodslist = res.data.data
}
})
保存到data中。
export default {
data () {
return {
goodslist: []
}
},
……(原有代码)
}
计算订单总额
需要用每件商品的单价乘以购买件数。
为了方便根据id获取每件商品的购买件数,编写getBuy方法。
src\store\modules\shopcart.js
const getters = {
……(原有代码)
// 获取要购买的商品
getBuy (state) {
var goods = {}
state.buy.forEach(item => {
goods[item.id] = item
})
return goods
}
}
src\pages\order\OrderCreate.vue
import { mapGetters, mapState } from 'vuex'
computed: {
...mapState('shopcart', ['buy']),
...mapGetters('shopcart', ['getBuy'])
},
获取到商品数据以后,进行计算。
if (res.data.code === 1) {
this.goodslist = res.data.data
var amount = 0
this.goodslist.forEach(item => {
item.count = this.getBuy[item.id].count
amount += item.count * item.price
})
this.amount = amount
}
保存到data中
data () {
return {
goodslist: [],
amount: 0
}
},
在页面中显示
<template>
<div class="shopcart-container">
<!-- 商品列表 -->
<div class="goods-list">
<!-- 商品列表项区域 -->
<div class="mui-card">
<div class="mui-card-content" v-for="(item) in goodslist" :key="item.id">
<div class="mui-card-content-inner flex">
<img :src="item.image">
<div class="info">
<h1>{{ item.name }}</h1>
<p class="flex">
<span class="price">¥{{ item.price }}</span>
<span>x{{ item.count }}</span>
</p>
</div>
</div>
</div>
<!-- 配送信息 -->
<div class="process-info">
<p>
<strong>配送服务</strong>
<strong>快递运输</strong>
</p>
<p>
<span>中小件送货时间</span>
<span>工作日、双休日与节假日均可送货</span>
</p>
</div>
<!-- 订单备注 -->
<div class="store-info">
<strong>订单备注</strong>
<textarea v-model="note" type="text" placeholder="选填,给商家留言"></textarea>
</div>
</div>
</div>
<!-- 运费信息 -->
<ul class="fare-info mui-card">
<li class="fare-price flex">
<span>商品金额</span>
<span class="red">¥{{ amount.toFixed(2) }}</span>
</li>
<li class="fare-price flex">
<span>运费</span>
<span class="red">¥0.00</span>
</li>
<li class="fare-price flex">
<span><strong>总价</strong></span>
<span class="red">¥{{ amount.toFixed(2) }}</span>
</li>
<!-- 创建订单按钮 -->
<div class="flex">
<button class="mui-btn mui-btn-primary mui-btn-block">创建订单</button>
</div>
</ul>
</div>
</template>
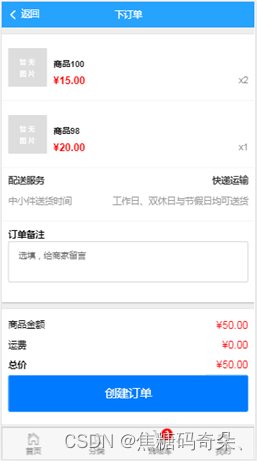
订单备注:买家可以为订单添加备注信息,用来提醒卖家。
在data中保存订单备注。
data () {
return {
goodslist: [],
amount: 0,
note: ''
}
},
样式代码:
<style lang="scss" scoped>
.flex {
display: flex;
}
.shopcart-container {
background: #eee;
overflow: hidden;
// 商品列表
.goods-list {
margin-top: 10px;
.mui-card {
margin: 0;
.mui-card-content {
border-bottom: 1px solid #eee;
.mui-card-content-inner {
align-items: center;
padding: 10px;
img {
width: 60px;
}
.info {
margin-left: 10px;
box-sizing: border-box;
width: 100%;
overflow: hidden;
h1 {
font-size: 13px;
font-weight: bold;
line-height: 20px;
padding-top: 22px;
}
p {
flex-direction: row;
align-items: center;
justify-content: space-between;
.price {
font-size: 16px;
font-weight: 700;
color: red;
flex: 1
}
}
}
}
}
// 配送信息
.process-info {
padding: 10px;
border-bottom: 1px solid #eee;
p {
display: flex;
flex-direction: row;
align-items: center;
justify-content: space-between;
color: #333;
span {
color:#999
}
}
}
// 店铺备注
.store-info {
padding: 10px;
textarea {
font-size: 13px;
}
}
}
}
// 运费信息
.fare-info {
padding: 10px;
margin: 10px 0 0 0;
.fare-price {
padding: 5px 0;
display: flex;
justify-content: space-between;
.red {
color: red;
font-size: 16px;
}
}
}
}
</style>
页面效果:
显示默认收货地址
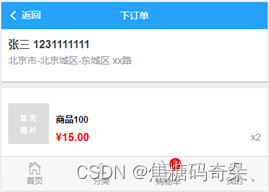
在创建订单时,显示用户的默认收货地址。
src\pages\order\OrderCreate.vue
先从收货地址列表中查出来一个地址,显示到页面中。
created () {
this.getAddress(),
this.getGoodsList()
},
methods: {
……(原有代码)
getAddress () {
this.$http.get('address/def').then(res => {
window.console.log(res.data)
})
}
}
保存到data中。
src\pages\order\OrderCreate.vue
this.$http.get('address/def').then(res => {
if (res.data.code === 0) {
this.$toast(res.data.msg)
} else if (res.data.code === 1) {
if (res.data.data) {
this.address = res.data.data
} else {
this.$toast('请先添加收货地址')
}
} else if (res.data.code === 2) {
this.$router.push({ name: 'login' })
}
})
data () {
return {
goodslist: [],
amount: 0,
note: '',
address: {}
}
},
在页面中显示。
<div class="shopcart-container">
<!-- 收货地址区域 -->
<div class="address-container">
<div class="mui-card">
<h3>{{ address.name }} {{ address.tel }}</h3>
<p>{{ address.area }} {{ address.detail }}</p>
</div>
</div>
……(原有代码)
</div>
样式:
.shopcart-container {
……(原有代码)
// 收货地址
.address-container {
.mui-card {
margin: 0;
padding: 10px;
h3 {
color: #333;
font-size: 16px;
font-weight: bold;
}
}
}
}
运行结果:
选择其他收货地址
单击后跳转到选择收货地址页面。
src\pages\order\OrderCreate.vue
……(原有代码)
<router-link :to="{name: 'address_select'}">
<h3>{{ address.name }} {{ address.tel }}</h3>
<p>{{ address.area }} {{ address.detail }}</p>
</router-link>
……(原有代码)
选择收货地址页面,复用了收货地址列表组件。
src\router.js
routes: [
……(原有代码)
{ path: '/user/address/select', component: Address, name: 'address_select', meta: { title: '选择收货地址' } },
],
单击收货地址中的某一项时,表示选用该地址。
src\pages\user\Address.vue
<li class="title" @click="select(item.id)">
<strong>{{ item.name }}</strong>
<strong>{{ item.tel }}</strong>
</li>
<li @click="select(item.id)">{{ item.area }} {{ item.detail }}</li>
判断当前路由是否为address_select,如果是,则返回创建订单页面,并把id传过去。
methods: {
……(原有代码)
select (id) {
if (this.$route.name !== 'address_select') {
return
}
this.$router.replace({ name: 'order_create', params: { id: id } })
}
}
接收传过来的id。
src\pages\order\OrderCreate.vue
created () {
if (this.$route.params.id) {
this.addressId = this.$route.params.id
}
……(原有代码)
},
保存到data
data () {
return {
goodslist: [],
amount: 0,
note: '',
address: {},
addressId: 0
}
},
在请求默认收货地址的时候,把id传给服务器。
getAddress () {
var params = { id: this.addressId }
this.$http.get('address/def', { params: params }).then(res => {
……(原有代码)
})
},
访问测试。
添加多个收货地址,观察在创建订单的时候,是否可以进行切换。
并且如果用户新增或编辑了收货地址,仍然可以正确选择收货地址。

细节优化:
为了避免选择收货地址后,用户点后退,需要点多次的问题,
在跳转收货地址页面的时候,使用replace的方式,表示直接替换当前页面。
src\pages\order\OrderCreate.vue
<router-link :to="{name: 'address_select'}" replace>
<h3>{{ address.name }} {{ address.tel }}</h3>
<p>{{ address.area }} {{ address.detail }}</p>
</router-link>
细节优化:
当用户当前没有添加任何收货地址的时候,自动跳转到收货地址页面,
要求用户进行添加。
在添加以后,当没有选择收货地址的时候,this.addressId为0,
这时候应该把服务器返回的收货地址id保存起来,
因为后面在提交订单的时候,会用到这个收货地址id。
if (res.data.data) {
this.address = res.data.data
this.addressId = res.data.data.id
} else {
this.$toast('请先添加收货地址')
this.$router.replace({ name: 'address_select' })
}
创建订单
src\pages\order\OrderCreate.vue
<button class="mui-btn mui-btn-primary mui-btn-block" @click="order">创建订单</button>
编写order()方法
methods: {
……(原有代码)
order () {
var form = {
address: this.addressId,
goods: this.buy,
note: this.note
}
this.$indicator.open({
text: '创建订单中'
})
this.$http.post('order/create', form).then(res => {
this.$indicator.close()
window.console.log(res.data)
})
}
}
点创建订单,控制台查看测试结果。

最后,在创建订单成功后,跳转到订单列表页面。
this.$http.post('order/create', form).then(res => {
this.$indicator.close()
if (res.data.code === 0) {
this.$toast(res.data.msg)
} else if (res.data.code === 1) {
this.$toast(res.data.msg)
this.$router.replace({ name: 'order_list' })
} else if (res.data.code === 2) {
this.$router.push({ name: 'login' })
}
})
使用replace()方法,这样可以禁止返回到创建订单前的页面,防止重复创建。
创建路由:
src\router.js
import OrderList from './pages/order/OrderList.vue'
routes: [
……(原有代码)
{ path: '/order/list', component: OrderList, name: 'order_list', meta: { title: '我的订单' } },
],
src\pages\order\OrderList.vue
<template>
<div>订单列表</div>
</template>
查看订单列表
src\pages\User.vue
<router-link :to="{ name: 'order_list' }" class="mui-navigate-right">
<img class="mui-media-object mui-pull-left" src="../assets/images/avatar_default.png">
<div class="mui-media-body">我的订单</div>
</router-link>
src\pages\order\OrderList.vue
<script>
export default {
created () {
this.getOrderList()
},
methods: {
getOrderList () {
this.$indicator.open({
text: '加载中'
})
this.$http.get('order/list').then(res => {
this.$indicator.close()
window.console.log(res.data)
})
}
}
}
</script>
输出到页面中。
src\pages\order\OrderList.vue
this.$http.get('order/list').then(res => {
this.$indicator.close()
if (res.data.code === 0) {
this.$toast(res.data.msg)
} else if (res.data.code === 1) {
if (res.data.data.length) {
this.orderlist = res.data.data
} else {
this.$toast('订单为空')
}
} else if (res.data.code === 2) {
this.$router.push({ name: 'login' })
}
})
在data中定义数据
export default {
data () {
return {
orderlist: []
}
},
……(原有代码)
}
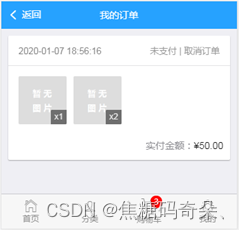
在页面中输出。
<template>
<div class="pay-list">
<div class="mui-card" v-for="order in orderlist" :key="order.id">
<div class="mui-card-header">
<span class="title">{{ order.create_time }}</span>
<span>
<span v-if="order.is_pay">已支付</span><span v-else>未支付</span> |
<span v-if="order.is_cancel">已取消</span>
<span v-else>取消订单</span>
</span>
</div>
<div class="mui-card-content">
<div class="mui-card-content-inner" >
<div class="cover" v-for="item in order.user_order_goods" :key="item.id">
<div class="img-con">
<img :src="item.goods_goods.image">
</div>
<div class="img-tag">x{{ item.count }}</div>
</div>
</div>
</div>
<p>实付金额:<span>¥{{ order.price }}</span></p>
</div>
</div>
</template>
样式:
<style lang="scss" scoped>
.pay-list p {
padding: 0 10px;
text-align: right;
span {
color: #151515;
}
}
.mui-card-header {
color:#999;
font-size: 13px;
span.title {
font-size: 13px;
color: #888;
}
}
.mui-card-content-inner {
.cover {
position: relative;
width: 70px;
height: 70px;
display: inline-block;
margin-right: 10px;
.img-con {
width: 100%;
height: 100%;
margin-right: 10px;
border-radius: 2px;
position: relative;
img {
width: 100%;
height: 100%;
border-radius: 2px;
position: absolute;
left: 50%;
top: 50%;
transform: translate3d(-50%,-50%,0);
}
}
.img-tag {
position: absolute;
opacity: .5;
background: #000;
color: #fff;
text-align: center;
font-size: 12px;
right: 0;
bottom: 0;
padding: 0 5px;
border-radius: 2px 0;
}
}
}
</style>
页面效果:
查看订单详情
src\pages\order\OrderList.vue
<div @click="show(order.id)" class="mui-card-content">
……
</div>
编写show()方法
methods: {
……(原有代码)
show (id) {
this.$router.push({ name: 'order_show', params: { id: id } });
}
}
定义路由:
src\router.js
import OrderShow from './pages/order/OrderShow.vue'
routes: [
……
{ path: '/order/show/:id', component: OrderShow, props: true, name: 'order_show', meta: { title: '查看订单' } }
],
src\pages\order\OrderShow.vue
<template>
<div>查看订单</div>
</template>
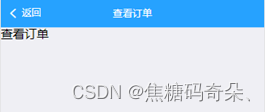
测试一下页面是否可以正确跳转。
加载数据
<script>
export default {
props: ['id'],
created () {
this.getOrder()
},
methods: {
getOrder () {
this.$indicator.open({
text: '加载中'
})
this.$http.get('order/show', {id: this.$props.id}).then(res => {
this.$indicator.close()
window.console.log(res.data)
})
}
}
}
</script>
接收服务器返回的数据。
src\pages\order\OrderShow.vue
this.$http.get('order/show', { id: this.$props.id }).then(res => {
this.$indicator.close()
if (res.data.code === 0) {
this.$toast(res.data.msg)
} else if (res.data.code === 1) {
this.order = res.data.data
} else if (res.data.code === 2) {
this.$router.push({ name: 'login' })
}
})
保存到data中。
export default {
data () {
return {
order: {}
}
},
……(原有代码)
}
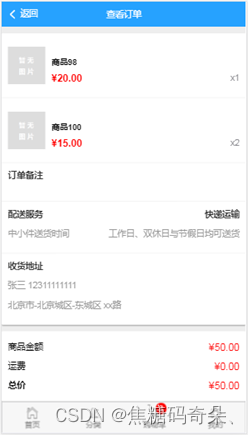
在页面中显示。
<template>
<div class="shopcart-container">
<!-- 商品列表 -->
<div class="goods-list">
<!-- 商品列表项区域 -->
<div class="mui-card">
<div class="mui-card-content" v-for="(item) in order.user_order_goods" :key="item.id">
<div class="mui-card-content-inner flex">
<img :src="item.goods_goods.image">
<div class="info">
<h1>{{ item.goods_goods.name }}</h1>
<p class="flex">
<span class="price">¥{{ item.price }}</span>
<span>x{{ item.count }}</span>
</p>
</div>
</div>
</div>
<!-- 订单备注 -->
<div class="process-info">
<p><strong>订单备注</strong></p>
<p><span>{{ order.note }}</span></p>
</div>
<!-- 配送信息 -->
<div class="process-info">
<p>
<strong>配送服务</strong>
<strong>快递运输</strong>
</p>
<p>
<span>中小件送货时间</span>
<span>工作日、双休日与节假日均可送货</span>
</p>
</div>
<!-- 收货地址 -->
<div class="process-info">
<p><strong>收货地址</strong></p>
<p><span>{{ order.address_name }} {{ order.address_tel }}</span></p>
<p><span>{{ order.address_area }} {{ order.address_detail }}</span></p>
</div>
</div>
</div>
<!-- 运费信息 -->
<ul class="fare-info mui-card">
<li class="fare-price flex">
<span>商品金额</span>
<span class="red">¥{{ order.price }}</span>
</li>
<li class="fare-price flex">
<span>运费</span>
<span class="red">¥0.00</span>
</li>
<li class="fare-price flex">
<span><strong>总价</strong></span>
<span class="red">¥{{ order.price }}</span>
</li>
<!-- 去支付按钮 -->
<div v-if="order.id && !order.is_cancel" class="flex">
<button class="mui-btn mui-btn-primary mui-btn-block">去支付</button>
</div>
</ul>
</div>
</template>
页面样式。
<style lang="scss" scoped>
.flex {
display: flex;
}
.shopcart-container {
background: #eee;
overflow: hidden;
// 商品列表
.goods-list {
margin-top: 10px;
.mui-card {
margin: 0;
.mui-card-content {
border-bottom: 1px solid #eee;
.mui-card-content-inner {
align-items: center;
padding: 10px;
img {
width: 60px;
}
.info {
margin-left: 10px;
box-sizing: border-box;
width: 100%;
overflow: hidden;
h1 {
font-size: 13px;
font-weight: bold;
line-height: 20px;
padding-top: 22px;
}
p {
flex-direction: row;
align-items: center;
justify-content: space-between;
.price {
font-size: 16px;
font-weight: 700;
color: red;
flex: 1
}
}
}
}
}
// 配送信息
.process-info {
padding: 10px;
border-bottom: 1px solid #eee;
p {
display: flex;
flex-direction: row;
align-items: center;
justify-content: space-between;
color: #333;
span {
color: #999
}
}
}
}
}
// 运费信息
.fare-info {
padding: 10px;
margin: 10px 0 0 0;
.fare-price {
padding: 5px 0;
display: flex;
justify-content: space-between;
.red {
color: red;
font-size: 16px;
}
}
}
}
</style>
页面效果:
取消订单
src\pages\order\OrderList.vue
<span v-else @click="cancel(order.id)">取消订单</span>
methods: {
……(原有代码)
cancel (id) {
this.$indicator.open({
text: '取消中'
})
this.$http.post('order/cancel', {id: id}).then(res => {
this.$indicator.close()
window.console.log(res.data)
})
}
}
在成功取消订单以后,重新加载订单列表。
src\pages\order\OrderList.vue
this.$http.post('order/cancel', {id: id}).then(res => {
this.$indicator.close()
if (res.data.code === 0) {
this.$toast(res.data.msg)
} else if (res.data.code === 1) {
this.getOrderList()
} else if (res.data.code === 2) {
this.$router.push({ name: 'login' })
}
})
测试程序。
单击“取消订单”,会变成“已取消”。

从商品详情页下订单
在商品详情页中查看商品时,如果单击“立即购买”,
也可以创建订单,
这个时候订单中只包含当前的这一件商品。
src\pages\goods\GoodsInfo.vue
<mt-button type="primary" size="small" @click="buy">立即购买</mt-button>
单击之后跳转到创建订单的页面。
methods: {
……(原有代码)
buy () {
this.$router.push({ name: 'order_create' })
}
}
在单击立即购买之后,应该将当前商品设为要购买的商品。
在src\store\modules\shopcart.js中修改setBuy方法,通过参数传入要设置的商品。
setBuy (state, goods) {
state.buy = []
if (goods) {
state.buy.push(goods)
} else {
state.car.some(item => {
if (item.selected) {
state.buy.push(item)
}
})
}
setItem('buy', state.buy)
},
在跳转前,将当前商品设为要购买的商品。
src\pages\goods\GoodsInfo.vue
buy () {
this.$store.commit('shopcart/setBuy', { id: this.$props.id, count: this.selectedCount })
this.$router.push({ name: 'order_create' })
}
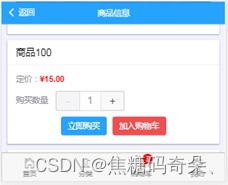
测试程序。

恭喜你大功告成!!
关注我~~


 3164
3164


 被折叠的 条评论
为什么被折叠?


