


前段时间介绍过UI自动化后起之秀的playwright录制脚本,那么作为UI自动化的前辈的Selenium肯定也应该具有录制脚本的功能,今天它来了就是Selenium的三大组件之一的Selenium IDE。
步骤 1: 使用 Selenium IDE 录制测试
安装 Selenium IDE:首先,需要在你的浏览器上安装 Selenium IDE。对于 Chrome 或 Firefox,可以从相应的扩展/插件商店下载并安装。
下载插件地址:国内下载地址:https://www.crx4chrome.com/crx/77585/
录制测试:
打开 Selenium IDE。
创建一个新的项目,命名为 “百度测试”。
在浏览器点击Selenium IDE ,创建一个测试项目,并命名
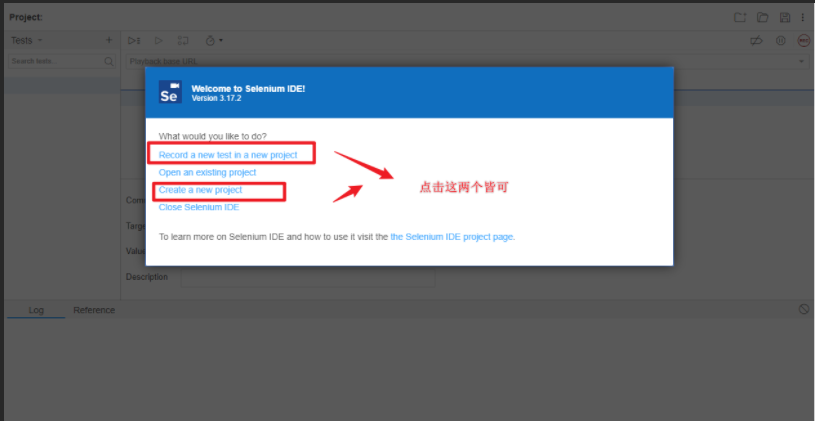
如果选择第一个,创建好项目后就会直接让你输入地址

如果选择创建一个项目,不立刻录制的话就进入项目里面点击 '录制' 按钮,打开百度网站(
https://www.baidu.com)。
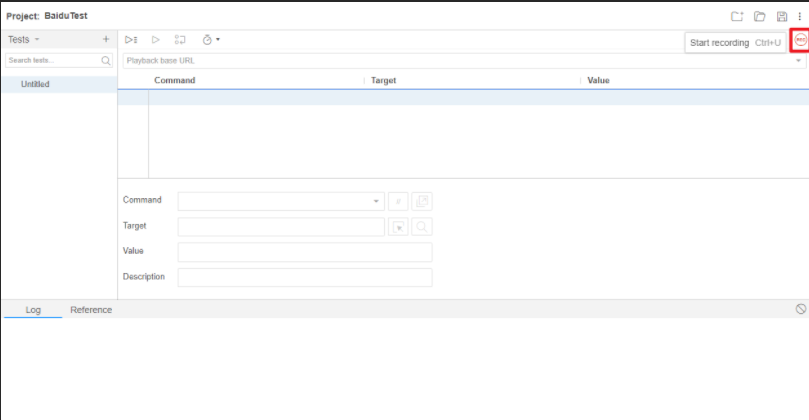
在搜索框中输入“测试”,然后点击“百度一下”按钮。
记录下搜索结果页面,然后返回插件页面停止录制。
步骤 2: 导出 Python 脚本
导出脚本:
在 Selenium IDE 中,选择你刚才录制的测试用例。
点击 “文件”> “导出” > “选择 Python(pytest)”。
保存生成的 Python 脚本文件。
Python 脚本示例:导出的 Python 脚本如下所示:
# Generated by Selenium IDE
import pytest
import time
import json
from selenium import webdriver
from selenium.webdriver.common.by import By
from selenium.webdriver.common.action_chains import ActionChains
from selenium.webdriver.support import expected_conditions
from selenium.webdriver.support.wait import WebDriverWait
from selenium.webdriver.common.keys import Keys
from selenium.webdriver.common.desired_capabilities import DesiredCapabilities

class TestBaidutest():
  def setup_method(self, method):
    self.driver = webdriver.Chrome()
    self.vars = {}

  def teardown_method(self, method):
    self.driver.quit()

  def test_baidutest(self):
    self.driver.get("https://www.baidu.com/")
    self.driver.set_window_size(1050, 652)
    actions = ActionChains(self.driver)
    actions.move_to_element(element).perform()
    self.driver.find_element(By.ID, "kw").click()
    self.driver.find_element(By.ID, "kw").send_keys("selenium")
    self.driver.find_element(By.ID, "kw").send_keys(Keys.ENTER)
    element = self.driver.find_element(By.CSS_SELECTOR, "section:nth-child(1) section:nth-child(3) .cover-img-boder_1-OG1")
    actions = ActionChains(self.driver)
    actions.move_to_element(element).perform()
步骤 3: 导出 Java 脚本并使用 TestNG
导出 Java 脚本:
重复上述 Python 脚本的导出步骤,但选择 “Java Junit)” 作为导出选项。
// Generated by Selenium IDE
import org.junit.Test;
import org.junit.Before;
import org.junit.After;
import static org.junit.Assert.*;
import static org.hamcrest.CoreMatchers.is;
import static org.hamcrest.core.IsNot.not;
import org.openqa.selenium.By;
import org.openqa.selenium.WebDriver;
import org.openqa.selenium.firefox.FirefoxDriver;
import org.openqa.selenium.chrome.ChromeDriver;
import org.openqa.selenium.remote.RemoteWebDriver;
import org.openqa.selenium.remote.DesiredCapabilities;
import org.openqa.selenium.Dimension;
import org.openqa.selenium.WebElement;
import org.openqa.selenium.interactions.Actions;
import org.openqa.selenium.support.ui.ExpectedConditions;
import org.openqa.selenium.support.ui.WebDriverWait;
import org.openqa.selenium.JavascriptExecutor;
import org.openqa.selenium.Alert;
import org.openqa.selenium.Keys;
import java.util.*;
import java.net.MalformedURLException;
import java.net.URL;
public class BaidutestTest {
  private WebDriver driver;
  private Map<String, Object> vars;
  JavascriptExecutor js;
  @Before
  public void setUp() {
    driver = new ChromeDriver();
    js = (JavascriptExecutor) driver;
    vars = new HashMap<String, Object>();
  }
  @After
  public void tearDown() {
    driver.quit();
  }
  @Test
  public void baidutest() {
    driver.get("https://www.baidu.com/");
    driver.manage().window().setSize(new Dimension(1050, 652));
    driver.findElement(By.id("kw")).click();
    driver.findElement(By.cssSelector(".bdsug-s")).click();
    {
      WebElement element = driver.findElement(By.cssSelector(".weather-icon"));
      Actions builder = new Actions(driver);
      builder.moveToElement(element).perform();
    }
    driver.findElement(By.id("kw")).click();
    driver.findElement(By.id("kw")).sendKeys("selenium");
    driver.findElement(By.id("kw")).sendKeys(Keys.ENTER);
    {
      WebElement element = driver.findElement(By.cssSelector("section:nth-child(1) section:nth-child(3) .cover-img-boder_1-OG1"));
      Actions builder = new Actions(driver);
      builder.moveToElement(element).perform();
    }
  }
}
修改为 TestNG:
import org.openqa.selenium.By;
import org.openqa.selenium.WebDriver;
import org.openqa.selenium.WebElement;
import org.openqa.selenium.chrome.ChromeDriver;
import org.testng.Assert;
import org.testng.annotations.AfterTest;
import org.testng.annotations.BeforeTest;
import org.testng.annotations.Test;

public class BaiduTest {
    private WebDriver driver;

    @BeforeTest
    public void setUp() {
        driver = new ChromeDriver();
    }

    @Test
    public void testSearch() {
        driver.get("http://www.baidu.com");
        WebElement element = driver.findElement(By.name("wd"));
        element.sendKeys("测试");
        element.submit();
        Assert.assertTrue(driver.getTitle().contains("测试"));
    }

    @AfterTest
    public void tearDown() {
        driver.quit();
    }
}
如果不想用Junit可以将 JUnit 相关的代码部分改写为使用 TestNG。
示例代码可能如下:
配置 Maven 的 pom.xml:
<dependencies>
    <dependency>
        <groupId>org.seleniumhq.selenium</groupId>
        <artifactId>selenium-java</artifactId>
        <version>4.1.0</version>
    </dependency>
    <dependency>
        <groupId>org.testng</groupId>
        <artifactId>testng</artifactId>
        <version>7.4.0</version>
        <scope>test</scope>
    </dependency>
</dependencies>
为了使用 TestNG 和 Selenium,需要在 Maven 的
pom.xml文件中添加相应的依赖:
本次分享到此结束,录制完成剩下的也就是修修改改,删删减减,这也节省了许多时间,有什么问题大家可以一起交流


 4418
4418


 被折叠的 条评论
为什么被折叠?
被折叠的 条评论
为什么被折叠?
 到【灌水乐园】发言


