


目录
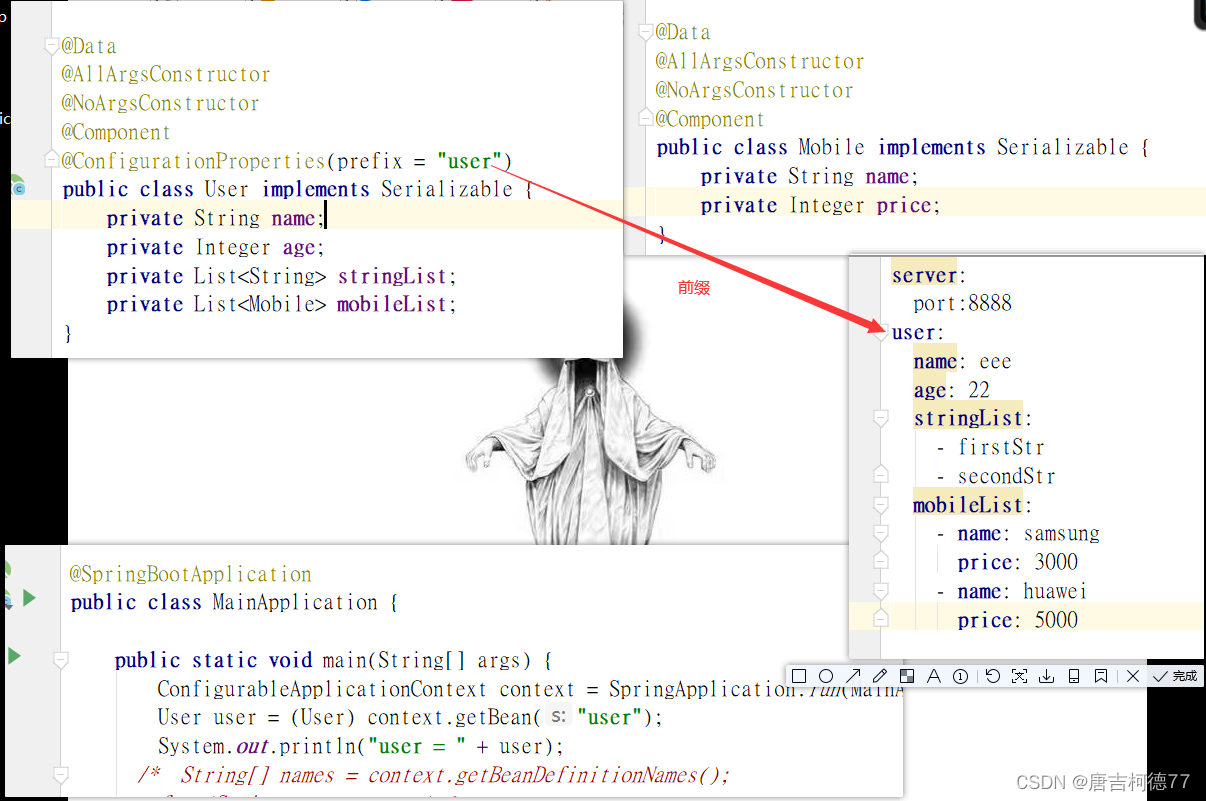
springboot如何获取application.yml里值
| agent_bill_no | 商户充值订单号 |
| result_msg | 结果描述 |
| charge_amt | 充值金额 |
第一天
mp最初
//yml配置文件
server:
  port: 8888
spring:
  datasource:
    driver-class-name: com.mysql.cj.jdbc.Driver
    url: jdbc:mysql://192.168.80.128:3306/mybatis_plus?useSSL=false
    username: root
    password: root
mybatis-plus:
  mapper-locations: classpath:mapper/*.xml
  configuration:
    map-underscore-to-camel-case: true
    log-impl: org.apache.ibatis.logging.stdout.StdOutImpl

//dao层
public interface UserMapper extends BaseMapper<User> {
    IPage<User> findPage(IPage<User> iPage);
}

//service接口
public interface UserService extends IService<User> {
}

//service接口实现类
@Service
public class UserServiceImpl extends ServiceImpl<UserMapper, User> implements UserService {
}

//controller层
@Controller
@RequestMapping("user")
public class UserController {

    @Autowired
    private UserService userService;

    @RequestMapping("get/{id}")
    @ResponseBody
    public User getById(@PathVariable("id") long id){
        return userService.getById(id);
    }
}

//启动类
@SpringBootApplication
@MapperScan("com.meitan.mp.mapper")
public class Application {
    public static void main(String[] args) {
        SpringApplication.run(Application.class,args);
    }
}
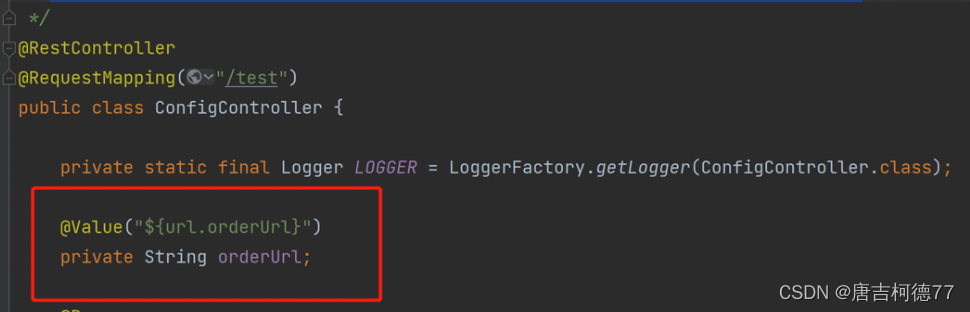
springboot如何获取application.yml里值
方法一.
方法二.
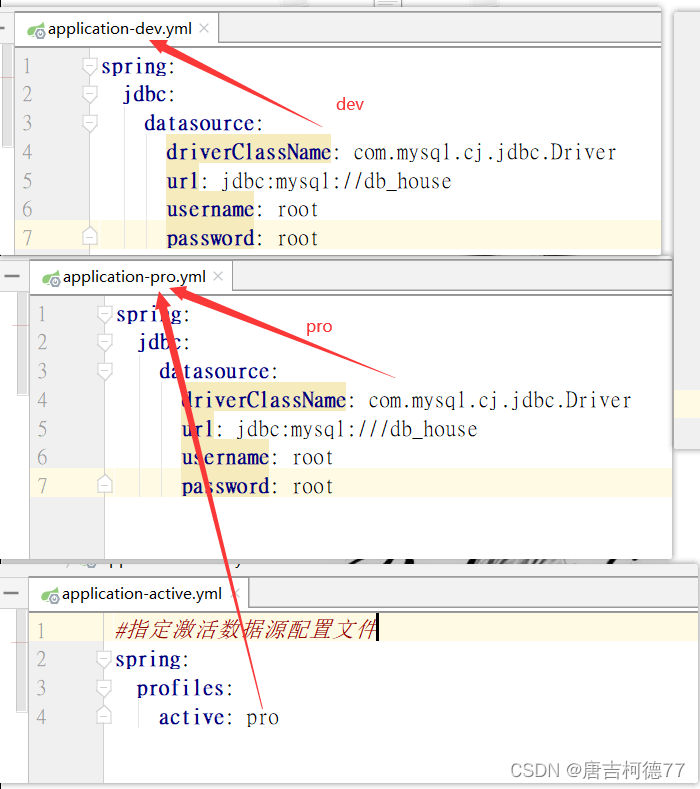
 指定激活某个yml配置文件
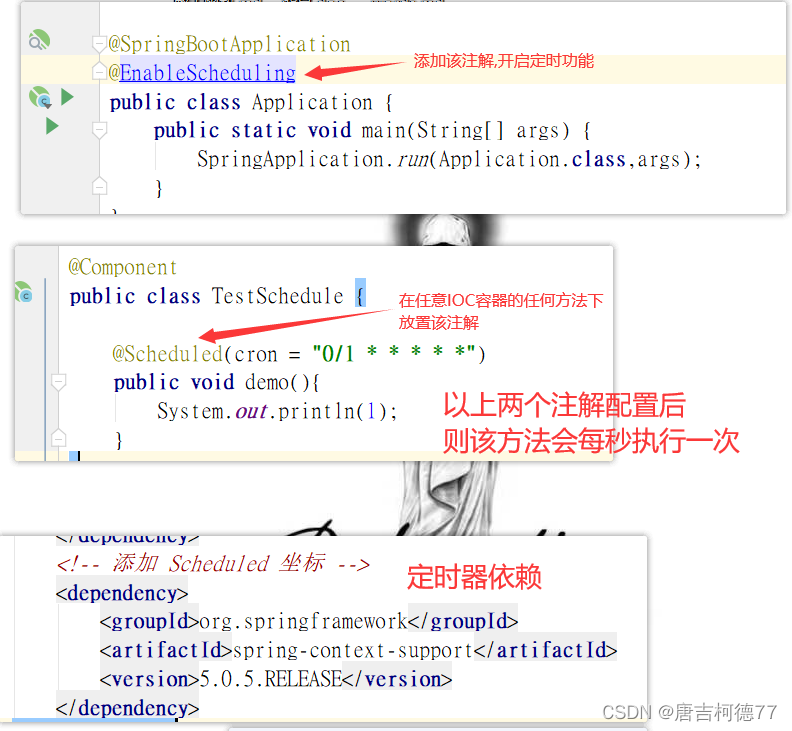
怎么开启定时器?
2.进行swagger2配置
//配置类
@Configuration
@EnableSwagger2
public class CoreSwagger2Config {

    @Bean
    public Docket adminApiConfig(){
        Docket docket = new Docket(DocumentationType.SWAGGER_2)  //设置文档类型
                .groupName("admin")                 //设置分组
                .apiInfo(getApiInfo())
                .select().paths(Predicates.and(PathSelectors.regex("/admin/.*"))) //给那个后端接口(@requestMapping的value属性值)配swagger2
                .build();
        return docket;
    }

    private ApiInfo getApiInfo() {
        ApiInfo apiInfo = new ApiInfoBuilder().title("尚融宝后台管理系统说明文档")
                .description("尚融宝后台管理系统接口说明文档具体描述信息")
                .contact(new Contact("joker", "jj", "yyyy@qq.com"))
                .build();
        return apiInfo;
    }
}

//controller层添加swagger2的相关注解
@RestController
@RequestMapping("core/admin/integralGrade")
@Api(tags = "管理积分等级接口")  //接口名
@CrossOrigin
public class AdminIntegralGradeController {

    @Autowired
    private IntegralGradeService integralGradeService;

    @ApiOperation("测试接口")
    @GetMapping("/test")
    private List<IntegralGrade> test() {
        List<IntegralGrade> list = integralGradeService.list();
        return list;
    }

    @ApiOperation(value = "根据id删除积分等级", notes = "逻辑删除")
    @DeleteMapping("/remove/{id}")
    public R removeById(
            @ApiParam(value = "数据id", required = true, example = "1")
            @PathVariable Long id) {
        boolean result = integralGradeService.removeById(id);
        if (result) {
            //return R.setResult(ResponseEnum.UPLOAD_ERROR);
            return R.ok().message("删除成功");
        } else {
            return R.error().message("删除失败");
        }
    }

}

//JavaBean进行swagger2配置
@Data
@EqualsAndHashCode(callSuper = false)
@ApiModel(value="IntegralGrade对象", description="积分等级表")  //实体类
public class IntegralGrade implements Serializable {

    private static final long serialVersionUID = 1L;

    @ApiModelProperty(value = "编号")  //实体类字段
    @TableId(value = "id", type = IdType.AUTO)
    private Long id;

    @ApiModelProperty(value = "积分区间开始")
    private Integer integralStart;
}
第四天
统一异常处理
//配置类
@Slf4j
@Component //Spring容器管理
@RestControllerAdvice //给带有@RestController注解的controller层类添加通知。。。如果使用@ControllerAdvice,则方法上需要添加@ResponseBody
public class UnifiedExceptionHandler {

    //处理通用异常处理
    @ExceptionHandler(value = Exception.class)
    public R exceptionHandler(Exception e){
        return R.error().message(e.getMessage());
    }

    //处理SQLexception
    @ExceptionHandler(value = BadSqlGrammarException.class)
    public R sqlExceptionHandler(BadSqlGrammarException e){
        return R.error().message(e.getMessage());
    }


    //处理自定义异常
    @ExceptionHandler(BusinessException.class)
    public R handleBusinessException(BusinessException e){
        log.error(e.getMessage(), e);
        return R.error().message(e.getMessage());
    }
}
第五天
EasyExcel
//随意写一个JavaBean
@Data
public class ExcelStudentDTO {
    @ExcelProperty("姓名")
    private String name;
    @ExcelProperty("生日")
    private Date birthday;
    @ExcelProperty("薪水")
    private Double salary;
}

//JavaBean->Excel文档
@Test
//java对象->Excel文档
public void a(){
    List<ExcelStudentDTO> list = new ArrayList<>();
    for (int i = 0; i < 10; i++) {
        ExcelStudentDTO excelStudentDTO = new ExcelStudentDTO();
        excelStudentDTO.setName("小"+i);
        excelStudentDTO.setBirthday(new Date());
        excelStudentDTO.setSalary(100d*i);
        list.add(excelStudentDTO);
    }
    EasyExcel.write("e:/2.xlsx",ExcelStudentDTO.class).sheet("学生信息表").doWrite(list);
}

//Excel文档->JavaBean     过程:Excel文档->java对象->监听处理->db
@Test
public void b(){
    EasyExcel.read("e:/2.xlsx", ExcelStudentDTO.class,new ExcelStudentDTOListener()).sheet("学生信息表").doRead();
}

//Excel文档->JavaBean 需要配置一个listener
public class ExcelStudentDTOListener extends AnalysisEventListener<ExcelStudentDTO> {

    List<ExcelStudentDTO> list = new ArrayList<>();

    @Override  //每读取一条数据,监听一天
    public void invoke(ExcelStudentDTO excelStudentDTO, AnalysisContext analysisContext) {
        if (list.size()>=3){

        }
        System.out.println(excelStudentDTO);
    }

    @Override  //全部数据读取完毕之后执行的方法
    public void doAfterAllAnalysed(AnalysisContext analysisContext) {

    }
}
第六天
数据库字典表->在前端下载为Excel表格
//controller层
@GetMapping("/export")
public void exportData(HttpServletResponse response){
    ServletOutputStream outputStream = null;
    response.setContentType("application/vnd.ms-excel");
    response.setCharacterEncoding("utf-8");
    try {
        response.setHeader("Content-disposition", "attachment;filename*=utf-8''" + URLEncoder.encode("数据字典表","UTF-8") + ".xlsx");
    } catch (UnsupportedEncodingException e) {
        e.printStackTrace();
    }
    try {
        outputStream = response.getOutputStream();
    } catch (IOException e) {
        e.printStackTrace();
    }
    List<ExcelDictDTO> list = dictService.exportData();
    EasyExcel.write(outputStream, ExcelDictDTO.class).sheet("数据字典表").doWrite(list);
}

//serviceimpl    综合流编程代替传统for循环
@Override
public List<ExcelDictDTO> exportData() {
    List<ExcelDictDTO> excelDictDTOList = new ArrayList<>();
    List<Dict> dictList = dictMapper.selectList(null);
    //将Dict的集合转化为ExcelDictDTO的集合
    excelDictDTOList = dictList.stream().map((dict) -> {
        ExcelDictDTO excelDictDTO = new ExcelDictDTO();
        //将Dict转化为ExcelDictDTO
        BeanUtils.copyProperties(dict,excelDictDTO);
        return excelDictDTO;
    }).collect(Collectors.toList());
    return excelDictDTOList;
}
第七天
1.解决redis存储键值对时,键和值编码格式问题
//写配置类
@Configuration
public class RedisConfig {


    @Bean
    public RedisTemplate<String, Object> redisTemplate(LettuceConnectionFactory redisConnectionFactory) {

        RedisTemplate<String, Object> redisTemplate = new RedisTemplate<>();
        redisTemplate.setConnectionFactory(redisConnectionFactory);

        //首先解决key的序列化方式
        StringRedisSerializer stringRedisSerializer = new StringRedisSerializer();
        redisTemplate.setKeySerializer(stringRedisSerializer);

        //解决value的序列化方式
        Jackson2JsonRedisSerializer<Object> jackson2JsonRedisSerializer = new Jackson2JsonRedisSerializer<>(Object.class);

        //序列化时将类的数据类型存入json,以便反序列化的时候转换成正确的类型
        ObjectMapper objectMapper = new ObjectMapper();
        //objectMapper.enableDefaultTyping(ObjectMapper.DefaultTyping.NON_FINAL);
        objectMapper.activateDefaultTyping(LaissezFaireSubTypeValidator.instance, ObjectMapper.DefaultTyping.NON_FINAL);

        // 解决jackson2无法反序列化LocalDateTime的问题
        objectMapper.disable(SerializationFeature.WRITE_DATES_AS_TIMESTAMPS);
        objectMapper.registerModule(new JavaTimeModule());

        jackson2JsonRedisSerializer.setObjectMapper(objectMapper);


        redisTemplate.setValueSerializer(jackson2JsonRedisSerializer);
        redisTemplate.setHashValueSerializer(jackson2JsonRedisSerializer);

        // hashkey的序列化
        redisTemplate.setHashKeySerializer(stringRedisSerializer);

        return redisTemplate;
    }
}
2.阿里云进行短信发送服务
@Service
public class ApiSmsServiceImpl implements ApiSmsService {

    @Autowired
    private RedisTemplate redisTemplate;

    @Override
    public void send(String mobile) {
        Assert.notNull(mobile, ResponseEnum.MOBILE_NULL_ERROR);
        Assert.isTrue(RegexValidateUtils.checkCellphone(mobile),ResponseEnum.MOBILE_ERROR);

        // 调用阿里短信api
        // 公共参数
        //第一个参数:区域id,表示使用哪个区域的服务器进行短信发送
        //第二个参数:阿里云里注册时给的 accesskey
        //第三个参数:阿里云里注册时给的 accesskey对应的秘钥
        DefaultProfile defaultProfile = DefaultProfile.getProfile(SmsProperties.REGION_ID,SmsProperties.KEY_ID,SmsProperties.KEY_SECRET);
        // 请求参数,以下五行为粘贴内容,固定把!
        CommonRequest commonRequest = new CommonRequest();
        commonRequest.setSysDomain("dysmsapi.aliyuncs.com");// 短信功能的网关
        commonRequest.setSysAction("SendSms");
        commonRequest.setSysMethod(MethodType.POST);
        commonRequest.setSysVersion("2017-05-25");
        //给那个手机号发送短信->mobile从controller传输过来
        commonRequest.putQueryParameter("PhoneNumbers",mobile);
        //使用短信发送时对应的专用签名
        commonRequest.putQueryParameter("SignName",SmsProperties.SIGN_NAME);
        //使用短信发送时对应的模板id
        commonRequest.putQueryParameter("TemplateCode",SmsProperties.TEMPLATE_CODE);
        //构造发送短信的内容->使用随机数工具类获取一个六位的随机数,然后放在map里边
        String sixBitRandom = RandomUtils.getSixBitRandom();
        Map<String,Object> map = new HashMap<>();
        map.put("code",sixBitRandom);
        Gson gson = new Gson();
        //map中存储的数据,键code对应的值为要发送的那个验证码
        commonRequest.putQueryParameter("TemplateParam",gson.toJson(map));


        // 阿里云的通用client
        IAcsClient iAcsClient = new DefaultAcsClient(defaultProfile);

        // 发送请求
        try {
            CommonResponse commonResponse = iAcsClient.getCommonResponse(commonRequest);
            boolean success = commonResponse.getHttpResponse().isSuccess();
            if(success){
                // 将验证码保存到redis
                redisTemplate.opsForValue().set("srb:sms:code:" + mobile, sixBitRandom);
            }
            System.out.println(commonResponse);
        } catch (ClientException e) {
            e.printStackTrace();
        }
    }
}
第八天
阿里云存储OSS
//controller层,前端直接上传文件,跟ssm整合时的multipartFile一样,然后后端返回给前端一个url,表示上传成功之后文件在阿里云上的存储地址,该url在浏览器粘贴可以直接访问我们上传的文件
@CrossOrigin
@RestController
@RequestMapping("/api/oss/file")
public class ApiOssController {

    @Autowired
    private ApiOssService apiOssService;

    @PostMapping("/uploadImage")
    public R uploadImage(@RequestParam("file")MultipartFile multipartFile,String module){
        String imageUrl = apiOssService.uploadImage(multipartFile,module);
        return R.ok().data("url",imageUrl);
    }
}

//service实现类
@Override
public String uploadImage(MultipartFile multipartFile, String module) {
    // 创建OSSClient实例。OssProperties.KEY_ID表示accesskey,OssProperties.KEY_SECRET表示accesskey对应的秘钥
    OSS ossClient = new OSSClientBuilder().build(OssProperties.ENDPOINT, OssProperties.KEY_ID, OssProperties.KEY_SECRET);

    String filenameExtension = StringUtils.getFilenameExtension(multipartFile.getOriginalFilename());
    String fileName = module+new DateTime().toString("/yyyy/MM/dd/")+ UUID.randomUUID().toString()+"."+filenameExtension;

    // 上传文件,OssProperties.BUCKET_NAME表示上传文件到指定的容器(桶名)
    try {
        ossClient.putObject(OssProperties.BUCKET_NAME,fileName,multipartFile.getInputStream(),null);
    } catch (IOException e) {
        e.printStackTrace();
    }

    // 拼接访问地址,OssProperties.ENDPOINT后边每一条 / 表示一个文件夹,如果没有该文件夹,阿里云会自动创建
    String url = "https://"+OssProperties.BUCKET_NAME+"."+OssProperties.ENDPOINT+"/"+fileName;
    System.out.println(url);
    // 关闭oss链接
    ossClient.shutdown();

    return url;
}
删除文件
/**
* 根据路径删除文件
* @param url ,url来自于前端
*/
@Override
public void removeFile(String url) {
// 创建OSSClient实例。
OSS ossClient = new OSSClientBuilder().build(
OssProperties.ENDPOINT,
OssProperties.KEY_ID,
OssProperties.KEY_SECRET);
//文件名(服务器上的文件路径)
String host = "https://" + OssProperties.BUCKET_NAME + "." + OssProperties.ENDPOINT + "/";
String objectName = url.substring(host.length());
// 删除文件。
ossClient.deleteObject(OssProperties.BUCKET_NAME, objectName);
// 关闭OSSClient。
ossClient.shutdown();
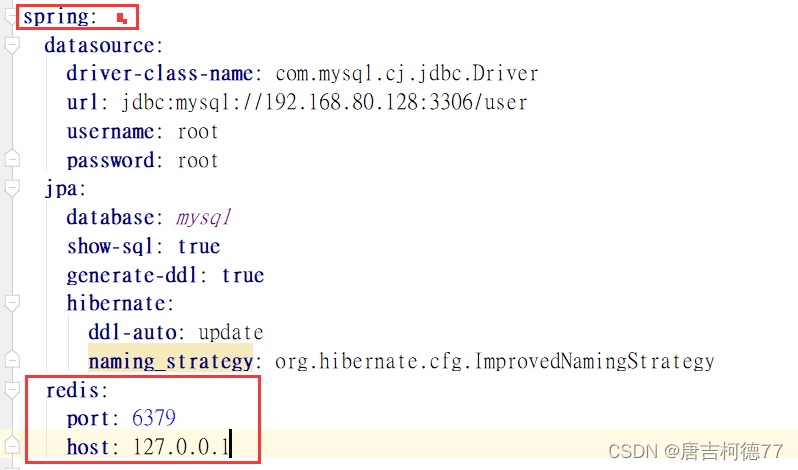
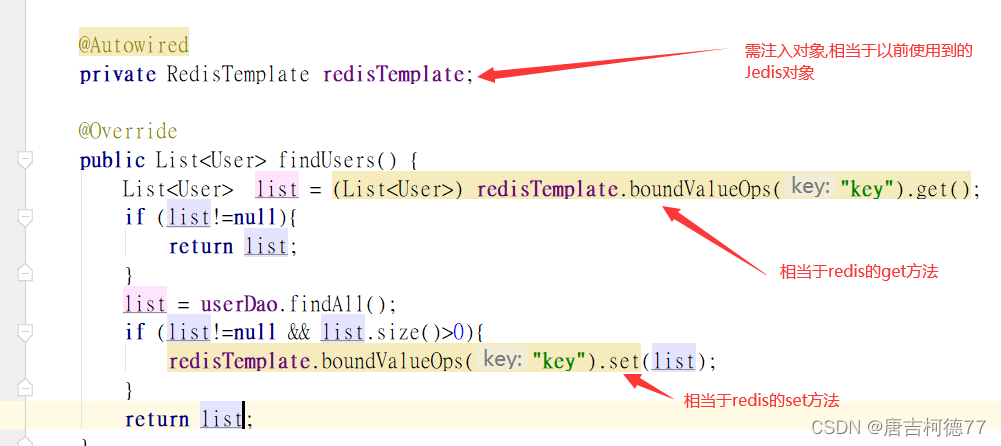
}第十天.
整合redis
第十一天.单点登录与jwt
第十三天.nacos集群的配置
第十九天
整合rabbitmq->producer
core中添加配置文件
//mq
spring.rabbitmq.host=192.168.222.2
spring.rabbitmq.port=5672
spring.rabbitmq.username=guest
spring.rabbitmq.password=guest
spring.rabbitmq.publisher-confirm-type=simple  //开启确认模式
spring.rabbitmq.publisher-returns=true         //开启回退模式

//进行rabbitTemplate相关配置
第一步:写一个消息转换器,
@Configuration
public class MQConfig {

    @Bean
    public MessageConverter messageConverter(){
        //json字符串转换器
        return new Jackson2JsonMessageConverter();
    }
}
第二步:配置消息确认机制及回退机制
@Component
public class AckMqConfig implements RabbitTemplate.ConfirmCallback,RabbitTemplate.ReturnCallback {

    @Autowired
    RabbitTemplate rabbitTemplate;

    @PostConstruct
    public void init(){
        rabbitTemplate.setConfirmCallback(this);
        rabbitTemplate.setReturnCallback(this);
    }

    @Override
    public void confirm(CorrelationData correlationData, boolean ack, String message) {
        System.out.println("消息发送确认");
    }

    @Override
    public void returnedMessage(Message message, int code, String codeStr, String exchange, String routing) {
        System.out.println("消息投递确认");
    }
}


//producer
public void sendMessage(String exchange, String routing, Object message) {
        rabbitTemplate.convertAndSend(exchange,routing,message);
    }
consumer
@Component
public class SmsReceiver {

    @Autowired
    ApiSmsService apiSmsService;
    //进行交换机队列绑定,并写好路由协议
    @RabbitListener(bindings = @QueueBinding(
            exchange = @Exchange(value = "exchange.topic.sms",durable = "true"),
            key = {"routing.sms.item"},
            value = @Queue(value = "queue.sms.item",durable = "true")
    ))
    public void a(Channel channel, Message message, SmsDTO smsDTO){
        byte[] body = message.getBody();
        String a = new String(body);
        System.out.println("消费消息");
        System.out.println(smsDTO);

        try {
            apiSmsService.sendMessage(smsDTO);
            //第一个参数:表示消息的标记
            //第二个参数:表示是否批量同意签收
            channel.basicAck(message.getMessageProperties().getDeliveryTag(),false);
        } catch (IOException e) {
/*
        发生异常我们除了回退消息的处理办法外还可以选择拒绝签收,如下
        第二参数:表示是否拒绝签收
        第三参数:表示是否让消息回到队列
        channel.basicNack(message.getMessageProperties().getDeliveryTag(),true,true);
*/
            try {
            //发生异常回退消息
                channel.txRollback();
            } catch (IOException ex) {
                ex.printStackTrace();
            }
            e.printStackTrace();
        }
    }
}


 1341
1341

 被折叠的 条评论
为什么被折叠?
被折叠的 条评论
为什么被折叠?
 到【灌水乐园】发言


