


目录
一、vue基本语法
1.插值表达式 {{}}
插值表达式用户把vue中所定义的数据,显示在页面上.。
el挂载点:设置Vue实例挂载(管理)的元素
语法:{{ 变量名/对象.属性名 }}
案例:
<div id="one">
    {{message}}
</div>
<script>
    var v1 = new Vue({
      el: "#one",
      data: {
        message: "hello world!"
      },
    })
</script>
2.显示数据(v-text)和(v-html)
v-test和v-html都是专门用来展示数据,其作用和插值表达式类似。并且还可以解决因网速慢差值表达式会显示原始的{{}}问题。
区别
v-text:把数据当作纯文本显示.
v-html:遇到html标签,会正常解析
示例
<div id="one" >
    <div v-text="message"></div>
    <div v-html="message"></div>
</div>
<script>
    var v = new Vue({
      el: '#one',
      data: {
        message: "<h3>哈哈哈</h3>"
    }
    });
</script>
结果

3.事件处理(v-on)
Vue中也可以给页面元素绑定事件.如元素点击click事件,提交submit事件,回车keyup.enter事件。
- 语法
<!--完整写法-->
<button v-on:事件名="函数名/vue表达式">点击</button>
<!--简化写法-->
<button @事件名="函数名/vue表达式">点击</button>
- 案例
<div id="one">
  <button v-on:click="addition()">加1</button>
  <button v-on:click="subtraction()">减1</button>
  <h1>{{score}}</h1>
</div>
<script>
  var app = new Vue({
    el:"#one",
    data:{
      score: 60
    },
    methods: {
      // 加1
      addition() {
        this.score+=1;
      },
      // 减1
      subtraction() {
        this.score-=1;
      },
    }
  });
</script>
4.循环遍历(v-for)
1.遍历数组
- 语法
v-for="item in items" // 遍历数组
v-for="(item,index) in items" // 遍历数组加下标
- 示例
<div id="one">
    <li v-for="user in users">{{user}}</li>
    <li v-for="(user,index) in users">{{user}}--{{index}}</li>
</div>
<script>
    var v1 = new Vue({
      el: "#one",
      data: {
        users: ['user1','user2','user3','user4','user5']
      },
    })
</script>
2.遍历对象
- 语法
v-for="value in object"
v-for="(value,key) in object"
v-for="(value,key,index) in object"
- 示例
<div id="one">
    <li v-for="key in person">{{key}}</li>
    <li v-for="(key,value) in person">{{key}}--{{value}}</li>
    <li v-for="(key,value,index) in person">{{key}}--{{value}}--{{index}}</li>
</div>
<script>
    var v1 = new Vue({
      el: "#one",
      data: {
        person: {"username":"lisi","age":"20","gender":"男"}
      },
    })
</script>
3.向数组中添加或删除元素
- 示例
<div id="one">
    <button @click="add">添加</button>
    <button @click="remove">移除</button>
    <li v-for="user in users">{{user}}</li>
</div>
<script>
    var v1 = new Vue({
      el: "#one",
      data: {
        users: ['user1','user2','user3','user4','user5']
      },
      methods: {
          // 向users数组中添加元素
        add() {
          this.users.unshift("user6");
        },
        // 移除users中的元素
        remove() {
          this.users.shift();
        },
      }
    })
</script>
5.判断语法(v-if)
- 语法
v-if="判断语句"
v-else-if="判断语句"
v-else- 示例
<div id="one">
    请输入你的成绩:<input type="text" v-model.number="score">
    <div v-if="score>=90"> <h2>优秀!</h2></div>
    <div v-else-if="score>=80"> <h2>良好!</h2> </div>
    <div v-else-if="score>=70"> <h2>中等!</h2> </div>
    <div v-else-if="score>=60"> <h2>及格!</h2> </div>
    <div v-else><h2>不及格!</h2> </div>
</div>
<script>
    var app = new Vue({
      el:"#one",
      data:{
        score: 60
      },
    });
</script>
6.元素显示与隐藏(v-show)
条件满足(为true)时,显示元素,反之不显示。但是此元素依然存在,只是其CSS属性display变为none了。
<div id="one" >
    <h1 v-show="show">hello world!</h1>
</div>
<script>
    var v = new Vue({
      el: '#one',
      data: {
        show: true
    }
    });
</script>
当show设置为false时:

7.动态设置属性(v-bind)
常用于动态设置标签的属性值,如src,href,value,class等等
- 语法
v-bind:value=""  //正常写法
:value="" //简写- 示例
<div id="one">
    <input type="button" v-bind:value="message">
</div>
<script>
    var v1 = new Vue({
      el: "#one",
      data: {
        message: "哈哈"
      },
    })
</script>
8.数据双向绑定(v-model)
数据双向绑定可以实现数据变化的时候,页面会自动刷新,页面变化的时候,数据也会自动变化。
双向绑定只能绑定文本框,单选框,复选框,文本域以及下拉列表等表单元素。
1.绑定文本框
<div id="one">
    <input type="text" v-model="message">
    <span>{{message}}</span>
</div>
<script>
    var v1 = new Vue({
        el:"#one",
        data:{
            // 该属性和文本框的属性保持一致
            message: ""
        },
    });
</script>
2.绑定单个复选框
<div id="one">
    <input type="checkbox" v-model="message">同意<br>
    <span>{{message}}</span>
</div>
<script>
    var v1 = new Vue({
        el:"#one",
        data:{
            // 该属性和文本框的属性保持一致
            message: false
        },
    });
</script>

3.绑定多个复选框
<div id="one">
    <input type="checkbox" v-model="message" value="Java">Java<br>
    <input type="checkbox" v-model="message" value="Python">Python<br>
    <input type="checkbox" v-model="message" value="C++">C++<br>
    <span>{{message}}</span>
</div>
<script>
    var v1 = new Vue({
        el:"#one",
        data:{
            // 数组中的值就是被选中的元素的value属性值
            message: []
        },
    });
</script>

9.计算属性
1.计算属性很重要的特性: 带缓存, 性能极强。
2.在第一次使用该属性时进行计算, 计算后将结果缓存起来, 后面如果还有其他地方用到, 会直接从缓存中取值, 不会再次计算。
3.如果方法中的某些数据更新了,与此相关的方法都会重新执行一遍。
- 语法
computed: {

}- 示例
<div id="one">
  {{currentTime_methods()}}<br>   <!-- methods里的方法调用要加() -->
  {{currentTime_computed}}        <!-- computed里的方法调用不加   计算属性 -->
</div>
<script>
  var v1 = new Vue({
    el: "#one",
    data: {
      message: "hello world!"
    },
    methods: {
        currentTime_methods: function () {
            return Date.now();
        }
    },
    // 计算属性
    computed: {
        currentTime_computed: function () {
            return Date.now();
       }
    }
});
二、vue组件
1.使用组件的三个步骤
- 创建一个组件 (Vue.extend)
- 注册组件
- 使用组件
<div id="root">
    <!-- 3.使用student组件 -->
    <student></student>
    <school></school>
</div>
<!--<script src="vue/vue.min.js"></script>-->
<script>
    // Vue.config.devtools = true
  // 1. 创建student组件
  let student = Vue.extend({
    template: `<div>
                   <h1>{{ id }}--{{ name }}</h1>
               </div>`,
    data(){
      return{
          id: '11',
          name: 'lisi',
      }
    }
  })
    // 创建组件可以简写
    // let student = {
    //     template: `<div>
    //                <h1>{{ id }}--{{ name }}</h1>
    //            </div>`,
    //     data(){
    //         return{
    //             id: '11',
    //             name: 'lisi',
    //         }
    //     }
    // }

  // 1. 创建school组件
  let school = Vue.extend({
       template: `<div>
                   <h1>{{ schoolName }}--{{ address }}</h1>
               </div>`,
       data(){
            return{
                schoolName: '实验小学',
                address: '陕西省咸阳市',
            }
       }
  })
  new Vue({
    el: '#root',
    data: {
    },
    // 2.注册组件(局部注册)
    components: {
      student,
      school
    }
  });
2.注册组件的两种方式
- 局部注册
- 全局注册
// 局部注册组件
new Vue({
    el: '#root',
    data: {
    },
    // 2.注册组件(局部注册)
    components: {
      student
    }
  });

// 全局注册组件 可以在任何div容器下使用该组件标签
Vue.component('student',student)
3.组件嵌套
<script>

// 如下school组件中嵌套了student组件

// 1. 创建student组件
  let student = Vue.extend({
    template: `<div>
                   <h1>{{ id }}--{{ name }}</h1>
               </div>`,
    data(){
      return{
          id: '11',
          name: 'lisi',
      }
    }
  })
  // 1. 创建school组件
  let school = Vue.extend({
       template: `<div>
                   <h1>{{ schoolName }}--{{ address }}</h1>
                 </div>`,
       data(){
            return{
                schoolName: '实验小学',
                address: '陕西省咸阳市',
            }
       },
      components: {
           // 组件嵌套
           student
      }
  })
</script>
4.认识vue文件
<template>
  <!-- 组件的结构 (模版里必须要有一个根元素,用div)包裹 -->
  <div>
      ...
  </div>
</template>

<script>
// 组件交互相关的代码(数据,方法等等)
// export 暴露导出模块
export default {
  name: "App" // 组件名
}
</script>

<style scoped>
/*组件的样式*/
</style>
5.创建组件并暴露的写法
// 如下写法其实是一种简写
export default {

}

// 完整如下
export const Student = Vue.extend({

})
export default(Student)
// 或者

export let Student = Vue.export({

})
三、axios异步请求
axios是一个基于 promise 的 HTTP 库, 主要用于:发送异步请求获取数据。
1.引入axios
<script src="https://unpkg.com/axios/dist/axios.min.js"></script>2.get和post请求
语法
// 方法一默认为正常响应回的数据,方法二为错误信息
axios.get("地址?key1=value1&key2=value2").then(function(response){},function(err){})
axios.post("地址",{key1:value1,key2:value2}).then(function(response){},function(err){})
示例
<script>
    // get请求
    axios.get("地址?key1=value1&key2=value2").then(
          // then中的第一个方法是响应成功返回的数据,第二个方法是返回的错误信息
          function (response) {
             console.log(response);
          },
          function (err) {
             console.log(err);
          }
    )

    //post请求
    axios.post("地址",{
        // 请求参数
        username: "lisi",
        password: "123"
    }).then(
        // then中的第一个方法是响应成功返回的数据,第二个方法是返回的错误信息
        function (response) {
           console.log(response);
        },
        function (err) {
            console.log(err);
        }
    )
</script>
3.vue+axios
<script>
  var v1 = new Vue({
    el: "#one",
    data: {
      user: {}
    },
    // 当页面加载完毕后
    created() {
      axios.get("info/userinfo",{
        // get请求的参数
        params: {
          username: "admin",
          password: "123",
        },
        // 响应数据格式为json
        responseType: "json",
      }).then(ret => {
        // 打印响应数据
        console.log(ret.data);
        // 把响应数据赋值给vue中的user属性
        this.user=ret.data;
      }).catch(err => {
        // 打印错误信息
        console.log(err);
      });
    }
  });
</script>
四、创建 vue-cli 脚手架
1.什么是npm
npm是JS的一个包管理程序,相当于后端的maven,Node Package Manager 。
2.使用webpack手动执行(不用脚手架)
// 1.创建项目
vue init webpack 项目名
// 2,进行该项目
cd 项目
// 3.安装运行环境
npm install
// 4.启动项目
npm run dev
// 5.结束项目
ctrl+c

// 由于JS文件引入使用了import,是es6语法,浏览器不认识,需要将该Js文件通过webpack
// 打包成一个新的压缩的JS文件后,再引入HTML文件中

// 对JS文件打包成压缩的浏览器认识的JS文件,需要在webpack.confog.js
// 文件中配置【注意//webpack.confog.js配置文件的位置】
//module.exports = {
//    entry: './modules/main.js',      // 程序入口
//    output: {
//        filename: './js/bundle.js'   // 打包生成的JS文件位置
//    }
//}
webpack //打包命令
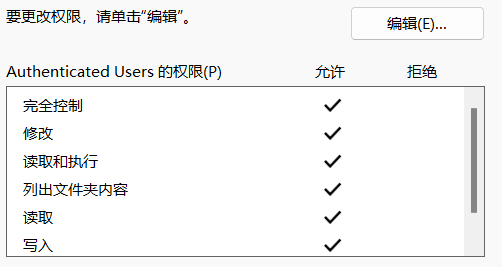
可能出现的问题
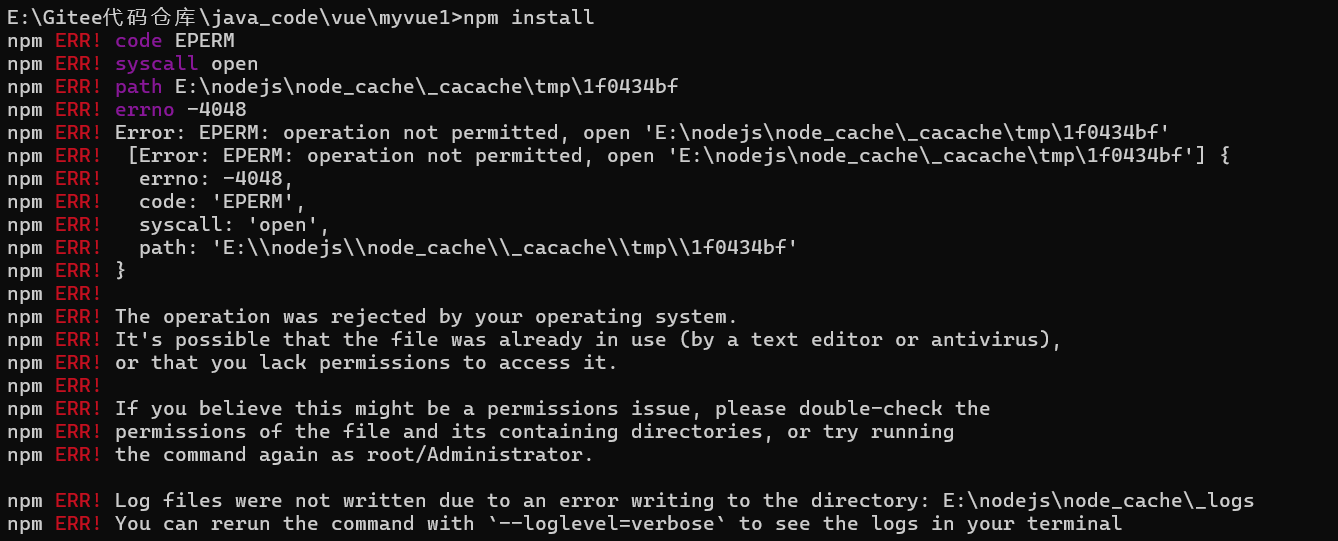
解决办法
对 node_global文件,node_cache文件 右键->属性->安全->编辑,全勾上。
3.创建脚手架步骤
- 1. 创建vue项目
vue create 项目名
- 2.进入该项目
cd 项目名- 3.启动项目
npm run serve- 4.结束项目
ctrl + c
4.npm run serve 命令可能出现的问题
原因是存在语法检查,组件命名没有按照它规范来。
解决办法:在vue.config.js文件中添加如下代码即可。
lintOnSave: false

5.vue脚手架项目结构

6.项目创建步骤示例(脚手架中执行)
- 首先创建两个vue文件(Student和School)
- 再创建一个vue文件(App),该文件嵌套上面两个文件(组件引入)
- 再创建一个JS文件(main),引入App.vue文件
- 最后创建一个HTML文件(index),并引入使用webpack打包而成的JS文件
- 最后在当前项目下使用 npm run serve 命令启动项目
首先创建两个vue文件(Student和School)
School.vue文件
<template>
<!-- 组件的结构 (模版里必须要有一个根元素) -->
  <div>
    <h2>学校名称:{{name}}</h2>
    <h2>学校地址:{{address}}</h2>
    <button @click="showName">点我提示学校名</button>
  </div>
</template>

<script>
// 组件交互相关的代码(数据,方法等等)
// export 将。。。暴露
export default {
  name: "School",  //组件名,最好跟文件名相同
  data() {
    return {
      name: '希望中学',
      address: '陕西省西安市'
    }
  },
  methods: {
    showName: function () {
      alert(this.name);
    }
  }
}
</script>

<style scoped>
  /*组件的样式*/
</style>
student.vue文件
<template>
  <div>
    <h2>学生姓名:{{name}}</h2>
    <h2>学生年龄:{{age}}</h2>
    <button @click="showName">点我提示学生名</button>
  </div>
</template>

<script>
export default {
  name: "Student",
  data() {
    return {
        name: '张三',
        age: '18'
    }
  },
  methods: {
    showName: function () {
      alert(this.name);
    }
  }

}
</script>

<style scoped>

</style>
再创建一个vue文件(App),该文件嵌套上面两个文件(即引入两个vue文件)
<template>
<!--  使用这两个组件-->
  <div>  <!-- 切记模版里必须要有一个根元素 -->
    <School></School>
    <Student></Student>
  </div>
</template>

<script>
  // 导入这两个组件
  import School from './components/School.vue'
  import Student from './components/Student.vue'

  export default {
    name: "App",
    data() {
    },
    components: {
      School,
      Student
    }
  }
</script>

<style scoped>

</style>
再创建一个JS文件(main),引入App.vue文件
// 引入vue组件
import Vue from 'vue'
// 引入App组件
import App from './App.vue'

Vue.config.productionTip = false

new Vue({
  render: h => h(App),
}).$mount('#app')
最后创建一个HTML文件(index)
<!DOCTYPE html>
<html lang="">
  <head>
    <meta charset="utf-8">
    <meta http-equiv="X-UA-Compatible" content="IE=edge">
    <meta name="viewport" content="width=device-width,initial-scale=1.0">
    <link rel="icon" href="<%= BASE_URL %>favicon.ico">
    <title><%= htmlWebpackPlugin.options.title %></title>
  </head>
  <body>
    <div id="app"></div>
    <!-- built files will be auto injected -->
  </body>
</html>
文件创建完毕,使用如下命令启动项目
npm run serve五、vuex
实现多组件共享数据,管理数据的一个插件。
六、vue-router 前端路由
1.基本使用
1.安装vue-router
// 1.安装vue路由,3表示路由版本是3版本,路由3版本对应vue2版本
npm i vue-router@3
2.编写router配置项(js文件)
/**
 *   该文件专门用来创建应用的路由器
  */

// 引入vue-router
import VueRouter from 'vue-router'

// 引入路由对应的组件
import Student from './Student.vue'
import School from './School.vue'

// 创建并暴露一个路由器
export default new VueRouter({
    // 如下,一个routers可以有一对或者多对 路径和组件
    routers: [
        {
            path: '/allstudents',      // 路径
            component: 'Student', // 组件名 前提是得引入组件
        },
        {
            path: '/allschools',
            component: 'School',
        }
    ]
})
3.引入路由器(main.js文件中)
import Vue from 'vue'
import App from './App.vue'

// 引入路由器(源自配置项中的路由器)
import router from './router'

Vue.config.productionTip = false

new Vue({
  render: h => h(App),
  router: router  // 设置路由器
}).$mount('#app')
3.实现切换(vue文件中的模版里不能再使用a标签,要替换成vue-router提供的router-link标签 )
<router-link to="/allstudents"></router-link>
<router-link to="/allschools"></router-link>
4.指定展示位置
<router-view></router-view>2.路由嵌套
// 引入vue-router
import VueRouter from 'vue-router'

// 引入路由对应的组件
import Student from './Student.vue'
import Student1 from './student1.vue'
import Student2 from './student2.vue'

// 创建并暴露一个路由器
export default new VueRouter({
    routers: [
        {
            path: '/allstudents',      // 路径
            component: Student,        // 组件名 前提是得引入组件
            children: [                // 组件嵌套
                {
                    path: 'student1',  // 嵌套的二级路由不用加斜杠
                    component: Student1
                },
                {
                    path: 'student2',
                    component: Student2
                }
            ]
        },

    ]
})
七、Vue插件库的使用
以vue-router为例
1.引入插件库
import VueRouter from 'vue-router'2.应用插件
Vue.use(VueRouter)


 1573
1573

 被折叠的 条评论
为什么被折叠?
被折叠的 条评论
为什么被折叠?
 到【灌水乐园】发言


