


Flume(1.11.0版本)
简介
概述
-
Flume本身是由Cloudera公司开发的后来贡献给了Apache的一套针对日志数据进行收集(collecting)、汇聚(aggregating)和传输(moving)的机制
-
Flume本身提供了简单且灵活的结构来完成日志数据的传输

-
Flume有两大版本:
- Flume0.X:又称之为
Flume-og,依赖于Zookeeper部署,需要提供的格式文件相对复杂,所以现在市面上已经不使用了 - Flume1.X:又称之为
Flume-ng,不依赖于Zookeeper部署,需要提供的格式文件结构明确且简单,所以是现在流通的版本
- Flume0.X:又称之为
基本概念
-
Event
-
Flume会将收集到的每一条日志封装成一个Event
-
Event本质上就是一个json串,即Flume会将收集到的日志封装成json的形式,Event中固定的包含两部分:headers和body
{"headers":{},"body":""}
-
-
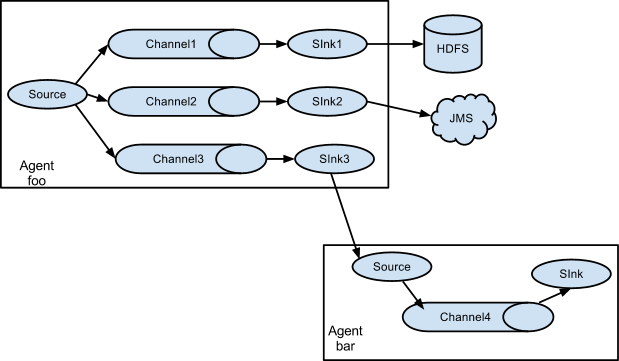
Agent:Flume流动模型的基本组成结构,至少包含3部分
- Source:从数据源采集数据 - collecting
- Channel:临时存储数据 - aggregating
- Sink:将数据写出到目的地 - moving
流动模型
-
单级流动
-
多级流动:又称之为串联流动

-
扇入流动:又称之为并联流动、聚集流动

-
扇出流动:又称之为复用流动
-
复杂流动:按照需求将多个流动进行组合,那么就是复杂流动
参数解释
| 参数 | 解释 |
|---|---|
--name或者-n | 指定要运行的agent的名字 |
--conf或者-c | Flume的原生配置 |
--conf-file或者-f | 执行的文件 |
-D | 指定运行其他的参数 |
flume.root.logger | 指定日志的打印级别,级别分为INFO,WARN和ERROR,可以指定打印位置console和logfile |
Source
NetCat TCP Source
-
Netcat TCP Source监听TCP请求,在使用的时候需要监听指定的主机和端口,从这个指定主机的指定端口来接收TCP请求,并且将TCP请求内容作为日志来进行收集
-
默认情况下,每一条数据大小不能超过512B,可以通过参数
max-line-length来修改-
在Flume中,所有的流动模型,不是通过代码来指定,而是通过格式文件来配置,所以实际过程中,往往会要求格式文件存放在统一的位置上。上课过程中,统一要求将格式文件放到
/opt/software/flume-1.11.0/data下cd /opt/software/flume-1.11.0/ mkdir data cd data -
编辑格式文件,文件名和后缀名可以自己定义 properties文件的 key = value 格式配置在vim会有颜色上的区分,便于阅读。
vim basic.propertie在文件中添加
# 给Agent起名 a1就是这个agent的名字 # 给Source起名 # 如果有多个Source,那么名字之间用空格隔开 a1.sources = s1 # 给Channel起名 a1.channels = c1 # 给Sink起名 a1.sinks = k1 # 配置Source a1.sources.s1.type = netcat a1.sources.s1.bind = 0.0.0.0 a1.sources.s1.port = 8090 # 配置Channel a1.channels.c1.type = memory a1.channels.c1.capacity = 1000 a1.channels.c1.transactionCapacity = 1000 # 配置Sink a1.sinks.k1.type = logger # 将Source和Channel绑定 a1.sources.s1.channels = c1 # 将Sink和Channel绑定 a1.sinks.k1.channel = c1 -
执行
flume-ng agent --name a1 --conf $FLUME_HOME/conf --conf-file basic.properties -Dflume.root.logger=INFO,console -
复制窗口之后,发送TCP请求
nc hadoop01 8090
-
Exec Source
-
Exec Source运行指定命令,监听命令结果,将命令结果作为日志进行收集
-
案例:监听指定文件,如果文件中新添了数据,那么自动收集这个文件中的数据
-
构建空文件
touch /opt/software/flume-1.11.0/data/a.txt -
监听这个文件,如果这个文件中新添了数据,自动收集数据作为日志
vim execsource.properties在文件中添加
a1.sources = s1 a1.channels = c1 a1.sinks = k1 # 配置Exec Source # Source的类型 a1.sources.s1.type = exec # 监听指定的命令 a1.sources.s1.command = tail -F /opt/software/flume-1.11.0/data/a.txt # 指定命令的脚本类型 a1.sources.s1.shell = /bin/sh -c a1.channels.c1.type = memory a1.sinks.k1.type = logger a1.sources.s1.channels = c1 a1.sinks.k1.channel = c1 -
执行命令
flume-ng agent -n a1 -c $FLUME_HOME/conf -f execsource.properties -Dflume.root.logger=INFO,console -
在新窗口中追加数据
echo "testing" >> /opt/software/flume-1.11.0/data/a.txt
echo "exec" >> /opt/software/flume-1.11.0/data/a.txt
AVRO Source
-
AVRO Source接收被AVRO序列化之后的数据,结合AVRO Sink,可以实现复杂的流动模型
-
案例
-
编辑文件
cd /opt/software/flume-1.11.0/data/
vim avrosource.properties
在文件中添加
a1.sources = s1 a1.channels = c1 a1.sinks = k1 # 配置AVRO Source # 类型必须是avro a1.sources.s1.type = avro # 监听的主机 a1.sources.s1.bind = 0.0.0.0 # 监听的端口号 a1.sources.s1.port = 6666 a1.channels.c1.type = memory a1.sinks.k1.type = logger a1.sources.s1.channels = c1 a1.sinks.k1.channel = c1 -
启动
flume-ng agent -n a1 -c $FLUME_HOME/conf -f avrosource.properties -Dflume.root.logger=INFO,console -
在新窗口中启动AVRO客户端
flume-ng avro-client -H hadoop01 -p 6666 -F a.txt
-
Spooling Directory Source
-
监听指定的目录,如果目录中产生了新的文件,那么自动的将新文件中的内容收集起来
-
默认情况下,这个文件如果被收集了,那么文件的后缀就是
.COMPLETED -
案例
-
创建目录
mkdir /opt/flume_data -
编辑文件
vim spooldirsource.properties在文件中添加
a1.sources = s1 a1.channels = c1 a1.sinks = k1 # 配置Spooling Directory Source # 类型必须是spooldir a1.sources.s1.type = spooldir # 监听的目录 a1.sources.s1.spoolDir = /opt/flume_data # 被收集过的文件后缀 # 利用这条规则,可以过滤掉一部分不需要收集的文件 a1.sources.s1.fileSuffix = .finished a1.channels.c1.type = memory a1.sinks.k1.type = logger a1.sources.s1.channels = c1 a1.sinks.k1.channel = c1 -
执行
flume-ng agent -n a1 -c $FLUME_HOME/conf -f spooldirsource.properties -Dflume.root.logger=INFO,console
-
Taildir Source
-
可以用于监听一个或者一组文件,如果被监听的文件中添加了新数据,那么新添的数据会被自动收集
-
Exec Source需要通过指定
tail -F命令才能监听指定文件,Spooling Directory Source监听指定的目录,并不能确定文件中是否新添了数据 -
不同于Exec Source的地方在于,Taildir Source不需要指定命令,还可以监控一类文件,且Taildir Source通过记录偏移量实现断点续传效果
-
偏移量通过属性
positionFile来决定,默认是~/.flume/taildir_position.json -
需要注意的是,Taildir Source不支持在Windows中使用
-
案例:监听flume_data目录下所有的log和txt文件,如果文件被添加新数据,那么自动收集
-
编辑文件
vim taildirsource.properties -
在文件中添加
a1.sources = s1 a1.channels = c1 a1.sinks = k1 # 配置Taildir Source # 类型必须是TAILDIR a1.sources.s1.type = TAILDIR # 监听的一组文件的组名 a1.sources.s1.filegroups = f1 f2 # 文件组中的要监听的文件 a1.sources.s1.filegroups.f1 = /opt/flume_data/.*log.* a1.sources.s1.filegroups.f2 = /opt/flume_data/.*txt.* # 偏移量的存储位置 a1.sources.s1.positionFile = /opt/flume_data/taildir_position.json a1.channels.c1.type = memory a1.sinks.k1.type = logger a1.sources.s1.channels = c1 a1.sinks.k1.channel = c1 -
执行
flume-ng agent -n a1 -c $FLUME_HOME/conf -f taildirsource.properties -Dflume.root.logger=INFO,console
-
Sequence Generator Source
-
序列产生器,从0开始递增到
totalEvents,默认情况下totalEvents的值Long.MAX_VALUE -
实际过程中,会利用这个Source测试流动模型是否搭建成功
-
案例
a1.sources = s1
a1.channels = c1
a1.sinks = k1

# 配置Sequence Generator Source
# 类型必须是seq
a1.sources.s1.type = seq
# 最大值
a1.sources.s1.totalEvents = 100

a1.channels.c1.type = memory

a1.sinks.k1.type = logger

a1.sources.s1.channels = c1
a1.sinks.k1.channel = c1
HTTP Source
-
接收HTTP请求,并且将请求内容作为日志进行收集
-
只能接收GET和POST请求,其中GET请求接收只能用于实验,实际过程中使用HTTP Source来接收POST请求
-
案例
-
在文件中添加
a1.sources = s1 a1.channels = c1 a1.sinks = k1 # 配置HTTP Source # 类型必须是http a1.sources.s1.type = http # 监听端口 a1.sources.s1.port = 8888 a1.channels.c1.type = memory a1.sinks.k1.type = logger a1.sources.s1.channels = c1 a1.sinks.k1.channel = c1 -
启动Flume
-
发送POST请求
curl -X POST -d '[{"headers":{"class":"flume"},"body":"welcome~~~"}]' http://hadoop01:8888
-
Custom Source
- Flume支持用户自定义Source。Flume针对Source提供了顶级接口
Source,但是实际过程中,并不是实现Source接口,而是实现子接口之一:EventDrivenSource:事件驱动Source,本身是一个被动型Source,需要自己定义线程来获取数据以及封装数据PollableSource:拉取Source,本身是一个主动型Source,提供了线程来获取数据,只需要考虑数据怎么封装即可
- 由于在自定义Source的时候,还需要考虑获取格式文件中的参数值,所以还需要实现
Configurable接口 - 实际过程中,考虑到要覆盖的方法比较多,所以继承
AbstractSource
pom依赖
<!--Flume核心包-->
<dependency>
    <groupId>org.apache.flume</groupId>
    <artifactId>flume-ng-core</artifactId>
    <version>1.11.0</version>
</dependency>
<!--Flume开发包-->
<dependency>
    <groupId>org.apache.flume</groupId>
    <artifactId>flume-ng-sdk</artifactId>
    <version>1.11.0</version>
</dependency>
<!--Flume配置包-->
<dependency>
    <groupId>org.apache.flume</groupId>
    <artifactId>flume-ng-configuration</artifactId>
    <version>1.11.0</version>
</dependency>
自定义EventDrivenSource
代码
import org.apache.flume.Context; import org.apache.flume.Event; import org.apache.flume.EventDrivenSource; import org.apache.flume.channel.ChannelProcessor; import org.apache.flume.conf.Configurable; import org.apache.flume.event.EventBuilder; import org.apache.flume.source.AbstractSource; import java.util.HashMap; import java.util.Map; import java.util.concurrent.ExecutorService; import java.util.concurrent.Executors; // 自定义代码实现Sequence Generator Source,加深理解 public class AuthDrivenSource extends AbstractSource implements EventDrivenSource, Configurable { private long start; private long end; private long step; private ExecutorService es; // 获取参数值 @Override public void configure(Context context) { // 3 -> +4 // 获取起始值 // 如果用户没有指定,那么默认从0开始递增 start = context.getLong("start", 0L); // 获取结束值 // 如果不指定,递增到Long.MAX_VALUE end = context.getLong("end", Long.MAX_VALUE); // 获取步长 // 如果不指定,那么默认每次递增1 step = context.getLong("step", 1L); // 保证数据的合理性 if (start > end || step < 1) throw new IllegalArgumentException(); } // 启动Source @Override public synchronized void start() { // 线程池中准备5个线程 es = Executors.newFixedThreadPool(5); // 获取ChannelProcessor ChannelProcessor cp = this.getChannelProcessor(); // 提交任务 es.submit(new Add(start, end, step, cp)); } // 结束Source @Override public synchronized void stop() { if (es != null) es.shutdown(); }} // 自增 class Add implements Runnable {private final long start; private final long end; private final long step; private final ChannelProcessor cp; public Add(long start, long end, long step, ChannelProcessor cp) { this.start = start; this.end = end; this.step = step; this.cp = cp; } @Override public void run() { for (long i = start; i < end; i += step) { // 封装headers // 在headers中记录了数据产生的时间 Map<String, String> headers = new HashMap<>(); headers.put("time", String.valueOf(System.currentTimeMillis())); // 封装body byte[] body = String.valueOf(i).getBytes(); // 将数据封装成Event Event e = EventBuilder.withBody(body, headers); // 将Event传递给Channel来存储 cp.processEvent(e); } } }-
将程序打成jar包(要求是JDK1.8,好多框架还不支持17版本),上传到Flume安装目录的lib目录下
cd /opt/software/flume-1.11.0/lib/ rz -
回到格式文件目录下,编辑文件
cd /opt/software/flume-1.11.0/data/
vim authdrivensource.properties
在文件中添加
a1.sources = s1 a1.channels = c1 a1.sinks = k1 # 配置自定义EventDrivenSource # 类型必须是类的全路径名 a1.sources.s1.type = com.fesco.source.AuthDrivenSource # 起始值 a1.sources.s1.start = 10 # 结束值 a1.sources.s1.end = 100 # 步长 a1.sources.s1.step = 5 a1.channels.c1.type = memory a1.sinks.k1.type = logger a1.sources.s1.channels = c1 a1.sinks.k1.channel = c1 -
启动Flume
自定义PollableSource
代码
import org.apache.flume.Context; import org.apache.flume.Event; import org.apache.flume.PollableSource; import org.apache.flume.channel.ChannelProcessor; import org.apache.flume.conf.Configurable; import org.apache.flume.event.EventBuilder; import org.apache.flume.source.AbstractSource; import java.util.ArrayList; import java.util.HashMap; import java.util.List; import java.util.Map; public class AuthPollableSource extends AbstractSource implements PollableSource, Configurable { private long min; private long max; private long step; // 获取配置 @Override public void configure(Context context) { this.min = context.getLong("min", 0L); this.max = context.getLong("max", Long.MAX_VALUE); this.step = context.getLong("step", 1L); if (min > max || step < 1) throw new IllegalArgumentException(); } // 封装数据,写出数据 @Override public Status process() { // 定义List来临时存储数据 List<Event> events = new ArrayList<>(); // 获取ChannelProcessor ChannelProcessor cp = this.getChannelProcessor(); for (long i = min; i < max; i += step) { // 封装headers Map<String, String> headers = new HashMap<>(); headers.put("timestamp", String.valueOf(System.currentTimeMillis())); // 封装body byte[] body = String.valueOf(i).getBytes(); // 封装Event Event e = EventBuilder.withBody(body, headers); events.add(e); // 每50条数据写一次 if (events.size() >= 50) { // 写出数据。这个方法一次写出多个 cp.processEventBatch(events); // 清空集合 events.clear(); } } return Status.READY; } // PollableSource主动提供线程来获取数据 // 如果线程暂时没有获取到数据,那么线程会临时休眠 // 这个方法就是控制线程的休眠时间,单位是毫秒 @Override public long getBackOffSleepIncrement() { return 1000; } @Override public long getMaxBackOffSleepInterval() { return 10000; } }-
打成jar包,上传到lib目录下
cd ../lib rz -
回到格式文件目录下,编辑文件
cd ../data/
vim authpollablesource.properties
在文件中添加
a1.sources = s1
a1.channels = c1
a1.sinks = k1

# 配置自定义PollableSource
# 类型必须是类的全路径名
a1.sources.s1.type = com.fesco.source.AuthPollableSource   //注意自己的全类名
# 起始值
a1.sources.s1.min = 10
# 结束值
a1.sources.s1.max = 1000
# 步长
a1.sources.s1.step = 5

a1.channels.c1.type = memory

a1.sinks.k1.type = logger

a1.sources.s1.channels = c1
a1.sinks.k1.channel = c1
cd …/data/
vim authpollablesource.properties在文件中添加 ```properties a1.sources = s1 a1.channels = c1 a1.sinks = k1 # 配置自定义PollableSource # 类型必须是类的全路径名 a1.sources.s1.type = com.fesco.source.AuthPollableSource //注意自己的全类名 # 起始值 a1.sources.s1.min = 10 # 结束值 a1.sources.s1.max = 1000 # 步长 a1.sources.s1.step = 5 a1.channels.c1.type = memory a1.sinks.k1.type = logger a1.sources.s1.channels = c1 a1.sinks.k1.channel = c1- 启动Flume
-
-


 1004
1004


 被折叠的 条评论
为什么被折叠?
被折叠的 条评论
为什么被折叠?
 到【灌水乐园】发言


