


SSM整合
项目结构配置搭建
pom的依赖:
 <dependencies>
    <dependency>
      <groupId>junit</groupId>
      <artifactId>junit</artifactId>
      <version>3.8.1</version>
      <scope>test</scope>
    </dependency>

    <dependency>
      <groupId>javax.servlet</groupId>
      <artifactId>javax.servlet-api</artifactId>
      <version>4.0.1</version>
      <scope>provided</scope>
    </dependency>


    <!-- https://mvnrepository.com/artifact/org.springframework/spring-webmvc -->
    <dependency>
      <groupId>org.springframework</groupId>
      <artifactId>spring-webmvc</artifactId>
      <version>5.3.18</version>
    </dependency>

    <!--    添加json数据转换相关坐标-->

    <dependency>
      <groupId>com.fasterxml.jackson.core</groupId>
      <artifactId>jackson-databind</artifactId>
      <version>2.9.0</version>
    </dependency>

    <!--   Spring 操作数据库的包-->
    <dependency>
      <groupId>org.springframework</groupId>
      <artifactId>spring-jdbc</artifactId>
      <version>6.0.0</version>
    </dependency>
    <!--mybatis包-->
    <dependency>
      <groupId>org.mybatis</groupId>
      <artifactId>mybatis</artifactId>
      <version> 3.5.11</version>
    </dependency>
    <!--mybatis 与 Spring整合的包-->
    <dependency>
      <groupId>org.mybatis</groupId>
      <artifactId>mybatis-spring</artifactId>
      <version>2.0.7</version>
    </dependency>
    <!--    mysql包-->
    <dependency>
      <groupId>mysql</groupId>
      <artifactId>mysql-connector-java</artifactId>
      <version>8.0.30</version>
    </dependency>
<!--    spring 测试包  版本需要跟spring-mvc的一样-->
    <dependency>
      <groupId>org.springframework</groupId>
      <artifactId>spring-test</artifactId>
      <version>5.3.18</version>
    </dependency>
    <!--德鲁伊依赖-->
    <dependency>
      <groupId>com.alibaba</groupId>
      <artifactId>druid</artifactId>
      <version>1.2.14</version>
    </dependency>
  </dependencies>
配置文件夹的各个配置文件:
SpringConfig:
@Configuration
@ComponentScan({"com.study.service"})
@PropertySource("classpath:jdbc.properties")
//一定要加classpath: 不然读取不到
@Import({JdbcConfig.class, MybatisConfig.class})
public class SpringConfig {

}
SpringMvcConfig
@Configuration
@ComponentScan("com.study.controller")
@EnableWebMvc
public class SpringMvcConfig {
}
JdbcConfig
public class JdbcConfig {
    @Value("${jdbc.driver}")
    private String driver;
    @Value("${jdbc.url}")
    private String url;
    @Value("${jdbc.username}")
    private String username;
    @Value("${jdbc.password}")
    private String password;

    @Bean
    public DataSource dataSource() {
        DruidDataSource dataSource = new DruidDataSource();
        dataSource.setDriverClassName(driver);
        dataSource.setUrl(url);
        dataSource.setUsername(username);
        dataSource.setPassword(password);
        return dataSource;
    }
}
MybatisConfig
public class MybatisConfig {

    @Bean
    public SqlSessionFactoryBean sqlSessionFactory(DataSource dataSource){
        SqlSessionFactoryBean factoryBean =new SqlSessionFactoryBean();
        factoryBean.setDataSource(dataSource);
        factoryBean.setTypeAliasesPackage("com.study.domain");
        return factoryBean;
    }


    @Bean
    public MapperScannerConfigurer mapperScannerConfigurer(){
        MapperScannerConfigurer msc =new MapperScannerConfigurer();
        msc.setBasePackage("com.study.dao");
        return msc;
    }
}
ServletConfig
public class ServletConfig extends AbstractAnnotationConfigDispatcherServletInitializer {
    protected Class<?>[] getRootConfigClasses() {
        return new Class[]{SpringConfig.class};
    }

    protected Class<?>[] getServletConfigClasses() {
        return new Class[]{SpringMvcConfig.class};
    }

    protected String[] getServletMappings() {
        return new String[]{"/"};
    }
}
dao层:
public interface BrandDao {
    @Insert("insert into tb_brand1 values (null,#{brandName},#{description},#{status})")
    public void save(Brand brand);

    @Update("update tb_brand1 set brand_name=#{brandName}, description=#{description}, status=#{status} where id=#{id}")
    public void update(Brand brand);

    @Delete("delete from tb_brand1 where id =#{id}")
    //用@Results可以嵌套多个@Result
    @Results({
            @Result(property="brandName",column="brand_name")
    })
    public void delete(Integer id);

    @Select("select * from tb_brand1 where id = #{id}")
    @Results({
            @Result(property="brandName",column="brand_name")
    })
    public Brand getById(Integer id);

    @Select("select * from tb_brand1")
    public List<Brand> getAll();


}
service接口:
public interface BrandService {
    public boolean save(Brand brand);

    public boolean update(Brand brand);

    public boolean delete(Integer id);

    public Brand getById(Integer id);

    public List<Brand> getAll();
}
seivice实现类:
@Service
public class BrandServiceImpl implements BrandService {

    @Autowired
    private BrandDao brandDao;  //这里自动装配会报错,我们在设置里把检查的报错换成警告就可以了


    public boolean save(Brand brand) {
        brandDao.save(brand);
        return true;
    }

    public boolean update(Brand brand) {
        brandDao.update(brand);
        return true;
    }

    public boolean delete(Integer id) {
        brandDao.delete(id);
        return true;
    }

    public Brand getById(Integer id) {
        return brandDao.getById(id);
    }

    public List<Brand> getAll() {
        return brandDao.getAll();
    }
}
REST风格的controller类:
@RestController
@RequestMapping("/brands")
public class BrandController {
    @Autowired
    private BrandService brandService;

@PostMapping
    public boolean save(@RequestBody Brand brand) {
        brandService.save(brand);
        return true;
    }
@PutMapping
    public boolean update(@RequestBody Brand brand) {
        brandService.update(brand);
        return true;
    }
@DeleteMapping("/{id}")
    public boolean delete(@PathVariable Integer id) {
        brandService.delete(id);
        return true;
    }
@GetMapping("/{id}")
    public Brand getById(@PathVariable Integer id) {
        return brandService.getById(id);
    }
@GetMapping
    public List<Brand> getAll() {
        return brandService.getAll();
    }
}
测试
注意:测试的spring-test版本需要跟spring-webmvc版本一致,否则会报错
@RunWith(SpringJUnit4ClassRunner.class)
@ContextConfiguration(classes = SpringConfig.class)
public class BrandServiceTest {

    @Autowired
    private BrandService brandService;

    @Test
    public void testGetById(){
        Brand brand = brandService.getById(1);
        System.out.println(brand);
    }

    @Test
    public void testGetAll(){
        List<Brand> all =brandService.getAll();
        System.out.println(all);
    }

}
增删改查的内容,我们直接用tomcat运行然后postman进行调试就可以了
事务
1.首先在JdbcConfig里面编写事务管理的bean类
2.在SpringConfig加上 @EnableTransactionManagement //注解开发事务
3.在对应的接口上加上@Transactional
表现层数据封装
我们后台返回的类型有很多,这时候我们封装成一个Result类,这样就统一起来,并且方便跟前端交互,封装的时候要记得设置相应的构造方法 这样会更方便
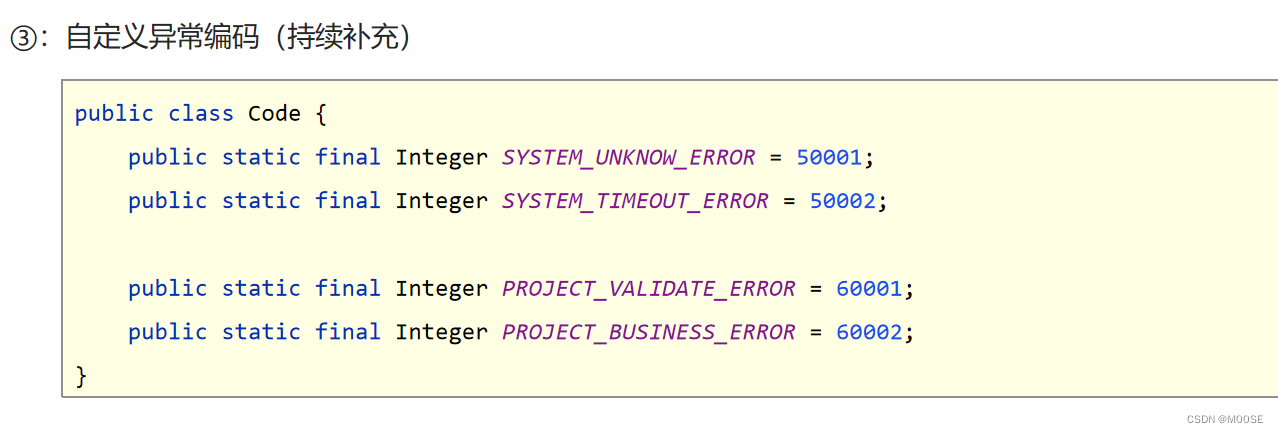
然后我们再封装一个Code类,使用静态常量定义各个状态,这样我们就能通过类名.常量名调用了
Controller把所有返回值都设置成Result的结果:
@RestController
@RequestMapping("/brands")
public class BrandController {
    @Autowired
    private BrandService brandService;

    @PostMapping
    public Result save(@RequestBody Brand brand) {
        boolean flag = brandService.save(brand);
        return new Result(flag ? Code.SAVE_OK:Code.SAVE_ERR,flag);
    }

    @PutMapping
    public Result update(@RequestBody Brand brand) {
        boolean flag = brandService.update(brand);
        return new Result(flag ? Code.UPDATE_OK:Code.UPDATE_ERR,flag);
    }

    @DeleteMapping("/{id}")
    public Result delete(@PathVariable Integer id) {
        boolean flag = brandService.delete(id);
        return new Result(flag ? Code.DELETE_OK:Code.DELETE_ERR,flag);
    }

    @GetMapping("/{id}")
    public Result getById(@PathVariable Integer id) {
        Brand brand = brandService.getById(id);
        Integer code =brand!=null?Code.GET_OK:Code.GET_ERR;
        String msg =brand!=null?"":"数据查询失败,请重试";

        return new Result(code,brand,msg);
    }

    @GetMapping
    public Result getAll() {
        List<Brand> all = brandService.getAll();
        Integer code =all!=null?Code.GET_OK:Code.GET_ERR;
        String msg =all!=null?"":"数据查询失败,请重试";
        return new Result(code,all,msg);
    }
}
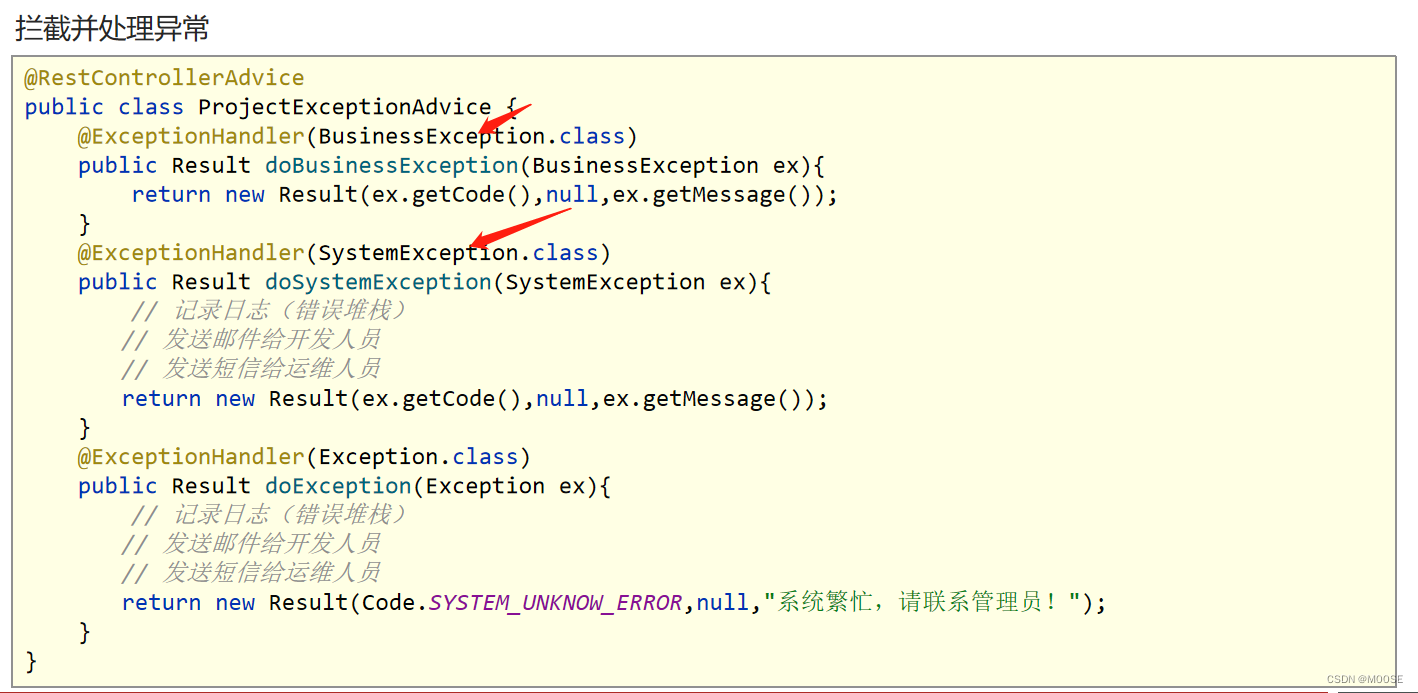
异常处理器
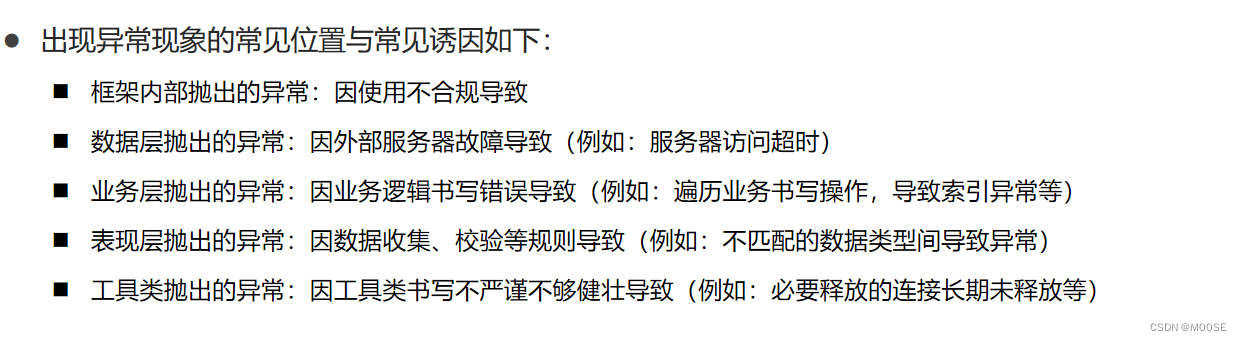
异常出现的地方会很多,最好就是集中在表现层进行处理
SpringMVC就提供了异常处理器
我们在Controller包里新建一个异常处理器

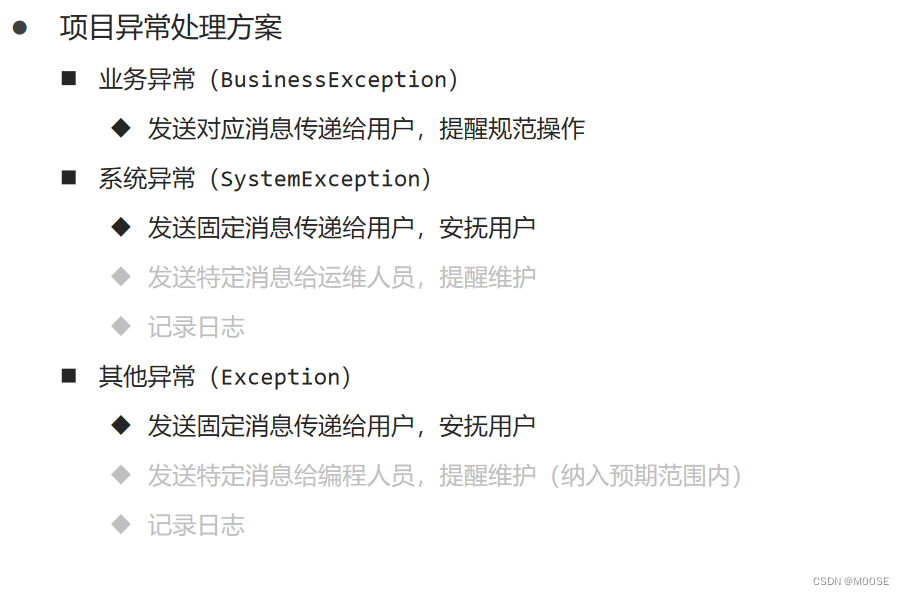
项目异常处理方案
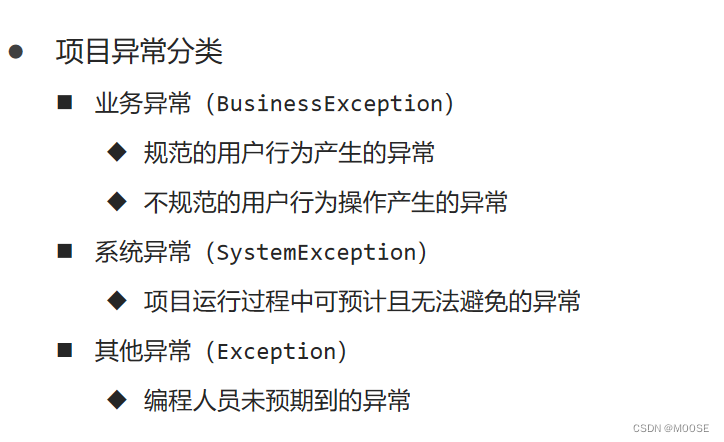
我们创建一个exception包
然后在里面分别自定义各个种类的异常类BusinessException 跟 SystemException
继承RuntimeException,并加一个code变量,分别写上构造方法。如:
public class SystemException extends RuntimeException{
    private Integer code;


    public SystemException( Integer code,String message) {
        super(message);
        this.code = code;
    }

    public SystemException(String message,Throwable cause, Integer code) {
        super(message,cause);

        this.code = code;
    }

    public Integer getCode() {
        return code;
    }

    public void setCode(Integer code) {
        this.code = code;
    }
}
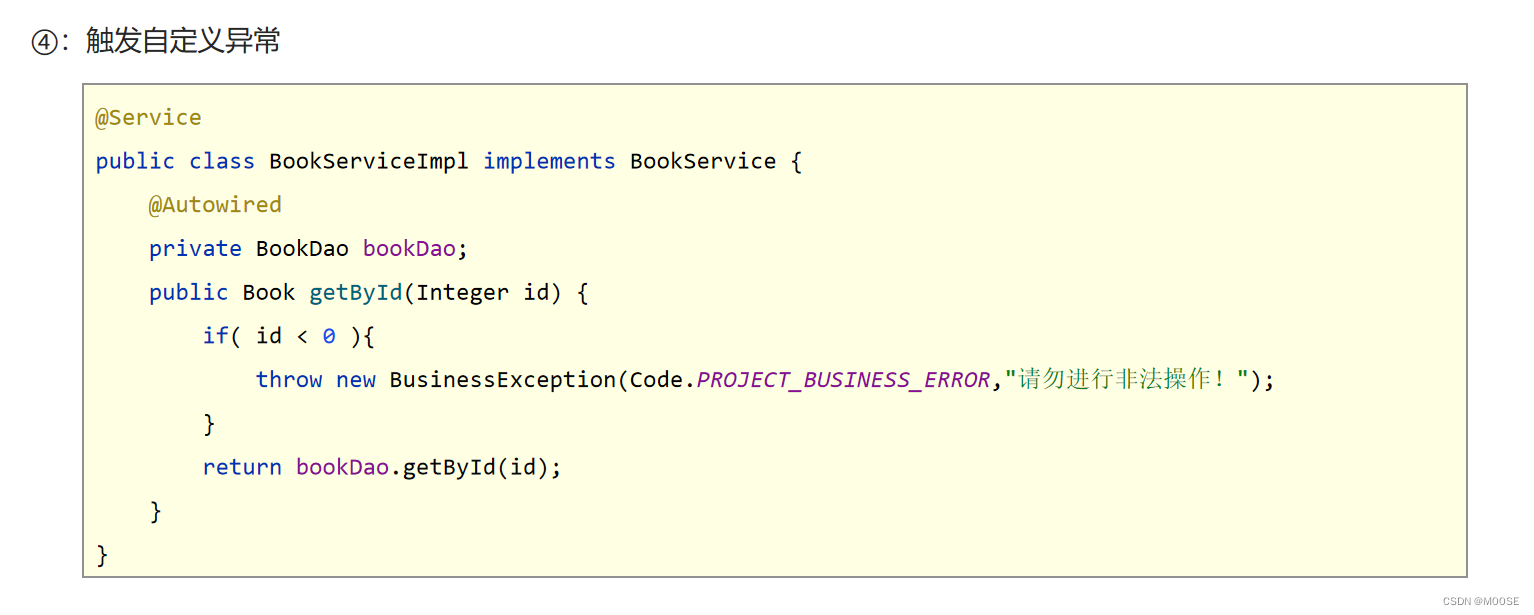
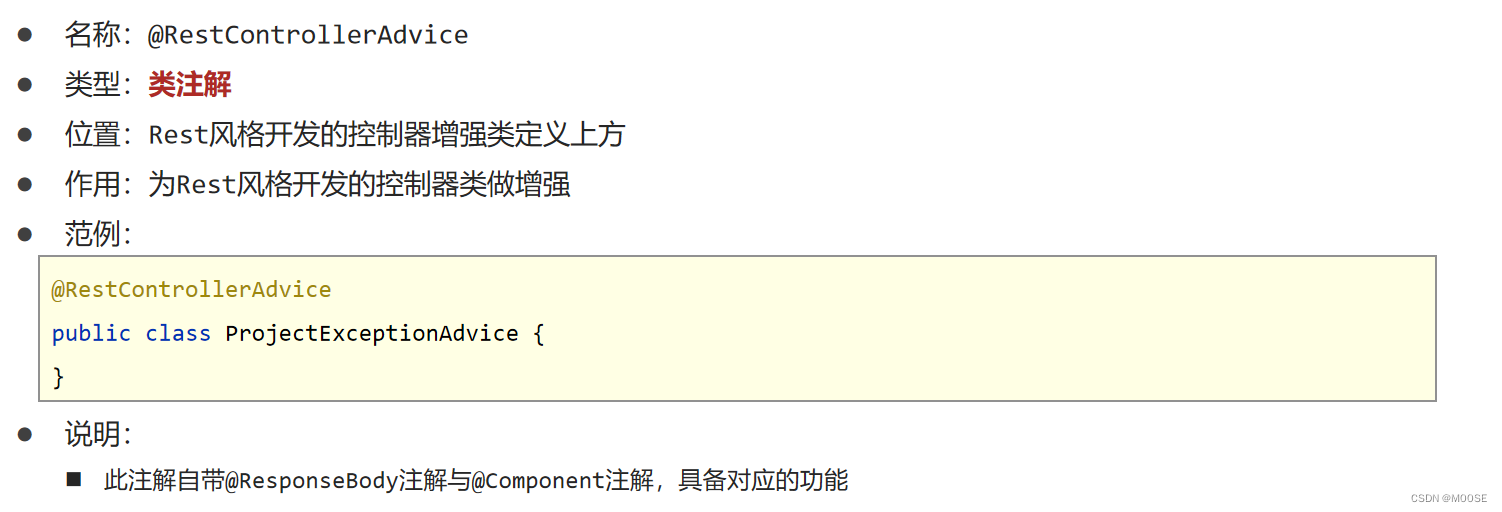
触发后我们修改之前在controller层写的ProjectExceptionAdvice,分别拦截各种异常并作出相应的处理
前端页面放行
为了避免,前端的页面已经js css之类的被SpringMVC拦截,我们新建一个SpringMvcSupport类
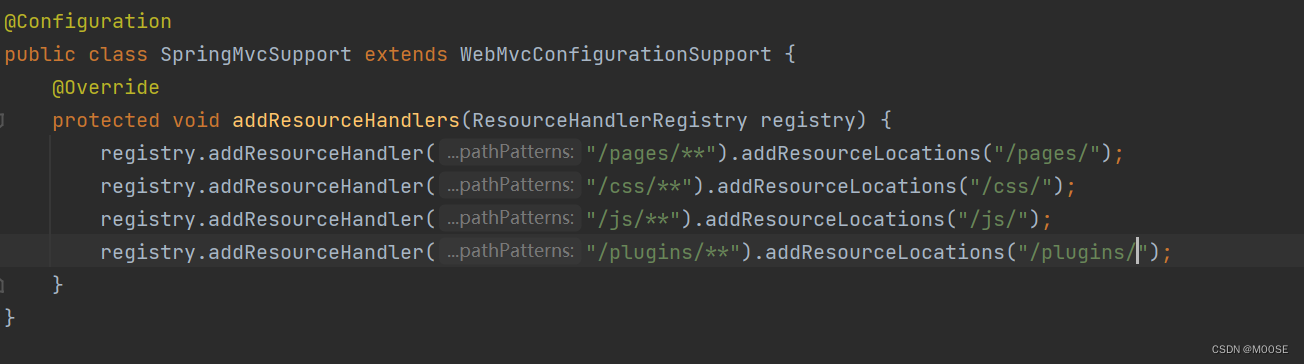
然后在SpringMvcConfig中把对应的包位置扫进去,就可以了
@ComponentScan({"com.study.controller","com.study.config"})
前端代码:
<html>

<head>
    <!-- 页面meta -->
    <meta charset="utf-8">
    <meta http-equiv="X-UA-Compatible" content="IE=edge">
    <title>SpringMVC案例</title>
    <meta content="width=device-width,initial-scale=1,maximum-scale=1,user-scalable=no" name="viewport">
    <!-- 引入样式 -->
    <link rel="stylesheet" href="../plugins/elementui/index.css">
    <link rel="stylesheet" href="../plugins/font-awesome/css/font-awesome.min.css">
    <link rel="stylesheet" href="../css/style.css">
</head>

<body class="hold-transition">

<div id="app">
    <div class="content-header">
        <h1>品牌管理呵呵</h1>
    </div>
    <div class="app-container">
        <div class="box">
            <div class="filter-container">
                <el-input placeholder="品牌名称" v-model="pagination.queryString" style="width: 200px;"
                          class="filter-item"></el-input>
                <el-button @click="getAll()" class="dalfBut">查询</el-button>
                <el-button type="primary" class="butT" @click="handleCreate()">新建</el-button>
            </div>

            <el-table size="small" current-row-key="id" :data="dataList" stripe highlight-current-row>
                <el-table-column type="index" align="center" label="序号"></el-table-column>
                <el-table-column prop="brandName" label="品牌名称" align="center"></el-table-column>
                <el-table-column prop="description" label="品牌描述" align="center"></el-table-column>
                <el-table-column prop="status" label="品牌状态" align="center"></el-table-column>
                <el-table-column label="操作" align="center">
                    <template slot-scope="scope">
                        <el-button type="primary" size="mini" @click="handleUpdate(scope.row)">编辑</el-button>
                        <el-button type="danger" size="mini" @click="handleDelete(scope.row)">删除</el-button>
                    </template>
                </el-table-column>
            </el-table>
            <!-- 新增标签弹层 -->

            <div class="add-form">
                <el-dialog title="新增图书" :visible.sync="dialogFormVisible">
                    <el-form ref="dataAddForm" :model="formData" :rules="rules" label-position="right"
                             label-width="100px">
                        <el-row>
                            <el-col :span="12">
                                <el-form-item label="品牌名称" prop="brandName">
                                    <el-input v-model="formData.brandName"/>
                                </el-form-item>
                            </el-col>
                            <el-col :span="12">
                                <el-form-item label="品牌描述" prop="description">
                                    <el-input v-model="formData.description"/>
                                </el-form-item>
                            </el-col>
                        </el-row>
                        <el-row>
                            <el-col :span="24">
                                <el-form-item label="状态">
                                    <el-input v-model="formData.status" type="textarea"></el-input>
                                </el-form-item>
                            </el-col>
                        </el-row>
                    </el-form>

                    <div slot="footer" class="dialog-footer">

                        <el-button @click="dialogFormVisible = false">取消</el-button>

                        <el-button type="primary" @click="handleAdd()">确定</el-button>

                    </div>

                </el-dialog>

            </div>

            <!-- 编辑标签弹层 -->

            <div class="add-form">
                <el-dialog title="编辑检查项" :visible.sync="dialogFormVisible4Edit">
                    <el-form ref="dataEditForm" :model="formData" :rules="rules" label-position="right"
                             label-width="100px">
                        <el-row>
                            <el-col :span="12">
                                <el-form-item label="品牌名称" prop="brandName">
                                    <el-input v-model="formData.brandName"/>
                                </el-form-item>
                            </el-col>
                            <el-col :span="12">
                                <el-form-item label="品牌描述" prop="description">
                                    <el-input v-model="formData.description"/>
                                </el-form-item>
                            </el-col>
                        </el-row>
                        <el-row>
                            <el-col :span="24">
                                <el-form-item label="品牌状态">
                                    <el-input v-model="formData.status" type="textarea"></el-input>
                                </el-form-item>
                            </el-col>

                        </el-row>
                    </el-form>
                    <div slot="footer" class="dialog-footer">
                        <el-button @click="dialogFormVisible4Edit = false">取消</el-button>
                        <el-button type="primary" @click="handleEdit()">确定</el-button>
                    </div>
                </el-dialog>
            </div>
        </div>
    </div>
</div>

</body>

<!-- 引入组件库 -->

<script src="../js/vue.js"></script>

<script src="../plugins/elementui/index.js"></script>

<script type="text/javascript" src="../js/jquery.min.js"></script>

<script src="../js/axios-0.18.0.js"></script>

<script>
    var vue = new Vue({

        el: '#app',
        data: {
            pagination: {},
            dataList: [],//当前页要展示的列表数据
            formData: {},//表单数据
            dialogFormVisible: false,//控制表单是否可见
            dialogFormVisible4Edit: false,//编辑表单是否可见
            rules: {//校验规则
                brandName: [{required: true, message: '图书类别为必填项', trigger: 'blur'}],
                description: [{required: true, message: '图书名称为必填项', trigger: 'blur'}]
            }
        },

        //钩子函数,VUE对象初始化完成后自动执行
        created() {
            this.getAll();
        },

        methods: {
            //列表
            getAll() {
                //发送ajax请求
                axios.get("/brands").then((res)=>{
                    this.dataList=res.data.data;
                });
            },

            //弹出添加窗口
            handleCreate() {
                this.dialogFormVisible=true;
                this.resetForm();
            },

            //重置表单
            resetForm() {
                this.formData={}
            },

            //添加
            handleAdd() {
                //发送ajax请求
                axios.post("/brands",this.formData).then((res)=>{

                    console.log(res.data)

                    if(res.data.code===20011){
                        //操作成功则关闭弹层
                        this.dialogFormVisible=false;
                        this.$message.success("添加成功")
                    }else if (res.data.code===20010){
                        this.$message.error("添加失败")
                    }else {//其他异常
                        this.$message.error(res.data.msg)
                    }

                }).finally(()=>{
                    this.getAll();
                })
            },

            //弹出编辑窗口
            handleUpdate(row) {
                //弹出窗口要根据id查询数据
                axios.get("/brands/"+row.id).then((res)=>{

                    if(res.data.code===20041){
                        //查询成功则弹出编辑页面
                        this.formData=res.data.data;
                        this.dialogFormVisible4Edit=true;
                    }else {
                        this.$message.error(res.data.msg)
                    }

                })
            },

            //编辑
            handleEdit() {
                axios.put("/brands",this.formData).then((res)=>{

                    if(res.data.code===20031){
                        //操作成功则关闭弹层
                        this.dialogFormVisible4Edit=false;
                        this.$message.success("修改成功")
                    }else if (res.data.code===20030){
                        this.$message.error("修改失败")
                    }else {//其他异常
                        this.$message.error(res.data.msg)
                    }

                }).finally(()=>{
                    this.getAll();
                })
            },

            // 删除
            handleDelete(row) {
                //弹出提示框
                this.$confirm("此操作将永久删除当前数据,是否继续?","提示",{
                    type:'info'
                }).then(()=>{ //点击确定后执行下面代码
                    axios.delete("/brands/"+row.id).then((res)=>{

                        if(res.data.code===20021){
                            //查询成功则弹出编辑页面
                            this.$message.success("删除成功")
                            this.getAll();
                        }else {
                            this.$message.error("删除失败")
                        }

                    }).catch(()=>{
                        //取消删除
                    })
                })
            }
        }
    })

</script>

</html>
拦截器

拦截器(Interceptor)是一种动态拦截方法调用的机制,在SpringMVC中动态拦截控制器方法的执行
作用:
在指定的方法调用前后执行预先设定的代码
阻止原始方法的执行

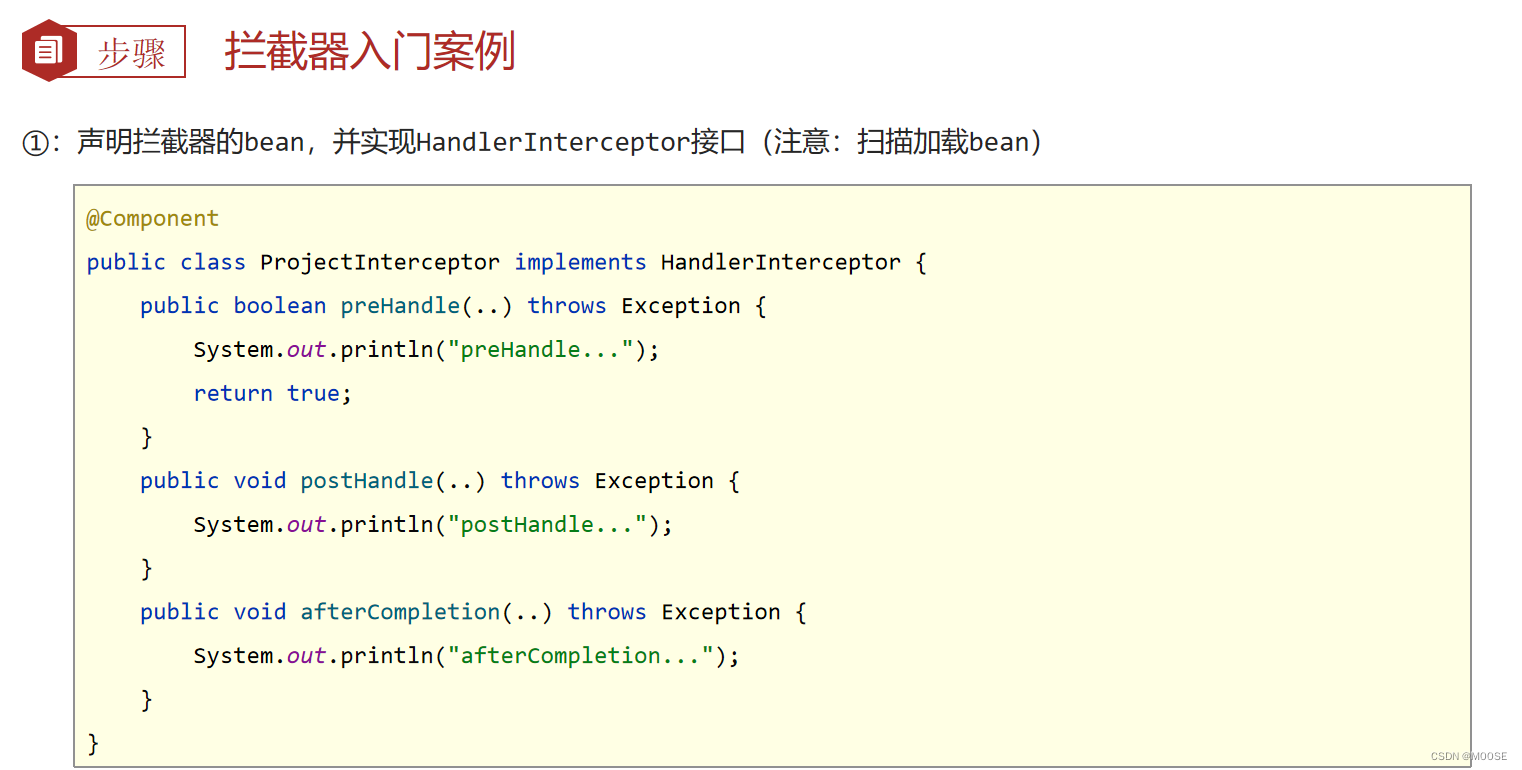
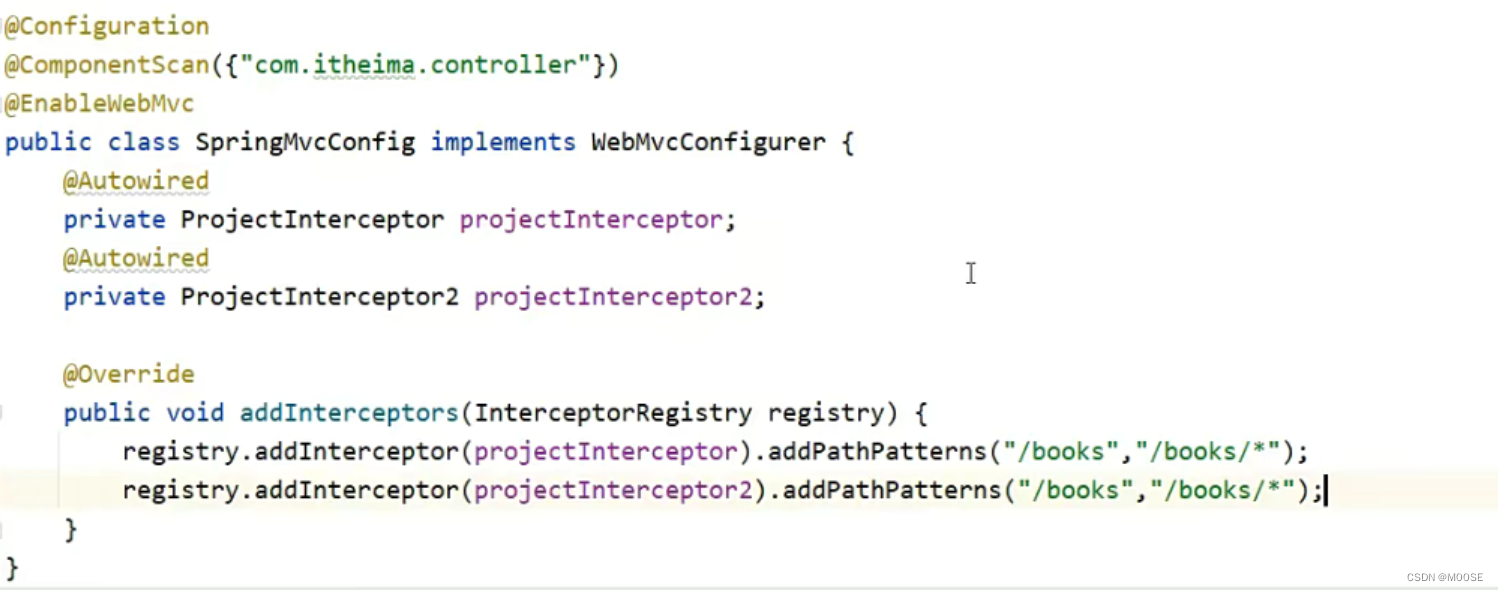
我们在Controller包中 新建一个interceptor包,在包中新建如上所示ProjectInterceptor类
然后在之前写的SpringMvcSupport中添加刚才我们自定义的拦截器并设置拦截的路径:
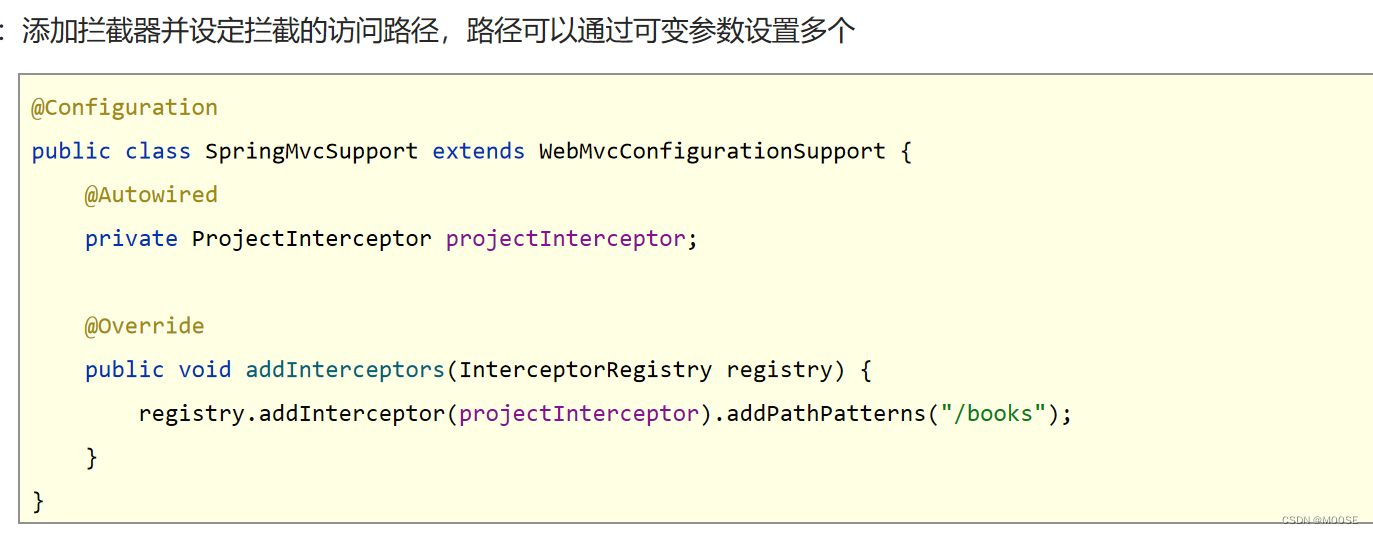
拦截路径可以为多个,也可以用星号*, addPathPatterns("/books", "/books/*");、
当然我们也可以简化开发:也就是在SpringConfig直接实现WebMvcConfig但是侵入性比较强

当返回值为false则直接不运行后面的方法,直接结束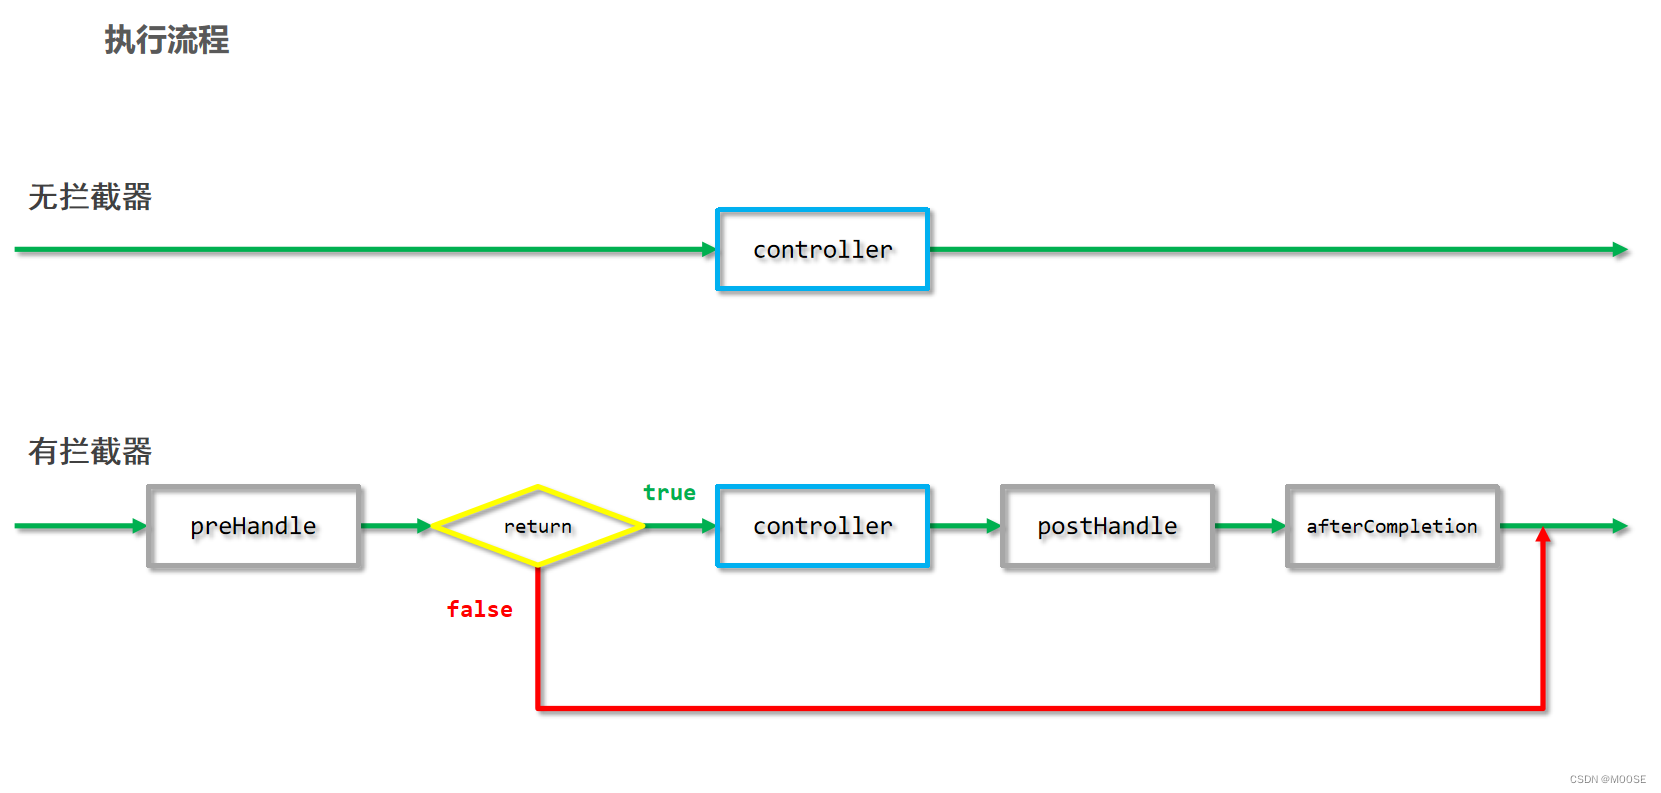
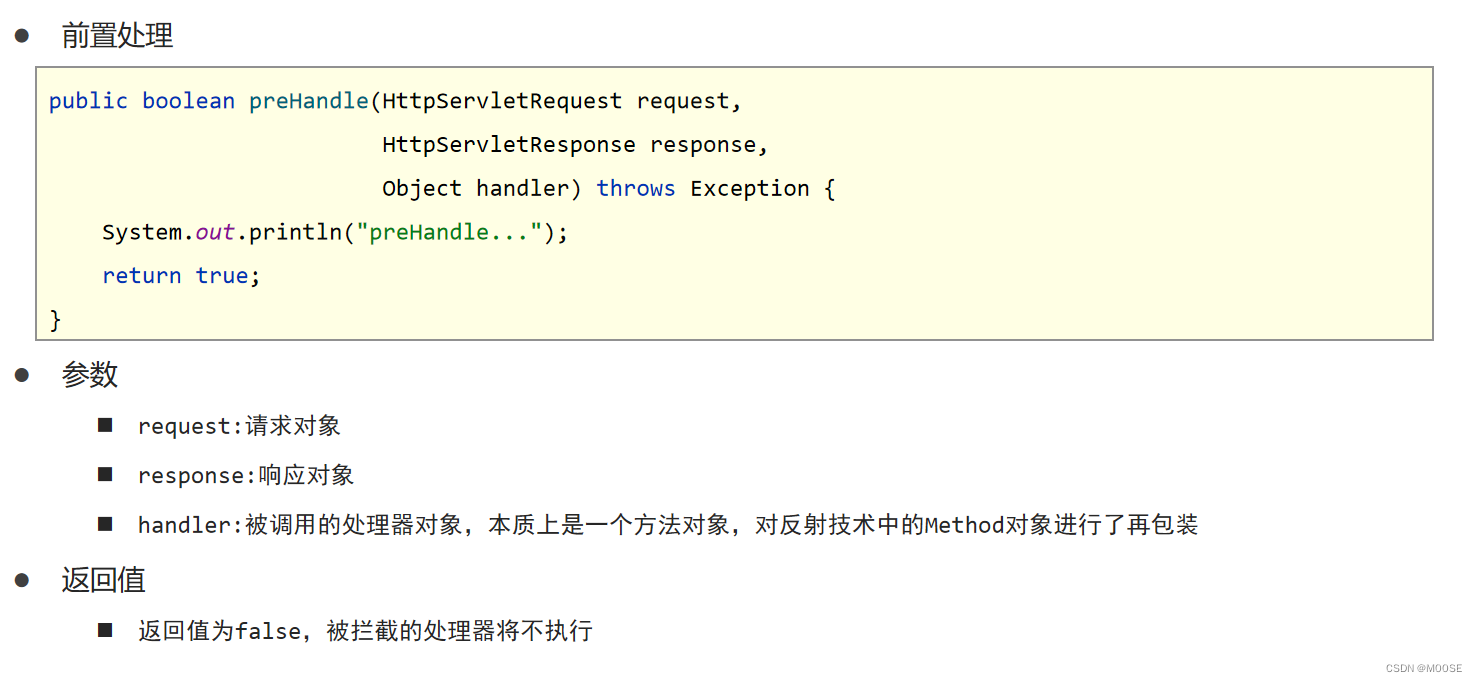
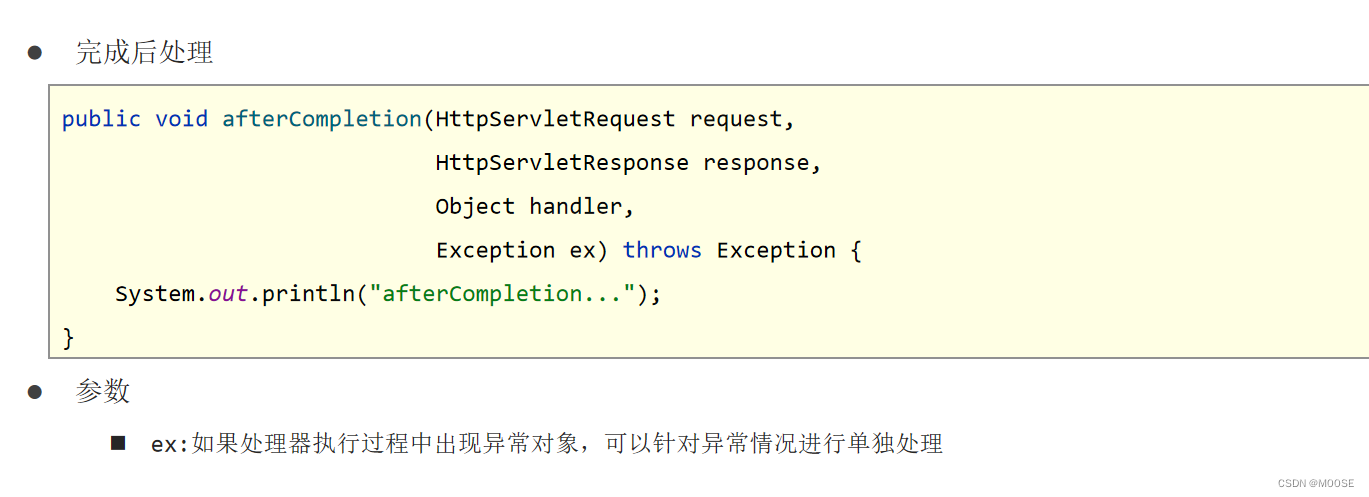
拦截器参数

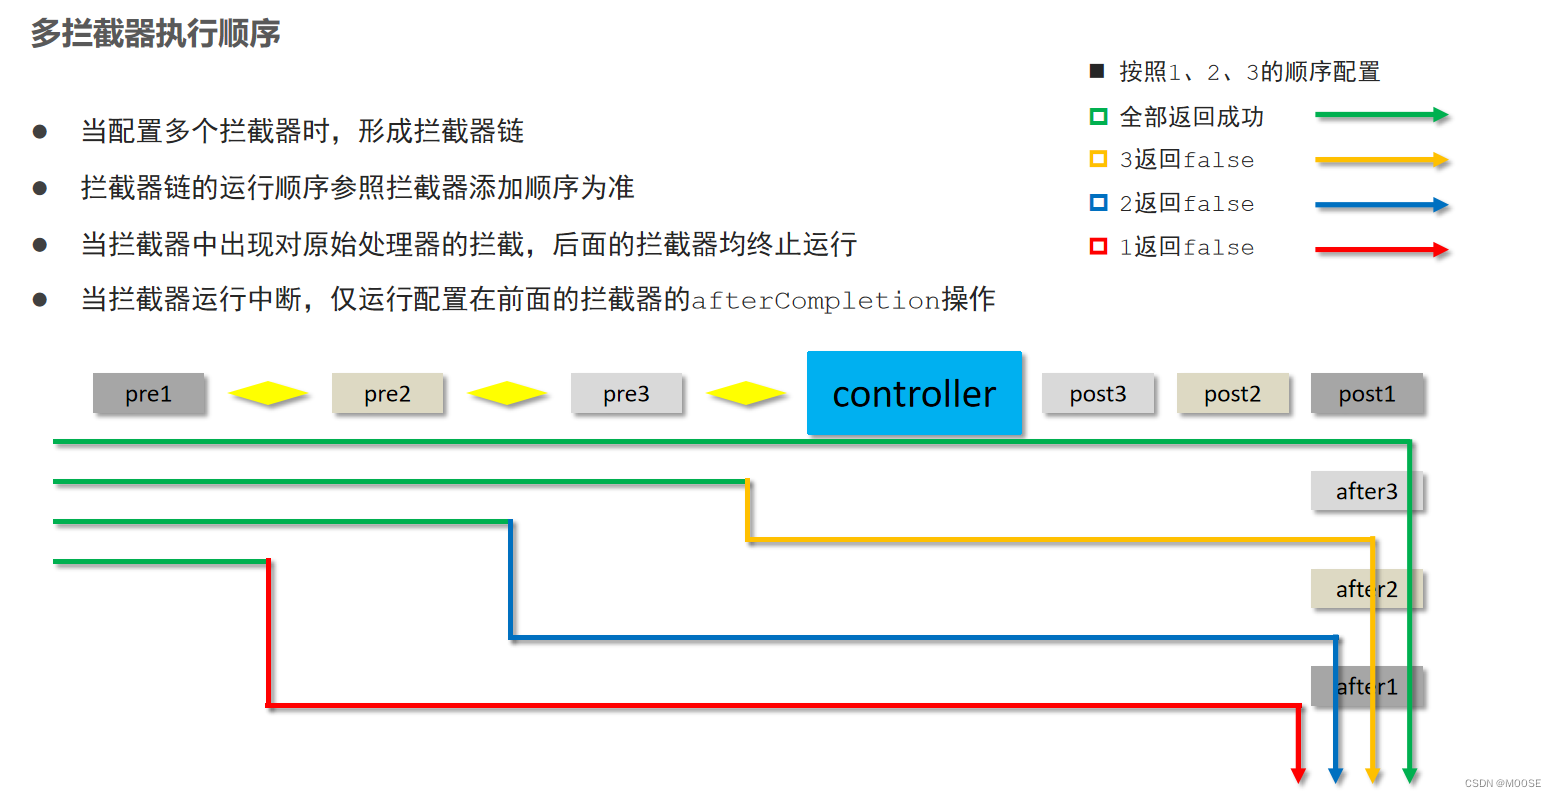
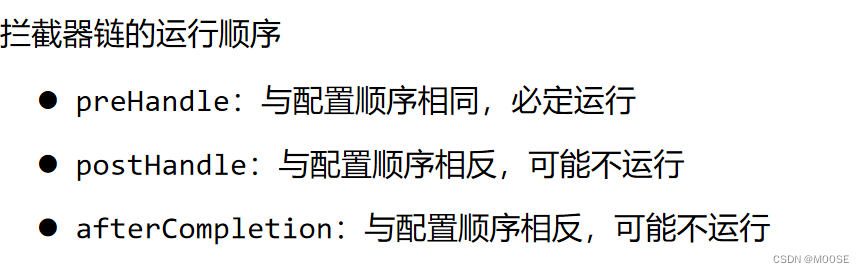
多拦截器执行顺序
书写格式:


 309
309


 被折叠的 条评论
为什么被折叠?
被折叠的 条评论
为什么被折叠?
 到【灌水乐园】发言


