


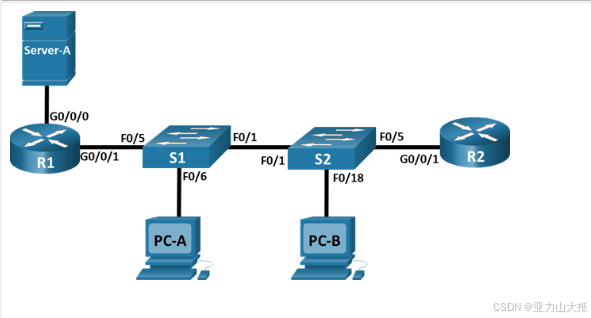
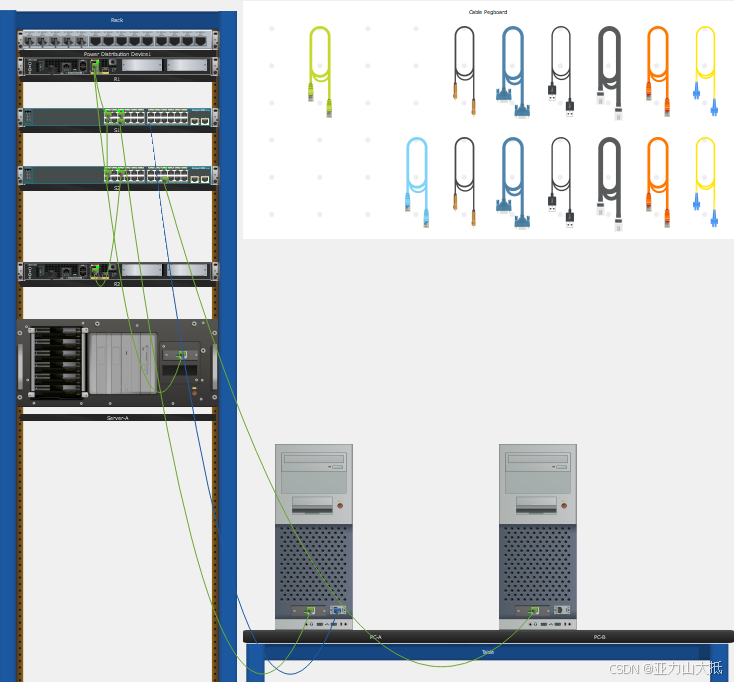
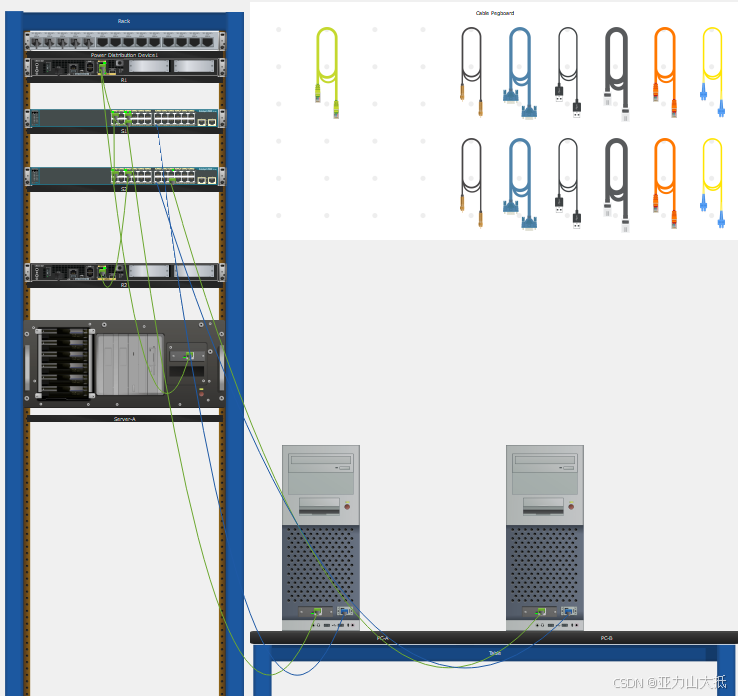
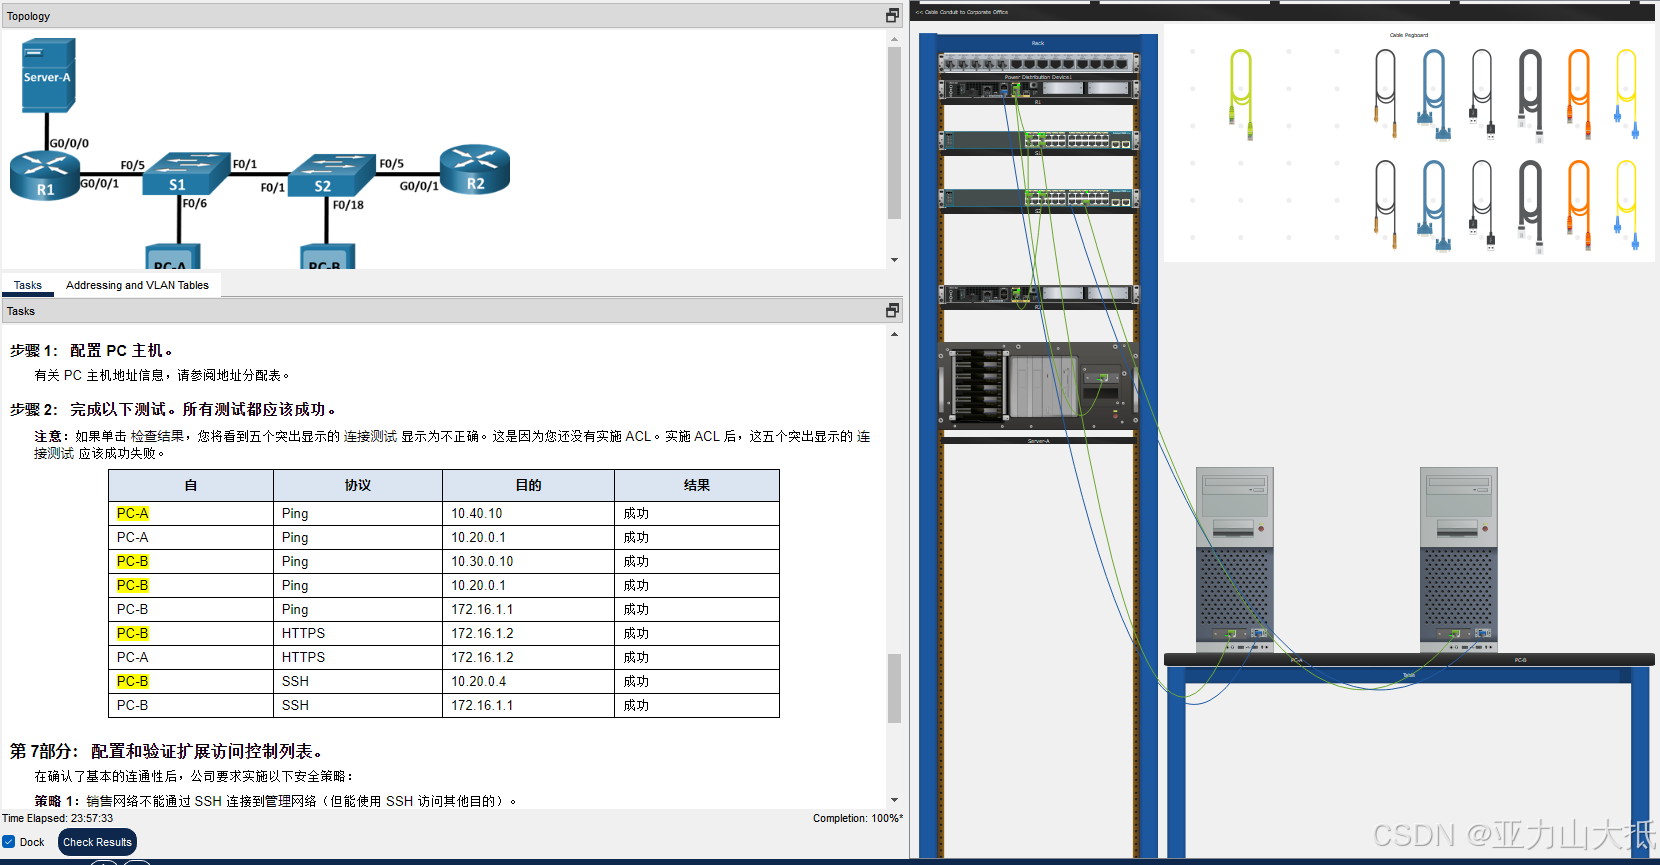
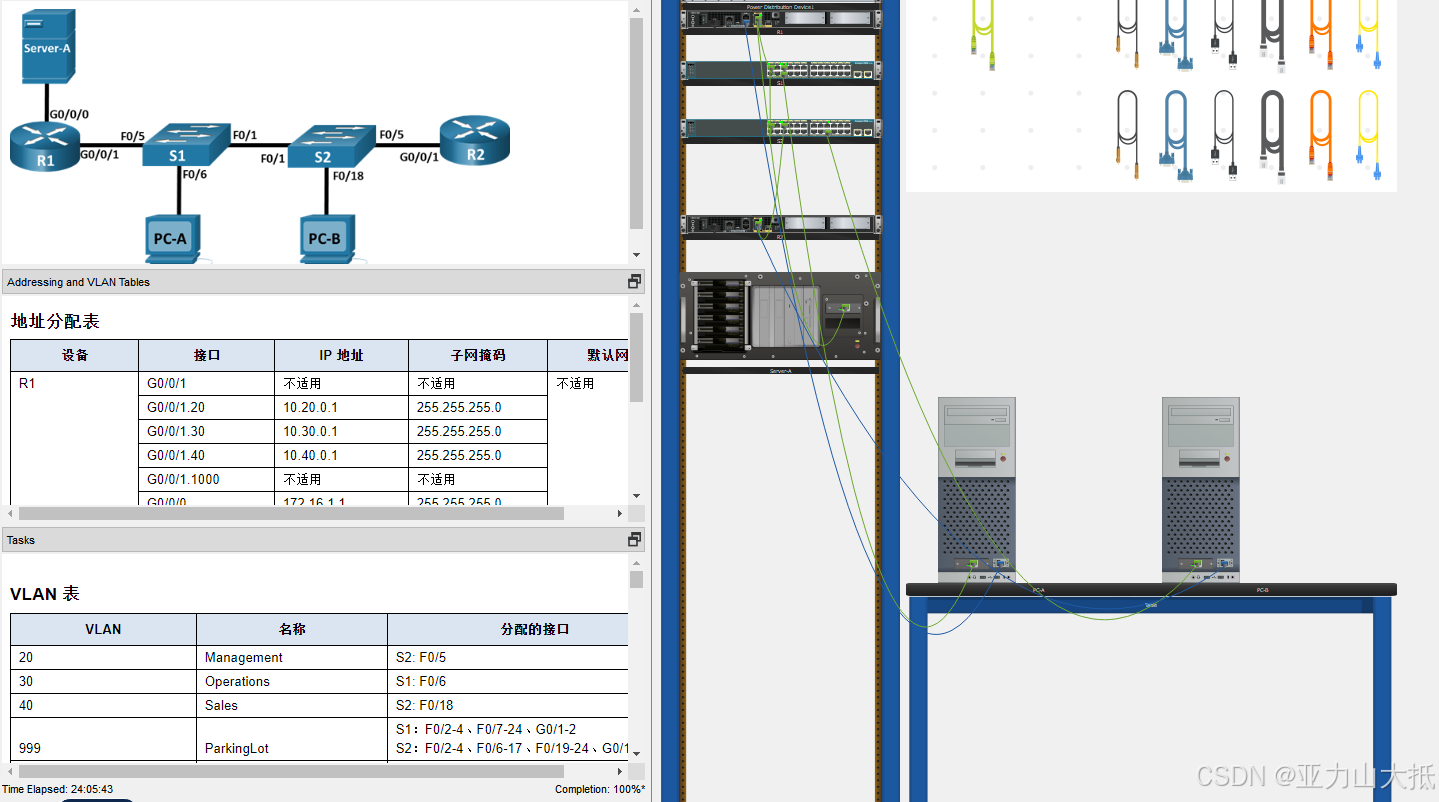
拓扑图
地址分配表如下: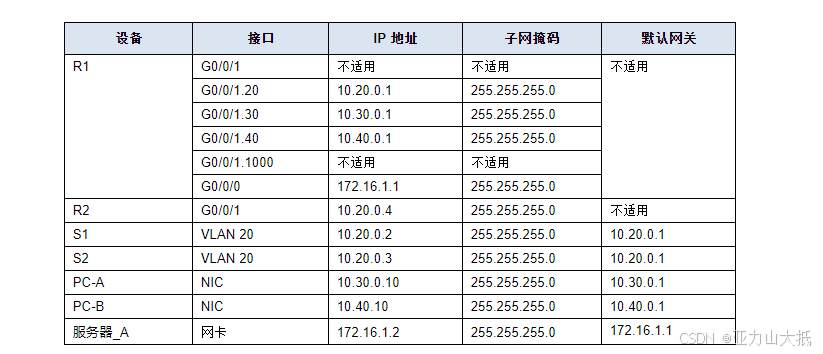
这里说一下PC-B的ip地址是10.40.0.10
这个是这个题的问题
VLAN表

目录
背景/场景
在这个 Packet Tracer 物理模式 (PTPM) 练习中,您的任务是在小公司的网络上配置访问控制列表 (ACL)。ACL 是控制第 3 层流量的最简单和最直接的方法之一。R1 连接了互联网并把这条默认路由信息共享给 R2。完成了初始配置后,公司提出了一些流量安全性要求,您负责实施这些需求。注意:本练习中有 100 多个得分项目。因此,Packet Tracer 将显示当前正确的项目数量,而不是百分比得分。
实验步骤:
第 1部分: 建立网络并配置设备的基本设置
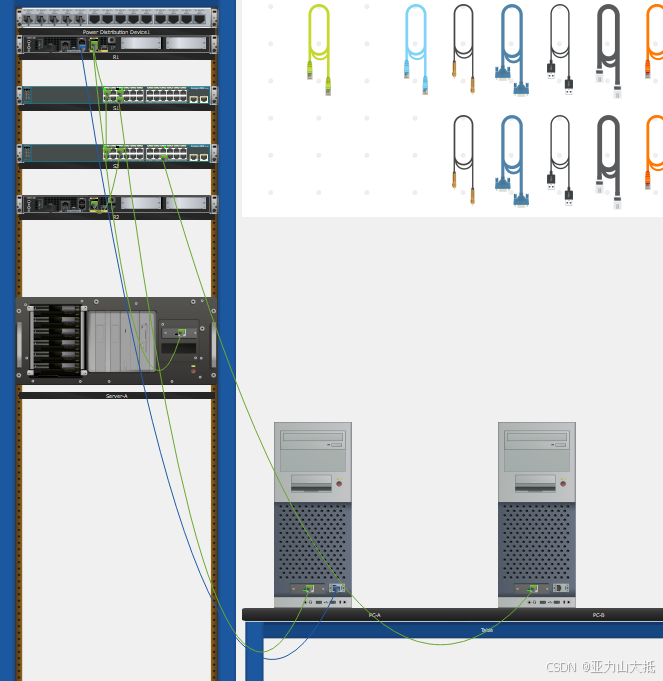
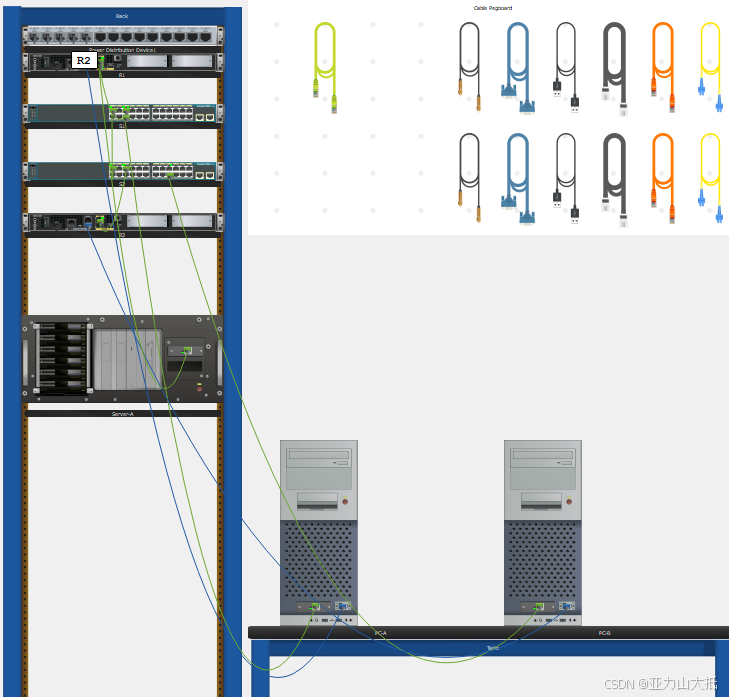
步骤 1: 建立如拓扑图所示的网络。
a. 按照拓扑所示连接并开启设备。在配置每台交换机或路由器时,使用控制台电缆将 PC 连接到它们。要访问交换机或路由器,必须在 PC 和要配置的设备之间连接控制台电缆。我们建议将 PC-A 连接到 R1 ,将 PC-B 连接到 R2,如图下所示。
PC-A 连接到 R1
 PC-B 连接到 R2
b. 然后,在配置交换机时,将 PC-A 连接到 S1 ,将 PC-B 连接到 S2。连接控制台电缆后,单击 PC > 桌面选项卡 > 终端,然后单击 确定以访问命令行,如图下所示。
PC-A 连接到 S1
PC-B 连接到 S2
特别说明console是配置口在思科里面是蓝色的线,要是学到现在这还不会那我就无语了。
将控制台电缆更换到新设备时(例如在路由器和交换机之间),单击控制台电缆末端并将其拖回线缆插板,比尝试将电缆直接连接到另一台设备更容易。将控制台电缆连接到其他设备后,必须关闭并重新打开 终端 窗口才能建立新的连接。
步骤 2: 为每台路由器配置基本设置。
打开配置窗口
a. 为路由器分配一个设备名称。
Router>en
Router#conf t
Router(config)# host R1
b. 为了防止路由器尝试将错误输入的命令视为主机名,禁用 DNS 查找。
R1(config)# no ip domain lookup
或者是
R1(config)# no ip domain-lookup
c. 指定 class 作为特权EXEC加密密码。
R1(config)# enable secret class
d. 指定 cisco 作为控制台密码并启用登录。
R1(config)# line console 0
R1(config-line)# password cisco
R1(config-line)# login
e. 指定 cisco 作为 vty 密码。您将在本练习稍后启用登录功能。
R1(config)# line vty 0 4
R1(config-line)# password cisco
f. 加密明文密码。
R1(config)# service password-encryption
g. 创建一个向访问设备者发出警告的标语:未经授权,禁止访问。
R1(config)# banner motd $ Authorized Users Only! $
h. 将运行配置保存到启动配置文件中。
R1(config)#end
R1# copy running-config startup-config
关闭配置窗口
步骤 3: 配置每台交换机的基本设置。
打开配置窗口
a. 给交换机分配一个设备名称。
Switch>en
Switch#conf t
Switch(config)# hostname S1
b. 为了防止路由器尝试将错误输入的命令视为主机名,禁用 DNS 查找。
S1(config)# no ip domain-lookup
c. 指定 class 作为特权 EXEC 加密密码。
S1(config)# enable secret class
d. 指定 cisco 作为控制台密码并启用登录。
S1(config)# line console 0
S1(config-line)# password cisco
S1(config-line)# login
e. 指定 cisco 作为 vty 密码。您将在本练习稍后启用登录功能。
S1(config)# line vty 0 15
S1(config-line)# password cisco
f. 加密明文密码。
S1(config)# service password-encryption
g. 创建一个向访问设备者发出警告的标语:未经授权,禁止访问。
S1(config)# banner motd $ Authorized Users Only! $
h. 将运行配置保存到启动配置文件中。
S1(config)# end
S1# copy running-config startup-config
关闭配置窗口
第 2部分: 在交换机上配置VLAN。
步骤 1: 在两台交换机上创建VLAN。
打开配置窗口
a. 按照 VLAN 表的内容,在每台交换机上创建并命名 VLAN。
参考这个
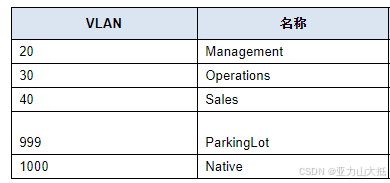
S1(config)# vlan 20
S1(config-vlan)# name Management
S1(config-vlan)# vlan 30
S1(config-vlan)# name Operations
S1(config-vlan)# vlan 40
S1(config-vlan)# name Sales
S1(config-vlan)# vlan 999
S1(config-vlan)# name ParkingLot
S1(config-vlan)# vlan 1000
S1(config-vlan)# name Native
S1(config-vlan)# exit
S2(config)# vlan 20
S2(config-vlan)# name Management
S2(config-vlan)# vlan 30
S2(config-vlan)# name Operations
S2(config-vlan)# vlan 40
S2(config-vlan)# name Sales
S2(config-vlan)# vlan 999
S2(config-vlan)# name ParkingLot
S2(config-vlan)# vlan 1000
S2(config-vlan)# name Native
S2(config-vlan)# exit
b. 使用地址分配表中包含的 IP 地址信息配置管理接口和默认网关。
S1(config)# interface vlan 20
S1(config-if)# ip address 10.20.0.2 255.255.255.0
S1(config-if)# no shutdown
S1(config-if)# exit
S1(config)# ip default-gateway 10.20.0.1
S1(config)# end
S2(config)# interface vlan 20
S2(config-if)# ip address 10.20.0.3 255.255.255.0
S2(config-if)# no shutdown
S2(config-if)# exit
S2(config)# ip default-gateway 10.20.0.1
S2(config)# end
c. 将交换机上所有未使用的端口分配给停车场 VLAN。将其配置为静态访问模式,并在管理上停用这些端口。
S1(config)# interface range f0/2 – 4, f0/7 – 24, g0/1 – 2
S1(config-if-range)# switchport mode access
S1(config-if-range)# switchport access vlan 999
S1(config-if-range)# shutdown
S1(config-if-range)# end
S2(config)# interface range f0/2 – 4, f0/6 – 17, f0/19 – 24, g0/1 – 2
S2(config-if-range)# switchport mode access
S2(config-if-range)# switchport access vlan 999
S2(config-if-range)# shutdown
S2(config-if-range)# end这里我说一下,思科平台有bug,其实不需要输入这么多,不知道是平台原因还是这个5.5.2的思科本身就是这样。
如下所示:
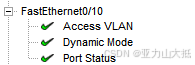
S1(config)#interface f0/10
S1(config-if-range)# switchport mode access
S1(config-if-range)# switchport access vlan 999
S1(config-if-range)# shutdown
S2(config)#interface f0/10
S2(config-if-range)# switchport mode access
S2(config-if-range)# switchport access vlan 999
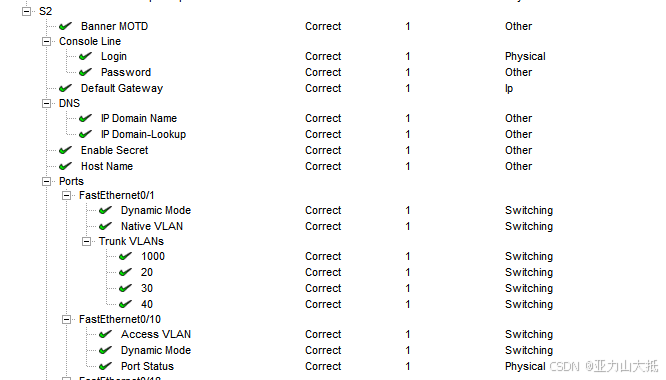
S2(config-if-range)# shutdown这样子也对,点击check Results然后看S1的
和S2的fastEthernet0/10接口,我发现上述命令只是跟int f0/10这个有关。
注意:interface range 命令有助于我们使用尽可能少的命令来完成此任务。
步骤 2: 将 VLAN 分配到正确的交换机接口。
a. 把使用的端口划分到(VLAN 表中指定的)正确 VLAN,并且配置为 access 模式。
S1(config)# interface f0/6
S1(config-if)# switchport mode access
S1(config-if)# switchport access vlan 30
S2(config)# interface f0/5
S2(config-if)# switchport mode access
S2(config-if)# switchport access vlan 20
S2(config-if)# interface f0/18
S2(config-if)# switchport mode access
S2(config-if)# switchport access vlan 40
关闭配置窗口
第 3部分: 配置中继
步骤 1: 手动配置中继接口 F0/1。
打开配置窗口
a. 更改接口 F0/1 上的交换机端口模式以强制建立中继。确保在两台交换机上都执行了这项操作。
S1(config)# interface f0/1
S1(config-if)# switchport mode trunk
S2(config)# interface f0/1
S2(config-if)# switchport mode trunk
b. 在配置干道时,在两个交换机上把本征 VLAN 设置为 1000。当两个接口使用不同的本征 VLAN 时,您可能会看到一些临时出现的错误消息。
S1(config-if)# switchport trunk native vlan 1000
S2(config-if)# switchport trunk native vlan 1000
c. 在配置干道时,指定VLAN 10、20、30和1000可以穿越这条干道。
S1(config-if)# switchport trunk allowed vlan 20,30,40,1000
S2(config-if)# switchport trunk allowed vlan 20,30,40,1000
d. 使用 show interfaces trunk 命令来验证中继端口、本征 VLAN 和干道上允许传输的VLAN。
S1# show interfaces trunk
步骤 2: 手动配置S1上的中继接口F0/5。
a. 给S1的F0/5接口上配置与F0/1相同的参数。这是连接 R1 的中继。
S1(config)# interface f0/5
S1(config-if)# switchport mode trunk
S1(config-if)# switchport trunk native vlan 1000
S1(config-if)# switchport trunk allowed vlan 20,30,40,1000
b. 将运行配置保存到启动配置文件中。
S1# copy running-config startup-config
关闭配置窗口
第 4部分: 配置路由
步骤 1: 在R1上配置VLAN间路由。
打开配置窗口
a. 激活路由器上的G0/0/1接口。
R1(config)# interface g0/0/1
R1(config-if)# no shutdown
b. 按照 IP 地址分配表给每个 VLAN 配置子接口。所有子接口都要使用802.1Q封装。确保本征 VLAN 对应的子接口没有分配 IP 地址。给每个子接口添加一段描述信息。
R1(config)# interface g0/0/1.20
R1(config-subif)# description Management Network
R1(config-subif)# encapsulation dot1q 20
R1(config-subif)# ip address 10.20.0.1 255.255.255.0
R1(config-subif)# interface g0/0/1.30
R1(config-subif)# encapsulation dot1q 30
R1(config-subif)# description Operations Network
R1(config-subif)# ip address 10.30.0.1 255.255.255.0
R1(config-subif)# interface g0/0/1.40
R1(config-subif)# encapsulation dot1q 40
R1(config-subif)# description Sales Network
R1(config-subif)# ip address 10.40.0.1 255.255.255.0
R1(config-subif)# interface g0/0/1.1000
R1(config-subif)# encapsulation dot1q 1000 native
R1(config-subif)# description Native VLAN
c. 使用地址分配表中的地址配置 R1 的 G0/0/1接口。
R1(config)# interface g0/0/0
R1(config-if)# ip address 172.16.1.1 255.255.255.0
R1(config-if)# no shutdown
d. 可以使用 show ip interface brief 命令来验证子接口是否已经启用。
R1# show ip interface brief
步骤 2: 按照地址分配表来配置 R2 的 G0/0/1 接口,配置默认路由的下一跳为 10.20.0.1。
R2(config)# interface g0/0/1
R2(config-if)# ip address 10.20.0.4 255.255.255.0
R2(config-if)# no shutdown
R2(config-if)# exit
R2(config)# ip route 0.0.0.0 0.0.0.0 10.20.0.1
第 5部分: 配置远程访问
步骤 1: 配置所有网络设备来支持基本SSH访问。
打开配置窗口
a. 创建一个本地用户,用户名为 SSHadmin,加密密码为 $cisco123!。
R1(config)# username SSHadmin secret $cisco123!
b. 使用 ccna-lab.com 作为域名。
R1(config)# ip domain name ccna-lab.com
c. 使用 1024 位长度来生成加密密钥。
R1(config)# crypto key generate rsa general-keys modulus 1024
d. 配置每台设备上的前 5 条 VTY 线路只支持 SSH 连接,使用本地用户数据库进行认证。
R1(config-line)# transport input ssh
R1(config-line)# login local
R1(config-line)# exit
关闭配置窗口
第 6部分: 验证连接
步骤 1: 配置 PC 主机。
有关 PC 主机地址信息,请参阅地址分配表。
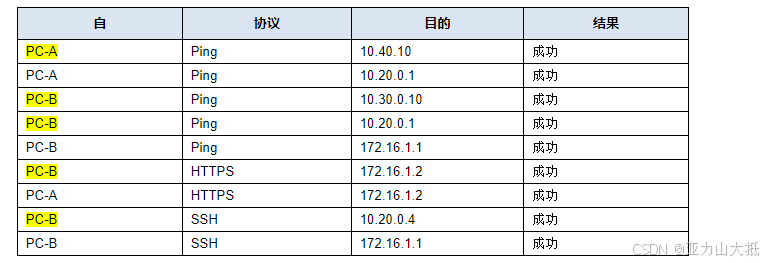
步骤 2: 完成以下测试。所有测试都应该成功。
注意:如果单击 检查结果,您将看到五个突出显示的 连接测试 显示为不正确。这是因为您还没有实施 ACL。实施 ACL 后,这五个突出显示的 连接测试 应该成功失败。
空白行——没有额外信息
第 7部分: 配置和验证扩展访问控制列表。
在确认了基本的连通性后,公司要求实施以下安全策略:
策略 1:销售网络不能通过 SSH 连接到管理网络(但能使用 SSH 访问其他目的)。
策略 2:销售网络不能使用任何 Web 协议 (HTTP/HTTPS) 访问管理网络中的 IP 地址。允许所有其他 Web 流量。
策略 3:销售网络不能向运营或管理网络发送 ICMP echo 请求。允许向其他网络发送 ICMP echo-request。
策略 4:运营网络不能向销售网络发送 ICMP echo 请求。允许向其他网络发送 ICMP echo-request。
步骤 1: 编辑并应用扩展访问列表,使其满足安全策略要求。
R1(config)# access-list 101 remark ACL 101 fulfills policies 1, 2, and 3
R1(config)# access-list 101 deny tcp 10.40.0.0 0.0.0.255 10.20.0.0 0.0.0.255 eq 22
R1(config)# access-list 101 deny tcp 10.40.0.0 0.0.0.255 172.16.1.2 0.0.0.0 eq 80
R1(config)# access-list 101 deny tcp 10.40.0.0 0.0.0.255 172.16.1.2 0.0.0.0 eq 443
R1(config)# access-list 101 deny icmp 10.40.0.0 0.0.0.255 10.20.0.0 0.0.0.255 echo
R1(config)# access-list 101 deny icmp 10.40.0.0 0.0.0.255 10.30.0.0 0.0.0.255 echo
R1(config)# access-list 101 permit ip any any
R1(config)# interface g0/0/1.40
R1(config-subif)# ip access-group 101 in
R1(config)# access-list 102 remark ACL 102 fulfills policy 4
R1(config)# access-list 102 deny icmp 10.30.0.0 0.0.0.255 10.40.0.0 0.0.0.255 echo
R1(config)# access-list 102 permit ip any any
R1(config)# interface g0/0/1.30
R1(config-subif)# ip access-group 102 in
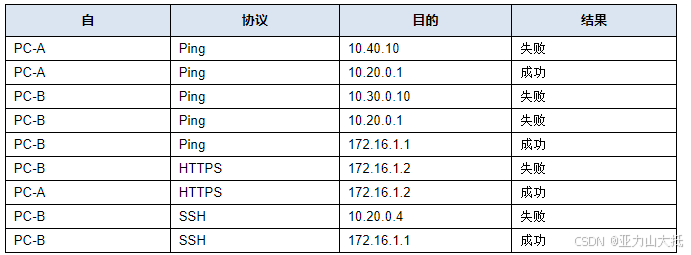
步骤 2: 验证已部署的访问列表是否执行了正确的安全策略。
完成以下测试。预期结果如下表所示:
注意:单击 检查结果 可强制 Packet Tracer 再次运行所有 连接测试 。
完成后等一会就百分百了。
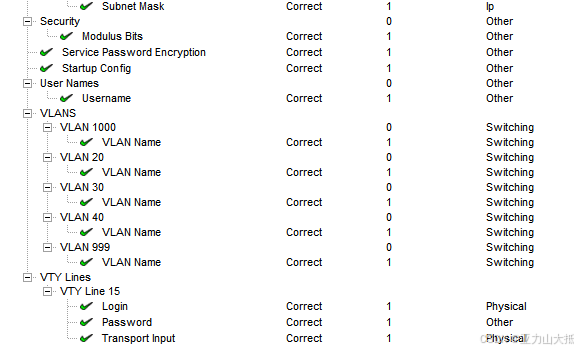
完成效果截图如下
另类的解题方式:
我们进入这个实验后点击Check Results,如下图所示
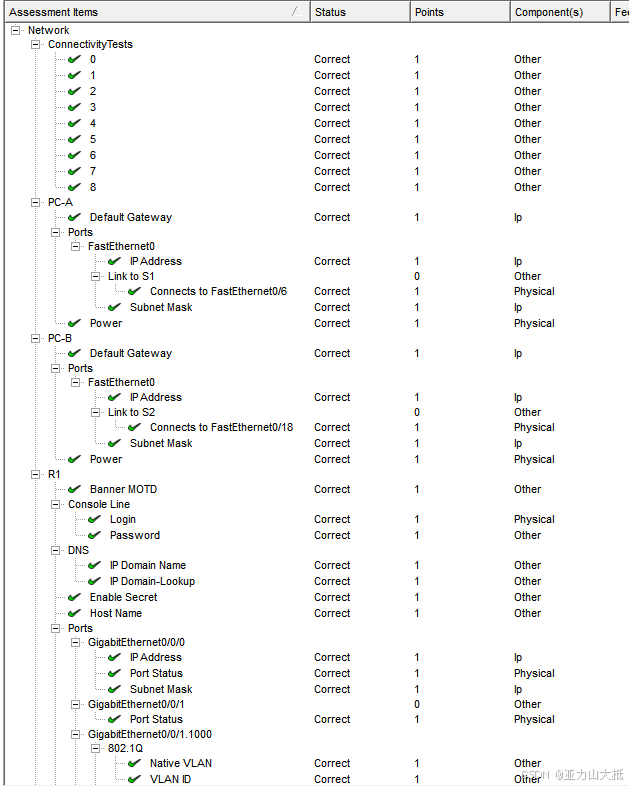
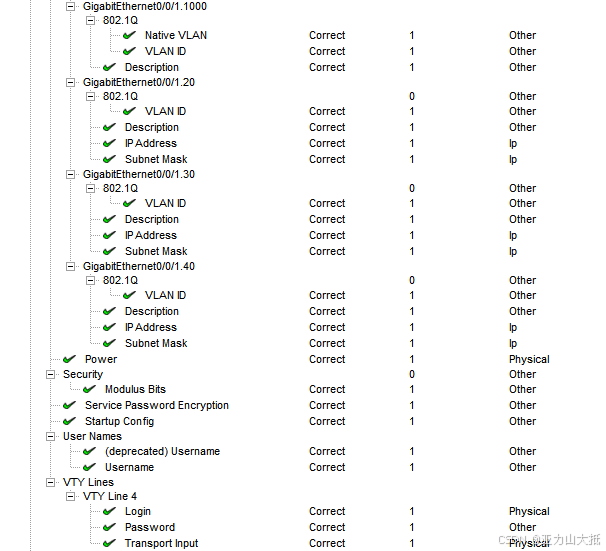
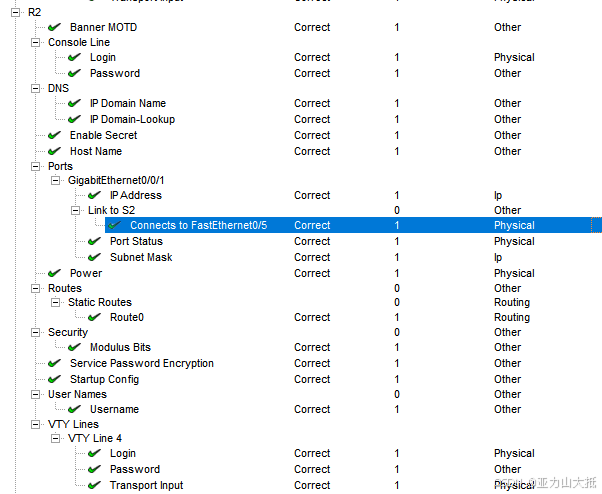
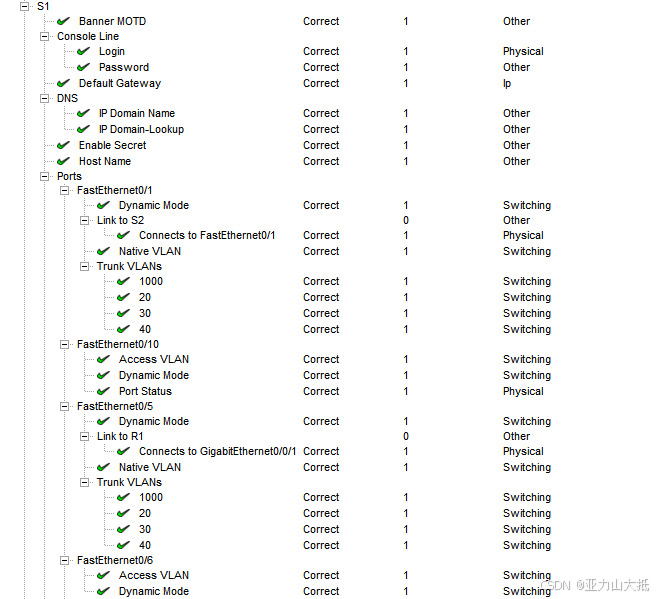
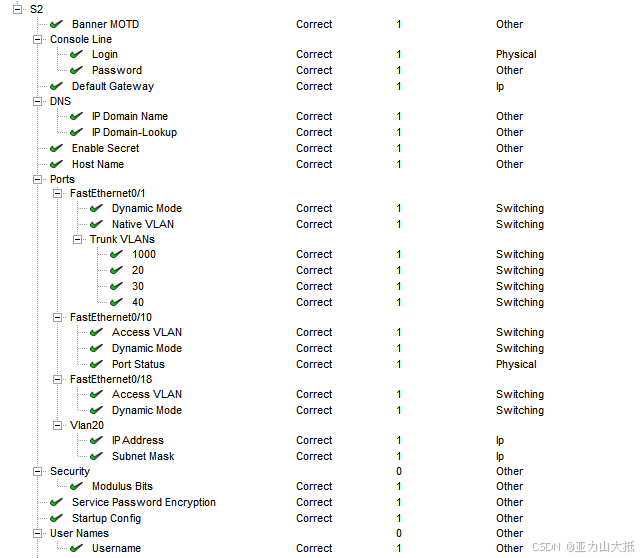
根据这些任务一步一步配命令也是可以到百分百的。
我根据上面的命令配置如下(非正规命令):
Router>
Router>enable
Router#conf t
Enter configuration commands, one per line. End with CNTL/Z.
Router(config)#hostname R1
R1(config)#no ip domain lookup
R1(config)#enable secret class
R1(config)#line console 0
R1(config-line)#password cisco
R1(config-line)#login
R1(config-line)#line vty 0 4
R1(config-line)#password cisco
R1(config-line)#service password-encryption
R1(config)#banner motd $ Authorized Users Only! $
R1(config)#end
R1#copy running-config startup-config
R1(config)#no ip domain lookup
R1(config)#ip domain name ccna-lab.com
R1(config)#interface g0/0/0
R1(config-if)#ip address 172.16.1.1 255.255.255.0
R1(config-if)#no shutdown
R1(config-if)#interface g0/0/1
R1(config-if)#no shutdown
R1(config-if)#interface g0/0/1.1000
R1(config-subif)#encapsulation dot1q 1000 native
R1(config-subif)#description Native VLAN
R1(config-subif)#interface g0/0/1.20
R1(config-subif)#description Management Network
R1(config-subif)#encapsulation dot1q 20
R1(config-subif)#ip address 10.20.0.1 255.255.255.0
R1(config-subif)#encapsulation dot1q 30
R1(config-subif)#description Operations Network
R1(config-subif)#ip address 10.30.0.1 255.255.255.0
R1(config-subif)#interface g0/0/1.40
R1(config-subif)#encapsulation dot1q 40
R1(config-subif)#description Sales Network
R1(config-subif)#ip address 10.40.0.1 255.255.255.0
R1#show ip interface brief
R1(config)#ip domain name ccna-lab.com
R1(config)#crypto key generate rsa general-keys modulus 1024
R1(config)#line vty 0 4
R1(config-line)#transport input ssh
R1(config-line)#login local
Router>
Router>en
Router#conf t
Enter configuration commands, one per line. End with CNTL/Z.
Router(config)#
Router(config)#hostname R2
R2(config)#banner motd $ Authorized Users Only! $
R2(config)#line console 0
R2(config-line)#password cisco
R2(config-line)#login
R2(config)#ip domain name ccna-lab.com
R2(config)#no ip domain lookup
R2(config)#service password-encryption
R2(config)#interface g0/0/1
R2(config-if)#ip address 10.20.0.4 255.255.255.0
R2(config-if)#no shutdownR2(config)#interface g0/0/1
R2(config-if)#ip address 10.20.0.4 255.255.255.0
R2(config-if)#no shutdownR2(config)#interface g0/0/1
R2(config-if)#ip address 10.20.0.4 255.255.255.0
R2(config-if)#no shutdown
R2(config-if)#exit
R2(config)#ip route 0.0.0.0 0.0.0.0 10.20.0.1R2(config)#crypto key generate rsa general-keys modulus 1024
R2(config)#end
R2#copy running-config startup-config
R2(config)#username SSHadmin secret $cisco123!
R2(config)#hostname R2
R2(config)#line vty 4
R2(config-line)#password cisco
R2(config-line)#transport input ssh
R2(config-line)#login localSwitch>en
Switch#conf t
Switch(config)#hostname S1
S1(config)#banner motd $ Authorized Users Only! $
S1(config)#line console 0
S1(config-line)#password cisco
S1(config-line)#login
S1(config)#ip default-gateway 10.20.0.1
S1(config-line)#ip domain name ccna-lab.com
S1(config)#ip domain name ccna-lab.com
S1(config)#no ip domain lookup
S1(config)#enable secret class
S1(config)#interface f0/1
S1(config-if)#switchport mode trunk
S1(config-if)#switchport trunk native vlan 1000
S1(config-if)#switchport trunk allowed vlan 20,30,40,1000S1(config)# interface f0/5
S1(config-if)# switchport mode trunk
S1(config-if)# switchport trunk native vlan 1000
S1(config-if)# switchport trunk allowed vlan 20,30,40,1000S1(config-if)#interface f0/10
S1(config-if)#switchport mode access
S1(config-if)#switchport access vlan 999
S1(config-if)#shutdownS1(config)# interface f0/6
S1(config-if)# switchport mode access
S1(config-if)# switchport access vlan 30S1(config)# interface vlan 20
S1(config-if)# ip address 10.20.0.2 255.255.255.0
S1(config-if)# no shutdown
S1(config-if)#ip default-gateway 10.20.0.1
S1(config)#crypto key generate rsa general-keys modulus 1024
S1(config)# service password-encryption
end
S1#copy running-config startup-config
S1(config)#username SSHadmin secret $cisco123!
S1(config)# ip domain name ccna-lab.com
S1(config)# vlan 20
S1(config-vlan)# name Management
S1(config-vlan)# vlan 30
S1(config-vlan)# name Operations
S1(config-vlan)# vlan 40
S1(config-vlan)# name Sales
S1(config-vlan)# vlan 999
S1(config-vlan)# name ParkingLot
S1(config-vlan)# vlan 1000
S1(config-vlan)# name Native
S1(config-vlan)# exit
S1(config)#line vty 15
S1(config-line)#password cisco
S1(config-line)#transport input ssh
S1(config-line)#login local
Switch(config)#hostname S2
S2(config)# ip default-gateway 10.20.0.1
S2(config)#no ip domain lookup
S2(config)#enable secret class
S2(config)# interface f0/1
S2(config-if)# switchport mode trunk
S2(config-if)# switchport trunk native vlan 1000
S2(config-if)# switchport trunk allowed vlan 20,30,40,1000
S2(config)#interface f0/10
S2(config-if-range)# switchport mode access
S2(config-if-range)# switchport access vlan 999
S2(config-if-range)# shutdown
S2(config-if)#interface f0/18
S2(config-if)#switchport mode access
S2(config-if)#switchport access vlan 40
S2(config)# interface vlan 20
S2(config-if)# ip address 10.20.0.3 255.255.255.0
S2(config-if)# no shutdown
S2(config)#crypto key generate rsa general-keys modulus 1024
S2(config)# service password-encryption
end
S2#copy running-config startup-config
S2(config)#username SSHadmin secret $cisco123!
S2(config)# vlan 20
S2(config-vlan)# name Management
S2(config-vlan)# vlan 30
S2(config-vlan)# name Operations
S2(config-vlan)# vlan 40
S2(config-vlan)# name Sales
S2(config-vlan)# vlan 999
S2(config-vlan)# name ParkingLot
S2(config-vlan)# vlan 1000
S2(config-vlan)# name Native
S2(config-vlan)# exit
如果到这里线没连错,并且命令全对应该是%97,如果敲错可能是这个的一下S1和S2的原因
S1(config)# interface range f0/2 – 4, f0/7 – 24, g0/1 – 2
S1(config-if-range)# switchport mode access
S1(config-if-range)# switchport access vlan 999
S1(config-if-range)# shutdown
S1(config-if-range)# end
S2(config)# interface range f0/2 – 4, f0/6 – 17, f0/19 – 24, g0/1 – 2
S2(config-if-range)# switchport mode access
S2(config-if-range)# switchport access vlan 999
S2(config-if-range)# shutdown
S2(config-if-range)# end如果单击 Check Results,您将看到 5 个突出显示的 Connectivity Tests 显示为不正确。这是因为您尚未实施 ACL。实施 ACL 后,这五个突出显示的连接测试应成功失败。
开发并应用符合安全策略声明的扩展访问列表。
R1#conf t
Enter configuration commands, one per line. End with CNTL/Z.
R1(config)#access-list 101 remark ACL 101 fulfills policies 1, 2, and 3
R1(config)#access-list 101 deny tcp 10.40.0.0 0.0.0.255 10.20.0.0 0.0.0.255 eq 22
R1(config)# access-list 101 deny tcp 10.40.0.0 0.0.0.255 172.16.1.2 0.0.0.0 eq 80
R1(config)#access-list 101 deny tcp 10.40.0.0 0.0.0.255 172.16.1.2 0.0.0.0 eq 443
R1(config)#access-list 101 deny icmp 10.40.0.0 0.0.0.255 10.20.0.0 0.0.0.255 echo
R1(config)#access-list 101 deny icmp 10.40.0.0 0.0.0.255 10.30.0.0 0.0.0.255 echo
R1(config)#access-list 101 permit ip any any
R1(config)#interface g0/0/1.40
R1(config-subif)#ip access-group 101 in
R1(config-subif)#access-list 102 remark ACL 102 fulfills policy 4
R1(config)#access-list 102 deny icmp 10.30.0.0 0.0.0.255 10.40.0.0 0.0.0.255 echo
R1(config)#access-list 102 permit ip any any
R1(config)#interface g0/0/1.30
R1(config-subif)#ip access-group 102 in
完成结果如下图所示:


 197
197

 被折叠的 条评论
为什么被折叠?
被折叠的 条评论
为什么被折叠?
 到【灌水乐园】发言


