


Netty源码初探
前言
本人在尝试使用Netty来手写RPC时,学习到了很多Netty知识,在此进行一些记录
示例
以下时服务端的简单启动示例
 public void start(int port) {

        EventLoopGroup bossGroup = new NioEventLoopGroup(1);
        EventLoopGroup workerGroup = new NioEventLoopGroup();

        DefaultEventExecutorGroup serviceHandlerGroup = new DefaultEventExecutorGroup(
                RuntimeUtil.getProcessorCount() * 2,
                ThreadUtil.newNamedThreadFactory("service-handler-group", false)
        );
        try {

            ServerBootstrap b = new ServerBootstrap();
            b.group(bossGroup, workerGroup)
                    .channel(NioServerSocketChannel.class)
                    .handler(new LoggingHandler(LogLevel.TRACE))
                    .childHandler(new ChannelInitializer<SocketChannel>() {
                        @Override
                        protected void initChannel(SocketChannel socketChannel) throws Exception {
                            socketChannel.pipeline()


                                    .addLast(new IdleStateHandler(30,0,0, TimeUnit.SECONDS))
                                    .addLast(new ProtocolEncoder())
                                    .addLast(new ProtocolDecoder())
                                    .addLast(serviceHandlerGroup, new NettyServerHandler());


                        }
                    })
                    .option(ChannelOption.SO_BACKLOG, 128)
                    .childOption(ChannelOption.SO_KEEPALIVE, true);

            ChannelFuture f = b.bind(port).sync();
            System.out.println("Server is now listening on port " + port);
            f.channel().closeFuture().sync();
        } catch (InterruptedException e) {
            throw new RuntimeException(e);
        } finally {
            workerGroup.shutdownGracefully();
            bossGroup.shutdownGracefully();
        }
    }
本文就基于这一段代码来进行深入探究Netty是如何实现的
EventLoopGroup
我们进入NioEventLoopGroup的源码中
public NioEventLoopGroup() {
       this(0);
   }

   public NioEventLoopGroup(int nThreads) {
       this(nThreads, (Executor)null);
   }
我们沿着this不断往下查找,发现
public NioEventLoopGroup(int nThreads, Executor executor, SelectorProvider selectorProvider, SelectStrategyFactory selectStrategyFactory) {
        super(nThreads, executor, new Object[]{selectorProvider, selectStrategyFactory, RejectedExecutionHandlers.reject()});
    }
然后进入super之后,发现nThreads这个参数影响的是这里
private static final int DEFAULT_EVENT_LOOP_THREADS = Math.max(1, SystemPropertyUtil.getInt("io.netty.eventLoopThreads", NettyRuntime.availableProcessors() * 2));

protected MultithreadEventLoopGroup(int nThreads, Executor executor, Object... args) {
    super(nThreads == 0 ? DEFAULT_EVENT_LOOP_THREADS : nThreads, executor, args);
}
最终发现:
一切的根源是MultithreadEventExecutorGroup这个类
protected MultithreadEventExecutorGroup(int nThreads, Executor executor, EventExecutorChooserFactory chooserFactory, Object... args) {

    this.terminatedChildren = new AtomicInteger();
    this.terminationFuture = new DefaultPromise(GlobalEventExecutor.INSTANCE);


    ObjectUtil.checkPositive(nThreads, "nThreads");


    if (executor == null) {
        executor = new ThreadPerTaskExecutor(this.newDefaultThreadFactory());
    }


    this.children = new EventExecutor[nThreads];


    for (int i = 0; i < nThreads; ++i) {
        boolean success = false;
        boolean var18 = false;

        try {
            var18 = true;

            this.children[i] = this.newChild((Executor) executor, args);
            success = true;
            var18 = false;
        } catch (Exception var19) {

            throw new IllegalStateException("failed to create a child event loop", var19);
        } finally {
            if (var18) {
                if (!success) {

                    for (int j = 0; j < i; ++j) {
                        this.children[j].shutdownGracefully();
                    }

                    for (int j = 0; j < i; ++j) {
                        EventExecutor e = this.children[j];

                        try {
                            while (!e.isTerminated()) {
                                e.awaitTermination(2147483647L, TimeUnit.SECONDS);
                            }
                        } catch (InterruptedException var20) {
                            Thread.currentThread().interrupt();
                            break;
                        }
                    }
                }
            }
        }

        if (!success) {

            for (int j = 0; j < i; ++j) {
                this.children[j].shutdownGracefully();
            }

            for (int j = 0; j < i; ++j) {
                EventExecutor e = this.children[j];

                try {
                    while (!e.isTerminated()) {
                        e.awaitTermination(2147483647L, TimeUnit.SECONDS);
                    }
                } catch (InterruptedException var22) {
                    Thread.currentThread().interrupt();
                    break;
                }
            }
        }
    }


    this.chooser = chooserFactory.newChooser(this.children);


    FutureListener<Object> terminationListener = new FutureListener<Object>() {
        public void operationComplete(Future<Object> future) throws Exception {
            if (MultithreadEventExecutorGroup.this.terminatedChildren.incrementAndGet() == MultithreadEventExecutorGroup.this.children.length) {
                MultithreadEventExecutorGroup.this.terminationFuture.setSuccess((Object) null);
            }
        }
    };


    for (EventExecutor e : this.children) {
        e.terminationFuture().addListener(terminationListener);
    }


    Set<EventExecutor> childrenSet = new LinkedHashSet<>(this.children.length);
    Collections.addAll(childrenSet, this.children);
    this.readonlyChildren = Collections.unmodifiableSet(childrenSet);
}
我们debug走进去,到这个地方

发现在这里使用了默认的线程工厂创建了一个ThreadPerTaskExecutor,接着往下走
发现从this.children = new EventExecutor[nThreads];这一行开始,在创建并初始化每一个Executor
接着往下看
this.chooser = chooserFactory.newChooser(this.children)这里创建了一个 EventExecutorChooser对象用于在多个 EventExecutor 之间选择一个执行任务
之后往下看,可以发现,为每一个children数组中的对象添加了TerminationListener这个监听器

TerminationListener的作用是,监听每一个EventExecutor的终止事件,当所有的EventExecutor都终止之后,会将TerminationFuture设置为成功状态,表示整个MultithreadEventExecutorGroup 已经完全终止
TerminationListener是个匿名内部类
FutureListener<Object> terminationListener = new FutureListener<Object>() {

    public void operationComplete(Future<Object> future) throws Exception {
        if (MultithreadEventExecutorGroup.this.terminatedChildren.incrementAndGet() == MultithreadEventExecutorGroup.this.children.length) {
            MultithreadEventExecutorGroup.this.terminationFuture.setSuccess((Object)null);
        }
    }
};
方法的最后,将所有的children中的EventExecutor转化为一个不可修改的集合,从而保证readonlyChildren集合中的元素不可修改,从而保证线程安全和数据的完整性到这里第一部分的源码就分析完毕,接下来让我们关注到ServerBootstrap这个类
ServerBootstrap
先回顾一波示例代码
b.group(bossGroup, workerGroup)
                    .channel(NioServerSocketChannel.class)
                    .handler(new LoggingHandler(LogLevel.TRACE))
                    .childHandler(new ChannelInitializer<SocketChannel>() {
                        @Override
                        protected void initChannel(SocketChannel socketChannel) throws Exception {
                            socketChannel.pipeline()


                                    .addLast(new IdleStateHandler(30,0,0, TimeUnit.SECONDS))
                                    .addLast(new ProtocolEncoder())
                                    .addLast(new ProtocolDecoder())
                                    .addLast(serviceHandlerGroup, new NettyServerHandler());


                        }
                    })
                    .option(ChannelOption.SO_BACKLOG, 128)
                    .childOption(ChannelOption.SO_KEEPALIVE, true);
group

让我们点进去查看:
public ServerBootstrap group(EventLoopGroup parentGroup, EventLoopGroup childGroup) {

    super.group(parentGroup);
    if (this.childGroup != null) {
        throw new IllegalStateException("childGroup set already");
    } else {
        this.childGroup = (EventLoopGroup)ObjectUtil.checkNotNull(childGroup, "childGroup");
        return this;
    }
}
在这里我们可以发现几个有趣的地方:
- 链式调用实际上就是在方法结束的时候返回this本身,这个指针
- parentGroup需要去看父类
先让我们聚焦到ServerBootstrap这个类
基本属性
public class ServerBootstrap extends AbstractBootstrap<ServerBootstrap, ServerChannel> {

    private static final InternalLogger logger = InternalLoggerFactory.getInstance(ServerBootstrap.class);


    private final Map<ChannelOption<?>, Object> childOptions = new LinkedHashMap<>();


    private final Map<AttributeKey<?>, Object> childAttrs = new ConcurrentHashMap<>();


    private final ServerBootstrapConfig config = new ServerBootstrapConfig(this);


    private volatile EventLoopGroup childGroup;


    private volatile ChannelHandler childHandler;
}
在这里我们就会发现,构造函数中的那些属性全都是在这里的让我们继续溯源到AbstractBootstrap
public abstract class AbstractBootstrap<B extends AbstractBootstrap<B, C>, C extends Channel> implements Cloneable {


private static final Map.Entry<ChannelOption<?>, Object>[] EMPTY_OPTION_ARRAY = new Map.Entry[0];


private static final Map.Entry<AttributeKey<?>, Object>[] EMPTY_ATTRIBUTE_ARRAY = new Map.Entry[0];


volatile EventLoopGroup group;


private volatile ChannelFactory<? extends C> channelFactory;


private volatile SocketAddress localAddress;


private final Map<ChannelOption<?>, Object> options = new LinkedHashMap<>();


private final Map<AttributeKey<?>, Object> attrs = new ConcurrentHashMap<>();


private volatile ChannelHandler handler;


private volatile ClassLoader extensionsClassLoader;
}
这里有个很有意思的继承关系
这个定义是一个抽象类 AbstractBootstrap,它有两个泛型参数 B 和 C,并且实现了 Cloneable 接口。
B extends AbstractBootstrap<B, C>:表示泛型参数B必须是AbstractBootstrap类的子类,并且具有相同的泛型参数B和C。这种定义方式通常用于实现流式 API,使方法可以返回当前对象的类型。C extends Channel:表示泛型参数C必须是Channel类的子类。
从这里可以看到public B group(EventLoopGroup group) { ObjectUtil.checkNotNull(group, "group"); if (this.group != null) { throw new IllegalStateException("group set already"); } else { this.group = group; return this.self(); } }
这里设置的group实际上就是在给从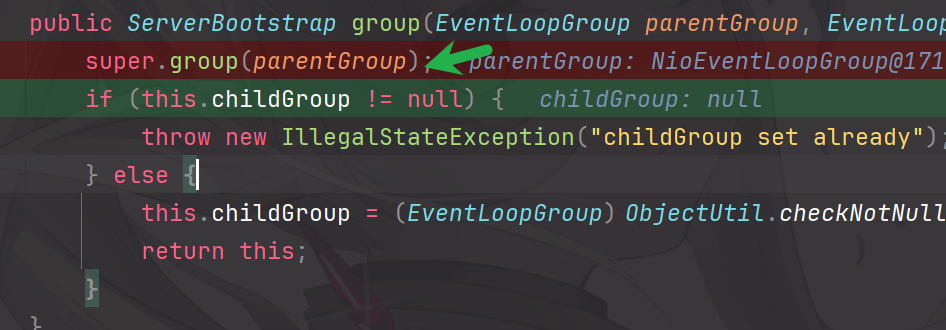
AbstractBoostrap中集成到的group进行赋值,而childGroup则是ServerBoostarap自己的新增的属性赋值
接着关注到.handler进入之后可以看到将handler赋值给属性了,这段源码比较简单,就不贴出来了
接着关注childHandler
在这里我们可以给连接后产生的SocketChannel配置一些东西,比如通过.addLast来添加连接处理器,handler是给Boss初0始化的,而childHandler则是给Worker进行初始化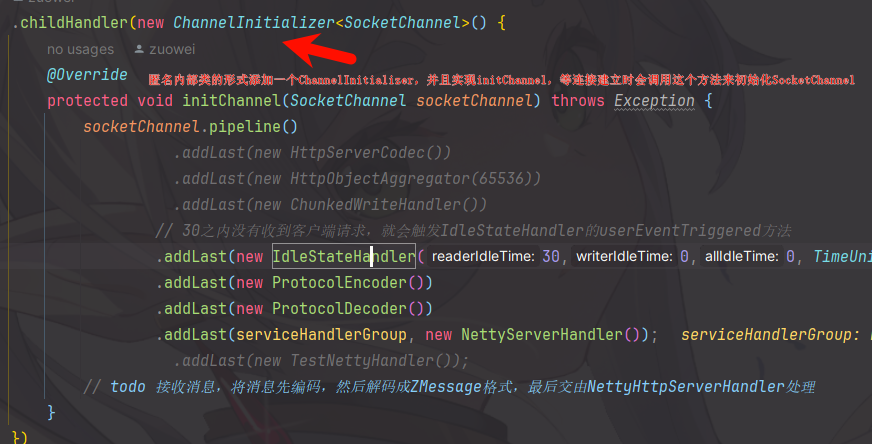
最后
.option 和 .childOption 是 Netty 中 ServerBootstrap 类的方法,用于配置服务器通道和子通道的选项。
其中.option是AbstractBoostrap中的属性。
以上都不是很难的部分,真正核心的在下面👇
bind
ChannelFuture f = b.bind(port).sync();这一段代码是将我们的ChannelFuture通过Boostrap启动类初始化之后,来绑定结果,ChannelFuture就是一个类似于Future的一个东西,提供了一些与Channel相关的方法,后文会展开,这里先跳过。
然我们跟着bind的调用链去揭开谜底!


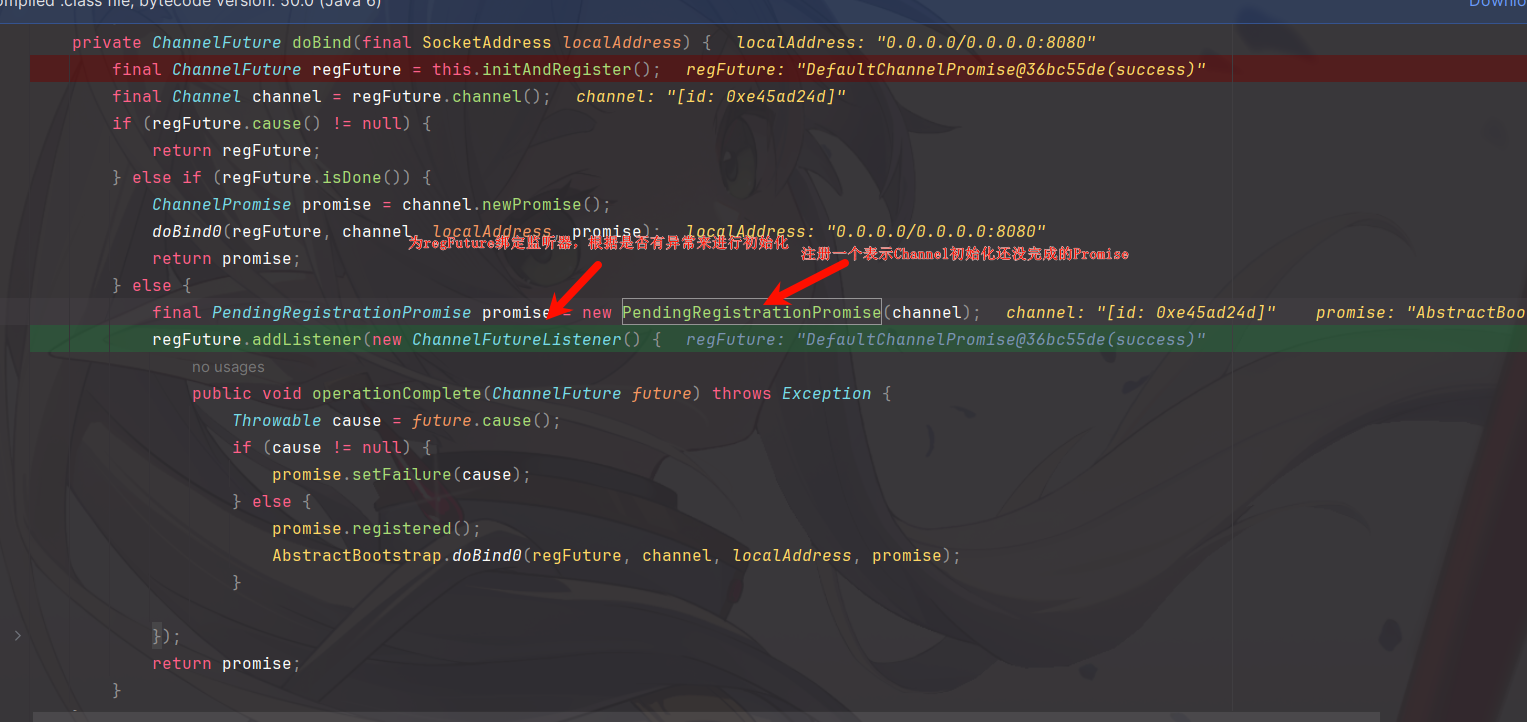
到这里我们才意识到,一切的根源都在doBind这个方法中。
先贴源码
private ChannelFuture doBind(final SocketAddress localAddress) {

    final ChannelFuture regFuture = this.initAndRegister();
    final Channel channel = regFuture.channel();


    if (regFuture.cause() != null) {
        return regFuture;
    }

    else if (regFuture.isDone()) {
        ChannelPromise promise = channel.newPromise();
        doBind0(regFuture, channel, localAddress, promise);
        return promise;
    }

    else {
        final PendingRegistrationPromise promise = new PendingRegistrationPromise(channel);
        regFuture.addListener(new ChannelFutureListener() {
            public void operationComplete(ChannelFuture future) throws Exception {
                Throwable cause = future.cause();

                if (cause != null) {
                    promise.setFailure(cause);
                }

                else {
                    promise.registered();
                    AbstractBootstrap.doBind0(regFuture, channel, localAddress, promise);
                }
            }
        });
        return promise;
    }
}
开始分析
![]()
让我们关注到initAndRegister这个方法
final ChannelFuture initAndRegister() {
    Channel channel = null;

    try {

        channel = this.channelFactory.newChannel();

        this.init(channel);
    } catch (Throwable var3) {


        if (channel != null) {
            channel.unsafe().closeForcibly();
            return (new DefaultChannelPromise(channel, GlobalEventExecutor.INSTANCE)).setFailure(var3);
        }

        return (new DefaultChannelPromise(new FailedChannel(), GlobalEventExecutor.INSTANCE)).setFailure(var3);
    }


    ChannelFuture regFuture = this.config().group().register(channel);

    if (regFuture.cause() != null) {
        if (channel.isRegistered()) {
            channel.close();
        } else {
            channel.unsafe().closeForcibly();
        }
    }


    return regFuture;
}对于channel = this.channelFactory.newChannel();这一行,我们debug进去,
最终在
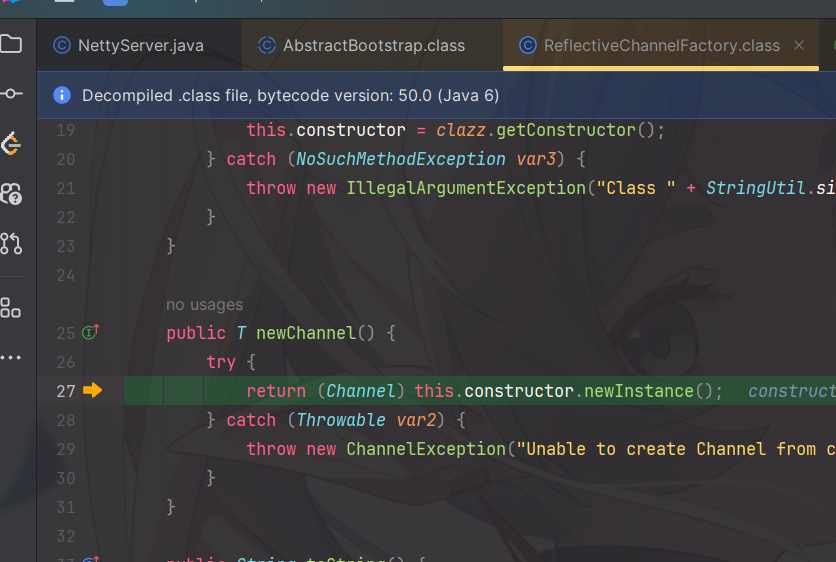
找到了如何初始化的,
![]()
Constructor 是 Java 反射机制中的一个类,用于表示类的构造方法。通过 Constructor 类,你可以动态地创建类的实例、获取构造方法的参数类型、访问修饰符等信息。
这里通过反射获得了io.netty.channel.ReflectiveChannelFactory
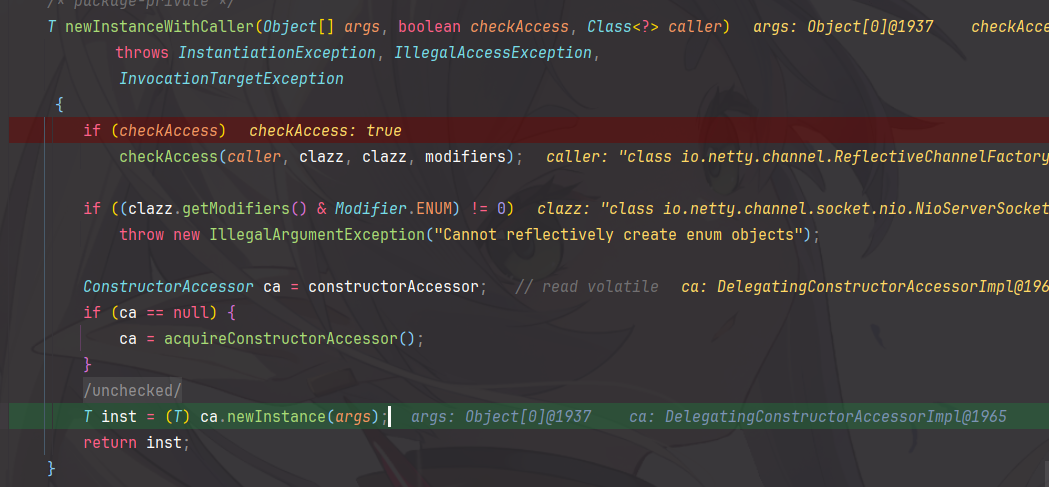
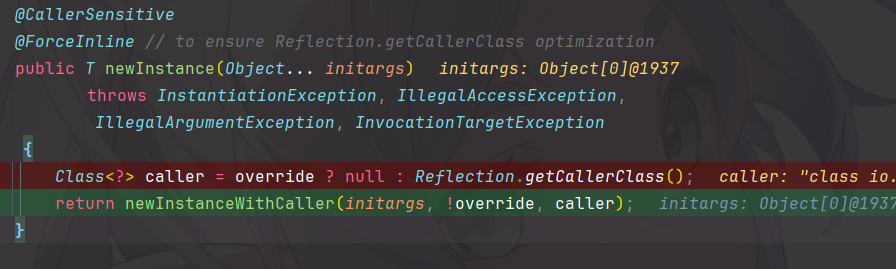
这里可以找到,实际上是通过DelegatingConstructorAccessorImpl来实现的,不断深入,最后在这里找到答案
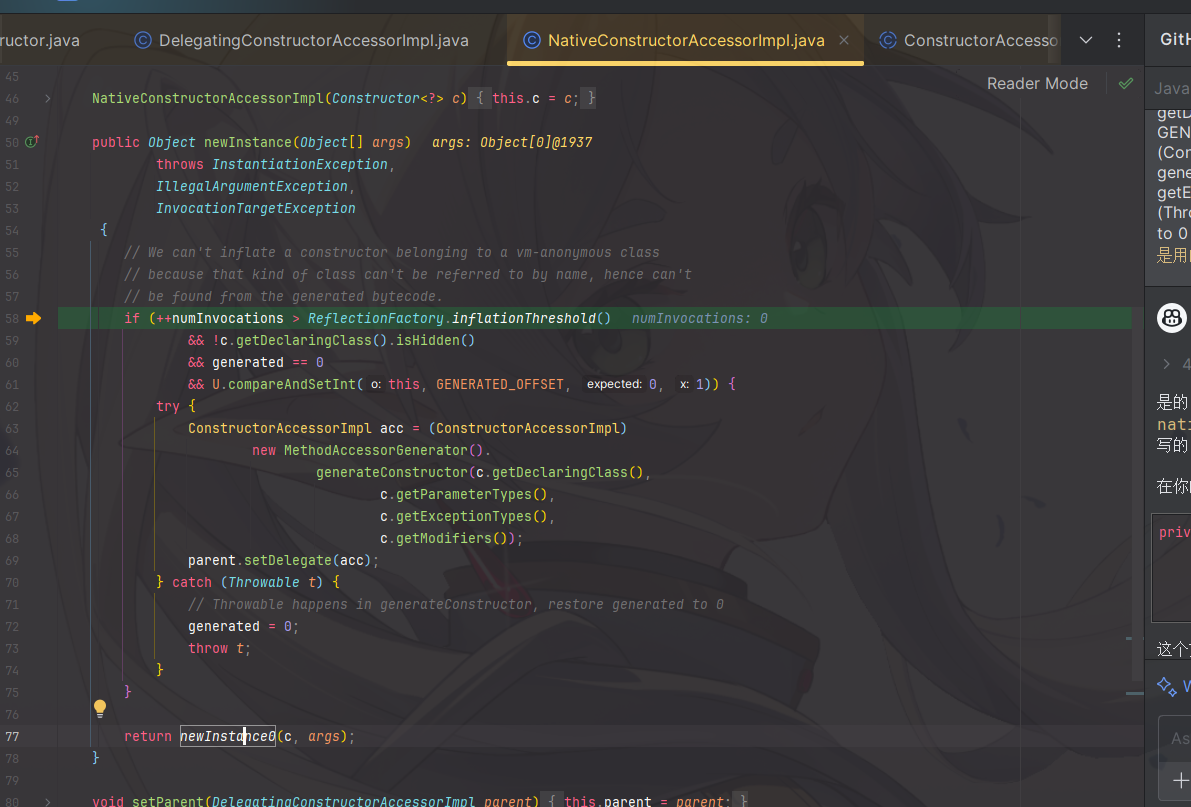
奥,原来是调用了一个本地方法来实现的服务注册!
ChannelFuture
补充一下ChannelFuture的定义
package io.netty.channel;

import io.netty.util.concurrent.Future;
import io.netty.util.concurrent.GenericFutureListener;

public interface ChannelFuture extends Future<Void> {

    Channel channel();


    ChannelFuture addListener(GenericFutureListener<? extends Future<? super Void>> listener);


    ChannelFuture addListeners(GenericFutureListener<? extends Future<? super Void>>... listeners);


    ChannelFuture removeListener(GenericFutureListener<? extends Future<? super Void>> listener);


    ChannelFuture removeListeners(GenericFutureListener<? extends Future<? super Void>>... listeners);


    ChannelFuture sync() throws InterruptedException;


    ChannelFuture syncUninterruptibly();


    ChannelFuture await() throws InterruptedException;


    ChannelFuture awaitUninterruptibly();


    boolean isVoid();
}
ChannelFuture就是定义了一系列的监听Channel行为的监听器
doBind
接着顺着doBind往下看
在这里如果出现各种异常行为,会给promise设置异常之后退出,否则则调用doBind0
private static void doBind0(final ChannelFuture regFuture, final Channel channel, final SocketAddress localAddress, final ChannelPromise promise) {

    channel.eventLoop().execute(new Runnable() {
        public void run() {

            if (regFuture.isSuccess()) {

                channel.bind(localAddress, promise).addListener(ChannelFutureListener.CLOSE_ON_FAILURE);
            } else {

                promise.setFailure(regFuture.cause());
            }
        }
    });
}
通过EventLoop的类关系图可以知道,EventLoop实际上就是一个封装的Executor,所以实际上是使用的Executor来跑一个线程来进行绑定至此,ServerBootstrap的初始化我们就已经完整的探究了一遍


 311
311

 被折叠的 条评论
为什么被折叠?
被折叠的 条评论
为什么被折叠?
 到【灌水乐园】发言


