


目录
2.IDEA脚手架搭建项目(博主的idea是2024.1最新版的)
1. 在pom中添加项目的父工程、起步依赖、插件、依赖和插件的下 载地址
3.编写配置文件application.properties
4.YAML文件_@ConfigurationProperties读取配置文件
2.在pom中添加MyBatis起步依赖和Mysql驱动依赖
一.框架介绍
1.背景介绍
Spring是一个非常优秀的轻量级框架,以IOC(控制反转)和AOP (面向切面)为思想内核,极大简化了JAVA企业级项目的开发。
虽然Spring的组件代码是轻量级的,但它的配置却是重量级的。使 用Spring进行项目开发需要在配置文件中写很多代码,所有这些配 置都代表了开发时的损耗。
除此之外,Spring项目的依赖管理也是一件耗时耗力的事情。在环 境搭建时,需要分析要导入哪些库的坐标,而且还需要分析导入与 之有依赖关系的其他库的坐标,一旦选错了依赖的版本,随之而来 的不兼容问题就会严重阻碍项目的开发进度。比如Spring5.0以上只 能使用Junit4.12以上的版本。


总结起来,Spring的缺点就是:
1 配置过于繁琐。
2 引入的依赖过多,版本控制复杂。
2.框架优点
SpringBoot对Spring的缺点进行改善和优化,基于约定大于配置的 思想,简化了Spring的开发,所谓简化是指简化了Spring中大量的 配置文件和繁琐的依赖引入。所以SpringBoot是一个服务于框架的
框架,它不是对Spring功能的增强,而是提供了一种快速使用 Spring框架的方式
SpringBoot的优点:
1 配置简单
2 依赖引入简单
3 提供了一些大型项目的非功能特性,如嵌入式服务器,安全指标,健康监测等。
自动配置
SpringBoot项目自动提供最优配置,同时可以修改默认值满足特定 的要求。
起步依赖
SpringBoot的依赖是基于功能的,而不是普通项目的依赖是基于 JAR包的。SpringBoot将完成一个功能所需要的所有坐标打包到一 起,并完成了版本适配,我们在使用某功能时只需要引入一个依赖 即可。
二.项目搭建
1.官网搭建
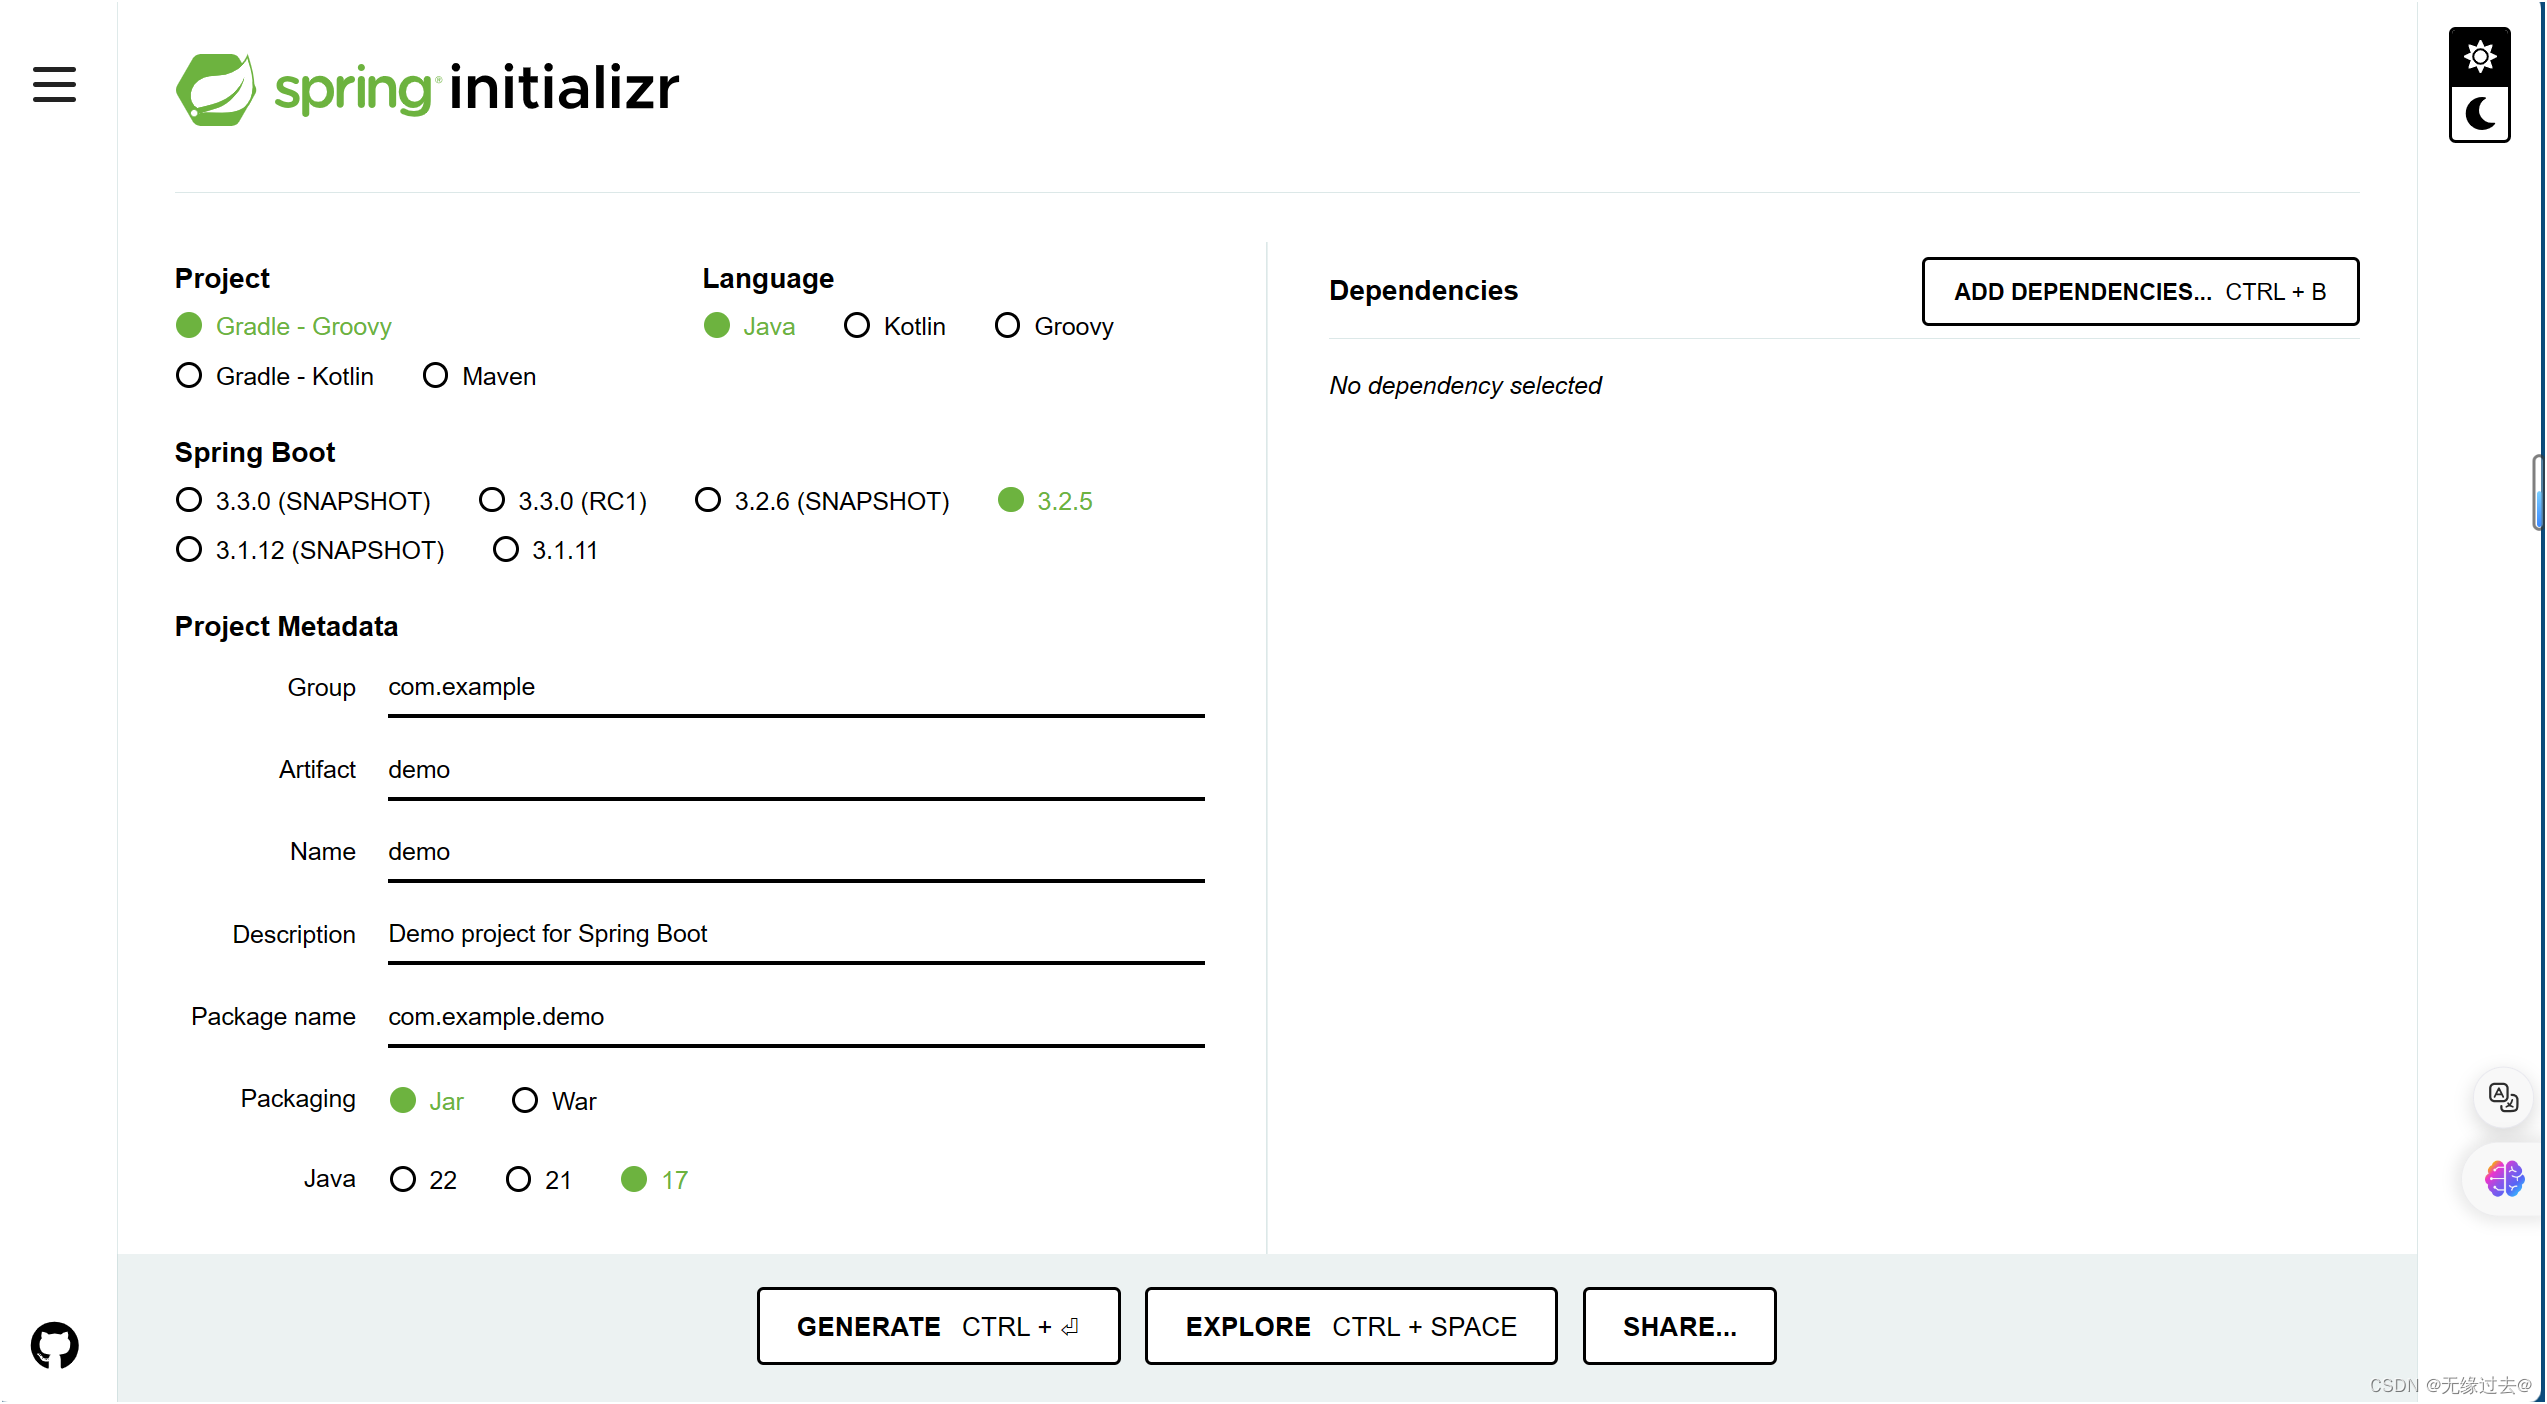
SNAPSHOT:快照版,表示开发版本,随时可能修改;
M1( Mn): M1是milestone的缩写,也就是里程碑版本;
RC1( RCn): RC1是release candidates的缩写,也就是发布预览版;
Release:正式版,也可能没有任何后缀也表示正式版
SpringBoot打包类型说明:
使用SpringMVC开发的是一个web项目,但由于在SpringBoot中直接嵌入了Tomcat等 Web容器,所以在使用SpringBoot做Web开发时不需要部署War文件,只需要打成Jar 包即可。
在idea中解压生成的SpringBoot项目即可:

2.IDEA脚手架搭建项目(博主的idea是2024.1最新版的)
在IDEA中新建项目,项目类型为Spring Initializr,写项目名、存 放位置、语言类型、项目类型、JDK版本等。点击下一步。
注意:这里一定要将项目类型改为Maven
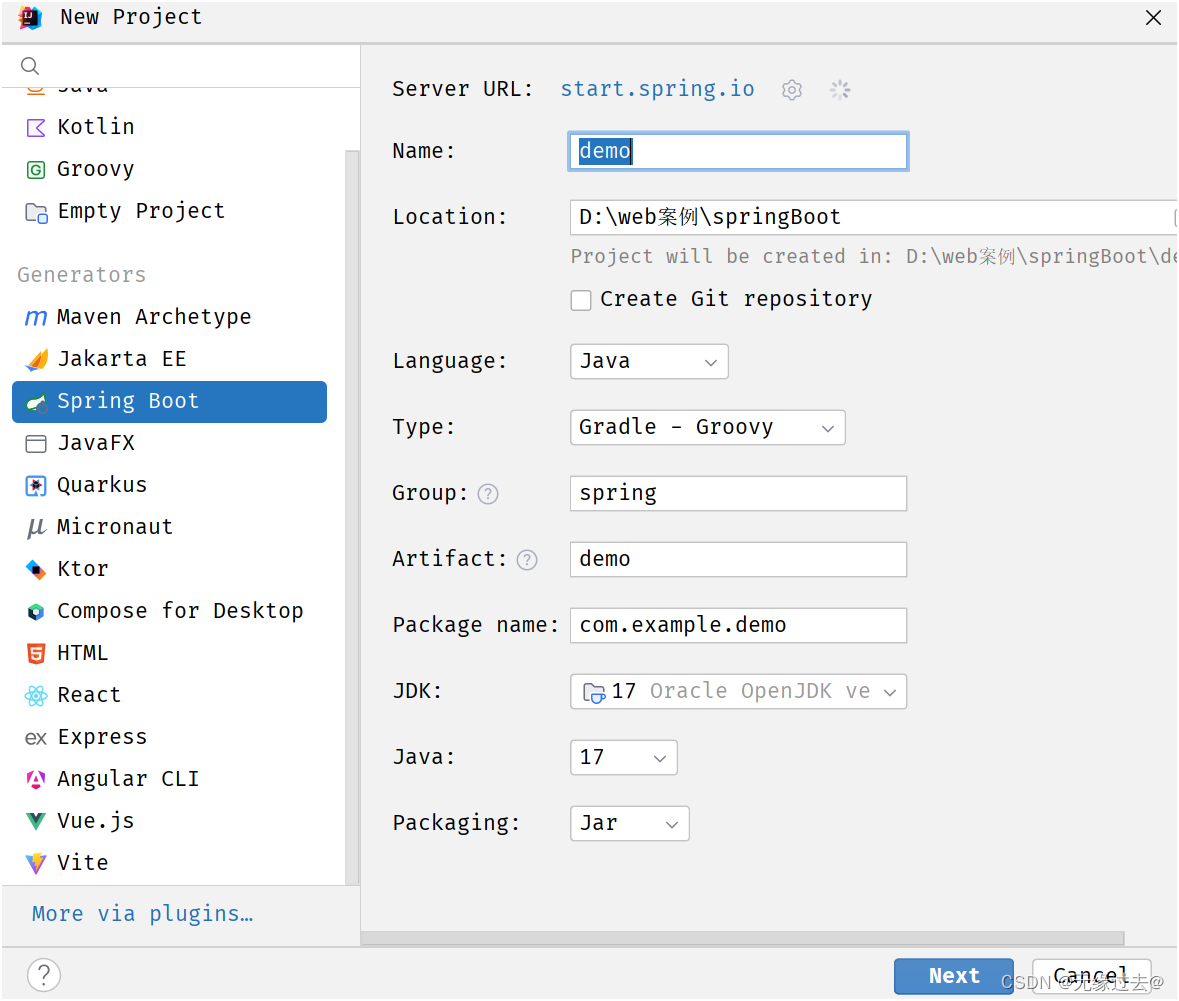
选择SpringBoot版本和需要的起步依赖,创建。

3.Maven搭建项目(不做要求争取会)
不管是通过官网,还是通过脚手架搭建项目,都需要连接
SpringBoot官网,但国内与SpringBoot官网连接并不稳定,此时我 们也可以使用Maven手动搭建SpringBoot项目:
1. 在pom中添加项目的父工程、起步依赖、插件、依赖和插件的下 载地址
<!-- 父工程 -->
<parent>
<groupId>org.springframework.boot</groupId>
<artifactId>spring-boot-starter- parent</artifactId>
<version>3.1.2</version> </parent>
<!-- 起步依赖 -->
<dependencies>
<dependency>
<groupId>org.springframework.boot</groupId> <artifactId>spring-boot-starter-
web</artifactId> </dependency>
<dependency>
<groupId>org.springframework.boot</groupId> <artifactId>spring-boot-starter-test</artifactId>
<scope>test</scope>
</dependency> </dependencies>
<!-- 插件 -->
<build>
<plugins>
<plugin>
<groupId>org.springframework.boot</groupId> <artifactId>spring-boot-maven-plugin</artifactId>
</plugin>
</plugins>
</build>
2.编写启动类
@SpringBootApplication
public class SpringBootApp {
public static void main(String[] args) {
SpringApplication.run(SpringBootApp.class, args);
} }
3.编写配置文件application.properties
#日志格式
logging.pattern.console=%d{MM/dd HH:mm:ss.SSS} %clr(%-5level) ---
[%-15thread] %cyan(%-50logger{50}) :%msg%n
#端口号
server.port=8080
4.运行启动类主方法,启动项目
三.项目结构
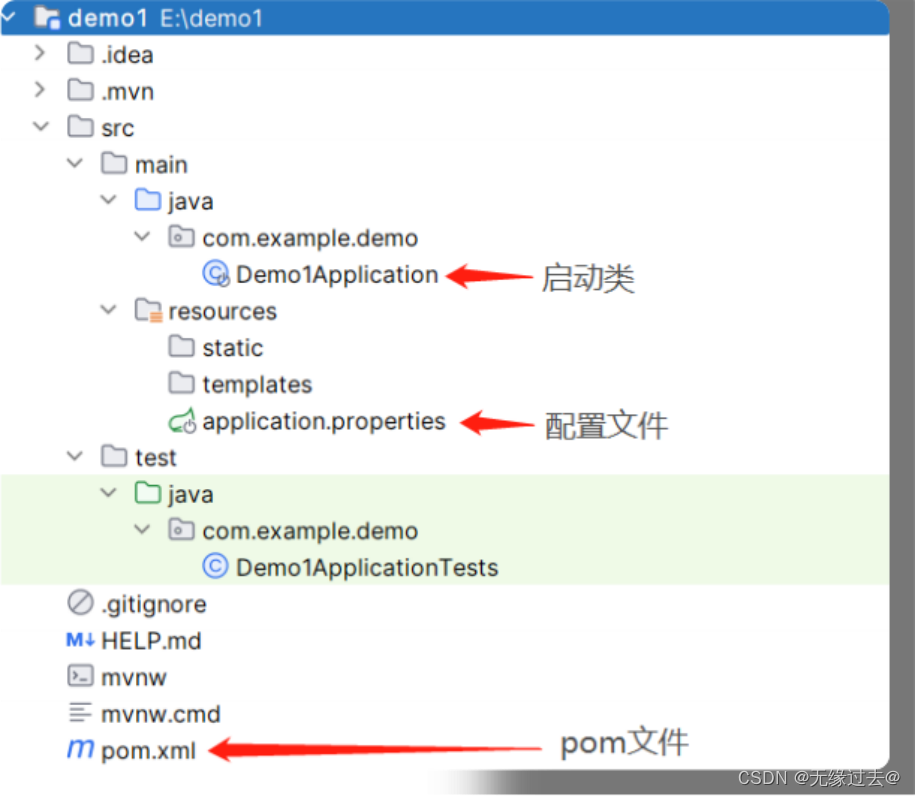
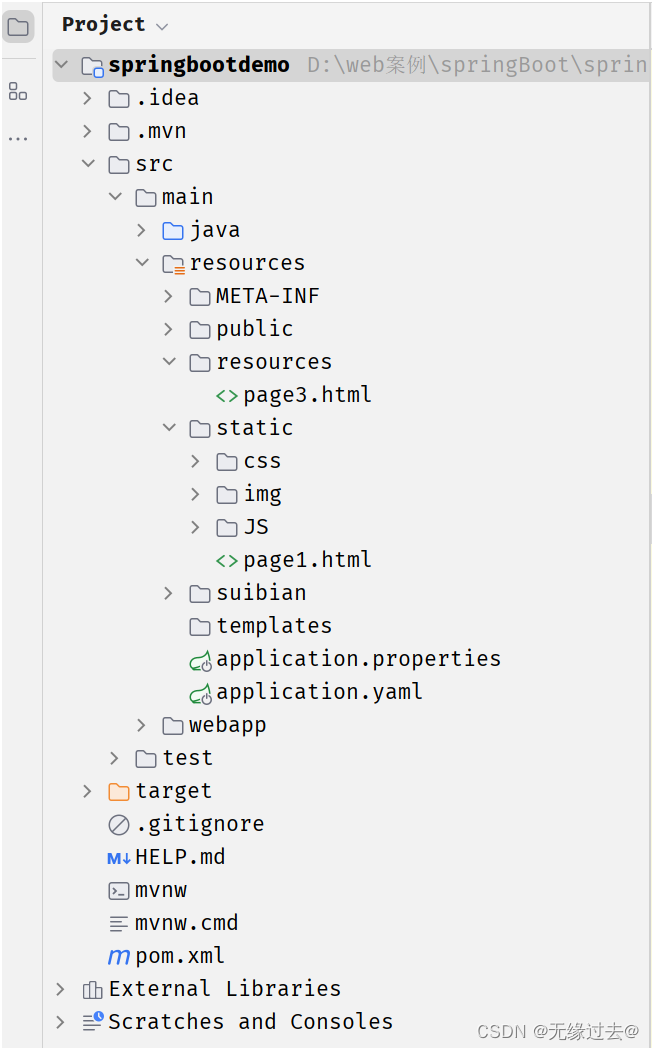
src.main.java
这个目录下存放的是Java代码,在我们写好的包名下,SprinBoot生 成了一个启动类,启动类的作用是启动SpringBoot项目,运行启动 类的main方法即可启动SpringBoot项目。
src.main.resources
这个目录下存放的是配置文件和页面相关的代码,SpringBoot默认 在 static 目录中存放静态资源,如css、js、图片等等。而 templates 中存
放模板引擎,如jsp、thymeleaf等。
由于SpringBoot极大简化了Spring配置,所以只有一个
application.properties配置文件,Spring的自动配置功能使得大部 分的配置都有默认配置,该文件的功能是覆盖默认配置信息,该文 件不写任何信息都可以启动项目。
启动后默认端口号为8080,我们可以覆盖该配置:
server.port=8888
src.test.java
这个目录下编写的是测试代码
pom文件
1 SpringBoot项目必须继承spring-boot-starter-parent,即所有 的SpringBoot项目都是spring-boot-starter-parent的子项目。 spring-boot-starter-parent中定义了常用配置、依赖、插件等 信息,供SpringBoot项目继承使用。
<parent>
<groupId>org.springframework.boot</groupId> <artifactId>spring-boot-starter-
parent</artifactId>
<version>3.1.2</version>
<relativePath/> <!-- lookup parent from repository -->
</parent>
SpringBoot项目中可以定义起步依赖,起步依赖不是以jar包为 单位,而是以功能为单位
<dependencies>
<dependency>
<groupId>org.springframework.boot</groupId>
<artifactId>spring-boot-starter-web</artifactId>
</dependency>

<dependency>
<groupId>org.springframework.boot</groupId>
<artifactId>spring-boot-starter-test</artifactId>
<scope>test</scope>
</dependency>
</dependencies>spring-boot-maven-plugin插件是将项目打包成jar包的插件。
该插件打包后的SpringBoot项目无需依赖web容器,可以直接使 用JDK运行
<build>
<plugins>
<plugin>
<groupId>org.springframework.boot</groupId>
<artifactId>spring-boot-maven-plugin</artifactId>
</plugin>
</plugins>
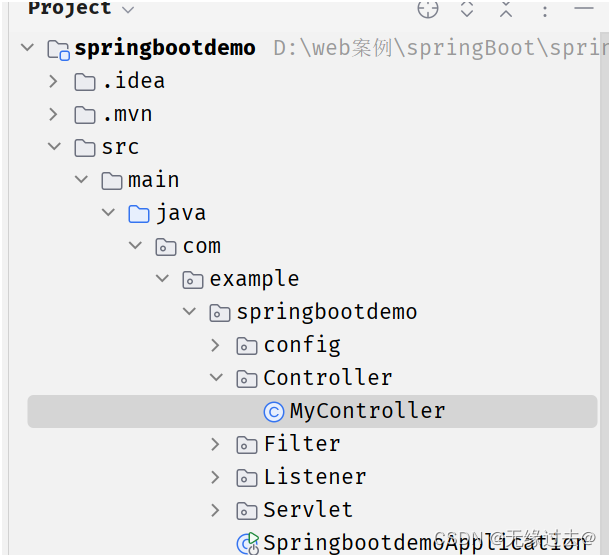
</build>四.springboot入门java代码
之前搭建的SpringBoot项目已经都整合了SpringMVC,我们编写一 个控制器进行测试:
@SuppressWarnings("all")
@Controller
public class MyController {
    @RequestMapping("/hello")
    @ResponseBody
    public String index() {
        System.out.println("hello springbootdemo!");
        return "hello springbootdemo!";
    }
}启动类在启动时会做注解扫描(@Controller、@Service、@Repository......),扫描位置为同包或者同级包下的注解,所以 我们要在启动类同级或同级包下编写代码。
启动项目,访问http://localhost:8080/hello
五.Yaml配置文件
1.简单介绍
SpringBoot项目中,大部分配置都有默认值,但如果想替换默认配置的话,可以使用 application.properties 文件进行配置。 properties文件是键值对类型的文件,之前一直在使用,所以我们不再对properties 文件进行阐述。
https://docs.spring.io/spring-boot/docs/3.1.2/reference/ht mlsingle/#appendix.application-properties可以查找配置文件如何覆盖SpringBoot项目的默认配置
除了properties文件外,SpringBoot还支持YAML文件进行配置。 YAML文件的扩展名为 .yml 或 .yaml 。SpringBoot默认会从resource目录下加载application.properties 或application.yml 文件。
YAML文件的基本要求如下:
大小写敏感
- 2 使用缩进代表层级关系
- 3 同级配置必须对齐,上下级配置必须缩进,但缩进的空格数不限。
- 4 相同的部分只出现一次
- 5 冒号和值之间必须要有空格
-
比如使用properties文件配置tomcat端口以及项目路径:
-
server.port=8888
server.servlet.context-path=/lhq
而使用YAML文件配置tomcat端口:
spring:
  web:
    resources:
      static-locations: classpath:/suibian,classpath:/static
2.配置数据
配置简单数据
语法:
| 数据名 : 值 |
示例代码:
| email: lhq@sxt.com |
配置对象数据
语法:
| 对象 : 属性名1: 属性值 属性名2: 属性值 # 或者 对象 : {属性名1: 属性值 ,属性名2: 属性值} |
示例代码:
| # 邮箱1 my1: email: lhq@sxt.com password: lhq # 邮箱2 my2: {email: lhq1@sxt.com,password: lhq} |
配置集合数据
语法
| 集合 : - 值1 - 值2 # 或者 集合 : [值1,值2] |
示例代码
| # 城市 city1: - beijing - shanghai - tianjin - chongqing city2: [beijing,tianjin,shanghai,chongqing] # 集合中的元素是对象 sxt: - address: beijing mobile: 13888888888 email: bjsxt@sxt.com - address: shanghai mobile: 13777777777 email: shsxt@sxt.com - address: guangzhou mobile: 13666666666 email: gzsxt@sxt.com |
注意:值与之前的 - 之间存在一个空格
3.YAML文件_@Value读取配置文件
读取自定义配置时,我们可以通过@Value注解将配置文件中的值映 射到一个Spring管理的Bean的字段上,用法如下:
1
@Controller
@SuppressWarnings("all")
public class Controller1 {
    /**
     * value只可以映射简单的数据
     */
    @Value("${email}")
    private String email;

    @Value("${my2.password}")
    private String password;

    @Value("${city1[0]}")
    private String city1;

    @Value("${sxt[0].mobile}")
    private String mobile;

    @Value("${myconfig.myport}")
    private int port;

    @RequestMapping("/yaml1")
    @ResponseBody
    public String yaml1() {
        return email + ":" + password + ":" + city1 + ":" + mobile+":"+port;
    }
}

@Value只能映射简单数据类型,不能将yaml文件中的对 象、集合映射到属性中。
4.YAML文件_@ConfigurationProperties读取配置文件
通过@ConfigurationProperties(prefifix ="对象") 可以将配置文件中的配置自动与实体进行映射,这样可以将yml文件中配置的对象属性直接映射到 Bean当中。
#配置一个User对象
user:
  id: 100010
  username: lhq
  address:
    - beijing
    - shanghai
    - tianjin
    - chongqing
  grades:
    - subject: math
      score: 100
    - subject: english
      score: 100
package springboot.springboot.domain;
@SuppressWarnings("all")
public class Grade {
private String subject;
private double score;
public Grade() {
}
public Grade(String subject, double score) {
this.subject = subject;
this.score = score;
}
public String getSubject() {
return subject;
}
public void setSubject(String subject) {
this.subject = subject;
}
public double getScore() {
return score;
}
public void setScore(double score) {
this.score = score;
}
@Override
public String toString() {
return "Grade{" +
"subject='" + subject + '\'' +
", score=" + score +
'}';
}
}
@SuppressWarnings("all")
@Controller
//和实体对象进行映射
@ConfigurationProperties(prefix = "user")
public class Controller2 {
private int id;
private String username;
private List<String> address;
private List<Grade> grades;
public int getId() {
return id;
}
public void setId(int id) {
this.id = id;
}
public String getUsername() {
return username;
}
public void setUsername(String username) {
this.username = username;
}
public List<String> getAddress() {
return address;
}
public void setAddress(List<String> address) {
this.address = address;
}
public List<Grade> getGrades() {
return grades;
}
public void setGrades(List<Grade> grades) {
this.grades = grades;
}
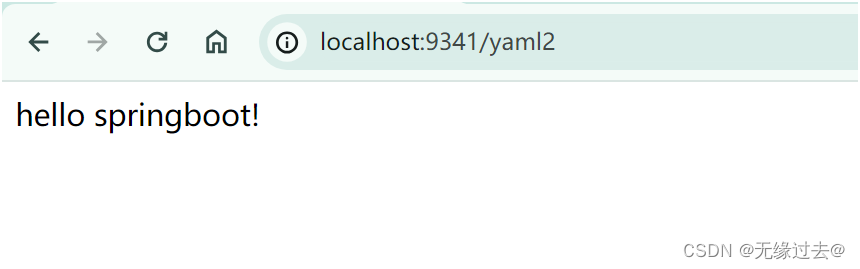
@RequestMapping("/yaml2")
@ResponseBody
public String yaml2() {
System.out.println(id);
System.out.println(username);
System.out.println(address);
System.out.println(grades);
return "hello springboot!";
}
}
5.YAML文件_占位符
YAML文件中可以使用 ${} 占位符,它有两个作用:
使用配置文件中的值
1 编写配置文件
| server: port: 8888 myconfig: myport: ${server.port} |
2 读取配置文件
@Controller
public class YmlController3 {
@Value("${myconfig.myport}")
private int port;


@RequestMapping("/yml3")
@ResponseBody
public String yml3(){
System.out.println(port);
return "hello springboot!";
} }
使用框架提供的方法
SpringBoot框架提供了一些生成随机数的方法可以在yml文件中使 用:
o ${random.value} :生成类似uuid的随机数,没有"-"连接
o ${random.uuid} :生成一个uuid,有短杠连接
o ${random.int} :随机取整型范围内的一个值
o ${random.int(10)}:随机生成一个10以内的数
o ${random.int(100,200)}:随机生成一个100-200 范围以内的数
o ${random.long}:随机取长整型范围内的一个值
o ${random.long(100,200)}:随机生成长整型100-200范围内的一个值
用法如下:
| # 随机生成tomcat端口 server: port: ${random.int(1024,9999)} |
6.YAML文件_配置文件存放位置及优先级

配置文件有如下存放位置:
项目根目录下
。 项目根目录下的/config子目录中
项目的resources 目录中
。 项目的resources下的/config子目录中
这些目录下都可以存放两类配置文件,分别是 application.yml 和
,这些配置文件的优先级从高到低依次为:
项目根目录下的/config子目录中
o config/application.properties
o config/application.yml
项目根目录下
o application.properties
o application.yml
项目的resources下的/config子目录中
o resources/config/application.properties
o resources/config/application.yml
项目的resources 目录中
o resources/application.properties
o resources/application.yml
优先级高的文件会覆盖优先级低的文件中的配置
7.YAML文件_bootstrap配置文件
SpringBoot中有两种容器对象,分别是bootstrap和application, bootstrap是应用程序的父容器, bootstrap加载优先于
applicaton。 bootstrap配置文件主要对bootstrap容器进行配置, application配置文件是对applicaton容器进行配置。
bootstrap配置文件也同样支持properties和yml两种格式,主要用 于从外部引入Spring应用程序的配置。
bootstrap配置文件特征
boostrap由父ApplicationContext加载,比applicaton优先加载。 boostrap里面的属性不能被覆盖。
bootstrap与application的应用场景
o application配置文件主要用于SpringBoot项目的自动化配 置。
o bootstrap配置文件有以下几个应用场景。
1 使用Spring Cloud Config配置中心时,需要在bootstrap配置文件中添加连接到配置中 心的配置属性来加载外部配置中心的配置信息
38
一些固定的不能被覆盖的属性。
3 一些加密/解密的场景。
六.Thymeleaf
1.Thymeleaf简介
Thymeleaf是一款用于渲染XML/HTML5内容的模板引擎,类似JSP。它可以轻易的与SpringMVC等Web框架进行集成作为Web应 用的模板引擎。SpringBoot推荐使用Thymeleaf编写动态页面。
Thymeleaf最大的特点是能够直接在浏览器中打开并正确显示模板 页面,而不需要启动整个Web应用。
Thymeleaf在有服务和无服务的环境下皆可运行,它即可以让美工 在浏览器查看页面的静态效果,也可以让程序员在服务器查看带数据的动态页面效果。
没有服务时,Thymeleaf的模板可以展示静态数据;当有数据返回到页面时,Thymeleaf会动态地替换掉静态内容,使页面动态显示。
2.简单代码
package lhq.myspringboot.Controller;

import jakarta.servlet.http.HttpServletRequest;
import jakarta.servlet.http.HttpSession;
import lhq.myspringboot.domain.Student;
import org.springframework.stereotype.Controller;
import org.springframework.ui.Model;
import org.springframework.web.bind.annotation.GetMapping;

import java.util.*;

@Controller
public class Pagecontroller {
    //页面跳转
    @GetMapping("/p1")
    public String p1(Model model, HttpSession session, HttpServletRequest request){
        model.addAttribute("msg","刘浩琦");
        model.addAttribute("date",new Date(130,0,1));
        model.addAttribute("sex","男");
        model.addAttribute("id",12);

        List<Student> students = new ArrayList();
        students.add(new Student("1","sxt",23));
        students.add(new Student("2","baizhan",22));
        students.add(new Student("3","admin",25));
        model.addAttribute("students",students);

        Map<String,Student> map = new HashMap();
        map.put("user1",new Student("1","sxt",23));
        map.put("user2",new Student("2","baizhan",22));
        map.put("user3",new Student("3","admin",25));
        model.addAttribute("map",map);

        request.setAttribute("request","lhq1");
        session.setAttribute("sess","lhq2");
        session.getServletContext().setAttribute("attr","lhq3");

        model.addAttribute("id","100");
        model.addAttribute("name","bzcxy");

        return "index";
    }
}
<!DOCTYPE html>
<!--引入thymeleaf的命名空间(既可以作为静态页面也可以作为动态页面),方便使用thymeleaf属性-->
<html lang="en" xmlns:th="http://www.thymeleaf.org">
<head>
    <meta charset="UTF-8">
    <title>Title</title>
</head>
<body>
<!--静态页面显示山西刘浩琦,动态页面使用后端传来的msg数据代替-->
<!--thymeleaf支持el表达式-->
<h1 th:text="${msg}">山西刘浩琦</h1>
<span th:text="${#strings.isEmpty(msg)}">刘浩琦</span><br>
<span th:text="${#strings.contains(msg,'hello')}">刘浩琦</span><br>
<span th:text="${#strings.length(msg)}">刘浩琦</span><br>
<span th:text="${#strings.substring(msg,0,3)}">刘浩琦</span><br>
<input th:value="${msg}" type="text"><br>
<hr>
<span th:text="${#dates.format(date)}"></span><br>
<span th:text="${#dates.format(date,'yyyy/MM/dd')}"></span><br>
<span th:text="${#dates.year(date)}"></span><br>
<span th:text="${#dates.month(date)}"></span><br>
<span th:text="${#dates.day(date)}"></span><br>
<hr>
<div>
    <span th:if="${sex} =='男'">
        <h1>姓别:男</h1>
    </span>
    <span th:if="${sex} =='女'">
        <h1>姓别:女</h1>
    </span>
</div>
<hr>
<div th:switch="${id}">
    <span th:case="1">ID为1</span>
    <span th:case="2"><h1>ID为2</h1></span>
    <span th:case="3">ID为3</span>
    <span th:case="4">ID为4</span>
    <span th:case="*"><h1>ID异常</h1></span>
</div>
<div>
    <table border="1" width="50%">
        <tr>
            <th>id</th>
            <th>name</th>
            <th>age</th>
        </tr>
        <!--遍历集合的每一项-->
        <!--每一项起名为student-->
        <tr th:each="student:${students}">
            <td th:text="${student.id}"></td>
            <td th:text="${student.name}"></td>
            <td th:text="${student.age}"></td>
        </tr>
    </table>
</div>
<hr>
<div>
    <table border="1" width="50%">
        <tr>
            <th>ID</th>
            <th>Name</th>
            <th>Age</th>
            <th>Key</th>
        </tr>
        <!-- 遍历出的是一个键值对对象,key获取键,value获取值 -->
        <tr th:each="m:${map}">
            <td th:text="${m.value.id}"></td>
            <td th:text="${m.value.name}"></td>
            <td th:text="${m.value.age}"></td>
            <td th:text="${m.key}"></td>
        </tr>
    </table>
</div>

<div>
    <table border="1" width="50%">
        <tr>
            <th>ID</th>
            <th>Name</th>
            <th>Age</th>
            <th>Key</th>
        </tr>
        <!-- 第一个对象是遍历出的对象,第二个对象是状态变量对象 -->
        <tr th:each="m,status:${map}">
            <td th:text="${m.value.id}"></td>
            <td th:text="${m.value.name}"></td>
            <td th:text="${m.value.age}"></td>
            <td th:text="${m.key}"></td>
        </tr>
    </table>
</div>
<div>
    <span th:text="${request}"></span><br>
    <span th:text="${session.sess}"></span><br>
    <span th:text="${application.attr}"></span><br>
    <a th:href="@{http://www.baidu.com}">百度</a><br>
    <a th:href="@{http://www.baidu.com?id=1}">静态参数</a><br>
    <a th:href="@{http://www.baidu.com(id=1)}">静态参数2</a><br>
    <a th:href="@{'http://www.baidu.com?id='+${id}+'&name='+${name}}">动态参数</a><br>
    <a th:href="@{http://www.baidu.com(id=${id},name=${name})}">动态参数2</a><br>
<!--RESTful风格的参数-->
    <a th:href="@{http://www.baidu.com/{id}/{name}(id=${id},name=${name})}">Restful风格的参数</a><br>
    <a th:href="@{http://www.baidu.com/{id}/{name}(id=${id},name=${name})}">restful格式传递参数方式</a>


</div>
</body>
</html>
<!--
${#strings.isEmpty(key)}	判断字符串是否为空,如果为空返回true,否则返回false
${#strings.contains(msg,'T')}	判断字符串是否包含指定的子串,如果包含返回true,否则返回false
${#strings.startsWith(msg,'a')}	判断当前字符串是否以子串开头,如果是返回true,否则返回false
${#strings.endsWith(msg,'a')}	判断当前字符串是否以子串结尾,如果是返回true,否则返回false
${#strings.length(msg)}	返回字符串的长度
${#strings.indexOf(msg,'h')}	查找子串的位置,并返回该子串的下标,如果没找到则返回-1
${#strings.substring(msg,2,5)}	截取子串,用法与JDK的subString方法相同
${#strings.toUpperCase(msg)}	字符串转大写
${#strings.toLowerCase(msg)}	字符串转小写
-->
3. 重点知识
| 语法 | 作用 |
| th:text | 将model中的值作为内容放入标签中 |
| th:value | 将model中的值放入input标签中的value属性中 |
| 方法 | 说明 | ||
| ${#strings.isEmpty(key)} | 判断字符串是否为空,如果为空返回true,否则返回false | ||
| ${#strings.contains(msg,'T')} | 判断字符串是否包含指定的子串,如果包含返回true,否则返 回false | ||
| ${#strings.startsWith(msg,'a')} | 判断当前字符串是否以子串开头,如果是返回true,否则返回 false | ||
| ${#strings.endsWith(msg,'a')} | 判断当前字符串是否以子串结尾,如果是返回true,否则返回 false | ||
| ${#strings.length(msg)} | 返回字符串的长度 | ||
| ${#strings.indexOf(msg,'h')} | 查找子串的位置,并返回该子串的下标,如果没找到则返回-1 | ||
| ${#strings.substring(msg,2,5)} | 截取子串,用法与JDK的 | subString | 方法相同 |
| ${#strings.toUpperCase(msg)} | 字符串转大写 | ||
| ${strings.toLowerCase(msg)} | 字符串转小写 | ||
| 方法 | 说明 |
| ${#dates.format(key)} | 格式化日期,默认的以浏览器默认语言为标准进行格式 化 |
| ${#dates.format(key,'yyyy/MM/dd')} | 按照自定义的格式做日期转换 |
| ${#dates.year(key)} | 取年 |
| ${#dates.month(key)} | 取月 |
| ${#dates.day(key)} | 取日 |
| 语法 | 作用 |
| th:if | 条件判断 |
| 语法 | 作用 |
| th:each | 迭代器,用于循环迭代集合 |
| 状态变量 | 含义 |
|---|---|
| index | 当前迭代器的索引,从0开始 |
| count | 当前迭代对象的计数,从1开始 |
| size | 被迭代对象的长度 |
| odd/even | 布尔值,当前循环是否是偶数/奇数,从0开始 |
| first | 布尔值,当前循环的是否是第一条,如果是返回true,否则返回false |
| last | 布尔值,当前循环的是否是最后一条,如果是则返回true,否则返回false |
在SpringBoot配置文件中可以进行Thymeleaf相关配置
| 配置项 | 含义 |
|---|---|
| spring.thymeleaf.prefix | 视图前缀 |
| spring.thymeleaf.suffix | 视图后缀 |
| spring.thymeleaf.encoding | 编码格式 |
| spring.thymeleaf.servlet.content-type | 响应类型 |
| spring.thymeleaf.cache=false | 页面缓存,配置为false则不启用页面缓存,方便测试 |
spring:
  thymeleaf:
    prefix: classpath:/templates/
    suffix: .html
    encoding: UTF-8
    servlet:
      content-type: text/html
    cache: false
# spring.thymeleaf.prefix	视图前缀
# spring.thymeleaf.suffix	视图后缀
# spring.thymeleaf.encoding	编码格式
# spring.thymeleaf.servlet.content-type	响应类型
# spring.thymeleaf.cache=false	页面缓存,配置为false则不启用页面缓存,方便测试
七.springboot整合MyBatis
Spring整合MyBatis时需要进行大量配置,而SpringBoot整合 MyBatis则可以简化很多配置:
1.准备步骤
1.准备数据库数据
2.在pom中添加MyBatis起步依赖和Mysql驱动依赖
        <dependency>
            <groupId>org.springframework.boot</groupId>
            <artifactId>spring-boot-starter</artifactId>
        </dependency>
            <!-- 其他业务依赖 -->
        <dependency>
            <groupId>org.springframework.boot</groupId>
            <artifactId>spring-boot-starter-thymeleaf</artifactId>
        </dependency>
        <dependency>
            <groupId>org.springframework.boot</groupId>
            <artifactId>spring-boot-starter-web</artifactId>
        </dependency>
        <!--MyBatis的起步依赖-->
        <dependency>
            <groupId>org.mybatis.spring.boot</groupId>
            <artifactId>mybatis-spring-boot-starter</artifactId>
            <version>3.0.3</version>
        </dependency>
        <!--MySql驱动-->
        <dependency>
            <groupId>com.mysql</groupId>
            <artifactId>mysql-connector-j</artifactId>
            <scope>runtime</scope>
        </dependency>
        <dependency>
            <groupId>org.springframework.boot</groupId>
            <artifactId>spring-boot-starter-test</artifactId>
            <scope>test</scope>
        </dependency>
        <dependency>
            <groupId>org.mybatis.spring.boot</groupId>
            <artifactId>mybatis-spring-boot-starter-test</artifactId>
            <version>3.0.3</version>
            <scope>test</scope>
        </dependency>
3.编写实体类
package spring.springbootmybatis.domain;

public class Student {
    private int id;
    private String name;
    private String sex;
    private String address;

    public Student() {
    }
    public Student(int id, String name, String sex, String address) {
        this.id = id;
        this.name = name;
        this.sex = sex;
        this.address = address;
    }

    public int getId() {
        return id;
    }

    public void setId(int id) {
        this.id = id;
    }

    public String getName() {
        return name;
    }

    public void setName(String name) {
        this.name = name;
    }

    public String getSex() {
        return sex;
    }

    public void setSex(String sex) {
        this.sex = sex;
    }

    public String getAddress() {
        return address;
    }

    public void setAddress(String address) {
        this.address = address;
    }
    @Override
    public String toString() {
        return "Student{" +
                "id=" + id +
                ", name='" + name + '\'' +
                ", sex='" + sex + '\'' +
                ", address='" + address + '\'' +
                '}';
    }
}
4. 编写Mapper接口
package spring.springbootmybatis.mapper;

import org.apache.ibatis.annotations.Mapper;
import org.apache.ibatis.annotations.Select;
import spring.springbootmybatis.domain.Student;

import java.util.List;

@Mapper
public interface StudentMapper {

    @Select("select * from student")
    List<Student> findAll();

    @Select("select * from student where id = #{id}")
    Student findById(int id);
}
以下步骤非必需 ,因为在这里我们直接使用@Mapper注解以及数据库代码注解@Select,容器会直接扫描有该注解的Mapper接口,省略了配置Mapper的映射文件与配置文件。但是数据源配置是必须的。
5.编写Mapper映射文件
<?xml version="1.0" encoding="UTF-8"?> <!DOCTYPE mapper
PUBLIC "-//mybatis.org//DTD Mapper 3.0//EN"
"http://mybatis.org/dtd/mybatis-3- mapper.dtd">
<mapper
namespace="com.itbaizhan.springbootmybatis.m apper.StudentMapper">
<select id="findAll" resultType="student">
select * from student
</select> </mapper>6.编写配置文件(数据源是必须配置的不可以省略)
#配置数据源
spring:
  datasource:
    driver-class-name: com.mysql.cj.jdbc.Driver
    url: jdbc:mysql:///student?serverTimezone=UTC
    username: root
    password: 1011lhq
#    开启请求参数的内容协商格式(传入不同的参数就可以获取不同格式的数据)
  mvc:
    contentnegotiation:
      favor-parameter: true
      parameter-name: format   #请求的参数名(默认的参数名就是format)
# MyBatis配置
mybatis:
  # 映射文件位置
  mapper-locations: spring/springbootmybatis/mapper/*Mapper.xml
  # 配置别名
  type-aliases-package: spring.springbootmybatis.domain
logging:
  pattern:
    console: '%d{HH:mm:ss.SSS} %clr(%-5level) ---  [%-15thread] %cyan(%-50logger{50}):%msg%n'

messages:
#  国际化资源文件基本名
basename: messages7.SpringBoot单元测试
默认引入测试相关的依赖哦!!!
        <dependency>
            <groupId>org.springframework.boot</groupId>
            <artifactId>spring-boot-starter-test</artifactId>
            <scope>test</scope>
        </dependency>
        <dependency>
            <groupId>org.mybatis.spring.boot</groupId>
            <artifactId>mybatis-spring-boot-starter-test</artifactId>
            <version>3.0.3</version>
            <scope>test</scope>
        </dependency>
创建测试类
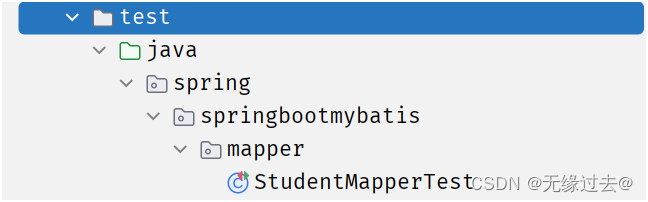
package spring.springbootmybatis.mapper;

import org.junit.jupiter.api.Test;
import org.springframework.beans.factory.annotation.Autowired;
import org.springframework.boot.test.context.SpringBootTest;
import spring.springbootmybatis.domain.Student;

import java.util.List;

@SpringBootTest
//测试类注解,可以在运行代码时加载容器
class StudentMapperTest {
    @Autowired
    private StudentMapper studentMapper;

    @Test
    void findAll() {
        List<Student> all = studentMapper.findAll();
        for (Student student : all) {
            System.out.println(student);
        }
    }
    @Test
    void findById() {
        Student student = studentMapper.findById(1);
        System.out.println(student);
    }
}
结果如下:

八SpringBoot热部署
热部署,就是在应用正在运行的时候升级软件,却不需要重新启动应用。即修改完代码后不需要重启项目即可生效。在SpringBoot 中,可以使用DevTools工具实现热部署。
 <!--热部署工具-->
        <dependency>
            <groupId>org.springframework.boot</groupId>
            <artifactId>spring-boot-devtools</artifactId>
            <optional>true</optional>
</dependency> 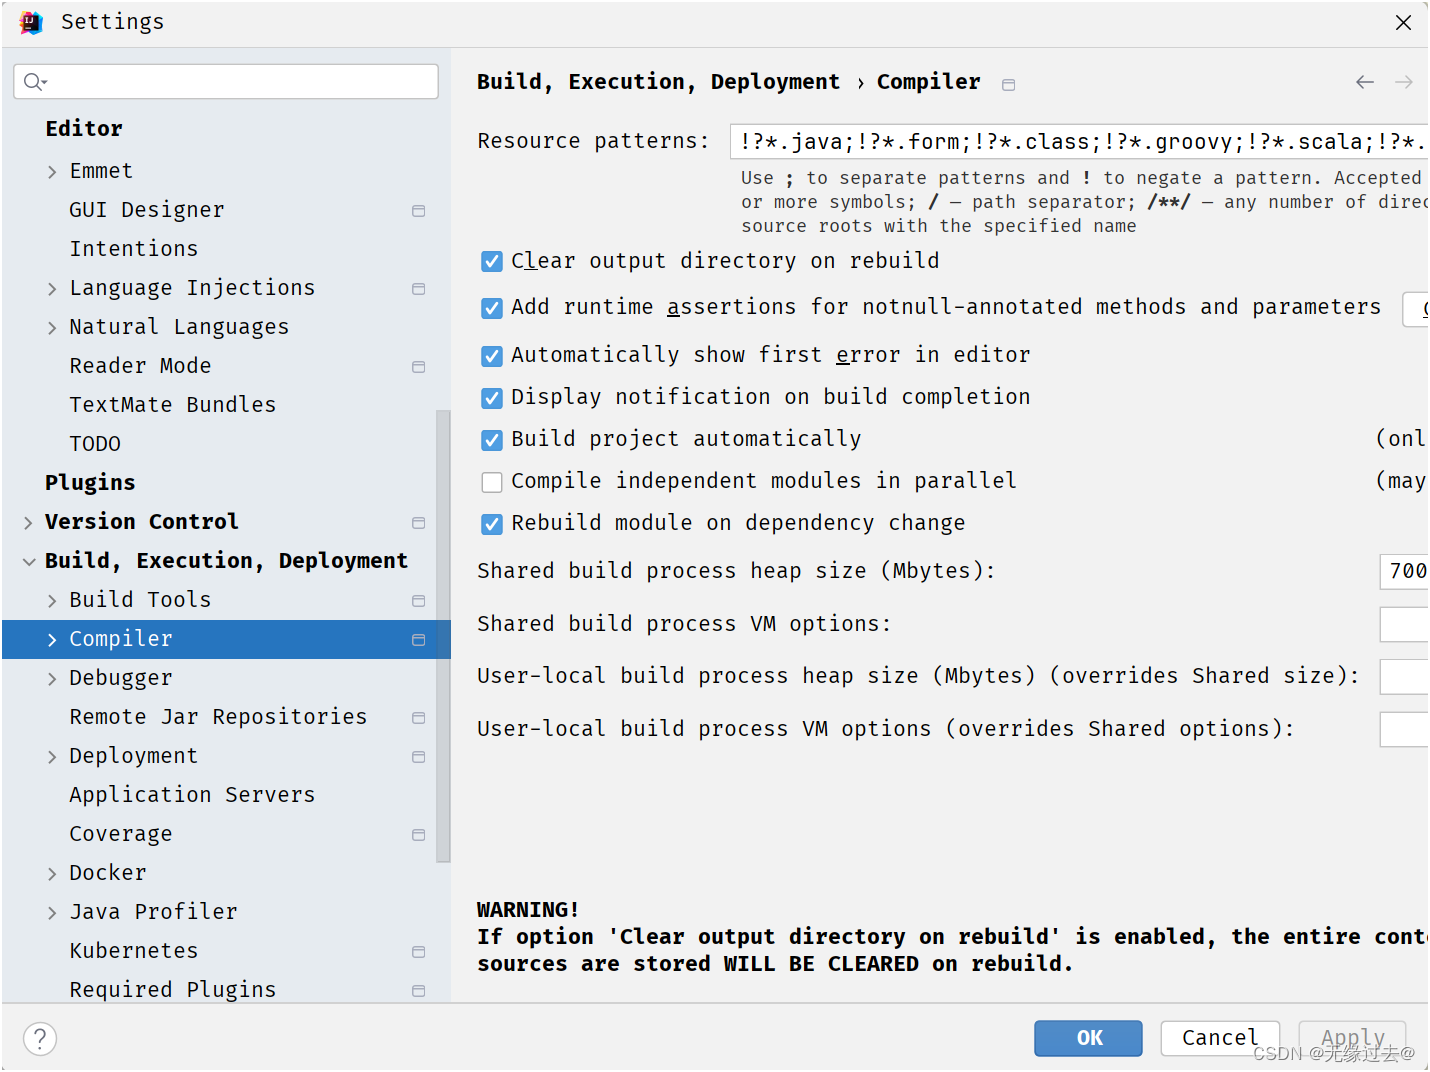
![]()


完成这些设置后,此时热部署即可生效
九.SpringBoot定时任务
定时任务即系统在特定时间执行一段代码。Spring Boot默认已经整 合了Spring Task定时任务,只需要添加相应的注解即可完成。
在启动类中加入@EnableScheduling注解即可开启定时任务
package spring.springbootmybatis;

import org.mybatis.spring.annotation.MapperScan;
import org.springframework.boot.SpringApplication;
import org.springframework.boot.autoconfigure.SpringBootApplication;
import org.springframework.scheduling.annotation.EnableScheduling;

@SpringBootApplication
@EnableScheduling
@MapperScan
public class SpringbootMybatisApplication {

    public static void main(String[] args) {
        SpringApplication.run(SpringbootMybatisApplication.class, args);
    }

}
package spring.springbootmybatis.Task;

import org.springframework.scheduling.annotation.Scheduled;
import org.springframework.stereotype.Component;

import java.text.SimpleDateFormat;
import java.util.Date;

@Component
public class Mytask {
    //定时任务,每秒执行一次
    @Scheduled(cron = "* * * * * *")
    public void task1(){
        SimpleDateFormat simpleDateFormat = new SimpleDateFormat("HH:mm:ss");
        System.out.println(simpleDateFormat.format(new Date()));
    }
}
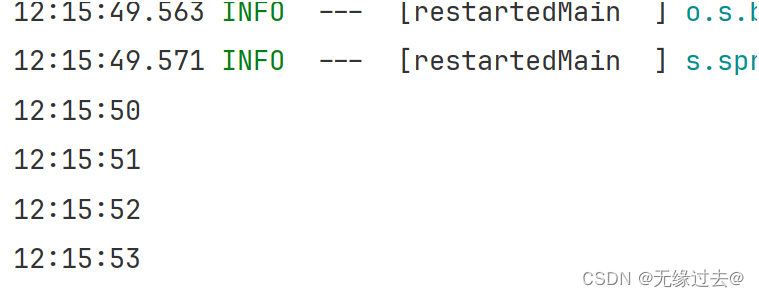
此时定时任务完成!!!
到这里我们的springboot基础知识就差不多过半了,宝子们想看spring,MyBatis,springmvc哪一个的或者JavaSE相关知识的评论区给我说,喜欢就点个赞吧!!!


 1万+
1万+

 被折叠的 条评论
为什么被折叠?
被折叠的 条评论
为什么被折叠?
 到【灌水乐园】发言


