


目录
ApplicationContext VS BeanFactor ...
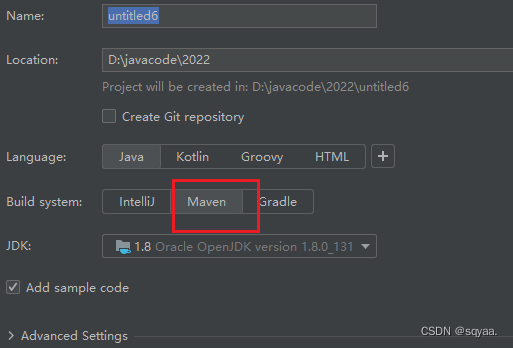
1.创建 Spring 项目
1.1创建一个 Maven 项目
1.2添加 Spring 框架支持(pom.xml)
在pom.xml中注入依赖(从maven仓库https://mvnrepository.com/) ,版本号与jdk版本要相对应。
<?xml version="1.0" encoding="UTF-8"?>
<project xmlns="http://maven.apache.org/POM/4.0.0"
         xmlns:xsi="http://www.w3.org/2001/XMLSchema-instance"
         xsi:schemaLocation="http://maven.apache.org/POM/4.0.0 http://maven.apache.org/xsd/maven-4.0.0.xsd">
    <modelVersion>4.0.0</modelVersion>
    <groupId>org.example</groupId>
    <artifactId>spring_demo2</artifactId>
    <version>1.0-SNAPSHOT</version>
    <properties>
        <maven.compiler.source>8</maven.compiler.source>
        <maven.compiler.target>8</maven.compiler.target>
        <project.build.sourceEncoding>UTF-8</project.build.sourceEncoding>
    </properties>
    <!--这里的5.2.3和jdk版本号有关-->
    <dependencies>
        <dependency>
            <groupId>org.springframework</groupId>
            <artifactId>spring-context</artifactId>
            <version>5.2.3.RELEASE</version>
        </dependency>
        <dependency>
            <groupId>org.springframework</groupId>
            <artifactId>spring-beans</artifactId>
            <version>5.2.3.RELEASE</version>
        </dependency>
    </dependencies>
</project>

1.3添加启动类
public class MainApp {
    public static void main(String[] args) {

    }
}

2.存储 Bean 对象
2.1创建 Bean

public class HelloWorld {
    private String message;

    public void setMessage(String message) {

        this.message = message;
    }

    public void sayHello() {

        System.out.println("Hello, " + message);
    }
}
2.2将 Bean 注册到容器(Spring)
💡这段是直接复制的无需了解
<?xml version="1.0" encoding="UTF-8"?>
<beans xmlns="http://www.springframework.org/schema/beans"
       xmlns:xsi="http://www.w3.org/2001/XMLSchema-instance"
       xsi:schemaLocation="
            http://www.springframework.org/schema/beans
            http://www.springframework.org/schema/beans/spring-beans.xsd">


</beans>
💡这段是需要自己加入到file中的
注意这里的id不能和别的名字重复,后续还会被用到,class是你创建的Bean的类名字(包名+类名,这里没创建包,就只写了类名)
完整代码
<?xml version="1.0" encoding="UTF-8"?>
<beans xmlns="http://www.springframework.org/schema/beans"
       xmlns:xsi="http://www.w3.org/2001/XMLSchema-instance"
       xsi:schemaLocation="
            http://www.springframework.org/schema/beans
            http://www.springframework.org/schema/beans/spring-beans.xsd">

    <!-- 定义HelloWorld Bean ,这里的class是包名+类名,没有包名就不用管了;id就是给bean对象取的名字-->

    <bean id="helloWorld" class="HelloWorld">
        <!--<property name="message" value="Spring World" />-->
    </bean>
</beans>


3.获取并使用 Bean 对象
3.1创建 Spring 上下文(获取全局配置文件)

// 加载Spring配置文件即创建Spring上下文;
ApplicationContext context = new ClassPathXmlApplicationContext("applicationContext.xml");
ApplicationContext VS BeanFactor ...
引入BeanFactory
/**💡1.Spring上下文对象可以使用ApplicationContext;
 *  ApplicationContext context = new ClassPathXmlApplicationContext("applicationContext.xml");
 * 💡2.使用BeanFactory,ApplicationContest属于BeanFactory的子类,
 * BeanFactory beanFactory =new XmlBeanFactory(new ClassPathResourse("application.xml"))

 * **/
ApplicationContext 与 BeanFactory :
1.都可以得到 Spring 上下文对象;2.都是来自 Spring 的顶级接口。
不同点:
1.继承关系和功能: ApplicationContext 属于 BeanFactory 的子类; BeanFactory 只有最基础访问 Bean 的能力,而ApplicationContext 除了拥有 BeanFactory 功能之外,还包了更多的功能,如:国际化支持、资源访问、事件传播等。
2.性能: ApplicationContext 加载方式是将 Bean 对象一次性加载,所以在后面访问 Bean 对象时会很快; BeanFactory 需要某个时,采取加载 Bean 对象,所以它在执行 Bean 获取时,比较慢。(就相当于现做的餐和快餐的区别)
3.2获取指定的 Bean 对象

HelloWorld helloWorld = (HelloWorld) context.getBean("helloWorld");
3.2.1注意事项 以及 getBean 方法的更多用法
/**💡1.getBean和XML中配置的bean id是相互对应的;
 * 💡2.不仅可以通过名称来找bean,也可以通过类型来找bean
 * context.getBean("HelloWorld.class")
 *但是对于这个写法,如果user有两个,那就会出错;
 * eg:一个班有两个学生叫张三,那这还怎末找?
 * */

/**💡3.HelloWorld helloWorld =  context.getBean("helloWorld",User.class);
 * 此时就不需要强转!
 * */
3.3使用 Bean

MainApp完整代码
import org.springframework.context.ApplicationContext;
import org.springframework.context.support.ClassPathXmlApplicationContext;

public class MainApp {
    public static void main(String[] args) {
        // 加载Spring配置文件即创建Spring上下文;
        ApplicationContext context = new ClassPathXmlApplicationContext("applicationContext.xml");
        /**💡1.Spring上下文对象可以使用ApplicationContext;
         *  ApplicationContext context = new ClassPathXmlApplicationContext("applicationContext.xml");
         * 💡2.使用BeanFactory,ApplicationContest属于BeanFactory的子类,
         * BeanFactory beanFactory =new XmlBeanFactory(new ClassPathResourse("application.xml"))
         *
         * **/


        // 获取定义的Bean对象
        HelloWorld helloWorld = (HelloWorld) context.getBean("helloWorld");
        /**💡1.getBean和XML中配置的bean id是相互对应的;
         * 💡2.不仅可以通过名称来找bean,也可以通过类型来找bean
         * context.getBean("HelloWorld.class")
         *但是对于这个写法,如果user有两个,那就会出错;
         * eg:一个班有两个学生叫张三,那这还怎末找?
         * */

        /**💡3.HelloWorld helloWorld =  context.getBean("helloWorld",User.class);
         * 此时就不需要强转!
         * */

        // 调用Bean对象的方法
        helloWorld.sayHello();
    }
}
4.运行


 2126
2126

 被折叠的 条评论
为什么被折叠?
被折叠的 条评论
为什么被折叠?
 到【灌水乐园】发言


