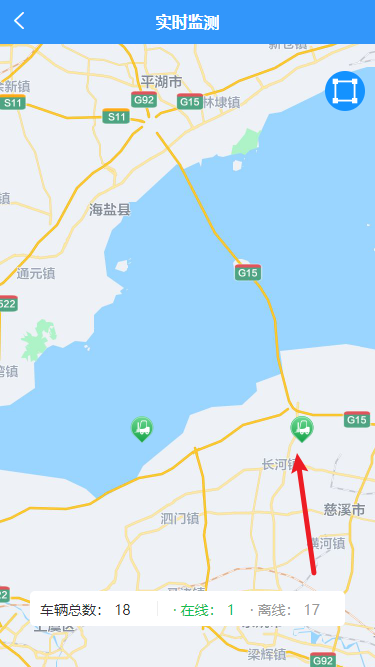
uniapp+腾讯地图实现地图标记点位以及画多边形

效果:

官网: https://uniapp.dcloud.net.cn/component/map.html#map

// 回显的数据格式
polygons: [
                    {
                        points: [
                            {
                                latitude: 28.51888245793022,
                                longitude: 119.98906378916045,
                            },
                            {
                                latitude: 28.475729153565684,
                                longitude: 119.7966929814844,
                            },
                            {
                                latitude: 28.456177380060186,
                                longitude: 120.07130302831642,
                            },
                            {
                                latitude: 28.41960240564566,
                                longitude: 119.90682381395553,
                            },
                        ],
                        strokeWidth: 4, // 描边的宽度
                        strokeColor: '#1492ff', // 描边的颜色
                        fillColor: '#1492ff94', // 填充颜色
                    },
                    {
                        points: [
                            {
                                latitude: 36.79364322167569,
                                longitude: 118.07446541195007,
                            },
                            {
                                latitude: 33.440106715216565,
                                longitude: 109.72120044240603,
                            },
                            {
                                latitude: 30.27022820630607,
                                longitude: 119.5096078516515,
                            },
                            {
                                latitude: 37.47082862133101,
                                longitude: 118.7737041476045,
                            },
                        ],
                        strokeWidth: 4, // 描边的宽度
                        strokeColor: '#1492ff', // 描边的颜色
                        fillColor: '#1492ff94', // 填充颜色
                    }
                ], // 多边形回显数据格式

covers: [
                     {
                       latitude: 39.909,
                       longitude: 116.39742,
                       iconPath: iconPath
                    }, {
                        latitude: 39.90,
                        longitude: 116.39,
                        iconPath: iconPath
                    }
                ] // 点位的数据格式

功能实现

            <map ref="map"
             id="map"
             :latitude="latitude"
             :longitude="longitude"
             :markers="covers"       // 地图标点
             :scale="scale"
             :min-scale="minScale"
             :max-scale="maxScale"
             :show-location="true"
             :polygons="polygons"   // 地图上画不规则图形
             @regionchange="regionChange"
            >
        </map>

        var iconPath = require('../../../../static/images/icon/forklift.png');  // 图标位置
    export default {        
        data() {
            return {
                scale: 10, // 17
                minScale: 3, // 最小缩放级别
                maxScale: 20, // 最大缩放级别
                latitude: 30.25,  // 中心点
                longitude: 121.21, // 中心点
                covers: [], // 点位数据 // 可用 markers 代替
                params: {
                    mapLevel: 11,
                    bottomLeftLatitude: 29.85357527749677,
                    bottomLeftLongitude: 120.95250793457029,
                    topRightLatitude: 30.644831586175155,
                    topRightLongitude: 121.46749206542967,
                }, // 请求接口的参数(获取点位 --- 点聚合)
                polygons: [], // 多边形选框数据
                polygonsFlag: false, // 用户是否展示选框的标志
            }
        },
    methods: {
           /**
             * @Interface 获取所有的点位数据
             * */
            getPointers() {
                this.$u.api.realTimeMonitoring.selectCarPoints(this.params).then(res => {
                    if (res.code === 1) {
                        if (res.data !== []) {
                            res.data.forEach((item, index) => {
                                this.covers.push({
                                    latitude: item.y,
                                    longitude: item.x,
                                    iconPath,
                                })
                            })
                        }
                    }
                })
            },

        
            /**
             * @Interface 展示边界
             * */
            showBorder() {
                this.polygonsFlag = !this.polygonsFlag;
                if (this.polygonsFlag) {
                    this.$u.api.realTimeMonitoring.allLists().then(res => {
                        if (res.code === 1) {
                            this.polygons = res.data.polygons
                        }
                    })
                } else {
                    this.polygons = []
                }
            },


           /**
             * 获取可视区的经纬度
             * */
            regionChange() {
                let map = uni.createMapContext('map');
                map.getRegion({
                    success: res => {
                        this.params = {
                            mapLevel: this.scale,
                            bottomLeftLatitude: res.southwest.latitude,
                            bottomLeftLongitude: res.southwest.longitude,
                            topRightLatitude: res.northeast.latitude,
                            topRightLongitude: res.northeast.longitude,
                        }
                        setTimeout(() => {
                            this.getPointers()
                        }, 500)
                    },
                    fail: (data, code) => {
                        console.log('fail' + JSON.stringify(data));
                    }
                })
            },
    },
  onLoad() {
            this.getPointers()
        }
}
  • 4
    点赞
  • 11
    收藏
    觉得还不错? 一键收藏
  • 0
    评论
以下是使用uniapp实现腾讯地图导航的代码示例: 1. 在 `pages.json` 中添加需要使用的页面: ```json { "pages": [ { "path": "pages/map/map", "style": { "navigationBarTitleText": "地图导航" } } ] } ``` 2. 在 `map.vue` 文件中添加地图组件: ```html <template> <view class="container"> <map :longitude="longitude" :latitude="latitude" :markers="markers" :polyline="polyline" /> <view class="button-group"> <button class="btn" @tap="chooseLocation">选择位置</button> <button class="btn" @tap="navigate">导航</button> </view> </view> </template> <script> export default { data() { return { longitude: 0, latitude: 0, markers: [], polyline: [] }; }, methods: { chooseLocation() { uni.chooseLocation({ success: res => { this.longitude = res.longitude; this.latitude = res.latitude; this.markers = [{ id: 0, longitude: res.longitude, latitude: res.latitude, title: res.name }]; } }); }, navigate() { uni.openLocation({ longitude: this.longitude, latitude: this.latitude, name: this.markers[0].title, success: () => { uni.showToast({ title: '导航成功' }); } }); } } }; </script> <style> .container { position: fixed; top: 0; left: 0; right: 0; bottom: 0; } .button-group { position: absolute; bottom: 20px; left: 50%; transform: translateX(-50%); display: flex; flex-direction: row; } .btn { margin: 10px; padding: 10px; border: 1px solid #ccc; border-radius: 4px; background-color: #fff; } </style> ``` 3. 在 `manifest.json` 文件中添加腾讯地图 SDK 的 APP_KEY: ```json { "app": { "tencentmap": { "sdkKey": "your_app_key" } } } ``` 其中,`your_app_key` 需要替换为你自己的腾讯地图 SDK 的 APP_KEY。 4. 运行项目,在地图页面中选择位置并点击导航按钮即可进行导航。

“相关推荐”对你有帮助么?

  • 非常没帮助
  • 没帮助
  • 一般
  • 有帮助
  • 非常有帮助
提交
评论
添加红包

请填写红包祝福语或标题

红包个数最小为10个

红包金额最低5元

当前余额3.43前往充值 >
需支付:10.00
成就一亿技术人!
领取后你会自动成为博主和红包主的粉丝 规则
hope_wisdom
发出的红包
实付
使用余额支付
点击重新获取
扫码支付
钱包余额 0

抵扣说明:

1.余额是钱包充值的虚拟货币,按照1:1的比例进行支付金额的抵扣。
2.余额无法直接购买下载,可以购买VIP、付费专栏及课程。

余额充值