


文章目录
Android UI 设计是指在Android应用程序中创建用户界面的过程。这涉及到使用XML布局文件定义界面元素的位置和外观,以及通过Java或Kotlin代码处理用户交互。Android UI设计包括使用各种视图组件(如按钮、文本框、列表等)和布局管理器(如线性布局、相对布局等)来构建用户友好的界面。
布局管理器(或简称布局)是 ViewGroup 类的扩展。它们用于在我们正在构建的 UI
中设置子视图的位置。我们可以嵌套布局,因此我们可以使用布局组合创建任意复杂的 UI。
一、Android UI 简介
计算机出现的时候有着批处理界面和命令行界面,而图形用户界面的出来是当前较为流行的一种设计。在未来的阶段是虚拟现实技术脱离了键盘
UI的全称是用户界面(User Interface)。
用户界面是指用户与计算机系统进行交互时所看到的图形界面,包括各种元素如按钮、文本框、菜单等,以及用户与系统之间的交互方式。
鼠标的体验,通过行为,语言达到操控“计算机”的效果。
在实际生活中,我们可以看到的是不同厂商不同品牌对于手机屏幕尺寸的规格不同
1.1 在手机UI设计中,坚持的原则是什么
- 界面设计与程序逻辑分离:有利于并行开发,后期修改界面时不需修改程序逻辑代码。
- 自动适配不同屏幕:根据不同手机屏幕的解析度、尺寸和纵横比,自动调整部分控件位置和尺寸,避免显示错误。
- 合理利用屏幕空间:构建符合人机交互规律的用户界面,避免拥挤和凌乱的界面。
Android系统解决了前两个问题:使用XML描述界面,资源文件分类保存在不同文件夹中,允许灵活描述界面元素的相对位置和粗略尺寸。
1.2 安卓中的架构模式
优势:
- 设计可扩展的应用程序,方便进行未来的更改和更新。
- 实现模块化设计,提高代码质量,便于测试和维护。
缺点:
- 编写整个项目代码耗时较长。
- 需要开发团队高度的纪律性,因为一个错误的更改可能会影响整个架构的稳定性。
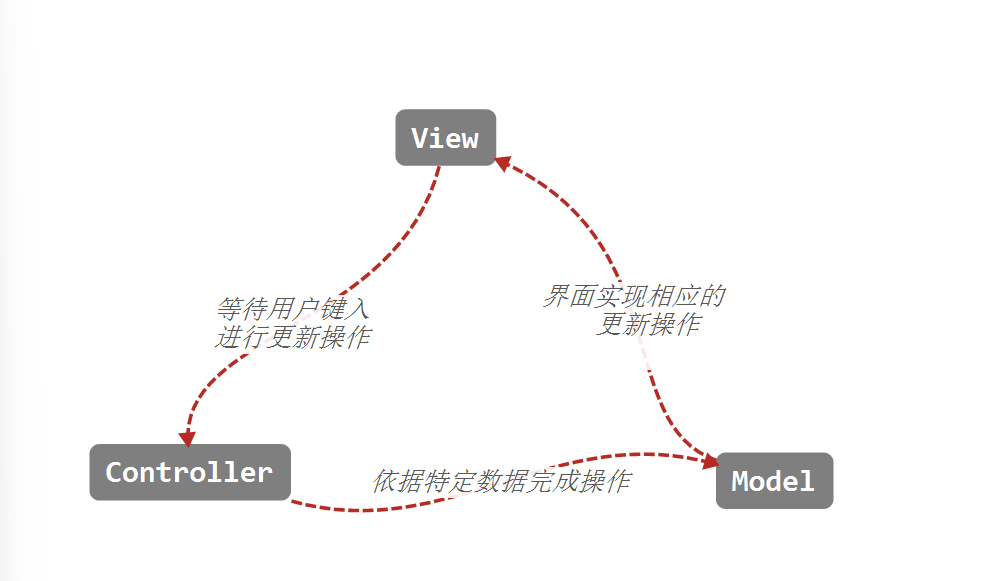
1.2.1 MVC (Model-View-Controller)设计模式
MVC 即把一个应用的输入、处理、输出流程按照三个层模型(model)-视图(view)-控制器(controller)的方式进行分离。
在Android系统中,视图(View)代表用户交互界面,一个应用可能有很多不同的视图。对于视图的处理仅限于视图上数据收集和处理,以及用户的请求,而不包括在视图上的业务流程的处理。
- Model【属于核心】: 此组件存储应用程序数据。它对界面一无所知。该模型负责处理域逻辑(实际业务规则)以及与数据库和网络层的通信。
- View【此处为采集用户信息】: 它是 UI(用户界面)层,用于保存屏幕上可见的组件。此外,它还提供了存储在模型中的数据的可视化,并为用户提供了交互。
- Controller【不作任何的数据处理,用户信息传递给模型,返回合适的View给用户】: 此组件建立视图和模型之间的关系。 它包含核心应用程序逻辑,并了解用户的行为并根据需要更新模型。【Activity作控制器的角色】
优缺点
优点:
耦合性低,更改视图不用重新编译模型和控制器的代码。
复用性高,可维护性高。
开发人员直接的参与到界面开发,将经理的逻辑放置在逻辑层处理,提高了工作效率和任务模块的分工
缺点
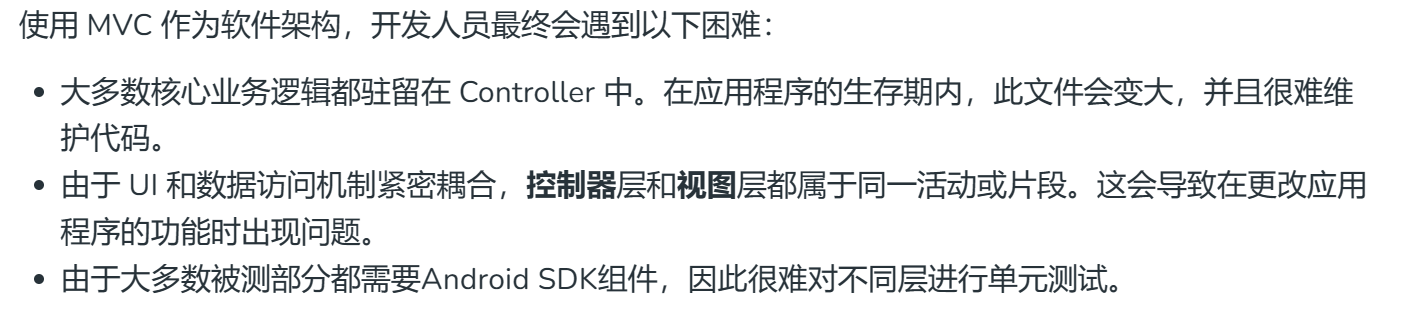
项目越大,Activity/Fragment的代码臃肿。
因为以XML文件作为View层的实现,View和Model层存在耦合,不利于后续的开发测试维护。如:动态的改变页面背景,隐藏/显现按钮
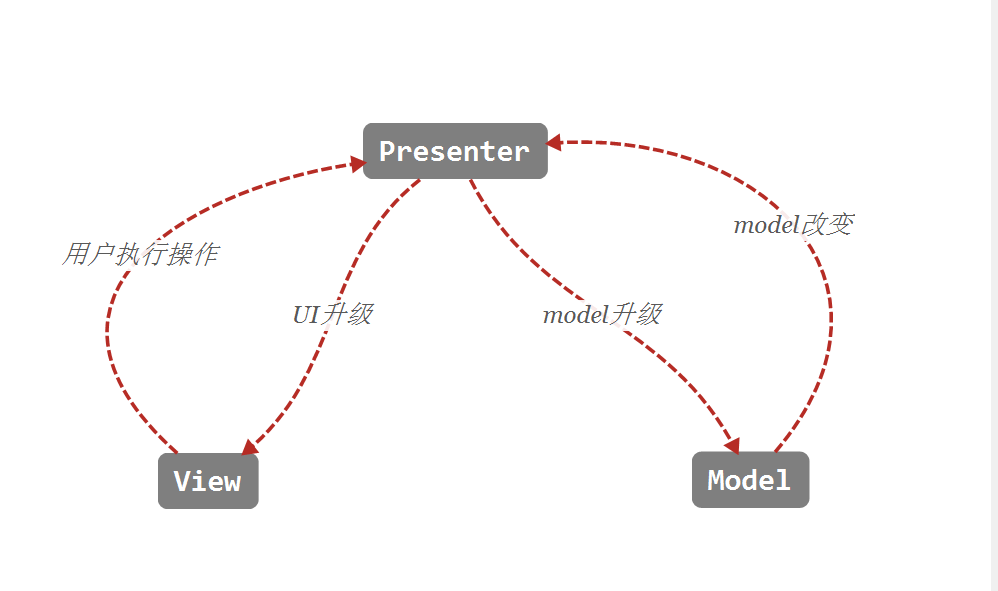
1.2.2 MVP(Model-View-Presenter)设计模式
MVP(模型 — 视图 — 演示者)作为传统 MVC(模型 — 视图 — 控制器)架构模式的替代方案出现。
- Model: 用于存储数据的图层。它负责处理域逻辑(实际业务规则)以及与数据库和网络层的通信。
- View: UI(用户界面)层。它提供数据的可视化并跟踪用户的操作,以便通知演示者。
- Presenter: 从模型中获取数据,并应用 UI 逻辑来决定要显示的内容。它管理视图的状态,并根据用户从视图输入的通知执行操作。
View-Presenter 和 Presenter-Model 之间的通信通过接口(也称为 Contract)进行。 一个
Presenter 类一次管理一个视图,即 Presenter 和 View 之间存在一对一的关系。
模型和视图类不了解彼此的存在。
android 组件中没有概念关系
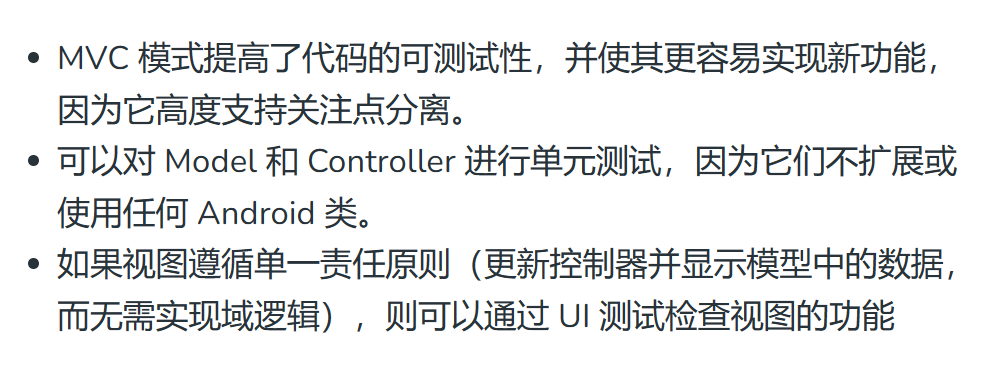
由于应用程序的模型、视图和演示者层是分开的,因此易于代码维护和测试。
如果开发人员不遵循单一责任原则来破坏代码,那么 Presenter 层往往会扩展到一个巨大的全知类。
MVP与MVC关系:
相同点:model层与MVC一样
不同点:其activity和fragment不属于controller层,而属于view层,用户事件的转发全部交由presenter层处理。
1.2.3 MVVM(Model—View—ViewModel ) 设计模式
- Model: 此层负责数据源的抽象。Model 和 ViewModel 协同工作以获取和保存数据。
- View: 此层的目的是将用户的操作通知 ViewModel。
- ViewModel: 它公开与视图相关的数据流
在 MVVM 架构中,视图通知 ViewModel 有关各种操作的信息。视图具有对 ViewModel 的引用,而 ViewModel 没有关于视图的信息。View 和 ViewModel 之间存在的多对一关系以及 MVVM 支持两者之间的双向数据绑定。
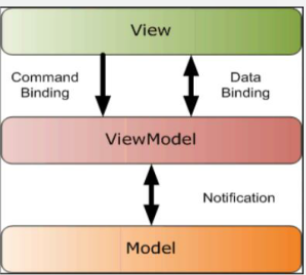
MVVM与MVP区别:在MVVM中View层存有ViewModel的引用,而ViewModel层并不存有View层的引用,即数据的消费者(view)知道数据的生产者(viewmodel) ,而数据生产者并不知道消费者。
低耦合、可重用性、独立开发、可测试
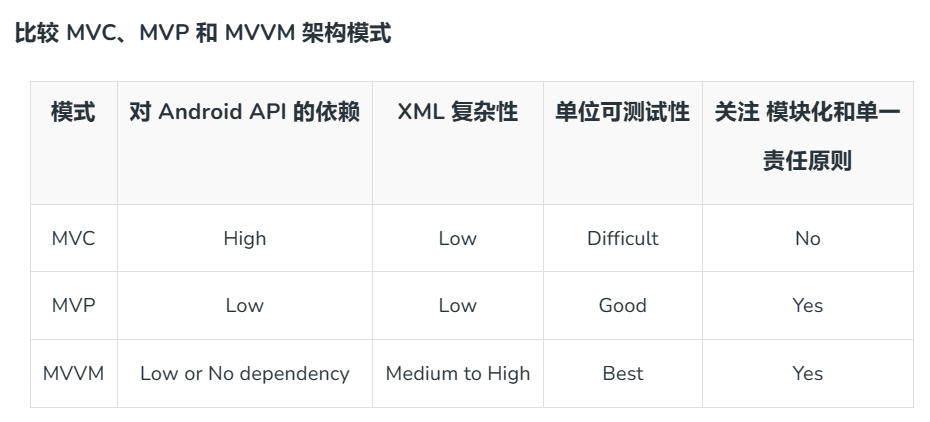
1.2.4 比较 MVC、MVP 和 MVVM 架构模式
二、 Android SDK 中最常用的布局类
2.1 UI布局
每个子视图固定在其框架中。
默认情况下,位置为左上角,但重力属性可用于更改其位置。
框架布局是一种Android布局,用于在应用程序中定义和管理多个子视图之间的相对位置。在框架布局中,可以使用各种属性来控制子视图的位置,如gravity、layout_gravity、layout_margin等。
需要精确控制子视图位置
支持嵌套和组合其他布局类
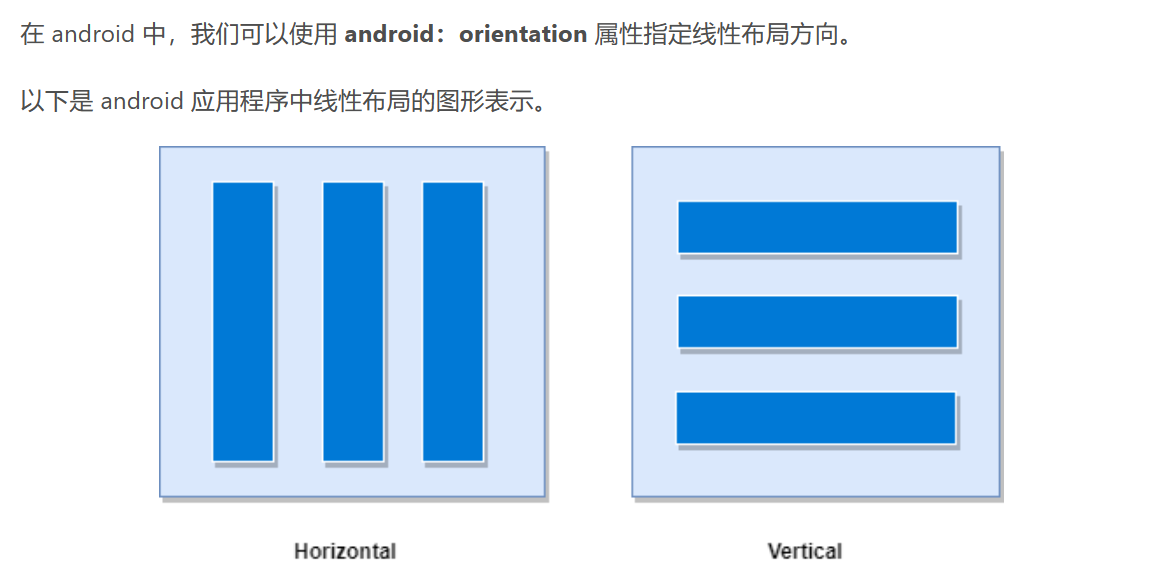
2.2 线性布局-LinearLayout
用于在垂直或水平方向排列子视图。
在垂直布局中,子视图按照从上到下的顺序排列
在水平布局中,子视图按照从左到右的顺序排列。
通过设置权重属性,开发人员可以控制每个子视图在可用空间内的相对大小,实现灵活的布局设计。
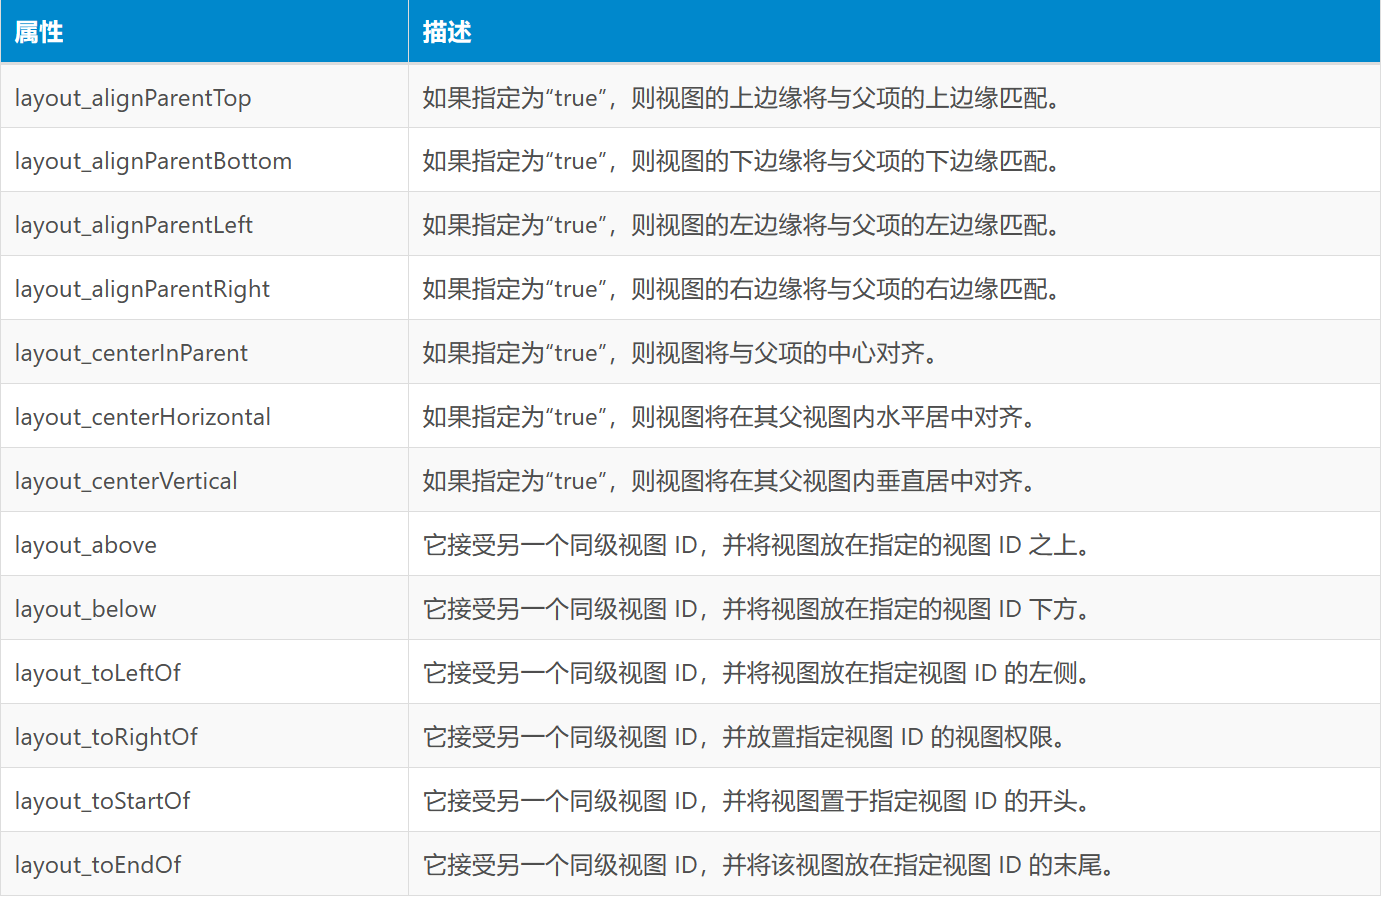
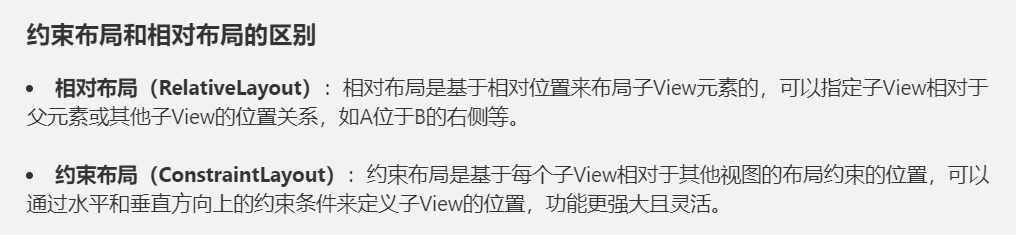
2.3 相对布局(RelativeLayout)
是一种灵活的Android布局,因为它允许开发人员定义每个子视图相对于其他视图或屏幕的位置。在相对布局中,可以使用各种规则(如alignParentTop、alignLeft、above等)来指定子视图相对于父视图或其他子视图的位置关系。这种布局方式使得设计师和开发人员能够更精确地控制界面元素的位置,从而实现更复杂和多样化的界面设计。相对布局在处理复杂布局和动态界面时非常有用。
2.4 网格布局
矩形网格来排列一系列行和列中的视图。通过将视图放置在网格中,开发人员可以更轻松地实现复杂的布局设计,而无需进行繁琐的嵌套。GridLayout非常灵活,可以简化布局过程,减少对复杂嵌套的需求,使界面设计更加直观和易于管理。GridLayout适合用于需要将视图按照网格方式排列的情况,提高了布局的灵活性和可维护性。
三、 UI布局
Android 中的 UI 布局是通过定义 View 和 ViewGroup 对象的层次结构来实现的。每个应用程序包含多个活动,每个活动可以看作是应用程序的一个页面,包含多个用户界面组件。这些组件可以是 View(视图)或 ViewGroup(视图组)。通过组合这些组件,可以创建丰富多样的用户界面。
3.1 View 视图
创建出可进行交互的组件并负责事件处理和绘制.被称为小部件。
View 是 Android 中用于构建用户界面的基本构建块之一。
它代表屏幕上的一个矩形区域,可以是按钮、文本框、图像等(如 TextView、ImageView、EditText、RadioButton 等)。
每个 View 对象都负责绘制自己,并处理与用户交互的事件。在 Android 应用程序中,所有可见的 UI 元素都是 View 对象的实例。
3.2 ViewGroup 布局管
可以包含多个子 View 或其他 ViewGroup。ViewGroup 负责排列和定位其子 View,以便构建复杂的用户界面。
ViewGroup 是 Android 中用于容纳和管理其他 View 对象的容器类。
常见的 ViewGroup 包括 LinearLayout、RelativeLayout、FrameLayout 等,它们提供不同的布局方式来组织和显示子 View。
四、再说明 Android UI布局的类型
它们都是ViewGroup 子类的一个子类
4.0 两种方式定义布局

(1)在 XML 中声明 UI 元素
在对应的/res/layout的xml文件中添加相应的,下面以线性布局为例:
<?xml version="1.0" encoding="utf-8"?>
<LinearLayout xmlns:android="http://schemas.android.com/apk/res/android"
    android:orientation="vertical"

    android:layout_width="match_parent"
    android:layout_height="match_parent">
    <TextView
        android:id="@+id/fstTxt"
        android:layout_width="wrap_content"
        android:layout_height="wrap_content"
        android:text="@string/name"
        />
    <EditText
        android:id="@+id/name"
        android:layout_width="wrap_content"
        android:layout_height="wrap_content"
        android:hint="@string/enter_the_ps"
        android:ems="10">
    </EditText>
    <Button
        android:id="@+id/getName"
        android:layout_width="wrap_content"
        android:layout_height="wrap_content"
        android:text="@string/get_name" />
</LinearLayout>
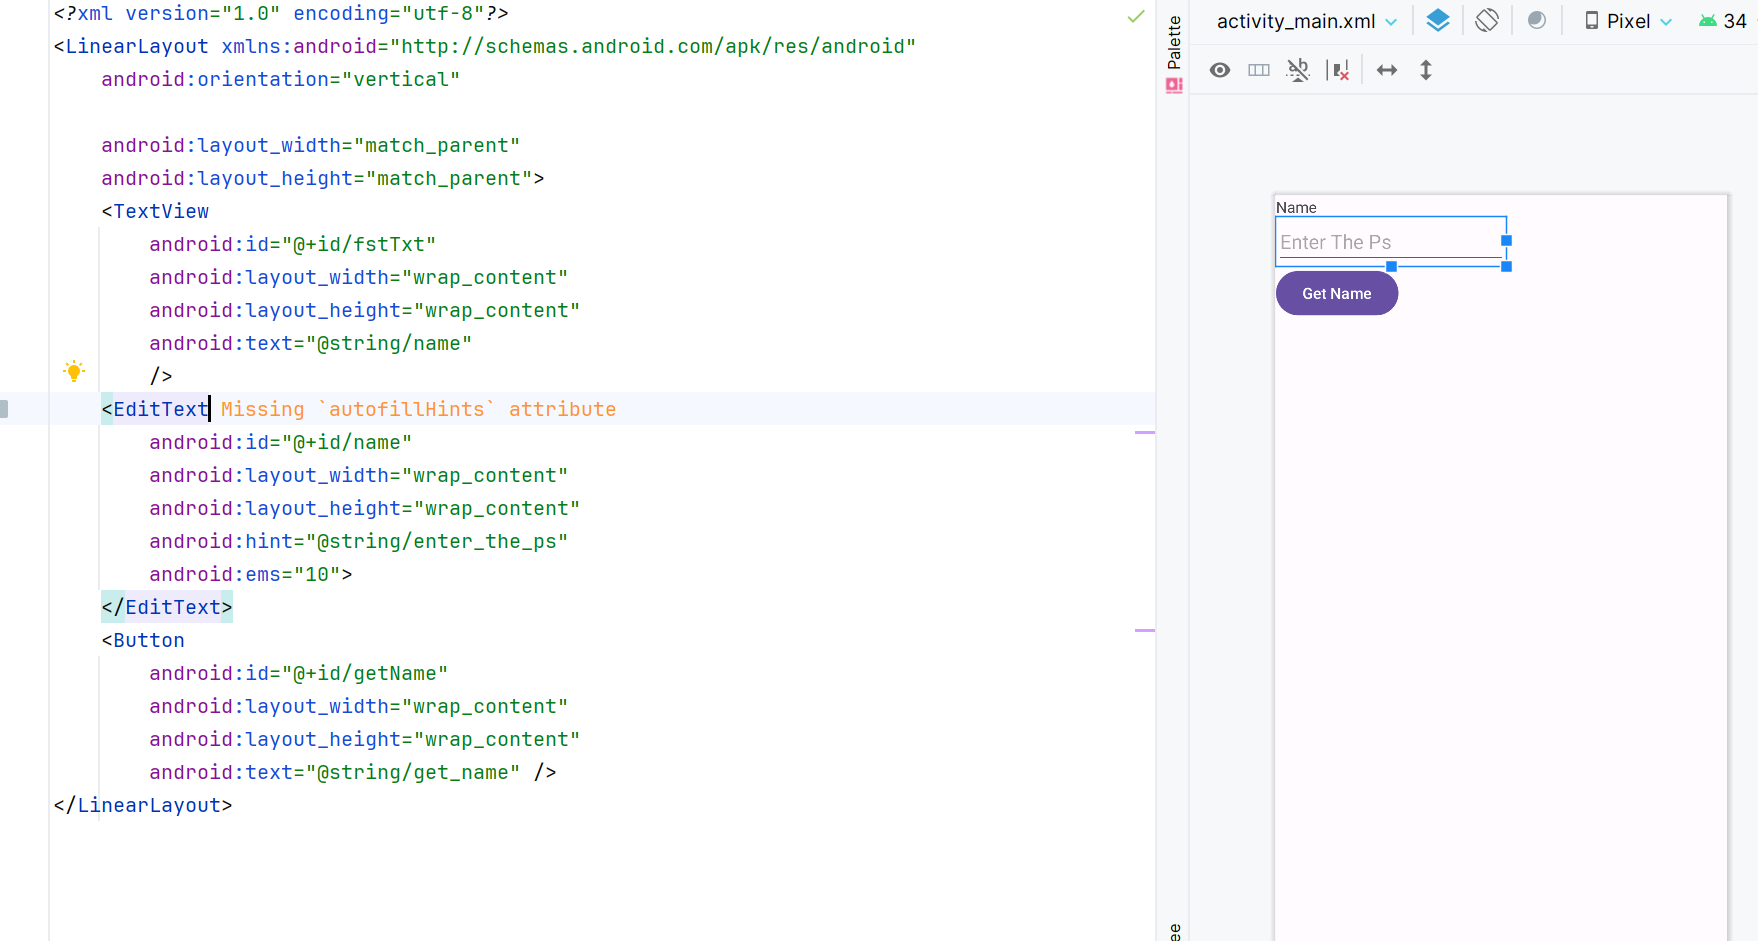
最终在活动中回调方法OnCreate()加载出来XML布局资源
protected void onCreate(Bundle savedInstanceState) {
    super.onCreate(savedInstanceState);
    setContentView(R.layout.activity_main);
}
我们使用的setContentView方法以R资源管理调用我们的布局。
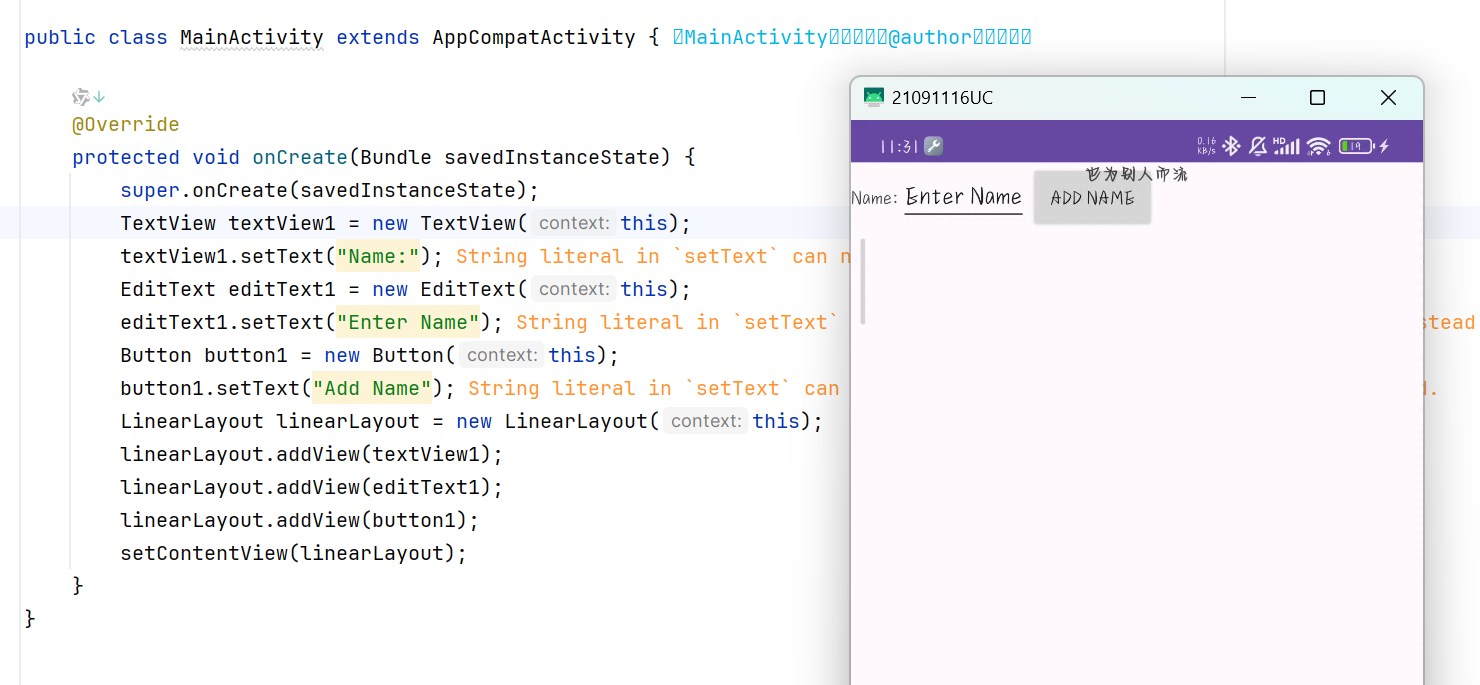
(2) 在运行时实例化布局元素
public class MainActivity extends AppCompatActivity {

    @Override
    protected void onCreate(Bundle savedInstanceState) {
        super.onCreate(savedInstanceState);
        TextView textView1 = new TextView(this);
        textView1.setText("Name:");
        EditText editText1 = new EditText(this);
        editText1.setText("Enter Name");
        Button button1 = new Button(this);
        button1.setText("Add Name");
        LinearLayout linearLayout = new LinearLayout(this);
        linearLayout.addView(textView1);
        linearLayout.addView(editText1);
        linearLayout.addView(button1);
        setContentView(linearLayout);
    }
}
真机结果
(3)宽度和高度
在使用XML文件定义布局时,我们需要使用layout_width和layout_height属性为每个元素设置宽度和高度。这两个属性用于指定View元素在父容器中的宽度和高度。
match_parent:如果设置为match_parent,则View将尝试与父容器的宽度或高度匹配。
wrap_content:如果设置为wrap_content,则View将根据内容调整其宽度或高度。
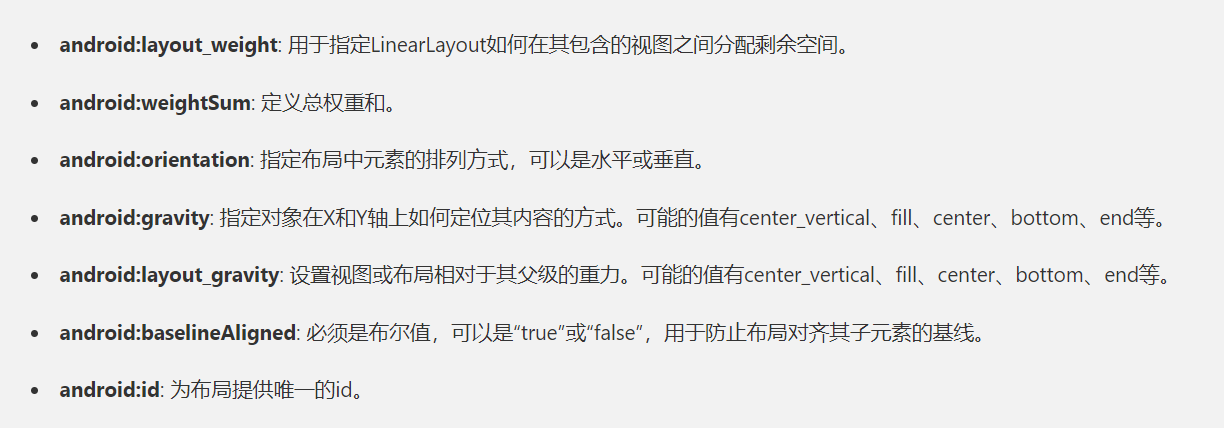
(4)Android 布局属性

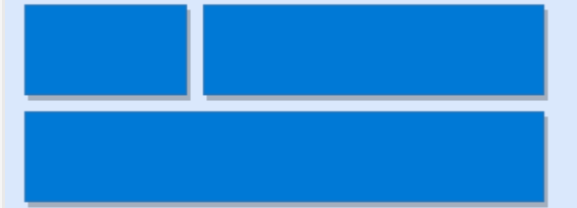
4.1 线性布局(LinearLayout):
(1)声明
根据orientation属性在水平或垂直方向提供子View元素。
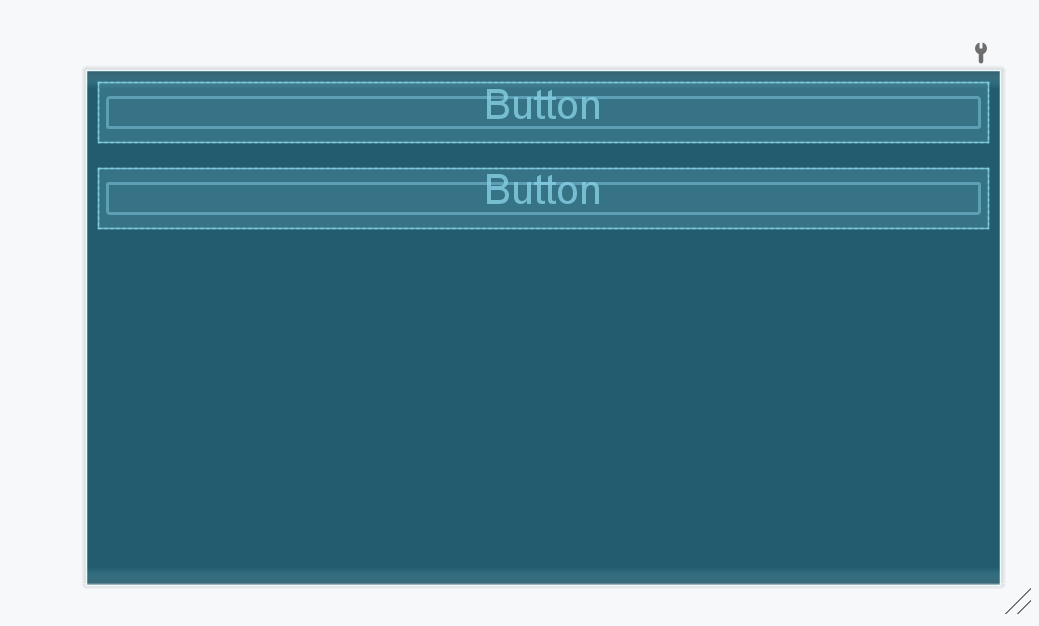
vertical
<?xml version="1.0" encoding="utf-8"?>
<LinearLayout xmlns:android="http://schemas.android.com/apk/res/android"
    android:layout_width="match_parent"
    android:layout_height="match_parent"

    android:orientation="vertical" >

   <!--在此处添加子视图 -->
    <!-- Add Button-->
    <Button
        android:layout_width="match_parent"
        android:layout_margin="10dp"
        android:layout_height="wrap_content"/>

    <!-- Add Button-->
    <Button
        android:layout_width="match_parent"
        android:layout_margin="10dp"
        android:layout_height="wrap_content"/>
</LinearLayout>
horizontal
<?xml version="1.0" encoding="utf-8"?>
<LinearLayout xmlns:android="http://schemas.android.com/apk/res/android"
    android:layout_width="match_parent"
    android:layout_height="match_parent"

    android:orientation="horizontal" >

    <!--在此处添加子视图 -->
    <!-- Add Button-->
    <Button
        android:layout_width="wrap_content"
        android:layout_height="match_parent"
        android:layout_margin="10dp" />

    <Button
        android:layout_width="wrap_content"
        android:layout_height="match_parent"
        android:layout_margin="10dp" />

</LinearLayout>
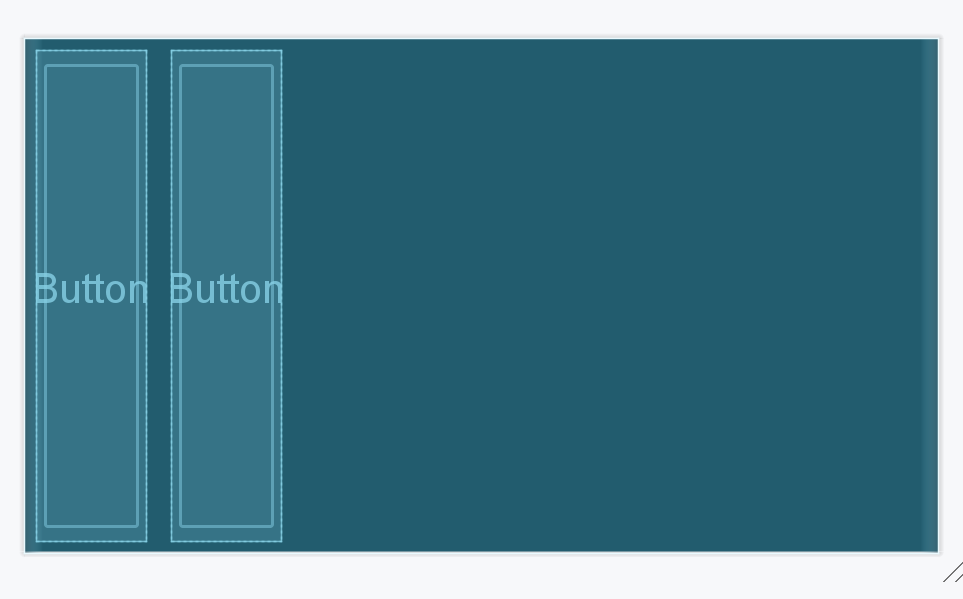
在 LinearLayout 中,子 View 实例逐个排列,因此水平列表将只有一行多列,垂直列表将有一列多行。
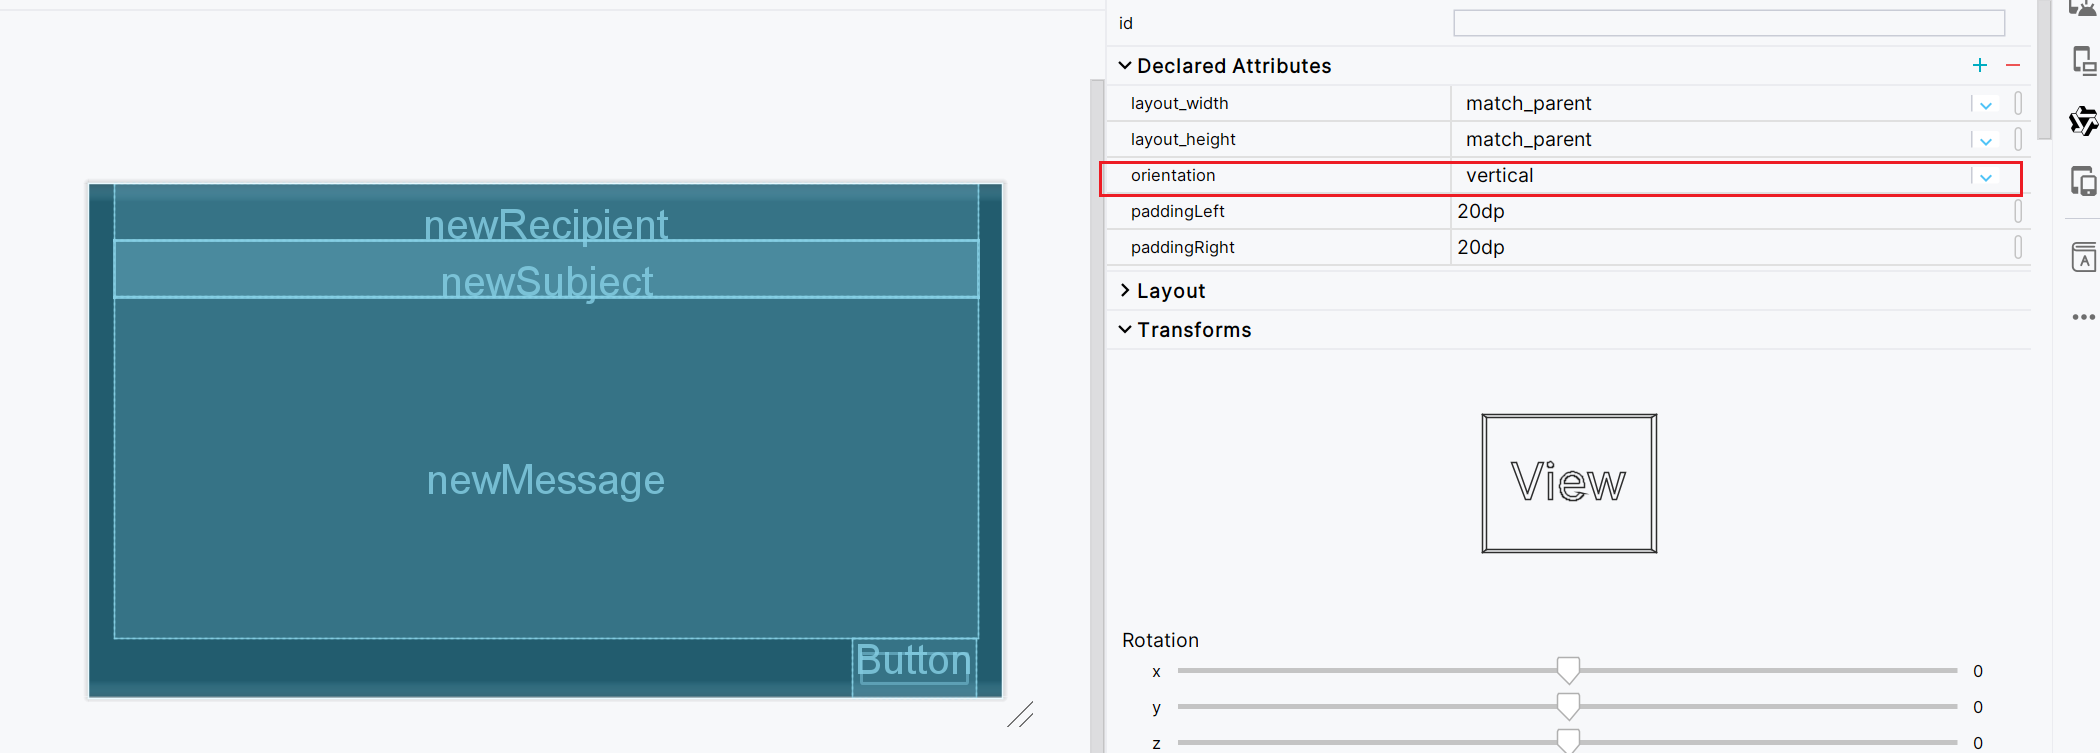
(2)示例
<?xml version="1.0" encoding="utf-8"?>
<LinearLayout xmlns:android="http://schemas.android.com/apk/res/android"
    android:layout_width="match_parent"
    android:layout_height="match_parent"
    android:paddingLeft="20dp"
    android:paddingRight="20dp"
    android:orientation="vertical" >
    <EditText
        android:id="@+id/newRecipient"
        android:layout_width="match_parent"
        android:layout_height="wrap_content"
        android:hint="Recipient"/>
    <EditText
        android:id="@+id/newSubject"
        android:layout_width="match_parent"
        android:layout_height="wrap_content"
        android:hint="Subject"/>
    <EditText
        android:id="@+id/newMessage"
        android:layout_width="match_parent"
        android:layout_height="0dp"
        android:layout_weight="1"
        android:gravity="top"
        android:hint="Message"/>
    <Button
        android:layout_width="100dp"
        android:layout_height="wrap_content"
        android:layout_gravity="right"
        android:text="Send"/>
</LinearLayout>
若改为horizontal,又因为本身设计给控件的宽度,除了TextView剩下的就被挤到右边看不见的地方了。
(3)子视图根据权重比例分配剩余空间的效果layout_weight 和 weightSum 属性
(a)layout_weight
- layout_weight 是一个附加在每个子视图上的属性,表示该视图与其他具有非零权重值的兄弟视图相比应占用的空间比例。
- 当在 LinearLayout 中设置了子视图的 layout_width 或 layout_height 为 “0dp”(在 API 级别 17 及以上也可以使用 “match_constraint”,即 “0dp” 的新名称)时,系统会根据这些子视图的 layout_weight 进行空间分配。
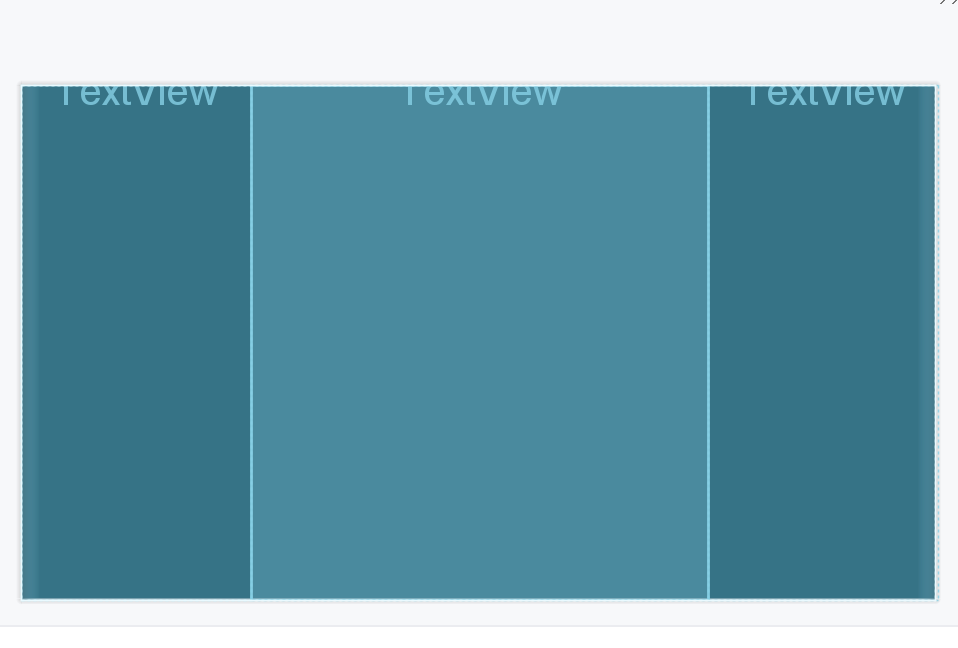
<?xml version="1.0" encoding="utf-8"?>
<LinearLayout
    xmlns:android="http://schemas.android.com/apk/res/android"
    xmlns:tools="http://schemas.android.com/tools"
    android:layout_width="match_parent"
    android:layout_height="match_parent"
    android:orientation="horizontal"
    android:weightSum="10"
    tools:context=".MainActivity">

    <TextView
        android:layout_width="0dp"
        android:layout_height="match_parent"
        android:layout_weight="1"
        android:text="First item" />

    <TextView
        android:layout_width="0dp"
        android:layout_height="match_parent"
        android:layout_weight="2"
        android:text="Second item" />

    <TextView
        android:layout_width="0dp"
        android:layout_height="match_parent"
        android:layout_weight="1"
        android:text="Third item" />
</LinearLayout>
三个 TextView 的总权重为 4,第一个和第三个 TextView 各自占总宽度的 1/4,而第二个 TextView 占总宽度的 2/4。
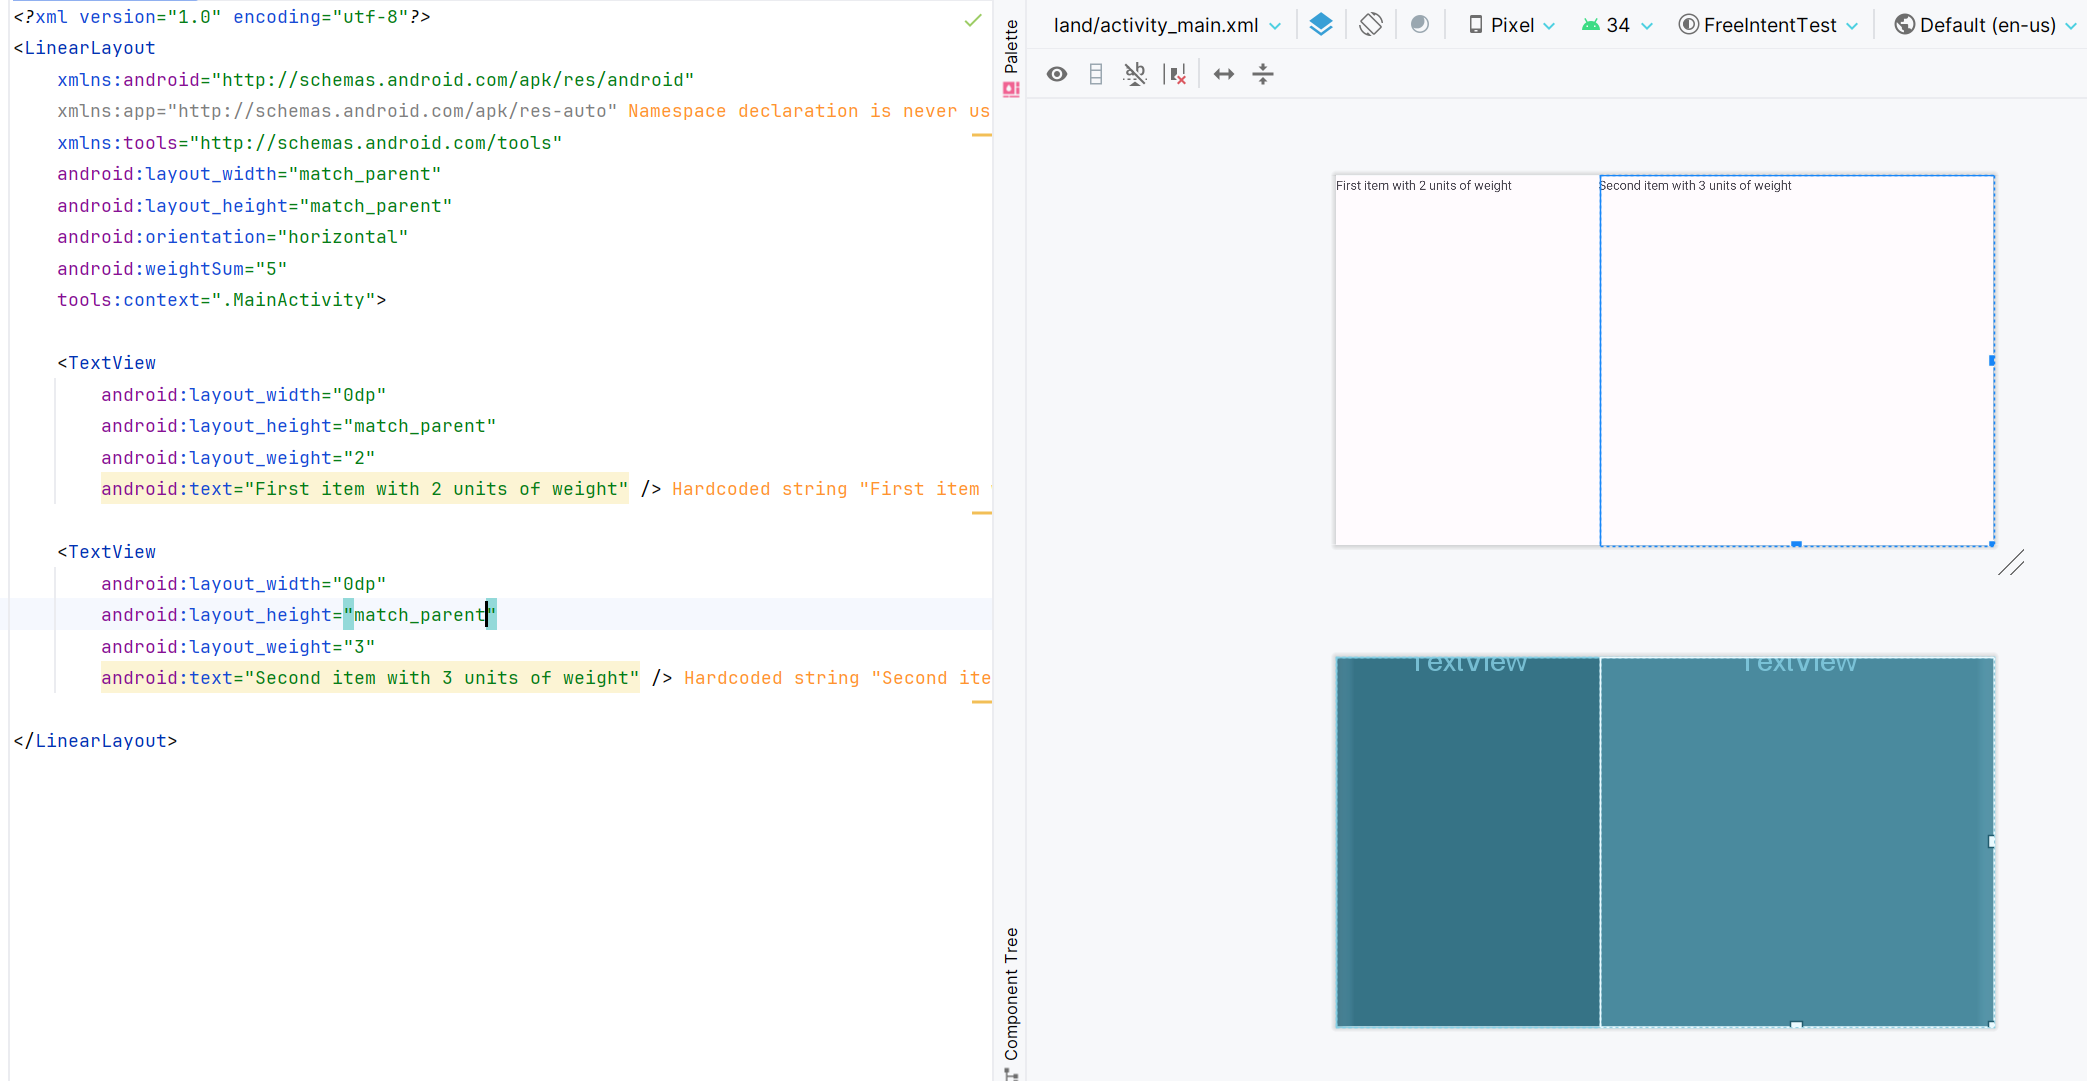
(b) weightSum:
- weightSum 是一个应用于LinearLayout本身的属性,表示所有子视图的权重总和。
- 如果没有明确设置 weightSum,则默认取所有子视图 layout_weight 数值的最大可能值作为总权重。
- 设置 weightSum 的情况通常是为了明确指定总的权重分配基数,防止因新增或删除具有权重的子视图导致布局混乱。
   <LinearLayout
       android:orientation="horizontal"
       android:layout_width="match_parent"
       android:layout_height="wrap_content"
       android:weightSum="5">

       <TextView
           android:layout_width="0dp"
           android:layout_height="wrap_content"
           android:layout_weight="2"
           android:text="First item with 2 units of weight" />

       <TextView
           android:layout_width="0dp"
           android:layout_height="wrap_content"
           android:layout_weight="3"
           android:text="Second item with 3 units of weight" />
   </LinearLayout>
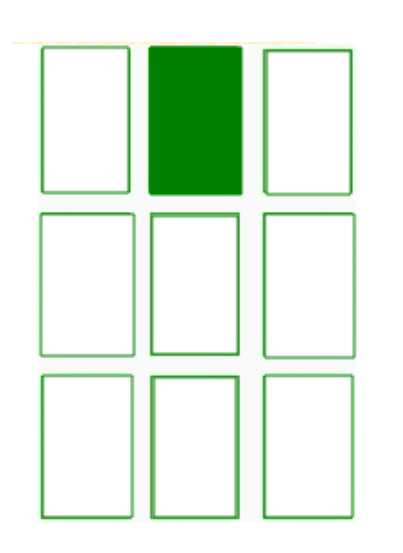
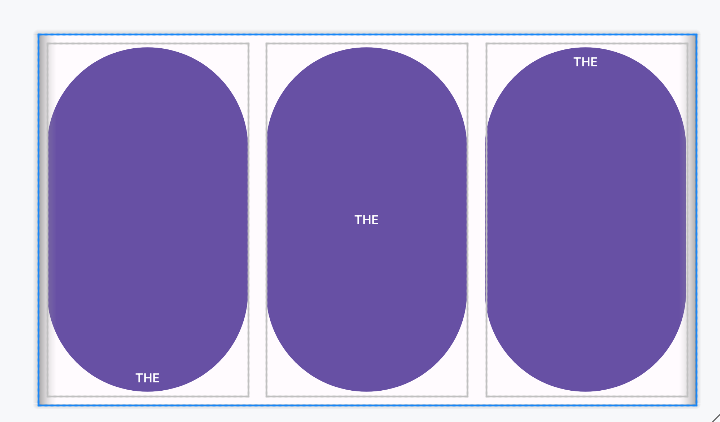
(4)gravity
 <Button
        android:layout_width="wrap_content"
        android:layout_height="match_parent"
        android:layout_margin="10dp"
        android:layout_weight="1"
        android:gravity="bottom|center"
        android:text="THE" />

    <Button
        android:layout_width="wrap_content"
        android:layout_height="match_parent"
        android:layout_margin="10dp"
        android:layout_weight="1"
        android:gravity="center"
        android:text="THE" />

    <Button
        android:layout_width="wrap_content"
        android:layout_height="match_parent"
        android:layout_margin="10dp"
        android:layout_weight="1"
        android:gravity="center|top"
        android:text="THE" />
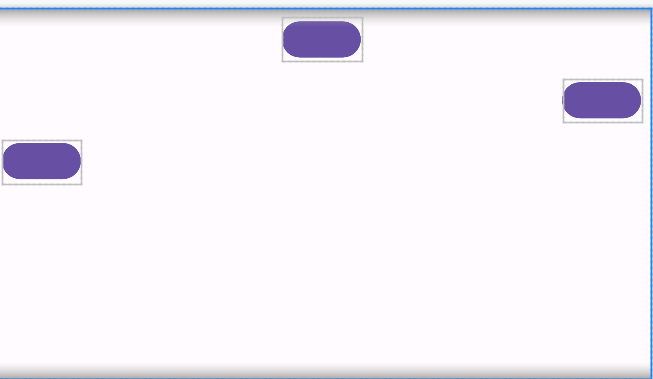
(5)layout_gravity
    android:orientation="vertical"
    android:weightSum="3"
    tools:context=".MainActivity">
    <Button
        android:layout_width="wrap_content"
        android:layout_height="wrap_content"
        android:layout_gravity="center"
        android:layout_margin="10dp" />

    <Button
        android:layout_width="wrap_content"
        android:layout_height="wrap_content"
        android:layout_gravity="right"
        android:layout_margin="10dp" />

    <Button
        android:layout_width="wrap_content"
        android:layout_height="wrap_content"
        android:layout_gravity="left"
        android:layout_margin="10dp" />
4.2 相对布局(RelativeLayout):
例如(A 位于 B 的右侧)或相对于父元素的位置(固定到父元素的顶部)。
消除嵌套的视图组并保持布局层次结构平坦,从而提高应用程序的性能。
指定子View元素相对于彼此或父元素的位置。可以灵活地定义视图之间的相对位置。、
最有用的布局属性。
<?xml version="1.0" encoding="utf-8"?>
<RelativeLayout xmlns:android="http://schemas.android.com/apk/res/android"
    android:layout_width="match_parent"
    android:layout_height="match_parent"
    android:paddingLeft="10dp"
    android:paddingRight="10dp">

    <Button
        android:id="@+id/btn1"
        android:layout_width="wrap_content"
        android:layout_height="wrap_content"
        android:layout_alignParentLeft="true"
        android:text="Button1" />

    <Button
        android:id="@+id/btn7"
        android:layout_width="wrap_content"
        android:layout_height="wrap_content"
        android:layout_toRightOf="@+id/btn1"
        android:layout_alignTop="@+id/btn1"
        android:layout_alignBottom="@+id/btn1"
        android:text="Button7" />


    <Button
        android:id="@+id/btn3"
        android:layout_width="wrap_content"
        android:layout_height="wrap_content"
        android:layout_alignParentLeft="true"
        android:layout_centerVertical="true"
        android:text="Button3" />

    <Button
        android:id="@+id/btn7_new_position"
        android:layout_width="wrap_content"
        android:layout_height="wrap_content"
        android:layout_alignBottom="@+id/btn3"
        android:layout_toRightOf="@+id/btn3"
        android:text="Buttonx" />

    <Button
        android:id="@+id/btn2"
        android:layout_width="wrap_content"
        android:layout_height="wrap_content"
        android:layout_alignParentRight="true"
        android:layout_centerVertical="true"
        android:text="Button2" />

    <Button
        android:id="@+id/btn4"
        android:layout_width="match_parent"
        android:layout_height="wrap_content"
        android:layout_alignParentBottom="true"
        android:text="Button4" />

    <Button
        android:id="@+id/btn5"
        android:layout_width="wrap_content"
        android:layout_height="wrap_content"
        android:layout_alignBottom="@+id/btn2"
        android:layout_centerHorizontal="true"
        android:text="Button5" />

    <Button
        android:id="@+id/btn6"
        android:layout_width="wrap_content"
        android:layout_height="wrap_content"
        android:layout_above="@+id/btn4"
        android:layout_centerHorizontal="true"
        android:text="Button6" />

</RelativeLayout>

4.3 约束布局(ConstraintLayout):
指定每个子视图相对于其他视图的布局约束的位置。功能强大,支持复杂的布局结构。
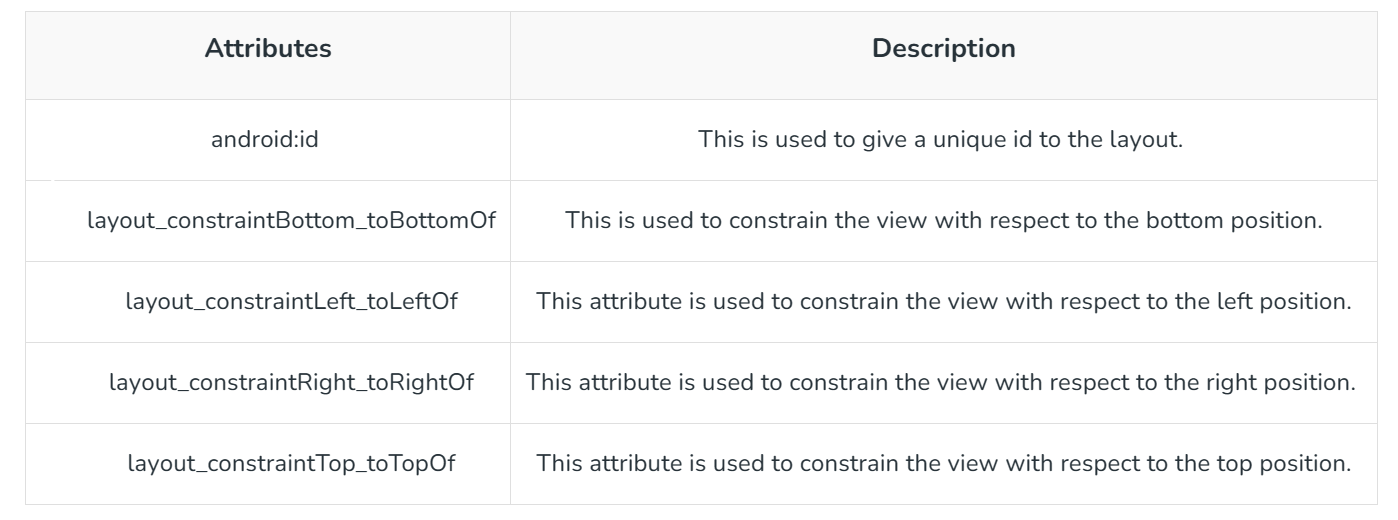
类似于 RelativeLayout,但功能更强大。
(1)优势缺点
在 Android 中使用 ConstraintLayout 的优势
- 可以使用 Android Studio 设计编辑器的拖放功能完全设计界面。
- 有助于提高 UI 性能。
- 可以通过一行代码控制小部件组。
- 可以轻松地添加动画到应用程序中的 UI 组件中。
在 Android 中使用 ConstraintLayout 的缺点
- 生成的 XML 代码有时难以理解。
- 结果有时与设计编辑器中不同。
- 可能需要创建额外的布局文件来处理横向模式的 UI。
ConstraintLayout 与 Linear Layout 的不同
- ConstraintLayout 可以以任何顺序定位 UI 组件,而 Linear Layout 只能水平或垂直排列。
- 在 Linear Layout 中可以使用权重平均划分 UI 组件,而在 ConstraintLayout 中需要手动排列。
ConstraintLayout 与 RelativeLayout 的不同
- 在 ConstraintLayout 中需要向所有四个边的视图添加约束,而在 RelativeLayout 中可以简单地使用 ID 对齐 UI 组件。
ConstraintLayout 与网格布局的不同
- 在网格布局中 UI 组件仅以网格方式排列,而在 ConstraintLayout 中可以根据需求对齐 UI 组件。
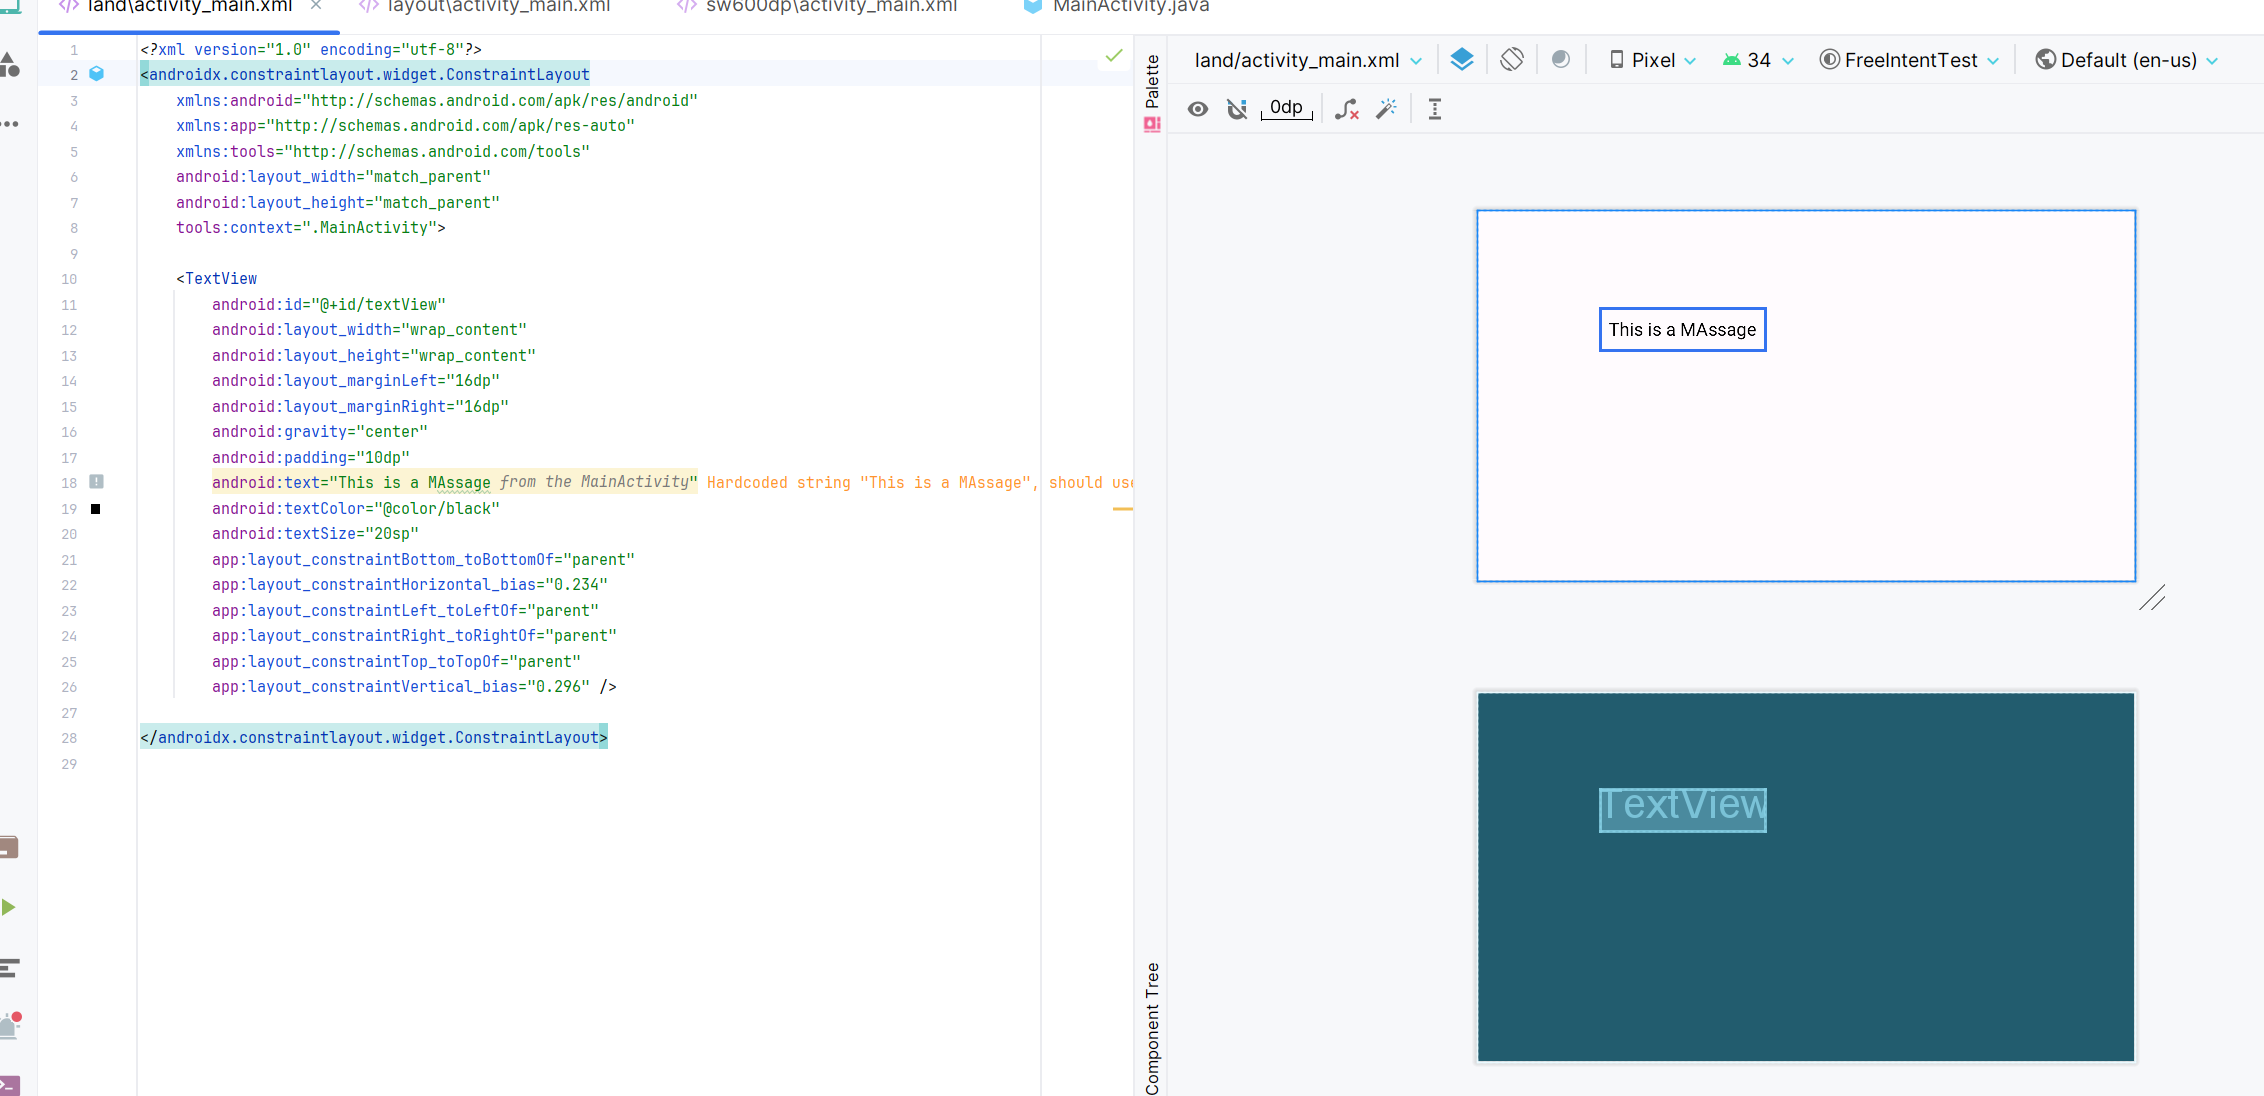
(2)实现
<?xml version="1.0" encoding="utf-8"?>
<androidx.constraintlayout.widget.ConstraintLayout
    xmlns:android="http://schemas.android.com/apk/res/android"
    xmlns:app="http://schemas.android.com/apk/res-auto"
    xmlns:tools="http://schemas.android.com/tools"
    android:layout_width="match_parent"
    android:layout_height="match_parent"
    tools:context=".MainActivity">

    <TextView
        android:id="@+id/textView"
        android:layout_width="wrap_content"
        android:layout_height="wrap_content"
        android:layout_marginLeft="16dp"
        android:layout_marginRight="16dp"
        android:gravity="center"
        android:padding="10dp"
        android:text="This is a MAssage"
        android:textColor="@color/black"
        android:textSize="20sp"
        app:layout_constraintBottom_toBottomOf="parent"
        app:layout_constraintHorizontal_bias="0.234"
        app:layout_constraintLeft_toLeftOf="parent"
        app:layout_constraintRight_toRightOf="parent"
        app:layout_constraintTop_toTopOf="parent"
        app:layout_constraintVertical_bias="0.296" />

</androidx.constraintlayout.widget.ConstraintLayout>
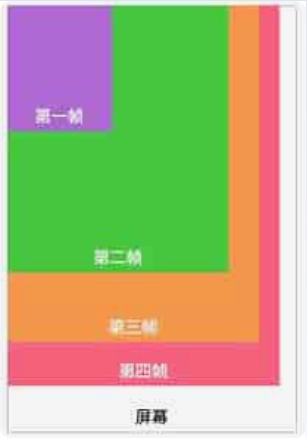
4.4 框架布局(FrameLayout):
在顶部显示单个View元素。适合用作容器,只显示一个子View。
Framelayout 是 Android 中的一个 ViewGroup 子类,用于指定多个视图叠加在一起以表示单个视图屏幕的位置。
通常情况下,我们可以说 FrameLayout 简单地阻止屏幕上的特定区域以显示单个视图。
在这里,所有子视图或元素都以堆叠格式添加,这意味着最近添加的子视图将显示在屏幕顶部。
但是,我们可以添加多个子视图并仅通过使用 Framelayout 中的 gravity 属性来控制它们的位置。
<FrameLayout xmlns:android="http://schemas.android.com/apk/res/android"
    android:layout_width="match_parent"
    android:layout_height="match_parent"
    android:orientation="vertical">
    // Add items or widgets here
</FrameLayout>
<?xml version="1.0" encoding="utf-8"?>
<FrameLayout xmlns:android="http://schemas.android.com/apk/res/android"
    xmlns:app="http://schemas.android.com/apk/res-auto"
    xmlns:tools="http://schemas.android.com/tools"
    android:layout_width="match_parent"
    android:layout_height="match_parent"
    android:orientation="vertical"
    android:padding="5dp">

    <TextView
        android:id="@+id/txtvw"
        android:layout_width="wrap_content"
        android:layout_height="wrap_content"
        android:layout_marginLeft="100dp"
        android:layout_marginTop="10dp"
        android:background="#286F24"
        android:padding="10dp"
        android:text="Test This is"
        android:textColor="#FFFFFF"
        android:textSize="20sp" />

    <EditText
        android:id="@+id/editText1"
        android:layout_width="match_parent"
        android:layout_height="wrap_content"
        android:layout_centerHorizontal="true"
        android:layout_marginTop="80dp"
        android:background="#ECEEE8"
        android:hint="Enter your email"
        android:padding="10dp" />

    <EditText
        android:id="@+id/editText2"
        android:layout_width="match_parent"
        android:layout_height="wrap_content"
        android:layout_centerHorizontal="true"
        android:layout_marginTop="150dp"
        android:background="#ECEEE8"
        android:hint="Enter password"
        android:padding="10dp" />

    <Button
        android:id="@+id/btn1"
        android:layout_width="wrap_content"
        android:layout_height="wrap_content"
        android:layout_marginLeft="110dp"
        android:layout_marginTop="240dp"
        android:text="Submit" />

    <TextView
        android:id="@+id/textView"
        android:layout_width="wrap_content"
        android:layout_height="wrap_content"
        android:text="TextView" />

</FrameLayout>
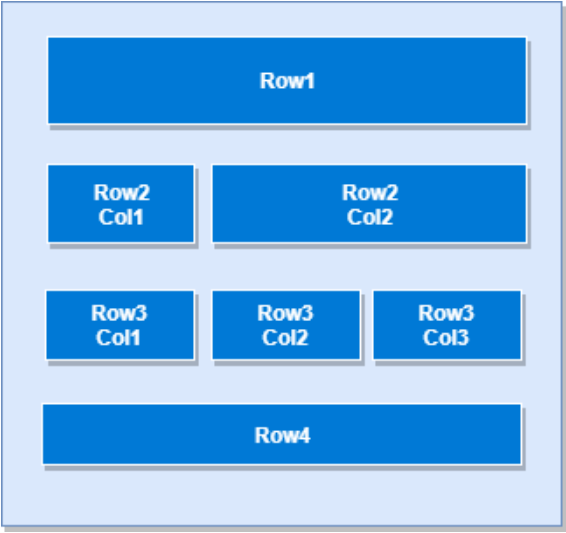
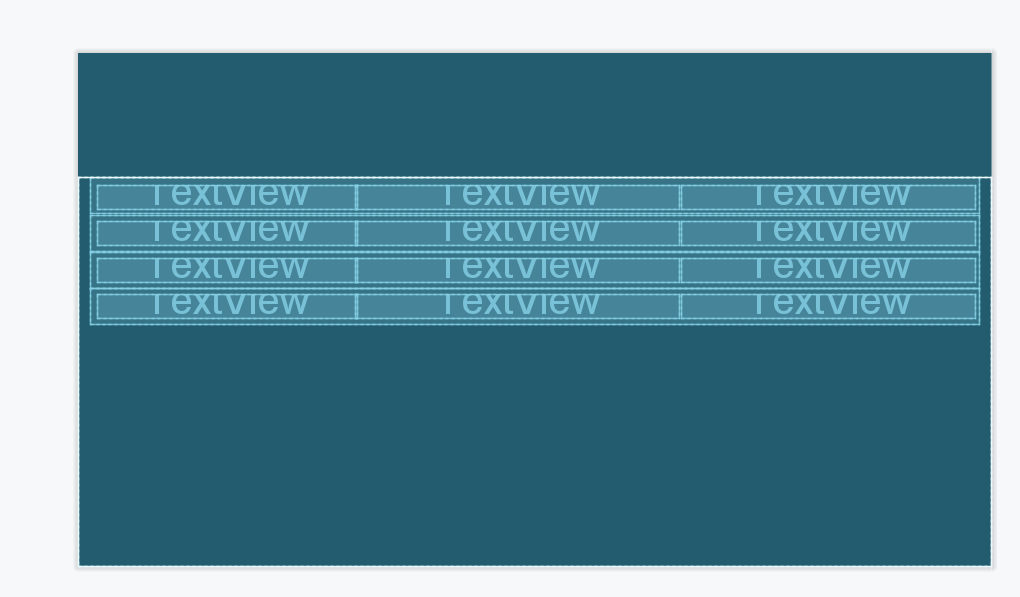
4.5 表格布局(TableLayout):
在行和列中显示子View元素。适合用于显示表格状数据。
<?xml version="1.0" encoding="utf-8"?>
<TableLayout xmlns:android="http://schemas.android.com/apk/res/android"
    android:layout_width="match_parent"
    android:layout_height="match_parent"
    android:layout_marginTop="100dp"
    android:paddingLeft="10dp"
    android:paddingRight="10dp" >
    <TableRow android:background="#0079D6" android:padding="5dp">
        <TextView
            android:layout_width="wrap_content"
            android:layout_height="wrap_content"
            android:layout_weight="1"
            android:text="用户ID" />
        <TextView
            android:layout_width="wrap_content"
            android:layout_height="wrap_content"
            android:layout_weight="1"
            android:text="用户名" />
        <TextView
            android:layout_width="wrap_content"
            android:layout_height="wrap_content"
            android:layout_weight="1"
            android:text="地点" />
    </TableRow>
    <TableRow android:background="#DAE8FC" android:padding="5dp">
        <TextView
            android:layout_width="wrap_content"
            android:layout_height="wrap_content"
            android:layout_weight="1"
            android:text="001" />
        <TextView
            android:layout_width="wrap_content"
            android:layout_height="wrap_content"
            android:layout_weight="1"
            android:text="a" />
        <TextView
            android:layout_width="wrap_content"
            android:layout_height="wrap_content"
            android:layout_weight="1"
            android:text="b" />
    </TableRow>
    <TableRow android:background="#DAE8FC" android:padding="5dp">
        <TextView
            android:layout_width="wrap_content"
            android:layout_height="wrap_content"
            android:layout_weight="1"
            android:text="002" />

        <TextView
            android:layout_width="wrap_content"
            android:layout_height="wrap_content"
            android:layout_weight="1"
            android:text="c" />

        <TextView
            android:layout_width="wrap_content"
            android:layout_height="wrap_content"
            android:layout_weight="1"
            android:text="d" />
    </TableRow>
    <TableRow android:background="#DAE8FC" android:padding="5dp">
        <TextView
            android:layout_width="wrap_content"
            android:layout_height="wrap_content"
            android:layout_weight="1"
            android:text="003" />
        <TextView
            android:layout_width="wrap_content"
            android:layout_height="wrap_content"
            android:layout_weight="1"
            android:text="e" />
        <TextView
            android:layout_width="wrap_content"
            android:layout_height="wrap_content"
            android:layout_weight="1"
            android:text="f" />
    </TableRow>
</TableLayout>


 743
743

 被折叠的 条评论
为什么被折叠?
被折叠的 条评论
为什么被折叠?
 到【灌水乐园】发言


