


文章目录
SpringBoot

第三章
1、springboot操作mybatisPlus
2、mybatisPlus代码生成器
3、swagger
4、thymeleaf
1、整合mybatsPlus
@@@@@@如果使用Mybatis所有操作要自己编写sql语句,自己编写mapper接口中方法,mybatisPlus对Mybatis进行了封装,常见的方法不用自己声明,即可直接使用

使用MybatisPlus后,常见的sql,mapper接口中的方法不需要自己编写了,由MybatisPlus直接提供,这样可以简化开发过程
步骤
1-2
@@@@@@@@在springboot中使用MybatisPlus

1、创建springboot项目

2、导入依赖

	1、web
	2、devtools 热部署
	3、mybatisPlus(需要手动导入)
	4、mysql (默认情况下,系统导入的是mysql 8.0,如果用的其他版本,就需要自己指定版本号)
	5、druid---------------这个依赖选不了,需要手动导入
	6、lombok

	注意:默认导入的mysql的依赖是:
	        <dependency>
		    <groupId>com.mysql</groupId>
		    <artifactId>mysql-connector-j</artifactId>
		    <scope>runtime</scope>
		</dependency>

		需要更改为:

		<dependency>
		    <groupId>mysql</groupId>
		    <artifactId>mysql-connector-java</artifactId>
		    <version>5.1.47</version>
		</dependency>


	导入druid
	<dependency>
            <groupId>com.alibaba</groupId>
            <artifactId>druid-spring-boot-starter</artifactId>
            <version>1.1.16</version>
        </dependency>

	 <!--导入mybatisPlus的依赖-->
        <dependency>
            <groupId>com.baomidou</groupId>
            <artifactId>mybatis-plus-boot-starter</artifactId>
            <version>3.0.5</version>
        </dependency>
		<dependency>
            <groupId>org.springframework.boot</groupId>
            <artifactId>spring-boot-starter-web</artifactId>
        </dependency>
        <dependency>
            <groupId>com.baomidou</groupId>
            <artifactId>mybatis-plus-boot-starter</artifactId>
            <version>3.0.5</version>
        </dependency>

        <dependency>
            <groupId>mysql</groupId>
            <artifactId>mysql-connector-java</artifactId>
            <version>5.1.47</version>
        </dependency>

        <dependency>
            <groupId>com.alibaba</groupId>
            <artifactId>druid-spring-boot-starter</artifactId>
            <version>1.1.16</version>
        </dependency>

        <dependency>
            <groupId>org.projectlombok</groupId>
            <artifactId>lombok</artifactId>
        </dependency>

        <dependency>
            <groupId>org.springframework.boot</groupId>
            <artifactId>spring-boot-devtools</artifactId>
        </dependency>

        <dependency>
            <groupId>org.apache.velocity</groupId>
            <artifactId>velocity-engine-core</artifactId>
            <version>2.0</version>
        </dependency>
3
3、编写配置文件 application.yml

	#服务器端口号
	server:
	  port: 9999
	#指定数据库连接
	spring:
	  datasource:
	    #使用druid连接池
	    type: com.alibaba.druid.pool.DruidDataSource
	    #数据库驱动
	    driver-class-name: com.mysql.jdbc.Driver
	    #连接地址
	    url: jdbc:mysql:///d113
	    #用户名及密码
	    username: root
	    password: root
	mybatis-plus:
	  #对哪一个包下面的实体类生成别名,默认别名是类名的首字母小写
	  type-aliases-package: org.java.entity
	  #指定mybatis中生成的mapper.xml配置文件的位置
	  mapper-locations: classpath:mapper/*Mapper.xml
	#输出org.java.dao这个包中操作数据库时的底层sql语句
	logging:
	  level:
	    org:
	      java:
		dao: debug
4-6
4、编写实体类
@Data
@AllArgsConstructor
@NoArgsConstructor
@TableName("inf")//如果表名与类名一致,该注解可以省略
public class Inf implements Serializable {
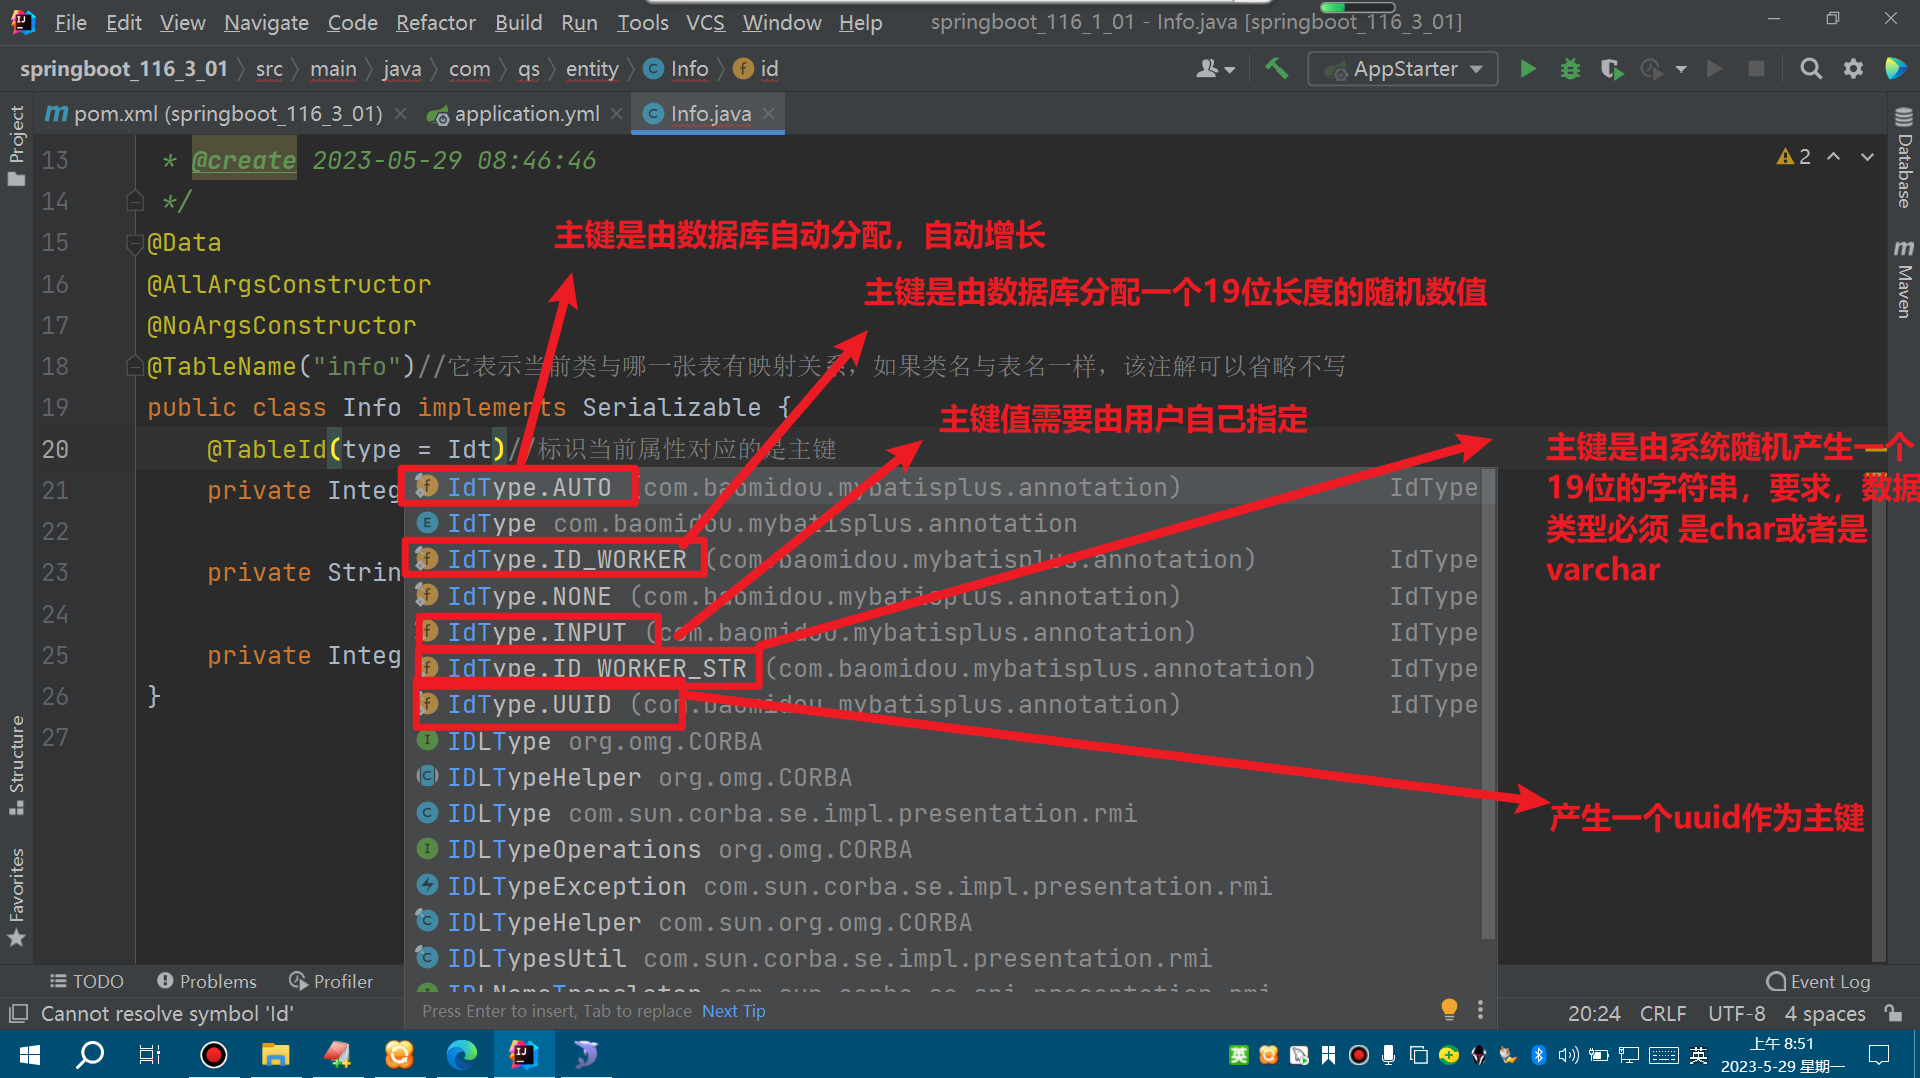
//它表示当前对应的是数据表中的主键,当前id的值是由数据库自动分配
@TableId(type = IdType.AUTO)
private Integer id;
@TableField("name")//描述当前属性与数据表中的哪一个字段有映射关系,如果同名可以省略不写
private String name;
private Integer score;
}
5、编写Mapper接口继承于BaseMapper
@Repository
public interface InfMapper extends BaseMapper<Inf> {
}
6、编写配置类扫描Mapper接口
@Configuration
@EnableTransactionManagement
@MapperScan(basePackages = "org.java.dao")
public class WebConfig {
}
7-10
7、编写Service接口

8、编写service实现类

	@Service
	public class InfServiceImpl implements InfService {

	    @Autowired
	    private InfMapper infMapper;

	    @Override
	    public void add(Inf inf) {
		infMapper.insert(inf);
	    }

	    @Override
	    public List<Inf> getList() {
		return infMapper.selectList(null);
	    }
	}

9、编写控制器类
	@RestController
	public class InfController {
	    @Autowired
	    private InfService infService;

	    @GetMapping("/init")
	    public List<Inf> getList(){
		return infService.getList();
	    }

	    @PostMapping("/add")
	    public void add(Inf inf){
		infService.add(inf);
	    }
	}
10、测试
问题
@@@@@@@问题:如果我们要使用一个方法findByScore,但mybatisplus中没有这个方法,我们可以直接扩展

1、在mapper接口指定方法
	@Repository
	public interface InfMapper extends BaseMapper<Inf> {

	    public List<Inf> findByScore();
	}

2、编写mapper.xml

	<mapper namespace="org.java.dao.InfMapper">
	    <select id="findByScore" parameterType="int" resultType="inf">
		select * from inf where score >=#{score}
	    </select>
	</mapper>


3、在yml文件中配置mybatis的信息
mybatis-plus:
  mapper-locations: classpath:mapper/*Mapper.xml
  type-aliases-package: org.java.entity
2、整合pageHelper分页
@@@@@@@@在springboot使用pageHelper实现分页

1、导入pageHelper依赖

	<dependency>
            <groupId>com.github.pagehelper</groupId>
            <artifactId>pagehelper-spring-boot-starter</artifactId>
            <version>1.2.12</version>
        </dependency>

2、在控制器编写方法接收参数进行分页显示

    @GetMapping("/show/{page}/{rows}")
    public PageInfo<Inf> showPage(@PathVariable("page")  Integer page, @PathVariable("rows")  Integer rows){
        //分页加载数据
        PageInfo<Inf> pg = infService.showPage(page,rows);

        return pg;
    }

3、编写InfService类中的方法,实现分页显示

    public PageInfo<Inf> showPage(Integer page, Integer rows) {
        //设置分页的信息
        PageHelper.startPage(page,rows);

        //创建一个queryWrapper对象,用于封装查询条件
        QueryWrapper<Inf> queryWrapper = new QueryWrapper<>();

        //分页查询
        PageInfo<Inf> pageInfo = new PageInfo<>(infMapper.selectList(queryWrapper));

        return pageInfo;
    }
3、MP代码生成器
使用MP代码生成器

作用:在项目中使用MP的代码生成器可以生成通用的:Mapper接口,service接口,service实现类,实体
类,以及项目的基本结构
1、编写yml文件
#服务器端口号
server:
  port: 8099
#指定数据库连接
spring:
  datasource:
    #使用druid连接池
    type: com.alibaba.druid.pool.DruidDataSource
    #数据库驱动
    driver-class-name: com.mysql.jdbc.Driver
    #连接地址
    url: jdbc:mysql:///d118?useUnicode=true&characterEncoding=UTF-8&useSSL=false
    #用户名及密码
    username: root
    password: 123456
mybatis-plus:
  #对哪一个包下面的实体类生成别名,默认别名是类名的首字母小写
  type-aliases-package: org.java.entity
  #指定mybatis中生成的mapper.xml配置文件的位置
  mapper-locations: classpath:mapper/*Mapper.xml
  configuration:
    log-impl: org.apache.ibatis.logging.stdout.StdOutImpl
#输出org.java.dao这个包中操作数据库时的底层sql语句
#logging:
#  level:
#    org:
#      java:
#        mapper: debug
2、导入依赖
1、web
2、热部署
3、mysql
    <dependency>
        <groupId>mysql</groupId>
        <artifactId>mysql-connector-java</artifactId>
        <version>5.1.47</version>
    </dependency>
4、druid
    <dependency>
        <groupId>com.alibaba</groupId>
        <artifactId>druid-spring-boot-starter</artifactId>
        <version>1.1.16</version>
    </dependency>
5、mybatis-plus
    <dependency>
        <groupId>com.baomidou</groupId>
        <artifactId>mybatis-plus-boot-starter</artifactId>
        <version>3.0.5</version>
    </dependency>
6、velocity--------------------------------生成代码时需要用到
    <dependency>
        <groupId>org.apache.velocity</groupId>
        <artifactId>velocity-engine-core</artifactId>
        <version>2.0</version>
    </dependency>
7、lombok
8、junit
3、创建mp代码生成器
导入生成代码的配置工具类,修改对应的信息,用于生成代码
注意:这个工具类一般放在test目录
package org.java.test;

import org.junit.Test;
import com.baomidou.mybatisplus.annotation.DbType;
import com.baomidou.mybatisplus.annotation.IdType;
import com.baomidou.mybatisplus.generator.AutoGenerator;
import com.baomidou.mybatisplus.generator.config.DataSourceConfig;
import com.baomidou.mybatisplus.generator.config.GlobalConfig;
import com.baomidou.mybatisplus.generator.config.PackageConfig;
import com.baomidou.mybatisplus.generator.config.StrategyConfig;
import com.baomidou.mybatisplus.generator.config.rules.DateType;
import com.baomidou.mybatisplus.generator.config.rules.NamingStrategy;
/**
 * @author arjun
 * @title: CodeGenerator
 * @description: 描述信息
 * @date 2023.08.27 09:16
 */
public class CodeGenerator {
    @Test
    public void run() {

        // 1、创建代码生成器
        AutoGenerator mpg = new AutoGenerator();

        // 2、全局配置
        GlobalConfig gc = new GlobalConfig();
        String projectPath = System.getProperty("user.dir");
        gc.setOutputDir("F:\\D118SpringBootFile\\item\\sb_MP" + "/src/main/java");

        gc.setAuthor("刘文君");
        gc.setOpen(false); //生成后是否打开资源管理器
        gc.setFileOverride(false); //重新生成时文件是否覆盖

        //UserServie
        // 默认情况下,接口的名称前会有一个字母i,如istuService
        gc.setServiceName("%sService");	//去掉Service接口的首字母I

        gc.setIdType(IdType.AUTO); //主键策略
        gc.setDateType(DateType.ONLY_DATE);//定义生成的实体类中日期类型
        gc.setSwagger2(false);//开启Swagger2模式

        mpg.setGlobalConfig(gc);

        // 3、数据源配置
        DataSourceConfig dsc = new DataSourceConfig();
        dsc.setUrl("jdbc:mysql://localhost:3306/d118?serverTimezone=GMT%2B8");
        dsc.setDriverName("com.mysql.jdbc.Driver");
        dsc.setUsername("root");
        dsc.setPassword("123456");
        dsc.setDbType(DbType.MYSQL);
        mpg.setDataSource(dsc);

        // 4、包配置
        PackageConfig pc = new PackageConfig();
        pc.setModuleName(""); //模块名 可以为空
        //包
        pc.setParent("org.java");
        pc.setController("controller");
        pc.setEntity("entity");
        pc.setService("service");
        pc.setMapper("mapper");
        mpg.setPackageInfo(pc);

        // 5、策略配置
        StrategyConfig strategy = new StrategyConfig();

        strategy.setInclude("stu","studemo");//数据表名 可同时选择多个表(如果注释此行代码,意味着映射数据库中所有的表)


        strategy.setNaming(NamingStrategy.underline_to_camel);//数据库表映射到实体的命名策略
        strategy.setTablePrefix(pc.getModuleName() + "_"); //生成实体时去掉表前缀

        strategy.setColumnNaming(NamingStrategy.underline_to_camel);//数据库表字段映射到实体的命名策略
        strategy.setEntityLombokModel(true); // lombok 模型 @Accessors(chain = true) setter链式操作

        strategy.setRestControllerStyle(true); //restful api风格控制器
        strategy.setControllerMappingHyphenStyle(true); //url中驼峰转连字符

        mpg.setStrategy(strategy);

        // 6、执行
        mpg.execute();
    }
}
4、生成代码
@Accessors(chain = true) //支持链式操作 new stu().setID(1)...;

注意要修改的地方:
	1、生成的xml包要重新放到resourses文件下,重命名为mapper
5、编写配置类扫描mapper类
    @Configuration
    @MapperScan(basePackages = "com.qs.mapper")
    public class WebConfig {
    }
6、编写控制器类
    @RestController
    @RequestMapping("/info")
    public class InfoController {
        @Autowired
        private InfoService infoService;

        @GetMapping("/init")
        public List<Info> getList(){
        return infoService.list(null);
        }
    }
通过mybatisPlus生成器生成的代码中,如果没有需要的方法,此时我们可以在service接口以及
Mapper接口中自己声明方法即可
4、swagger
1、什么是swagger
答:Api文档在线自动生成工具
2、作用
根据在代码中使用自定义的注解来生成接口文档,它可以支持在线调试,这个在前后端分离的项目中很重
要。这样做的好处是 在开发接口时可以通过swagger将接口文档定义好,同时也方便以后的维护
3、发展历程
后端时代:前端只用管理静态页面,将整个html交给后端;后端的模板引擎JSP, 后端是主力。


前后端分离时代:
    后端:后端控制层,服务层,数据访问层
    前端:前端控制层,视图层
    前端可以伪造后端的数据,通过json跟后端进行交互。现在已经不需要后端,前端工程依然可以运行起来。
    前后端交互方式:API接口
    前后端相对独立,松耦合
    前后端甚至可以部署到不同的服务器上面
产生的问题
1. 前后端集成联调,前端人员和后端人员无法做到及时协商以便尽快解决问题,最终将导致问题集中
爆发
2. 简单来讲,也就是前端不知道后端将提供给前端的接口名字以及后端将传送给前端的数据以及数据
类型
解决方案
首先应该指定计划,实时更新后端提供给前端的最新API,来降低集成的风险。

1、比如早些年,会指定word计划文档
    前后端分离:
    前端测试后端的接口:postman
    后端提供接口,需要实时更新最新的消息以及改动
    不太方便:这样需要特定去下载安装postman

2、Swagger:
	是世界上最流行的API框架
    RestFull Api文档在线自动生成工具==》Api文档与API接口定义同步更新
    直接运行,可以在线测试API接口
    支持多种语言:java、Php
4、一个简单的swagger项目
1、创建springboot项目
2、导入依赖
    <dependency>
        <groupId>org.springframework.boot</groupId>
        <artifactId>spring-boot-starter-web</artifactId>
    </dependency>
    <dependency>
        <groupId>org.springframework.boot</groupId>
        <artifactId>spring-boot-devtools</artifactId>
        <scope>runtime</scope>
        <optional>true</optional>
    </dependency>
    <dependency>
        <groupId>org.projectlombok</groupId>
        <artifactId>lombok</artifactId>
        <optional>true</optional>
    </dependency>
    <dependency>
        <groupId>org.springframework.boot</groupId>
        <artifactId>spring-boot-starter-tomcat</artifactId>
        <scope>provided</scope>
    </dependency>
    <dependency>
        <groupId>org.springframework.boot</groupId>
        <artifactId>spring-boot-starter-test</artifactId>
        <scope>test</scope>
    </dependency>

	swqgger主要的4个依赖
	<dependency>
        <groupId>io.springfox</groupId>
        <artifactId>springfox-swagger2</artifactId>
        <version>2.9.2</version>
    </dependency>
    <dependency>
        <groupId>io.springfox</groupId>
        <artifactId>springfox-swagger-ui</artifactId>
        <version>2.9.2</version>
    </dependency>
    <dependency>
        <groupId>io.swagger</groupId>
        <artifactId>swagger-annotations</artifactId>
        <version>1.5.22</version>
    </dependency>
    <dependency>
        <groupId>io.swagger</groupId>
        <artifactId>swagger-models</artifactId>
        <version>1.5.22</version>
    </dependency>
步骤太多了。。还是直接看pdf吧
第四章
1、swagger的使用
2、thymeleaf的使用
@Api(tags="用于描述当前类的信息")--放在控制类上

@ApiOperration(value="基本描述信息",notes="详情描述信息")--放在方法上

@ApiParam(value = "学生编号id",required = true)--放在参数里面

@ApiResponses({
            @ApiResponse(code = 200,message = "删除成功!"),
            @ApiResponse(code = 204,message = "服务器成功处理了请求,但没返回任何内容!"),
            @ApiResponse(code = 400,message = "参数无效!"),
            @ApiResponse(code = 401,message = "用户未授权!"),
            @ApiResponse(code = 403,message = "服务器拒绝请求!"),
            @ApiResponse(code = 404,message = "请求的资源不存在!"),
    })-----自定义服务器状态 放在方法上

@ApiImplicitParams({
            @ApiImplicitParam(name = "id", value = "学生编号id", required = true,paramType = "query"),
            @ApiImplicitParam(name = "name", value = "学生姓名", required = true, paramType = "query"),
            @ApiImplicitParam(name = "score", value = "学生成绩", required = true, paramType = "query"),
    })---多个参数的设置,放在方法上


 /*************************实体类*************************/


@ApiModel("学生实体类")--放在实体类上

@ApiModelProperty(value = "学生编号(主键)", required = false,notes = "编号可以为空,为空则由数据库自动分配")--放在属性上
控制器类上的注解
@RestController---返回josn数据类型

@Slf4j------------输出日志

@RequestMapping("/studemo")---请求路径

@Api(tags = "studemo的控制器类")---控制器类的描述信息
webconfig配置类
package com.java.config;

import org.mybatis.spring.annotation.MapperScan;
import org.springframework.context.annotation.Bean;
import org.springframework.context.annotation.Configuration;
import org.springframework.transaction.annotation.EnableTransactionManagement;
import org.springframework.web.bind.annotation.RestController;
import springfox.documentation.builders.PathSelectors;
import springfox.documentation.builders.RequestHandlerSelectors;
import springfox.documentation.service.ApiInfo;
import springfox.documentation.service.Contact;
import springfox.documentation.service.VendorExtension;
import springfox.documentation.spi.DocumentationType;
import springfox.documentation.spring.web.plugins.Docket;
import springfox.documentation.swagger2.annotations.EnableSwagger2;

import java.util.ArrayList;

/**
 * @author arjun
 * @title: webConfig
 * @description: 描述信息
 * @date 2023.08.27 11:45
 */
@Configuration
@MapperScan(basePackages = "com.java.mapper")
@EnableSwagger2
@EnableTransactionManagement
public class webConfig {


    //自定义设置swagger文档描述信息
    @Bean
    public Docket docket01() {
        //docket--一个docket就是一个swagger标签,用于描述swagger的信息
       Docket docket=new Docket(DocumentationType.SWAGGER_2).apiInfo(apiInfo()).groupName("1、扫描所有控制器类");
       return docket;
    }

    @Bean
    public Docket docket02() {
        //docket--一个docket就是一个swagger标签,用于描述swagger的信息
        Docket docket=new Docket(DocumentationType.SWAGGER_2)
                .apiInfo(apiInfo())
                .select()
                //设置条件
//                .paths(PathSelectors.ant("/user/**"))// 1、仅对user开头的请求,生成接口文档
                .apis(RequestHandlerSelectors.basePackage("com.java.controller"))// 2、只对这个包下面的控制器生成接口文档
                .build()
                .groupName("2、扫描自定义的控制器类");
        return docket;
    }

    //返回swagger的具体描述信息
    public static final Contact DEFAULT_CONTACT = new Contact("arjun", "https://arjunna.gitee.io", "arjunna@163.com");
    public ApiInfo apiInfo() {
        ApiInfo apiInfo=new ApiInfo("swagger的Api文档",
                                    "所有接口的描述信息及使用方法",
                                    "1.0",
                                    "urn:tos",
                                    DEFAULT_CONTACT,
                                    "Apache 2.0",
                                    "http://www.apache.org/licenses/LICENSE-2.0",
                                     new ArrayList<VendorExtension>());
        return apiInfo;
    }
}
1、swagger
看pdf就行
帮助文档:PDF地址
2、thymeleaf
在springboot中可以用jsp作为视图,呈现数据。但是,并不推荐

springboot中推荐使用“模板引擎”作为视图呈现数据

	开发中常用的模板引擎:

		1、thymeleaf-----------百里香叶

		2、freemaker

		3、velocity

更多的是使用thymeleaf作为springboot的视图组件,呈现数据

1、使用步骤
1、创建工程
2、导入依赖
	1、web
    2、热部署
    3、lombok
    4、thymeleaf
3、配置yml文件
server:
    port: 9999
spring:
    thymeleaf:
    enabled: true #启用thymeleaf
    encoding: utf-8 #编码
    cache: false #页面不缓存数据
    suffix: .html #模板页面的后缀名
    mode: HTML #模板页面是以html为基础
4、编写第一个模板页面 index.html

    要求:模板页必须放在templates目录中

    如果名称叫作: index.html,则该页面会自动加载

    如果在页面使用thymeleaf标签,需要导入下列指令
    <html lang="en" xmlns:th="http://www.thymeleaf.org">
5、编写控制器类
	用于加载数据,然后在init.html页面显示此处的语法,与springmvc语法一致

	@Controller
    public class InfoController {

        @GetMapping("/")
        public String init(Model model){
            //将数据存放在Model中(等同于request),在页面中显示数据
            model.addAttribute("msg","hello123");
            Info info = new Info(1,"bruce",99);
            model.addAttribute("info",info);
            return "/init";

        }
    }
6、在init.html页面,准备在页面中取到存储数据

	结果是: ${msg}----------- EL表达式取不值,它会原样显示

	原因是:thymeleaf页面中,不能直接使用EL表达式取值,thymeleaf它有自己的表达式

	在页面中引入th指令:
    <html lang="en" xmlns:th="http://www.thymeleaf.org">
    thymeleaf的表达式不能直接使用,只有在给html标签的属性赋值时才能使用

    <div th:属性=“${表达式}”>
    </div>
2、thymeleaf中的表达式
在thymeleaf页面中使用thymeleaf标签的基本步骤:

1、导入标签指令
	<html xmlns:th="http://www.thymeleaf.org">

2、使用thymeleaf表达式动态取值

	要求:thymeleaf的表达式不能直接使用,必须作为标签的属性来使用

	表达式的分类:

		1、标准变量表达式

		2、选择变量表达式

		3、路径表达式
1、标准变量表达式
@@@@@标准变量表达式   ${xxx}  ${xxx.属性}   ${xxx.xx()}


	作用:用于从作用域取值,显示在当前位置中

		<标签 th:text="${xxxx}">静态内容</标签>

	例如:  <span th:text="${msg}">消息</span>


	如果在容器中运行:那么就会显示${msg}的内容
	如果在非容器中显示,就只会显示 消息 两个字
2、选择变量表达式
@@@@@@选择变量表达式 *{xxx}  *{xxx.属性}   *{xxx.xx()}

	作用:用于从作用域取值,显示在当前位置中

		<标签 th:text="*{xxxx}">静态内容</标签>

	例如:  <span th:text="*{msg}">消息</span>
3、路径表达式
作用:一般在路径中动态取值时使用

语法: @{xxx} @{xxx.xxx} @{xxx.xxx()}
方式1: <a href="del/12345">删除数据1</a>

    href这种方式传递参数,只能传递固定参数,如果要动态取值向后传递,必须使用th:href
    @@@@@注意:在thymeleaf中,只有th开头的标签属性才允许动态取值
方式2: <a th:href="'del/'+${info.id}">删除数据2</a><Br>

    如果要使用th属性动态传递,静态内容要与动态内容分开,静态内容必须包含在‘’中
    这种方式的缺点:如果参数多了,这种写法很容易出错
方式3: <a th:href="@{|del/${info.id}|}">删除数据3</a><Br>
    通过路径表达式动态取值

 简化写法:以上代码可以进行简化 @{}可以省略不写
    <a th:href="|del/${info.id}|">删除数据4</a><Br>
显示图片

    <img src="/imgs/4.jpg">
    这种方式只能显示固定路径的图片
    <img th:src="'/imgs/'+${photo}">
    <img th:src="@{|/imgs/${photo}|}">
    <img th:src="|/imgs/${photo}|">
3、标签语法
1、th:text
th:text
    该标签属性,用于动态取值显示在当前位置
    <div th:text="${msg}"></div>
2、th:value
th:value
    该标签属性,用于动态取值显示在表单组件中,用于进行数据回显
    编号:<input type="text" th:value="${info.id}"><Br>
    姓名:<input type="text" th:value="${info.name}"><Br>
    成绩:<input type="text" th:value="${info.score}"><Br>
注意:有时候修改与新增共享同一个表单组件
    区别是:
    新增时表单数据为空,没有默认数据
    修改时,表单中是有默认数据的

    编号:<input type="text" th:value="${stu?.id}"><Br>
    姓名:<input type="text" th:value="${stu?.name}"><Br>
    成绩:<input type="text" th:value="${stu?.score}"><Br>

    ?表示,如果stu对象存在,就执行后面的取值操作。如果不存在就不执行
3、th:href
作用:设置超连接路径,并且允许在连接路径中动态取值

    <a th:href="'del/'+${info.id}">删除数据2</a><
    <a th:href="@{|del/${info.id}|}">删除数据3</a>
    <a th:href="|del/${info.id}|">删除数据3</a>(推荐使用)
4、th:src
作用:设置路径,允许在路径中动态取值

    <img th:src="'/imgs/'+${photo}">
    <img th:src="@{|/imgs/${photo}|}">
    <img th:src="|/imgs/${photo}|">
5、th:attr
作用:用于给标签的属性动态赋值

    <input type="text" th:attr="value='jack'"><Br>
    性别:<input type="radio" value="男" name="gender"
    th:attr="checked=${gender=='男'}">男
    <input type="radio" value="女" name="gender"
    th:attr="checked=${gender=='女'}">女
6、th:each
作用:用于对集合遍历,相当于C标签中的forEach

    <c:forEach items="${list}" var="info" varStatus="st">

        st:它用于保存当前对象在集合的状态
            ${st.index}---------获得当前对象在集合中的下标 0
            ${st.count}---------获得当前对象在集合中的个数 1
            ${st.first}---------判断当前对象是否是集合中的第1个对象
            ${st.last}---------获得当前对象是否是集合中的最后1个对象

    <tr th:each="info,st:${list}">
        <Td th:text="${info.id}"></Td>
        <Td th:text="${info.name}"></Td>
        <Td th:text="${info.score}"></Td>
        <td th:text="${st.index}"></td>
        <td th:text="${st.count}"></td>
        <td th:text="${st.first}"></td>
        <td th:text="${st.last}"></td>
    </tr>
:list--------它表示对哪一个集合遍历
    info---------它表示从集合中取到的第一个对象
    st-----------它用于保存当前对象在集合的状态

        ${st.index}---------获得当前对象在集合中的下标 0
        ${st.count}---------获得当前对象在集合中的个数 1
        ${st.first}---------判断当前对象是否是集合中的第1个对象
        ${st.last}---------获得当前对象是否是集合中的最后1个对象
隐藏状态:
	    <tr th:each="info:${list}">
        <Td th:text="${info.id}"></Td>
        <Td th:text="${info.name}"></Td>
        <Td th:text="${info.score}"></Td>
        <td th:text="${infoStat.index}"></td>
        <td th:text="${infoStat.count}"></td>
        <td th:text="${infoStat.first}"></td>
        <td th:text="${infoStat.last}"></td>
    </tr>

   使用:在对象info后面加上Stat,则可以触发隐藏状态
7、内敛文本
    作用:直接在页面中用表达取值
        语法:
        [[${msg}]] [[${info.name}]] [[${info.getScore()}]]

    msg:[[${msg}]]<Br>
    编号:[[${info.id}]]<Br>
    姓名:[[${info.name}]]<Br>
    成绩:[[${info.getScore()}]]<Br>
8、内联脚本
作用:用于在Js代码中,通过表达式直接取值

    <script th:inline="javascript">
    var msg = [[${msg}]];
    </script>
9、th:switch
作用:根据条件显示不同的结果,类似于java中的switch

    <div th:switch="${mylevel}">
    <div th:case="1">一级用户</div>
    <div th:case="2">二级用户</div>
    <div th:case="3">三级用户</div>
    </div>
10、th:if
作用:用于进行逻辑判断
    <span>
        <b th:if="${info.score>=60}" style="color: green">合格</b>
        <b th:if="${info.score<60}" style="color: red">不合格</b>
    </span>
    <Td>
        <b th:if="${info.score>=90}" style="color:green">优秀</b>
        <b th:if="${info.score>=80 && info.score<90}"
        style="color:blue">良好</b>
        <b th:if="${info.score>=60 && info.score<80}"
        style="color:gray">合格</b>
        <b th:if="${info.score<60}" style="color:red">不合格</b>
    </Td>
4、thymeleaf中的内置对象
1、日期
1、与日期相关的内置对象 #dates

${#dates.format(属性名,'yyyy-MM-dd')}
作用:按指定格式显示数据

出生日期:<b th:text="${#dates.format(bir,'yyyy-MM-dd')}"></b><Br>
出生日期2:<input type="date" th:value="${#dates.format(bir,'yyyy-MMdd')}"></input>
2、数值
2、与数值相关的内置对象 #numbers

账户余额:<B th:text="${#numbers.formatCurrency(balance)}"></B>
将当前数值,转换成货币格式显示

${#numbers.sequence(1,120)}
    从1开始到120结束,产生一个序列
    <select onchange="alert(this.value)">
    <option value="-1">请选择年龄</option>
    <option th:value="${age}" th:each="age:${#numbers.sequence(1,120)}">
    [[${age}]]岁</option>
    </select>

    <select onchange="alert(this.value)">
    <option value="-1">请选择年龄</option>
    <option th:attr="selected=${age==myAge}"
    th:value="${age}"
    th:each="age:${#numbers.sequence(1,120)}">[[${age}]]岁</option>
</select>
3、统计
3、与统计相关的内置对象

${#aggregates.sum[集合.![属性名]}
作用:用于对集合遍历,得到集合中的对象的某一个属性值相加的总和

例如:统计购物车的应付总金额
list集合中,所有学生的总分数为: <B th:text="${#aggregates.sum(list.!
[score])}"></B>
4、作用域
4、作用域相关的一组对象:
		${xxxx}--------------------它是从request范围中取值
        ${session.xxxx}------------它是从session范围中取值
        ${application.xxxx}-------它是从application范围中取值

    请求:<b th:text="${message}"></b> <Br>
    会话:<b th:text="${session.message}"></b> <Br>
    全局上下文:<b th:text="${application.message}"></b> <Br>

  /**/另外一种写法:
      请求:       <b th:text="${#request.getAttribute('msg2')}"></b>
      会话:       <b th:text="${#session.getAttribute('msg2')}"></b>
      上下文:     <b th:text="${#servletContext.getAttribute('msg2')}"></b>
3、综合应用
1-2
1、创建工程
2、导入依赖
        1、web
        2、热部署
        3、mysql
        4、mybatis-plus(3.0.5)
        5、velocity(用于生成代码)
        6、thymeleaf
        7、druid
        8、lombok
        9、pagehable
依赖
  <parent>
    <artifactId>spring-boot-starter-parent</artifactId>
    <groupId>org.springframework.boot</groupId>
    <version>2.3.12.RELEASE</version>
  </parent>

  <dependencies>
    <dependency>
      <groupId>junit</groupId>
      <artifactId>junit</artifactId>
      <version>4.11</version>
      <scope>test</scope>
    </dependency>
    <dependency>
      <groupId>org.springframework.boot</groupId>
      <artifactId>spring-boot-starter-web</artifactId>
    </dependency>
    <dependency>
      <groupId>com.baomidou</groupId>
      <artifactId>mybatis-plus-boot-starter</artifactId>
      <version>3.0.5</version>
    </dependency>

    <dependency>
      <groupId>com.github.pagehelper</groupId>
      <artifactId>pagehelper-spring-boot-starter</artifactId>
      <version>1.2.12</version>
    </dependency>
    <dependency>
      <groupId>org.springframework.boot</groupId>
      <artifactId>spring-boot-starter-thymeleaf</artifactId>
    </dependency>
    <dependency>
      <groupId>mysql</groupId>
      <artifactId>mysql-connector-java</artifactId>
      <version>5.1.47</version>
    </dependency>

    <dependency>
      <groupId>com.alibaba</groupId>
      <artifactId>druid-spring-boot-starter</artifactId>
      <version>1.1.16</version>
    </dependency>

    <dependency>
      <groupId>org.projectlombok</groupId>
      <artifactId>lombok</artifactId>
    </dependency>

    <dependency>
      <groupId>org.springframework.boot</groupId>
      <artifactId>spring-boot-devtools</artifactId>
    </dependency>

    <dependency>
      <groupId>org.apache.velocity</groupId>
      <artifactId>velocity-engine-core</artifactId>
      <version>2.0</version>
    </dependency>


    <dependency>
      <groupId>io.springfox</groupId>
      <artifactId>springfox-swagger2</artifactId>
      <version>2.9.2</version>
    </dependency>
    <dependency>
      <groupId>io.springfox</groupId>
      <artifactId>springfox-swagger-ui</artifactId>
      <version>2.9.2</version>
    </dependency>
    <dependency>
      <groupId>io.swagger</groupId>
      <artifactId>swagger-annotations</artifactId>
      <version>1.5.22</version>
    </dependency>
    <dependency>
      <groupId>io.swagger</groupId>
      <artifactId>swagger-models</artifactId>
      <version>1.5.22</version>
    </dependency>
  </dependencies>
3-5
3、导入代码生成的工具类

4、生成代码

5、编写yml文件
6
6、编写配置类

	@Configuration
    @MapperScan(basePackages = "com.qs.mapper")
    public class WebConfig {
    }
7-8
7、控制器类

8、问题处理

	注意:thymeleaf的超连接不能直接跳转页面
	<A href="add.html">添加</A> -----------错误写法
页面两种跳转方式
方式1:编写配置类实现配置跳转

	@Configuration
    @MapperScan(basePackages = "com.qs.mapper")
    public class WebConfig implements WebMvcConfigurer {
        @Override
        public void addViewControllers(ViewControllerRegistry registry) {
        //配置视图的跳转,指定发出什么请求,跳转到哪个页面
        registry.addViewController("/add").setViewName("add");
        }
    }
方式2:编写一个控制器类专门处理跳转

	@Controller
    public class ForwardController {
        @GetMapping("/forward/{page}")
        public String forward(@PathVariable String page){
        return "/"+page;
        }
    }
注意:在提交表单数据时,如果有日期类型的数据,需要在实体类中日期类型的属性上加上如下注解
@DateTimeFormat(pattern = "yyyy-MM-dd")
private Date bir;


 2438
2438


 被折叠的 条评论
为什么被折叠?
被折叠的 条评论
为什么被折叠?
 到【灌水乐园】发言


